

Accessory Catalog
Page 7
... straight stitching especially on the top of the foot guide plate. 4. Installing the Straight Stitch Needle Plate automatically sets the needle position to accomplish perfect straight stitching. It can be used with all Brother presser feet. Sew. SA538 AB C:Innov-is900D/SE-350...to the edge of the seam guide. 2. SA160 ABCDEFGHJKLMNO Straight Stitch Foot Straight Stitch Foot and Straight Stitch Needle Plate Vertical Stitching Alignment Foot Brother General Sewing Accessories 12 Straight Stitch Foot For precise straight stitching on thin fabrics or on both straight and curved...
... straight stitching especially on the top of the foot guide plate. 4. Installing the Straight Stitch Needle Plate automatically sets the needle position to accomplish perfect straight stitching. It can be used with all Brother presser feet. Sew. SA538 AB C:Innov-is900D/SE-350...to the edge of the seam guide. 2. SA160 ABCDEFGHJKLMNO Straight Stitch Foot Straight Stitch Foot and Straight Stitch Needle Plate Vertical Stitching Alignment Foot Brother General Sewing Accessories 12 Straight Stitch Foot For precise straight stitching on thin fabrics or on both straight and curved...

Accessory Catalog
Page 40
... your Cover Stitch). 1. Sew. Attaching 12 mm (approx. 1/2") bias tape: Use the large bias tape sliding plate with the LC1 presser foot (included with your machine for a chain stitch, the center needle. 2. Sew as folding them. Set T1/T2 presser foot. 2. Set up your machine for a cover stitch,... easily set it to top stitch with the LC2 presser foot. The stitches are always smooth. 1. SA226CV www.brother.com Attaching 6 mm (approx. 1/4") bias tape: Use the small bias tape sliding plate with 3 or 6 mm (approx. 1/8 or 1/4 inch) wide cover stitch. 1. Set the bias tape though...
... your Cover Stitch). 1. Sew. Attaching 12 mm (approx. 1/2") bias tape: Use the large bias tape sliding plate with the LC1 presser foot (included with your machine for a chain stitch, the center needle. 2. Sew as folding them. Set T1/T2 presser foot. 2. Set up your machine for a cover stitch,... easily set it to top stitch with the LC2 presser foot. The stitches are always smooth. 1. SA226CV www.brother.com Attaching 6 mm (approx. 1/4") bias tape: Use the small bias tape sliding plate with 3 or 6 mm (approx. 1/8 or 1/4 inch) wide cover stitch. 1. Set the bias tape though...
Users Manual - English
Page 2
... if it is required around the machine needle. 11. DANGER - To reduce the risk of lint, dust, and loose cloth. 5. Do not use the proper needle plate. Always unplug before changing the light bulb. The wrong plate can cause the needle to the nearest authorized dealer or service ...center for its intended use bent needles. 13.Do not pull or push fabric while stitching.
... if it is required around the machine needle. 11. DANGER - To reduce the risk of lint, dust, and loose cloth. 5. Do not use the proper needle plate. Always unplug before changing the light bulb. The wrong plate can cause the needle to the nearest authorized dealer or service ...center for its intended use bent needles. 13.Do not pull or push fabric while stitching.

Users Manual - English
Page 5
..., decorative stitch patterns, satin stitch patterns, cross stitch patterns, and more bothersome trial sewing. - A-4 Introduction no need to pull the bobbin thread up through the needle plate. - Attach the knee lifter to illustrated step-by-step instructions on the large LCD display. - no more . convenient for sewing with one touch - Wind the...
..., decorative stitch patterns, satin stitch patterns, cross stitch patterns, and more bothersome trial sewing. - A-4 Introduction no need to pull the bobbin thread up through the needle plate. - Attach the knee lifter to illustrated step-by-step instructions on the large LCD display. - no more . convenient for sewing with one touch - Wind the...
Users Manual - English
Page 9
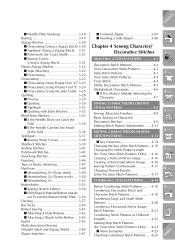
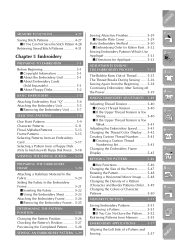
CONTENTS I Needle Plate Markings 3-18 Basting 3-19 Zigzag Stitches 3-20 I Overcasting (Using a Zigzag Stitch) 3-20 I Appliqué (Using a Zigzag Stitch) .. 3-21 I Patchwork (for Crazy Quilt 3-21 I Sewing Curves ......... 3-49 I Hemstitching (2) (Drawn work) .... 3-50 I Hemstitching (3 3-52 Buttonholes 3-53 I Sewing Stretch Fabrics 3-56 I Odd Shaped Buttons/Buttons that do not Fit into the Button Holder Plate .. 3-56 Darning 3-57 Bar Tacks 3-59 Button Sewing 3-61 I Attaching 4 Hole Buttons 3-62 I Attaching a Shank to the Button ... 3-63 Eyelet 3-63 Multi-directional Sewing (Straight...
CONTENTS I Needle Plate Markings 3-18 Basting 3-19 Zigzag Stitches 3-20 I Overcasting (Using a Zigzag Stitch) 3-20 I Appliqué (Using a Zigzag Stitch) .. 3-21 I Patchwork (for Crazy Quilt 3-21 I Sewing Curves ......... 3-49 I Hemstitching (2) (Drawn work) .... 3-50 I Hemstitching (3 3-52 Buttonholes 3-53 I Sewing Stretch Fabrics 3-56 I Odd Shaped Buttons/Buttons that do not Fit into the Button Holder Plate .. 3-56 Darning 3-57 Bar Tacks 3-59 Button Sewing 3-61 I Attaching 4 Hole Buttons 3-62 I Attaching a Shank to the Button ... 3-63 Eyelet 3-63 Multi-directional Sewing (Straight...
Users Manual - English
Page 10
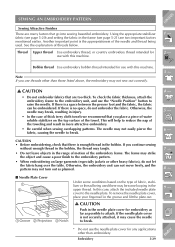
... 5-26 Changing the Pattern Position 5-26 Checking the Pattern's Position 5-27 Previewing the Completed Pattern ...... 5-28 SEWING AN EMBROIDERY PATTERN 5-29 Sewing Attractive Finishes 5-29 I Needle Plate Cover 5-29 Basic Embroidery Method 5-30 I Embroidering Order for Pattern Parts .. 5-32 Sewing Embroidery Patterns Which Use Appliqu 5-33 I Directions for Appliqu 5-33 ADJUSTMENTS DURING...
... 5-26 Changing the Pattern Position 5-26 Checking the Pattern's Position 5-27 Previewing the Completed Pattern ...... 5-28 SEWING AN EMBROIDERY PATTERN 5-29 Sewing Attractive Finishes 5-29 I Needle Plate Cover 5-29 Basic Embroidery Method 5-30 I Embroidering Order for Pattern Parts .. 5-32 Sewing Embroidery Patterns Which Use Appliqu 5-33 I Directions for Appliqu 5-33 ADJUSTMENTS DURING...
Users Manual - English
Page 20
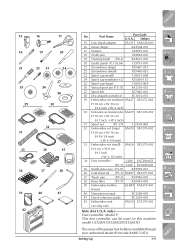
... × W 6-1/4 inch) 33 Embroidery set (small) SA426 X81275-002 H 2 cm × W 6 cm (H 1 inch × W 2-1/2 inch) 34 Foot controller 120V XA7290-051 (P.1-7) 230V XC0309-001 35 Needle plate cover (P.5-29) XA9939-051 36 Grid sheet set (P.7-1) SA507 X81277-001 37 Touch pen (P.9-3) XA9940-001 38 Knee lifter (P.1-7) XA6941-001 39 Embroidery bobbin SA...
... × W 6-1/4 inch) 33 Embroidery set (small) SA426 X81275-002 H 2 cm × W 6 cm (H 1 inch × W 2-1/2 inch) 34 Foot controller 120V XA7290-051 (P.1-7) 230V XC0309-001 35 Needle plate cover (P.5-29) XA9939-051 36 Grid sheet set (P.7-1) SA507 X81277-001 37 Touch pen (P.9-3) XA9940-001 38 Knee lifter (P.1-7) XA6941-001 39 Embroidery bobbin SA...
Users Manual - English
Page 44
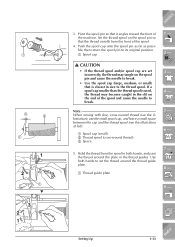
... size to its original position. 1 Spool cap 1 - 2 - Use both hands, and pass the thread around the thread guide plate. 1 Thread guide plate 3 - 4 - 5 - 6 - 7 - 8 - 9 - ?! Index Setting Up 1-33 CONTENTS Set the thread spool on the end of the spool. 4. Note When sewing with fine, cross-wound thread (see the... is closest in the thread guides. Hold the thread from the front of the spool and cause the needle to set incorrectly, the thread may tangle on the spool pin and cause the needle to break. • Use the spool cap (large, medium, or small) that is used, the thread may ...
... size to its original position. 1 Spool cap 1 - 2 - Use both hands, and pass the thread around the thread guide plate. 1 Thread guide plate 3 - 4 - 5 - 6 - 7 - 8 - 9 - ?! Index Setting Up 1-33 CONTENTS Set the thread spool on the end of the spool. 4. Note When sewing with fine, cross-wound thread (see the... is closest in the thread guides. Hold the thread from the front of the spool and cause the needle to set incorrectly, the thread may tangle on the spool pin and cause the needle to break. • Use the spool cap (large, medium, or small) that is used, the thread may ...

Users Manual - English
Page 49
... may be some sewing applications when you want to raise the needle. 6 5 - 6 - 3. Pull up the bobbin thread, for example, when making gathers, darts, free motion quilting or embroidery. Do not cut the thread. 2 - * Do not replace the bobbin cover. 3 - 2. ing the arrow in the needle plate. 7 - 1 2 8 - 4. While holding the upper thread, press the...
... may be some sewing applications when you want to raise the needle. 6 5 - 6 - 3. Pull up the bobbin thread, for example, when making gathers, darts, free motion quilting or embroidery. Do not cut the thread. 2 - * Do not replace the bobbin cover. 3 - 2. ing the arrow in the needle plate. 7 - 1 2 8 - 4. While holding the upper thread, press the...
Users Manual - English
Page 91
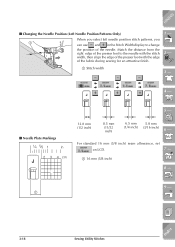
CONTENTS I Needle Plate Markings 14 58 1 in the Stitch Width display to the needle with the stitch width, then align the edge of the presser foot with the edge of the needle. For standard 16 mm (5/8 inch) seam allowance, set on LCD. 7 - 1 16 mm ... - 2 - 1 Stitch width 3 - ➜ ➜ ➜ ➜ J ➜ J J ➜ J 4 - 5 - I Changing the Needle Position (Left Needle Position Patterns Only) When you select left needle position stitch patterns, you 1 5 can use and in 2 3 4 cm J 12.0 mm (1/2 inch) 8.5 mm (11/32 inch) 6.5 mm 5.0 mm (1/4...
CONTENTS I Needle Plate Markings 14 58 1 in the Stitch Width display to the needle with the stitch width, then align the edge of the presser foot with the edge of the needle. For standard 16 mm (5/8 inch) seam allowance, set on LCD. 7 - 1 16 mm ... - 2 - 1 Stitch width 3 - ➜ ➜ ➜ ➜ J ➜ J J ➜ J 4 - 5 - I Changing the Needle Position (Left Needle Position Patterns Only) When you select left needle position stitch patterns, you 1 5 can use and in 2 3 4 cm J 12.0 mm (1/2 inch) 8.5 mm (11/32 inch) 6.5 mm 5.0 mm (1/4...

Users Manual - English
Page 100
...the side cutter, it out in step 8, and then start sewing. • Check that the needle does not touch the side cutter. Left side of 13 oz. denim can be cut : underneath the presser foot 1 Guide plate (lower knife) 2 Presser foot 9. Right side of cut if the whole fabric is raised. ... the upper thread, pass it below the presser foot and pull it may cause the needle to check that the needle is raised when the presser foot lever is simply spread out underneath the presser foot guide plate. Note • The fabric will not be about 5 mm (3/16 inch). 6 - 1 Seam margin * ...
...the side cutter, it out in step 8, and then start sewing. • Check that the needle does not touch the side cutter. Left side of 13 oz. denim can be cut : underneath the presser foot 1 Guide plate (lower knife) 2 Presser foot 9. Right side of cut if the whole fabric is raised. ... the upper thread, pass it below the presser foot and pull it may cause the needle to check that the needle is raised when the presser foot lever is simply spread out underneath the presser foot guide plate. Note • The fabric will not be about 5 mm (3/16 inch). 6 - 1 Seam margin * ...
Users Manual - English
Page 103
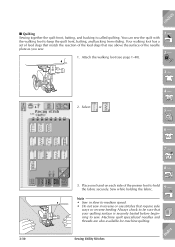
Machine quilt specialized needles and threads are also available for machine quilting. 3-30 Sewing Utility Stitches Index ning to keep the quilt front, batting, and backing from sliding. Your ... to be sure that require side ways or reverse feeding Always check to hold the fabric securely. Place one hand on each side of the needle plate as you sew. 1. Sew while holding the fabric. 9 - ?! Attach the walking foot (see page 1-40). 1 - 2 - 6 3 - 2. CONTENTS I Quilting Sewing together the quilt front, batting, and backing...
Machine quilt specialized needles and threads are also available for machine quilting. 3-30 Sewing Utility Stitches Index ning to keep the quilt front, batting, and backing from sliding. Your ... to be sure that require side ways or reverse feeding Always check to hold the fabric securely. Place one hand on each side of the needle plate as you sew. 1. Sew while holding the fabric. 9 - ?! Attach the walking foot (see page 1-40). 1 - 2 - 6 3 - 2. CONTENTS I Quilting Sewing together the quilt front, batting, and backing...
Users Manual - English
Page 105
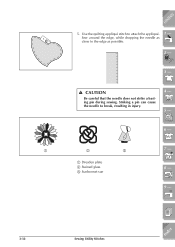
Striking a pin can cause the needle to attach the appliqué. 1 - Use the quilting appliqué stitch to break, resulting in injury. 4 - 5 - 6 - 1 2 3 1 Dresden plate 2 Stained glass 3 Sunbonnet sue 7 - 8 - 9 - ?! 3-32 Sewing Utility Stitches Index Sew around the edge, while dropping the needle as close to the edge as possible. 2 - 3 - CAUTION Be careful that the needle does not strike a basting pin during sewing. J CONTENTS 5.
Striking a pin can cause the needle to attach the appliqué. 1 - Use the quilting appliqué stitch to break, resulting in injury. 4 - 5 - 6 - 1 2 3 1 Dresden plate 2 Stained glass 3 Sunbonnet sue 7 - 8 - 9 - ?! 3-32 Sewing Utility Stitches Index Sew around the edge, while dropping the needle as close to the edge as possible. 2 - 3 - CAUTION Be careful that the needle does not strike a basting pin during sewing. J CONTENTS 5.
Users Manual - English
Page 204
..., place your fingernail in the frame (see page 5-20) and setting the fabric in the groove and lift the plate out. CAUTION Push in the needle plate cover for any applications other than embroidery. Embroidery 5-29 Index 4 - 5 - 6 - 7 - 8 - 9 - ?! CAUTION • Before embroidering, check that there ...securely attached, it may not turn out as possible to break. * Do not use with this case, attach the included needle plate cover to the needle plate. See the explanation of fabric, stabilizer or thread being used there may strike the object and cause a poor finish to...
..., place your fingernail in the frame (see page 5-20) and setting the fabric in the groove and lift the plate out. CAUTION Push in the needle plate cover for any applications other than embroidery. Embroidery 5-29 Index 4 - 5 - 6 - 7 - 8 - 9 - ?! CAUTION • Before embroidering, check that there ...securely attached, it may not turn out as possible to break. * Do not use with this case, attach the included needle plate cover to the needle plate. See the explanation of fabric, stabilizer or thread being used there may strike the object and cause a poor finish to...

Users Manual - English
Page 295
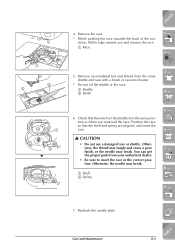
...function may damage the machine. 9 - ?! 1 Notch of shuttle 2 Shelf of the machine is dirty, gently wipe it with the disc-shaped screwdriver and remove the needle plate. 1 Needle plate 6 - 7 - 1 8 - 1 2 3. Remove the presser foot holder and 4 - Turn the balance wheel, and align the notch of shuttle a little ...to turn the balance wheel towards the front of race, as shown. CAUTION Be sure to the left of the shelf of the machine. the needle. 1 5 - 2 5 2. Then wipe again with a dry cloth. Otherwise, electric shock or injury may result. CONTENTS 1 - CLEANING THE ...
...function may damage the machine. 9 - ?! 1 Notch of shuttle 2 Shelf of the machine is dirty, gently wipe it with the disc-shaped screwdriver and remove the needle plate. 1 Needle plate 6 - 7 - 1 8 - 1 2 3. Remove the presser foot holder and 4 - Turn the balance wheel, and align the notch of shuttle a little ...to turn the balance wheel towards the front of race, as shown. CAUTION Be sure to the left of the shelf of the machine. the needle. 1 5 - 2 5 2. Then wipe again with a dry cloth. Otherwise, electric shock or injury may result. CONTENTS 1 - CLEANING THE ...
Users Manual - English
Page 296
Reattach the needle plate. Check that the shelf and spring are aligned, and insert the race. Index Care and Maintenance 8-3 Otherwise, the needle may break. Remove the race. * While pushing the race towards the back of the machine, lift the edge nearest you removed... the race so that the notch on the shuttle is in the correct position. Otherwise, the thread may tangle and cause a poor finish, or the needle may break. 1 Shelf 2 Spring 5 - 6 - 7 - 8 - 9 - ?! 7. CAUTION • Do not use a damaged race or shuttle. Remove accumulated lint and thread from your authorized ...
Reattach the needle plate. Check that the shelf and spring are aligned, and insert the race. Index Care and Maintenance 8-3 Otherwise, the needle may break. Remove the race. * While pushing the race towards the back of the machine, lift the edge nearest you removed... the race so that the notch on the shuttle is in the correct position. Otherwise, the thread may tangle and cause a poor finish, or the needle may break. 1 Shelf 2 Spring 5 - 6 - 7 - 8 - 9 - ?! 7. CAUTION • Do not use a damaged race or shuttle. Remove accumulated lint and thread from your authorized ...
Users Manual - English
Page 302
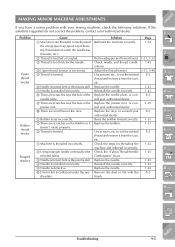
.... 3 Thread is too thick for the needle. 4 Upper thread tension is too strong. 5 Thread is twisted. 6 Needle is turned, bent or the point is dull. 7 Needle is installed incorrectly. 8 There are scratches near the hole of the needle plate. 9 There are scratches near the hole ... upper and lower thread. 1-31, 1-32 Check needle and thread combi- 1-45 nations. Replace the needle. 1-43 Reinstall the needle correctly. 1-43 Replace the needle plate, or con- 8-2 sult your authorized dealer. Check the "Fabric/Thread/Needle Combination" chart. CONTENTS MAKING MINOR MACHINE ADJUSTMENTS If ...
.... 3 Thread is too thick for the needle. 4 Upper thread tension is too strong. 5 Thread is twisted. 6 Needle is turned, bent or the point is dull. 7 Needle is installed incorrectly. 8 There are scratches near the hole of the needle plate. 9 There are scratches near the hole ... upper and lower thread. 1-31, 1-32 Check needle and thread combi- 1-45 nations. Replace the needle. 1-43 Reinstall the needle correctly. 1-43 Replace the needle plate, or con- 8-2 sult your authorized dealer. Check the "Fabric/Thread/Needle Combination" chart. CONTENTS MAKING MINOR MACHINE ADJUSTMENTS If ...
Users Manual - English
Page 305
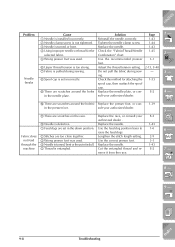
... foot. Use the feed dog position lever to raise the feed dogs. Lengthen the stitch length setting. Replace the needle. sult your authorized dealer . Replace the race, or consult your authorized dealer. in the needle plate. B Needle is defective. 1 Feed dogs are set incorrectly. 9 There are too close together. 3 Wrong presser foot was used...
... foot. Use the feed dog position lever to raise the feed dogs. Lengthen the stitch length setting. Replace the needle. sult your authorized dealer . Replace the race, or consult your authorized dealer. in the needle plate. B Needle is defective. 1 Feed dogs are set incorrectly. 9 There are too close together. 3 Wrong presser foot was used...
Users Manual - English
Page 316
...26, 5-46 Automatic reinforcement stitching 1-14, 2-14, 4-14 Automatic thread cutting 1-14, 2-15, 4-14, 5-46 B Balance wheel 1-4 Ball point needle 1-45 Bar tacks 3-59 Basic embroidery method 5-30 Basic operation key 1-21, 1-23 Basic sewing character/decorative stitches 4-9 utility stitches 2-1 Basting 3-19...runs out of thread 5-35 setting 1-31 winding 1-25, 1-29 Bobbin thread sensor 1-13, 5-19 Bobbin winder button 1-5 Button holder plate 3-54 Buttonholes 3-53 Button sewing 3-61 Buzzer 1-20 C Centered zippers 3-67 Character/Decorative stitches 4-1 adjusting patterns 1-20 checking combined patterns...
...26, 5-46 Automatic reinforcement stitching 1-14, 2-14, 4-14 Automatic thread cutting 1-14, 2-15, 4-14, 5-46 B Balance wheel 1-4 Ball point needle 1-45 Bar tacks 3-59 Basic embroidery method 5-30 Basic operation key 1-21, 1-23 Basic sewing character/decorative stitches 4-9 utility stitches 2-1 Basting 3-19...runs out of thread 5-35 setting 1-31 winding 1-25, 1-29 Bobbin thread sensor 1-13, 5-19 Bobbin winder button 1-5 Button holder plate 3-54 Buttonholes 3-53 Button sewing 3-61 Buzzer 1-20 C Centered zippers 3-67 Character/Decorative stitches 4-1 adjusting patterns 1-20 checking combined patterns...

Users Manual - English
Page 318
...-thread stand 1-10 MY CUSTOM STITCHTM 7-1 N Needle 1-45 changing 1-43 changing position 3-18 checking 1-43 needle/fabric/thread combinations 1-45 mode display 1-13 twin needle 2-5 Needle clamp screw 1-44 Needle clamp thread guide 1-34 Needle mode selection key 1-15, 2-5, 4-14 Needle plate cover 5-29 "Needle Position" button 1-4, 1-20 Needle stopper 1-44 Needle stop position 1-20 Needle threader lever 1-35 O One point patterns...
...-thread stand 1-10 MY CUSTOM STITCHTM 7-1 N Needle 1-45 changing 1-43 changing position 3-18 checking 1-43 needle/fabric/thread combinations 1-45 mode display 1-13 twin needle 2-5 Needle clamp screw 1-44 Needle clamp thread guide 1-34 Needle mode selection key 1-15, 2-5, 4-14 Needle plate cover 5-29 "Needle Position" button 1-4, 1-20 Needle stopper 1-44 Needle stop position 1-20 Needle threader lever 1-35 O One point patterns...


