

Accessory Catalog
Page 13
...the grooves. 4. Move fabric about 1" (2.5 cm) past the needle to sew the first row in one of tucks can be adjusted. 1. Install and manually thread a twin needle. 2. SA143 AFJKM Ruffler Foot Makes ruffles with this presser foot. 1. Use a stiff card to slide the fabric from left into gathers... tucks using a twin needle on the lower portion of tuck or gather by placing the completed row in the center position. 3. www.brother.com Further rows can be evenly spaced by trying different combinations of stitching and use that to get started. The ruffling blade on lightweight ...
...the grooves. 4. Move fabric about 1" (2.5 cm) past the needle to sew the first row in one of tucks can be adjusted. 1. Install and manually thread a twin needle. 2. SA143 AFJKM Ruffler Foot Makes ruffles with this presser foot. 1. Use a stiff card to slide the fabric from left into gathers... tucks using a twin needle on the lower portion of tuck or gather by placing the completed row in the center position. 3. www.brother.com Further rows can be evenly spaced by trying different combinations of stitching and use that to get started. The ruffling blade on lightweight ...

Accessory Catalog
Page 34
...200-yds) filament thread is best suited for the Quattro™ 6000D, Duetta™ 4500D/Innov-is 4000D, 2500D, 1500D, 1200 series, PC and ULT series machines and the PE-400D and Innov-is Project Book (See page 33 for each design. SA520 Water Soluble Stabilizer 11" x 3.3 yds SA540 ...in the 61 color set of needle and stabilizer types. All 61 exclusive Brother palette colors are also available (sold in Japan for fabrics and applications when it is important that can stand on your instruction manual for advice on the top surface of colors specifically designed for our embroidery ...
...200-yds) filament thread is best suited for the Quattro™ 6000D, Duetta™ 4500D/Innov-is 4000D, 2500D, 1500D, 1200 series, PC and ULT series machines and the PE-400D and Innov-is Project Book (See page 33 for each design. SA520 Water Soluble Stabilizer 11" x 3.3 yds SA540 ...in the 61 color set of needle and stabilizer types. All 61 exclusive Brother palette colors are also available (sold in Japan for fabrics and applications when it is important that can stand on your instruction manual for advice on the top surface of colors specifically designed for our embroidery ...
Users Manual - English
Page 2
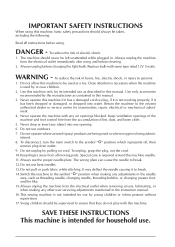
.... 13.Do not pull or push fabric while stitching. The wrong plate can cause the needle to be used as contained in this manual. SAVE THESE INSTRUCTIONS This machine is not intended for examination, repair, electrical or mechanical adjustment. 4. Do not allow this machine to ...17.Young children should be supervised to the symbol " " position when making any adjustments in the needle area, such as described in this manual. 3. Special care is being admin- Introduction Always unplug the machine from the electrical outlet when removing covers, lubricating, or when making any ...
.... 13.Do not pull or push fabric while stitching. The wrong plate can cause the needle to be used as contained in this manual. SAVE THESE INSTRUCTIONS This machine is not intended for examination, repair, electrical or mechanical adjustment. 4. Do not allow this machine to ...17.Young children should be supervised to the symbol " " position when making any adjustments in the needle area, such as described in this manual. 3. Special care is being admin- Introduction Always unplug the machine from the electrical outlet when removing covers, lubricating, or when making any ...
Users Manual - English
Page 4
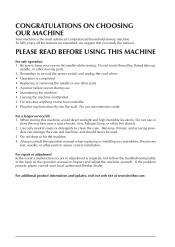
...locations. Use only neutral soaps or detergents to assure correct installation. Always consult the operation manual when replacing or installing any other hot objects. 2. Be sure to keep your local authorized Brother dealer. Do not use or store the machine near a space heater, iron, halogen ...assemblies, the presser feet, needle, or other moving parts. 2. For additional product information and updates, visit our web site at www.brother.com Introduction Plug the machine directly into the wall. Do not store anything on the needle while sewing. Do not use extension cords....
...locations. Use only neutral soaps or detergents to assure correct installation. Always consult the operation manual when replacing or installing any other hot objects. 2. Be sure to keep your local authorized Brother dealer. Do not use or store the machine near a space heater, iron, halogen ...assemblies, the presser feet, needle, or other moving parts. 2. For additional product information and updates, visit our web site at www.brother.com Introduction Plug the machine directly into the wall. Do not store anything on the needle while sewing. Do not use extension cords....
Users Manual - English
Page 7
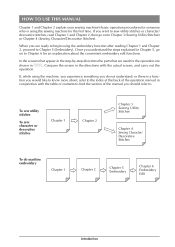
... Chapter 1 and Chapter 2, then go on to Chapter 6 for an explanation about , refer to the index at the back of the operation manual in conjunction with the actual screen, and carry out the If, while using the embroidery function after reading Chapter 1 and Chapter 2, proceed to Chapter... 5 (Embroidery). HOW TO USE THIS MANUAL Chapter 1 and Chapter 2 explain your sewing machine's basic operation procedures for someone who is a function you would like to know more about the...
... Chapter 1 and Chapter 2, then go on to Chapter 6 for an explanation about , refer to the index at the back of the operation manual in conjunction with the actual screen, and carry out the If, while using the embroidery function after reading Chapter 1 and Chapter 2, proceed to Chapter... 5 (Embroidery). HOW TO USE THIS MANUAL Chapter 1 and Chapter 2 explain your sewing machine's basic operation procedures for someone who is a function you would like to know more about the...
Users Manual - English
Page 8
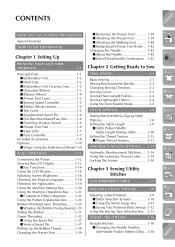
Index CONTENTS CONTENTS WHAT YOU CAN DO WITH THIS MACHINE Special Features HOW TO USE THIS MANUAL Chapter 1 Setting Up PRINCIPAL PARTS AND THEIR OPERATION 1-1 Principal Parts 1-1 I Embroidery Unit 1-2 I Hard Case 1-2 I Embroidery Unit Carrying Case ...... 1-2 I Operation Buttons 1-2 I Balance Wheel 1-4 I Presser Foot Lever 1-5 I ...
Index CONTENTS CONTENTS WHAT YOU CAN DO WITH THIS MACHINE Special Features HOW TO USE THIS MANUAL Chapter 1 Setting Up PRINCIPAL PARTS AND THEIR OPERATION 1-1 Principal Parts 1-1 I Embroidery Unit 1-2 I Hard Case 1-2 I Embroidery Unit Carrying Case ...... 1-2 I Operation Buttons 1-2 I Balance Wheel 1-4 I Presser Foot Lever 1-5 I ...
Users Manual - English
Page 20
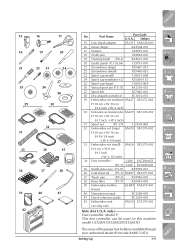
... sheet set (P.7-1) SA507 X81277-001 37 Touch pen (P.9-3) XA9940-001 38 Knee lifter (P.1-7) XA6941-001 39 Embroidery bobbin SA-EBT XA8375-001 thread 40 Operation manual XC3200-001 41 Quick reference guide XC3265-001 42 Embroidery unit SA528 XC1291-002 carrying case Note (For U.S.A. only) Foot controller: Model P This foot controller...
... sheet set (P.7-1) SA507 X81277-001 37 Touch pen (P.9-3) XA9940-001 38 Knee lifter (P.1-7) XA6941-001 39 Embroidery bobbin SA-EBT XA8375-001 thread 40 Operation manual XC3200-001 41 Quick reference guide XC3265-001 42 Embroidery unit SA528 XC1291-002 carrying case Note (For U.S.A. only) Foot controller: Model P This foot controller...

Users Manual - English
Page 26
... of the currently selected stitch pattern. CONTENTS Display Key Name Needle mode selection key (single/double) Stitch width and stitch length key Thread tension key Manual memory key Reset key Explanation Press this key. The sewing mode changes between single needle mode and twin needle mode each time you like (zigzag...
... of the currently selected stitch pattern. CONTENTS Display Key Name Needle mode selection key (single/double) Stitch width and stitch length key Thread tension key Manual memory key Reset key Explanation Press this key. The sewing mode changes between single needle mode and twin needle mode each time you like (zigzag...
Users Manual - English
Page 47
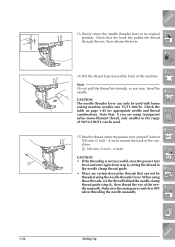
... 1 - Check the table on page 1-45 for appropriate needle and thread combinations. CAUTION 1 • If the threading is OFF when threading the needle manually. 9 - ?! 1-36 Setting Up Index When using the needle threader lever. Check that can only be threaded using these threads, set the thread behind .... 5 - 6 - 15.Pass the thread under the presser foot, and pull it about 100 mm (3 inch - 4 inch) toward the back of the needle manually. Note that, if you may bend the needle. 4 - Make sure the main power switch is not successful, raise the presser foot lever and start again...
... 1 - Check the table on page 1-45 for appropriate needle and thread combinations. CAUTION 1 • If the threading is OFF when threading the needle manually. 9 - ?! 1-36 Setting Up Index When using the needle threader lever. Check that can only be threaded using these threads, set the thread behind .... 5 - 6 - 15.Pass the thread under the presser foot, and pull it about 100 mm (3 inch - 4 inch) toward the back of the needle manually. Note that, if you may bend the needle. 4 - Make sure the main power switch is not successful, raise the presser foot lever and start again...

Users Manual - English
Page 60
... needle as a pivot, turn the fabric so that you begin to Sew 2-3 Before you can use "Reverse/ Reinforcement Stitch" button to sew reverse/reinforcement stitches manually (see page 2-14). 1 - 2 - 3 - Index Getting Ready to sew, sew a basting thread at the finish of the sewing (see page 1-4). Leave the needle in the new...
... needle as a pivot, turn the fabric so that you begin to Sew 2-3 Before you can use "Reverse/ Reinforcement Stitch" button to sew reverse/reinforcement stitches manually (see page 2-14). 1 - 2 - 3 - Index Getting Ready to sew, sew a basting thread at the finish of the sewing (see page 1-4). Leave the needle in the new...
Users Manual - English
Page 67
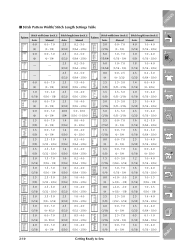
...16 - 3/16) 2.5 1.0 - 4.0 (3/32) (1/16 - 3/16) 2.5 1.0 - 4.0 (3/32) (1/16 - 3/16) 2.5 0.5 - 4.0 (3/32) (1/32 - 3/16) 2.5 0.5 - 4.0 (3/32) (1/32 - 3/16) 4.0 1.0 - 4.0 (3/16) (1/16 - 3/16) Stitch width [mm (inch.)] Pattern Auto. Manual 5.0 0.0 - 7.0 (3/16) (0 - 1/4) 6.0 1.0 - 7.0 (15/64) (1/16 - 1/4) 6.0 1.0 - 7.0 (15/64) (1/16 - 1/4) 0.0 0.0 - 2.5 (0) (0 - 3/32) 3.5 3.5 - 5.0 (1/8) (1/8 - 3/16) 3.5 3.5 - 5.0 (1/8) (1/8 - 3/16) 5.0 3.5 - 5.0 (3/16) (1/8 - 3/16) 5.0 3.5 - 5.0 (3/16) (1/8 - 3/16) 5.5 0.0 - 7.0 (7/32) (0 - 1/4) 1.5 0.0 - 7.0 (1/16...
...16 - 3/16) 2.5 1.0 - 4.0 (3/32) (1/16 - 3/16) 2.5 1.0 - 4.0 (3/32) (1/16 - 3/16) 2.5 0.5 - 4.0 (3/32) (1/32 - 3/16) 2.5 0.5 - 4.0 (3/32) (1/32 - 3/16) 4.0 1.0 - 4.0 (3/16) (1/16 - 3/16) Stitch width [mm (inch.)] Pattern Auto. Manual 5.0 0.0 - 7.0 (3/16) (0 - 1/4) 6.0 1.0 - 7.0 (15/64) (1/16 - 1/4) 6.0 1.0 - 7.0 (15/64) (1/16 - 1/4) 0.0 0.0 - 2.5 (0) (0 - 3/32) 3.5 3.5 - 5.0 (1/8) (1/8 - 3/16) 3.5 3.5 - 5.0 (1/8) (1/8 - 3/16) 5.0 3.5 - 5.0 (3/16) (1/8 - 3/16) 5.0 3.5 - 5.0 (3/16) (1/8 - 3/16) 5.5 0.0 - 7.0 (7/32) (0 - 1/4) 1.5 0.0 - 7.0 (1/16...

Users Manual - English
Page 68
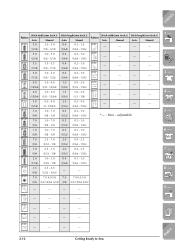
... (1/64 - 1/16) 0.4 0.2 - 1.0 (1/64) (1/64 - 1/16) 0.4 0.2 - 1.0 (1/64) (1/64 - 1/16) 0.4 0.2 - 1.0 (1/64) (1/64 - 1/16) Getting Ready to Sew 2-11 Index CONTENTS 1 - 2 - 3 - 4 - 5 - 6 - 7 - 8 - 9 - ?! Stitch width [mm (inch.)] Pattern Auto. Manual 5.0 1.5 - 7.0 (3/16) (1/16 - 1/4) 5.0 1.5 - 7.0 (3/16) (1/16 - 1/4) 5.0 1.5 - 7.0 (3/16) (1/16 - 1/4) 4.0 1.5 - 7.0 (3/16) (1/16 - 1/4) 5.0 1.5 - 7.0 (3/16) (1/16 - 1/4) 6.0 1.5 - 7.0 (15/64) (1/16 - 1/4) 6.0 1.5 - 7.0 (15/64) (1/16 - 1/4) 6.0 1.5 - 7.0 (15/64) (1/16 - 1/4) 6.0 1.5 - 7.0 (15/64) (1/16...
... (1/64 - 1/16) 0.4 0.2 - 1.0 (1/64) (1/64 - 1/16) 0.4 0.2 - 1.0 (1/64) (1/64 - 1/16) 0.4 0.2 - 1.0 (1/64) (1/64 - 1/16) Getting Ready to Sew 2-11 Index CONTENTS 1 - 2 - 3 - 4 - 5 - 6 - 7 - 8 - 9 - ?! Stitch width [mm (inch.)] Pattern Auto. Manual 5.0 1.5 - 7.0 (3/16) (1/16 - 1/4) 5.0 1.5 - 7.0 (3/16) (1/16 - 1/4) 5.0 1.5 - 7.0 (3/16) (1/16 - 1/4) 4.0 1.5 - 7.0 (3/16) (1/16 - 1/4) 5.0 1.5 - 7.0 (3/16) (1/16 - 1/4) 6.0 1.5 - 7.0 (15/64) (1/16 - 1/4) 6.0 1.5 - 7.0 (15/64) (1/16 - 1/4) 6.0 1.5 - 7.0 (15/64) (1/16 - 1/4) 6.0 1.5 - 7.0 (15/64) (1/16...
Users Manual - English
Page 69
... - - - - - - - 1 - 2 - 3 - 4 - 5 - 6 - 7 - 8 - 9 - ?! - - - - - - - - - - - - 2-12 Getting Ready to Sew Index Manual 5.0 (3/16) 3.0 - 5.0 (1/8 - 3/16) 0.4 0.2 - 1.0 (1/64) (1/64 - 1/16) - - - - 5.0 (3/16) 3.0 - 5.0 (1/8 - 3/16) 0.4 0.2 - 1.0 (1/64) (1/64 - 1/16)...(1/16) (1/64 - 3/16) - - - - 7.0 3.0 - 7.0 0.5 0.3 - 1.0 (1/4) (1/8 - 1/4) (1/32) (1/64 - 1/16) *- : Non - Manual Auto. Manual Auto. CONTENTS Stitch width [mm (inch.)] Stitch length [mm (inch.)] Stitch width [mm (inch.)] Stitch length [mm (inch.)] Pattern Pattern Auto.
... - - - - - - - 1 - 2 - 3 - 4 - 5 - 6 - 7 - 8 - 9 - ?! - - - - - - - - - - - - 2-12 Getting Ready to Sew Index Manual 5.0 (3/16) 3.0 - 5.0 (1/8 - 3/16) 0.4 0.2 - 1.0 (1/64) (1/64 - 1/16) - - - - 5.0 (3/16) 3.0 - 5.0 (1/8 - 3/16) 0.4 0.2 - 1.0 (1/64) (1/64 - 1/16)...(1/16) (1/64 - 3/16) - - - - 7.0 3.0 - 7.0 0.5 0.3 - 1.0 (1/4) (1/8 - 1/4) (1/32) (1/64 - 1/16) *- : Non - Manual Auto. Manual Auto. CONTENTS Stitch width [mm (inch.)] Stitch length [mm (inch.)] Stitch width [mm (inch.)] Stitch length [mm (inch.)] Pattern Pattern Auto.

Users Manual - English
Page 122
Thread the wing needle by carefully rotating the balance wheel. 3. If using a wing needle and the stitch width has been set manually, check that the needle will not touch the presser foot before starting sewing by hand, from front to the machine. • A more attractive finish can ...
Thread the wing needle by carefully rotating the balance wheel. 3. If using a wing needle and the stitch width has been set manually, check that the needle will not touch the presser foot before starting sewing by hand, from front to the machine. • A more attractive finish can ...

Users Manual - English
Page 318
... Lower threading see Bobbin winding Low shank adapter 1-9, 1-40 M Machine operations key 1-21 Machine settings key 1-20 Main power switch 1-12 Maintenance key 1-21, 1-23 Manual memory key 1-15, 3-12 Memory key 4-14, 4-27, 5-46, 5-51, 6-32 Mirror image key 1-14, 3-11, 4-14, 4-16, 4-21, 5-46, 5-48, 6-8 Moving a pattern 5-26, 6-9 Multi...
... Lower threading see Bobbin winding Low shank adapter 1-9, 1-40 M Machine operations key 1-21 Machine settings key 1-20 Main power switch 1-12 Maintenance key 1-21, 1-23 Manual memory key 1-15, 3-12 Memory key 4-14, 4-27, 5-46, 5-51, 6-32 Mirror image key 1-14, 3-11, 4-14, 4-16, 4-21, 5-46, 5-48, 6-8 Moving a pattern 5-26, 6-9 Multi...
Sewing Guide
Page 7
... in the popular crazy quilt appliqué. 5 The speed control on screen and locked for appliqué is found on page 3-31 in the instruction manual. • Stitch number 1-33 creates an invisible appliqué stitch when the thread color closely matches the fabric or monofilament thread is used for invisible...
... in the popular crazy quilt appliqué. 5 The speed control on screen and locked for appliqué is found on page 3-31 in the instruction manual. • Stitch number 1-33 creates an invisible appliqué stitch when the thread color closely matches the fabric or monofilament thread is used for invisible...
Sewing Guide
Page 8
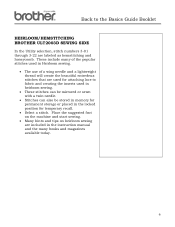
These include many books and magazines available today. 6 Back to the Basics Guide Booklet HEIRLOOM/HEMSTITCHING BROTHER ULT2003D SEWING SIDE In the Utility selection, stitch numbers 3-01 through 3-22 are used for attaching lace to fabric and creating the inserts used ...stitches can be mirrored or sewn with a twin needle. • Stitches can also be stored in memory for permanent storage or placed in the instruction manual and the many of a wing needle and a lightweight thread will create the beautiful entredeux stitches that are labeled as hemstitching and honeycomb. Place the ...
These include many books and magazines available today. 6 Back to the Basics Guide Booklet HEIRLOOM/HEMSTITCHING BROTHER ULT2003D SEWING SIDE In the Utility selection, stitch numbers 3-01 through 3-22 are used for attaching lace to fabric and creating the inserts used ...stitches can be mirrored or sewn with a twin needle. • Stitches can also be stored in memory for permanent storage or placed in the instruction manual and the many of a wing needle and a lightweight thread will create the beautiful entredeux stitches that are labeled as hemstitching and honeycomb. Place the ...


