

Accessory Catalog
Page 14
... select a center straight stitch. 2. Quilting Guide Use it to attach snap-on the walking foot. 3. Insert the straight bar into the hole of the seam. 5. Brother Quilting Feet 25 Quality quilting Brother offers you innovative accessories to make quilting easier, helping you form perfect 1/4'" seams and turn corners. Select the center needle position for...
... select a center straight stitch. 2. Quilting Guide Use it to attach snap-on the walking foot. 3. Insert the straight bar into the hole of the seam. 5. Brother Quilting Feet 25 Quality quilting Brother offers you innovative accessories to make quilting easier, helping you form perfect 1/4'" seams and turn corners. Select the center needle position for...

Accessory Catalog
Page 15
... pull the bobbin thread to feed the fabric consistently. Walking Foot/Open Toe Walking Foot Brother Quilting Feet 28 Walking Foot/Open Toe Walking Foot The feed dogs on the front of fabric and the walking foot with the needle to allow fabric to be easily sewn. Requires Low Shank Adapter for ULT series, PC-6500, PC-8200 and PC-8500 sewing...
... pull the bobbin thread to feed the fabric consistently. Walking Foot/Open Toe Walking Foot Brother Quilting Feet 28 Walking Foot/Open Toe Walking Foot The feed dogs on the front of fabric and the walking foot with the needle to allow fabric to be easily sewn. Requires Low Shank Adapter for ULT series, PC-6500, PC-8200 and PC-8500 sewing...
Users Manual - English
Page 8
... Cover 1-5 I Supplemental Spool Pin 1-6 I Flat Bed Attachment/Free Arm ........ 1-6 I Feed Dog Position Switch 1-6 I Presser Foot Dial 1-6 I Knee Lifter 1-7 I Foot Controller 1-7 Included Accessories 1-8 Options 1-10 I When Using the Multi-thread Stand 1-10 BASIC OPERATION 1-12 Connecting the Power 1-... Pin 1-37 Pulling Up the Bobbin Thread 1-38 Changing the Presser Foot 1-39 I Removing the Presser Foot 1-39 I Attaching the Presser Foot 1-39 I Attaching the Walking Foot .......... 1-40 I Reattaching the Presser Foot Holder ... 1-42 Changing the Needle 1-43 I About the Needle ...
... Cover 1-5 I Supplemental Spool Pin 1-6 I Flat Bed Attachment/Free Arm ........ 1-6 I Feed Dog Position Switch 1-6 I Presser Foot Dial 1-6 I Knee Lifter 1-7 I Foot Controller 1-7 Included Accessories 1-8 Options 1-10 I When Using the Multi-thread Stand 1-10 BASIC OPERATION 1-12 Connecting the Power 1-... Pin 1-37 Pulling Up the Bobbin Thread 1-38 Changing the Presser Foot 1-39 I Removing the Presser Foot 1-39 I Attaching the Presser Foot 1-39 I Attaching the Walking Foot .......... 1-40 I Reattaching the Presser Foot Holder ... 1-42 Changing the Needle 1-43 I About the Needle ...

Users Manual - English
Page 19
to open the accessory compartment. 1 Storage space 2 Presser foot storage space 3 Bobbin storage space 2 - 1 3 - 2 4 - 3 5 - 6 - Others 1 Buttonhole foot "A" X57789-101 2 Embroidery foot "Q" XC1274-001 3 Overcasting foot "G" X51162-001 4 Monogramming foot "N " X53840-301 5 Zipper foot "I" X59370-051 6 Zigzag foot "J" XC3021-051 7 Blind stitch foot "R" X56409-001 8 Button fitting foot "M" 130489-001 9 Walking foot SA140 XA8320-101 10 Side Cutter XC3198-001 11 Seam ripper...
to open the accessory compartment. 1 Storage space 2 Presser foot storage space 3 Bobbin storage space 2 - 1 3 - 2 4 - 3 5 - 6 - Others 1 Buttonhole foot "A" X57789-101 2 Embroidery foot "Q" XC1274-001 3 Overcasting foot "G" X51162-001 4 Monogramming foot "N " X53840-301 5 Zipper foot "I" X59370-051 6 Zigzag foot "J" XC3021-051 7 Blind stitch foot "R" X56409-001 8 Button fitting foot "M" 130489-001 9 Walking foot SA140 XA8320-101 10 Side Cutter XC3198-001 11 Seam ripper...
Users Manual - English
Page 51
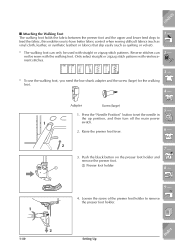
... the needle in the up position, and then turn off the main power 1 switch. 2. Raise the presser foot lever. 6 - 2 1 7 - 3. ment stitches. 3 - * To use the walking foot, you to have better fabric control when sewing difficult fabrics (such as vinyl cloth, leather, or synthetic leather)... that slip easily (such as quilting or velvet). 1 - * The walking foot can 2 - not be used with straight or zigzag stitch patterns. CONTENTS I Attaching the Walking Foot The walking foot holds the fabric between the presser foot and the upper and lower feed dogs to feed the fabric, this enables...
... the needle in the up position, and then turn off the main power 1 switch. 2. Raise the presser foot lever. 6 - 2 1 7 - 3. ment stitches. 3 - * To use the walking foot, you to have better fabric control when sewing difficult fabrics (such as vinyl cloth, leather, or synthetic leather)... that slip easily (such as quilting or velvet). 1 - * The walking foot can 2 - not be used with straight or zigzag stitch patterns. CONTENTS I Attaching the Walking Foot The walking foot holds the fabric between the presser foot and the upper and lower feed dogs to feed the fabric, this enables...

Users Manual - English
Page 52
... cause injury. • Be sure to turn the balance wheel toward the front of the walking foot so that the needle does not strike the presser foot. CAUTION 2 - Set the operation lever of the machine to low speeds. 7 - 8 - 9 - ?! If the screw is loose, the needle may result.... CONTENTS 5. Set the low shank adapter for the walking foot, and tighten the screw securely 6 with the screwdriver. 1 - CAUTION • Use the screwdriver to tighten the screw securely. CAUTION When sewing with your ...
... cause injury. • Be sure to turn the balance wheel toward the front of the walking foot so that the needle does not strike the presser foot. CAUTION 2 - Set the operation lever of the machine to low speeds. 7 - 8 - 9 - ?! If the screw is loose, the needle may result.... CONTENTS 5. Set the low shank adapter for the walking foot, and tighten the screw securely 6 with the screwdriver. 1 - CAUTION • Use the screwdriver to tighten the screw securely. CAUTION When sewing with your ...
Users Manual - English
Page 53
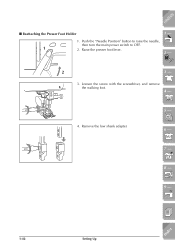
Remove the low shank adapter. 5 - 6 - 7 - 8 - 9 - ?! 1-42 Setting Up Index Loosen the screw with the screwdriver, and remove the walking foot. 4 - 4. CONTENTS I Reattaching the Presser Foot Holder 1 - 1. Push the "Needle Position" button to raise the needle, then turn the main power switch to OFF. 1 2. Raise the presser foot lever. 2 - 2 6 3 - 3.
Remove the low shank adapter. 5 - 6 - 7 - 8 - 9 - ?! 1-42 Setting Up Index Loosen the screw with the screwdriver, and remove the walking foot. 4 - 4. CONTENTS I Reattaching the Presser Foot Holder 1 - 1. Push the "Needle Position" button to raise the needle, then turn the main power switch to OFF. 1 2. Raise the presser foot lever. 2 - 2 6 3 - 3.
Users Manual - English
Page 103
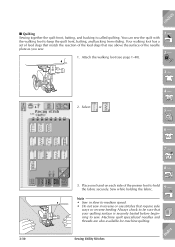
... for machine quilting. 3-30 Sewing Utility Stitches Index CONTENTS I Quilting Sewing together the quilt front, batting, and backing is securely basted before begin- Attach the walking foot (see page 1-40). 1 - 2 - 6 3 - 2. Note • Sew in slow to medium speed. • Do not sew in reverse or use stitches... that require side ways or reverse feeding Always check to be sure that rise above the surface of the presser foot to hold the fabric securely. Your walking foot has a set of feed dogs that match the reaction of the feed dogs that 6 your quilting surface is called...
... for machine quilting. 3-30 Sewing Utility Stitches Index CONTENTS I Quilting Sewing together the quilt front, batting, and backing is securely basted before begin- Attach the walking foot (see page 1-40). 1 - 2 - 6 3 - 2. Note • Sew in slow to medium speed. • Do not sew in reverse or use stitches... that require side ways or reverse feeding Always check to be sure that rise above the surface of the presser foot to hold the fabric securely. Your walking foot has a set of feed dogs that match the reaction of the feed dogs that 6 your quilting surface is called...
Users Manual - English
Page 320
... stitches mirror image 3-11 quick reference table 3-1 selecting 3-9, 3-13 stitch width/length settings table 2-10 Utility stitch key 1-14, 3-9 V Vertical mirror image key 4-14, 4-16 W Walking foot 1-8, 1-40 Z Zigzag stitches 3-20, 3-65 Zipper insertion 3-67, 3-68 Index Index CONTENTS 1 - 2 - 3 - 4 - 5 - 6 - 7 - 8 - 9 - ?!
... stitches mirror image 3-11 quick reference table 3-1 selecting 3-9, 3-13 stitch width/length settings table 2-10 Utility stitch key 1-14, 3-9 V Vertical mirror image key 4-14, 4-16 W Walking foot 1-8, 1-40 Z Zigzag stitches 3-20, 3-65 Zipper insertion 3-67, 3-68 Index Index CONTENTS 1 - 2 - 3 - 4 - 5 - 6 - 7 - 8 - 9 - ?!


