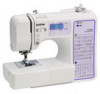
Users Manual - English
Page 6
SEWING BASICS 36 SEWING ...36 General sewing procedure ...36 Selecting a stitch ...37 Adjusting the stitch length and width ...38 Starting to sew ...39 Thread tension ...41 USEFUL SEWING TIPS ...42 Trial sewing ...42 Changing the sewing direction ...42 Sewing curves ...42 Sewing thick fabrics ...42 Sewing hook-and-loop fastener ......
SEWING BASICS 36 SEWING ...36 General sewing procedure ...36 Selecting a stitch ...37 Adjusting the stitch length and width ...38 Starting to sew ...39 Thread tension ...41 USEFUL SEWING TIPS ...42 Trial sewing ...42 Changing the sewing direction ...42 Sewing curves ...42 Sewing thick fabrics ...42 Sewing hook-and-loop fastener ......
Users Manual - English
Page 7
... Cleaning the race ...86 TROUBLESHOOTING ...89 Frequent troubleshooting topics ...89 Upper thread tightened up ...89 Tangled thread on wrong side of fabric ...90 Incorrect thread tension ...93 Fabric is caught in the machine and cannot be removed 94 List of symptoms ...98 ERROR MESSAGES ...103 Operation beep ...103 INDEX ...104 5 UTILITY...
... Cleaning the race ...86 TROUBLESHOOTING ...89 Frequent troubleshooting topics ...89 Upper thread tightened up ...89 Tangled thread on wrong side of fabric ...90 Incorrect thread tension ...93 Fabric is caught in the machine and cannot be removed 94 List of symptoms ...98 ERROR MESSAGES ...103 Operation beep ...103 INDEX ...104 5 UTILITY...
Users Manual - English
Page 10
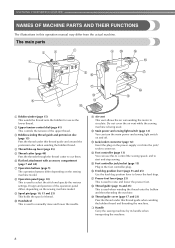
... (page 15) This winds the thread onto the bobbin for use this operation manual may differ from the actual machine. b Upper tension-control dial (page 41) This controls the tension of the upper thread. Do not cover the air vent while the sewing machine is used to circulate. k Air vent This vent...
... (page 15) This winds the thread onto the bobbin for use this operation manual may differ from the actual machine. b Upper tension-control dial (page 41) This controls the tension of the upper thread. Do not cover the air vent while the sewing machine is used to circulate. k Air vent This vent...
Users Manual - English
Page 20
... bobbin winding system Place the bobbin on the bobbin winder shaft a so that wraps around the d pre-tension disk with the start/stop button) to pass the thread around the pre-tension disk (page 15). Slide the sewing speed controller back to its p original position (for models equipped with...bobbin" to start /stop button) (for models equipped with the sewing speed controller.) CAUTION ● Not winding the bobbin properly may cause the thread tension to loosen, and may break the needle. this is turned after winding the thread around the bobbin five or six times. 18 a Notch b Bobbin...
... bobbin winding system Place the bobbin on the bobbin winder shaft a so that wraps around the d pre-tension disk with the start/stop button) to pass the thread around the pre-tension disk (page 15). Slide the sewing speed controller back to its p original position (for models equipped with...bobbin" to start /stop button) (for models equipped with the sewing speed controller.) CAUTION ● Not winding the bobbin properly may cause the thread tension to loosen, and may break the needle. this is turned after winding the thread around the bobbin five or six times. 18 a Notch b Bobbin...
Users Manual - English
Page 21
... models equipped with the start . CAUTION ● Be sure to cut to a suitable length. CAUTION ● Not winding the bobbin properly may cause the thread tension to loosen, and may become tangled in the bobbin winder seat. Cut the thread, slide the bobbin winder shaft j to the left, and then remove...
... models equipped with the start . CAUTION ● Be sure to cut to a suitable length. CAUTION ● Not winding the bobbin properly may cause the thread tension to loosen, and may become tangled in the bobbin winder seat. Cut the thread, slide the bobbin winder shaft j to the left, and then remove...
Users Manual - English
Page 22
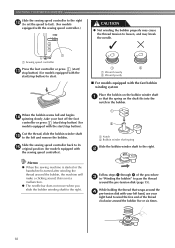
...The direction for feeding the bobbin thread is indicated by the arrow. If the thread unrolls in the wrong direction, it may cause the thread tension to its highest position by turning a the handwheel toward you accidentally step on quick-set the bobbin so the thread unrolls in injury. Raise ... bobbin wound with the needle position button), and raise the presser foot lever. CAUTION ● Winding the bobbin improperly may cause the thread tension to thread the machine as indicated. If you (counterclockwise) or press (needle position button) (for this sewing machine.
...The direction for feeding the bobbin thread is indicated by the arrow. If the thread unrolls in the wrong direction, it may cause the thread tension to its highest position by turning a the handwheel toward you accidentally step on quick-set the bobbin so the thread unrolls in injury. Raise ... bobbin wound with the needle position button), and raise the presser foot lever. CAUTION ● Winding the bobbin improperly may cause the thread tension to thread the machine as indicated. If you (counterclockwise) or press (needle position button) (for this sewing machine.
Users Manual - English
Page 23
... your right hand so that the end of the thread comes out from the left tab in the wrong direction, it may cause the thread tension to thread the machine as shown by the line in the diagram). ■ For models equipped with the quick-set the bobbin so the thread... clicks into place. Turn off the sewing machine. Hold the end of the thread, push the bobbin e down with the needle position button), and the tension-adjusting spring of the bobbin raise the presser foot lever. press (needle position button) (for feeding the bobbin thread is on the left, and then...
... your right hand so that the end of the thread comes out from the left tab in the wrong direction, it may cause the thread tension to thread the machine as shown by the line in the diagram). ■ For models equipped with the quick-set the bobbin so the thread... clicks into place. Turn off the sewing machine. Hold the end of the thread, push the bobbin e down with the needle position button), and the tension-adjusting spring of the bobbin raise the presser foot lever. press (needle position button) (for feeding the bobbin thread is on the left, and then...
Users Manual - English
Page 24
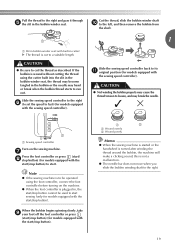
...the thread toward you start to sew, follow to cut it may cause incorrect thread tension (page 41). KNOWING YOUR SEWING MACHINE While lightly holding down the bobbin with the .... a Slit b Cutter (Cut the thread with e your right hand as shown, guide the thread through the tension-adjusting spring of the bobbin case, it with the cutter (c). If you want to draw up the bobbin thread ... You can begin sewing immediately without drawing up the lower thread" (page 28). 1 a Tension-adjusting spring 22 Replace the bobbin cover. Put the left tab in "Drawing up the bobbin thread.
...the thread toward you start to sew, follow to cut it may cause incorrect thread tension (page 41). KNOWING YOUR SEWING MACHINE While lightly holding down the bobbin with the .... a Slit b Cutter (Cut the thread with e your right hand as shown, guide the thread through the tension-adjusting spring of the bobbin case, it with the cutter (c). If you want to draw up the bobbin thread ... You can begin sewing immediately without drawing up the lower thread" (page 28). 1 a Tension-adjusting spring 22 Replace the bobbin cover. Put the left tab in "Drawing up the bobbin thread.
Users Manual - English
Page 37
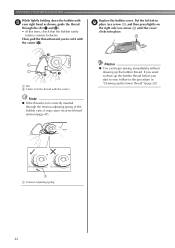
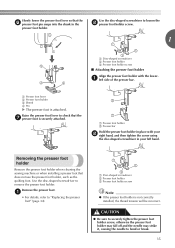
... presser foot holder, such as the quilting foot. a Presser foot lever b Presser foot holder c Shank d Pin X The presser foot is not correctly installed, the thread tension will be incorrect. Raise the presser foot lever to loosen the b presser foot holder screw. 1 a Disc-shaped screwdriver b Presser foot holder c Presser foot holder screw...
... presser foot holder, such as the quilting foot. a Presser foot lever b Presser foot holder c Shank d Pin X The presser foot is not correctly installed, the thread tension will be incorrect. Raise the presser foot lever to loosen the b presser foot holder screw. 1 a Disc-shaped screwdriver b Presser foot holder c Presser foot holder screw...
Users Manual - English
Page 43
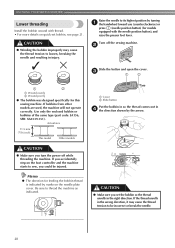
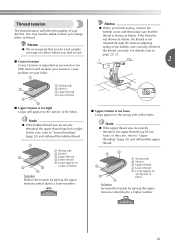
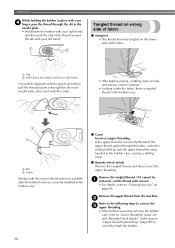
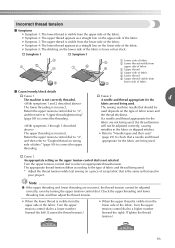
...make sure that you do a test sample on scrap of a fabric before you start to sew. ■ Correct tension Correct tension is too loose Loops appear on your stitches. Thread tension The thread tension will affect the quality of your fabric. 1 Memo ● When you change fabric or thread. Reinsert the thread ... ● If the upper thread was incorrectly threaded, the upper thread may need to a lower number. 54 3 ■ Upper tension is important as too much or too little tension will weaken your seams or cause puckers on the wrong side of the fabric. If the thread is not shown as...
...make sure that you do a test sample on scrap of a fabric before you start to sew. ■ Correct tension Correct tension is too loose Loops appear on your stitches. Thread tension The thread tension will affect the quality of your fabric. 1 Memo ● When you change fabric or thread. Reinsert the thread ... ● If the upper thread was incorrectly threaded, the upper thread may need to a lower number. 54 3 ■ Upper tension is important as too much or too little tension will weaken your seams or cause puckers on the wrong side of the fabric. If the thread is not shown as...
Users Manual - English
Page 44
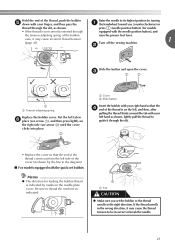
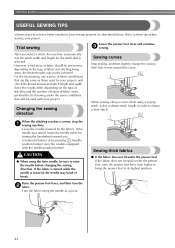
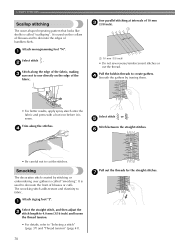
... to these tips when sewing your project. SEWING BASICS USEFUL SEWING TIPS Various ways to achieve better results for your project, and check the thread tension and stitch length and width. For the trial sewing, use a piece of fabric and stitching being sewn, the desired results may bend or break. When...
... to these tips when sewing your project. SEWING BASICS USEFUL SEWING TIPS Various ways to achieve better results for your project, and check the thread tension and stitch length and width. For the trial sewing, use a piece of fabric and stitching being sewn, the desired results may bend or break. When...
Users Manual - English
Page 72
...shaped repeating pattern that looks like shells is called "smocking". f • Be careful not to "Selecting a stitch" (page 37) and "Thread tension" (page 41). It is called "scalloping". a Select stitch . d Select stitch or . Attach zigzag foot "J". Sew parallel stitching at intervals of ... of handkerchiefs. a Select the straight stitch, and then adjust the b stitch length to 4.0 mm (3/16 inch) and loosen the thread tension. • For details, refer to cut the thread. b Stitch along the stitches. Smocking The decorative stitch created by ironing them. ...
...shaped repeating pattern that looks like shells is called "smocking". f • Be careful not to "Selecting a stitch" (page 37) and "Thread tension" (page 41). It is called "scalloping". a Select stitch . d Select stitch or . Attach zigzag foot "J". Sew parallel stitching at intervals of ... of handkerchiefs. a Select the straight stitch, and then adjust the b stitch length to 4.0 mm (3/16 inch) and loosen the thread tension. • For details, refer to cut the thread. b Stitch along the stitches. Smocking The decorative stitch created by ironing them. ...
Users Manual - English
Page 73
... is used to decorate trims, the front of blouses or cuffs made of fabric 71 a Attach zigzag foot "J". b Select stitch , and then increase the thread c tension. • For details, refer to one side. a Right side of thin fabrics. c Turn the fabric over so that look like shells are used when making...
... is used to decorate trims, the front of blouses or cuffs made of fabric 71 a Attach zigzag foot "J". b Select stitch , and then increase the thread c tension. • For details, refer to one side. a Right side of thin fabrics. c Turn the fabric over so that look like shells are used when making...
Users Manual - English
Page 91
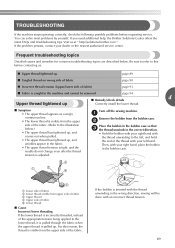
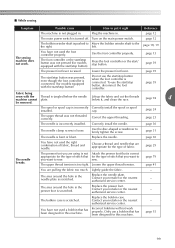
... stops operating correctly, check the following possible problems before contacting us at " http://solutions.brother.com " . Visit us . ■ Upper thread tightened up page 89 ■ Tangled thread on wrong side of fabric page 90 ■ Incorrect thread tension (Upper/lower side of fabric) page 93 ■ Fabric is caught in the...
... stops operating correctly, check the following possible problems before contacting us at " http://solutions.brother.com " . Visit us . ■ Upper thread tightened up page 89 ■ Tangled thread on wrong side of fabric page 90 ■ Incorrect thread tension (Upper/lower side of fabric) page 93 ■ Fabric is caught in the...
Users Manual - English
Page 92
... cannot be a removed, cut the thread with scissors. • For details, refer to correctly install the bobbin. 90 c Slit d Cutter Sewing with the correct thread tension is possible after the bobbin has been correctly installed in the bobbin case. ■ Cause Incorrect upper threading If the upper thread is tangled thread...
... cannot be a removed, cut the thread with scissors. • For details, refer to correctly install the bobbin. 90 c Slit d Cutter Sewing with the correct thread tension is possible after the bobbin has been correctly installed in the bobbin case. ■ Cause Incorrect upper threading If the upper thread is tangled thread...
Users Manual - English
Page 95
... lower thread is visible from the upper side of fabric ■ Cause/remedy/check details † Cause 1 The machine is not correctly threaded. Incorrect thread tension ■ Symptoms • Symptom 1: The lower thread is visible from the upper side of the fabric. • Symptom 2: The upper thread appears as a straight...Refer to "Needle types and their uses" (page 29) to check that should be used depends on the type of the fabric. Turn the upper tension-control dial to "Tangled thread on wrong side of scrap fabric that is the same as a straight line on the lower side of the fabric...
... lower thread is visible from the upper side of fabric ■ Cause/remedy/check details † Cause 1 The machine is not correctly threaded. Incorrect thread tension ■ Symptoms • Symptom 1: The lower thread is visible from the upper side of the fabric. • Symptom 2: The upper thread appears as a straight...Refer to "Needle types and their uses" (page 29) to check that should be used depends on the type of the fabric. Turn the upper tension-control dial to "Tangled thread on wrong side of scrap fabric that is the same as a straight line on the lower side of the fabric...
Users Manual - English
Page 101
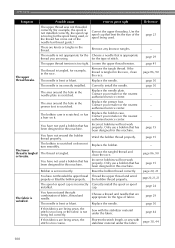
...machine cannot plate. Use the disc-shaped screwdriver to the left. Replace the needle. page 29 The needle breaks. The upper thread tension is incorrectly Correctly install the spool or spool installed. Replace the needle plate. Contact your retailer or the nearest authorized service center. -...below it right Reference The machine is scratched. page 30 The needle clamp screw is pushed to the right. Loosen the upper thread tension. Contact your retailer or the nearest - page 12 The bobbin winder shaft is loose. page 94 4 be removed. page 30 You...
...machine cannot plate. Use the disc-shaped screwdriver to the left. Replace the needle. page 29 The needle breaks. The upper thread tension is incorrectly Correctly install the spool or spool installed. Replace the needle plate. Contact your retailer or the nearest authorized service center. -...below it right Reference The machine is scratched. page 30 The needle clamp screw is pushed to the right. Loosen the upper thread tension. Contact your retailer or the nearest - page 12 The bobbin winder shaft is loose. page 94 4 be removed. page 30 You...
Users Manual - English
Page 102
Use the spool cap that has been designed for this machine. The upper thread tension is bent or blunt. Loosen the upper thread tension. The needle is too tight. The area around the hole in the thread. Replace the bobbin case. Incorrect bobbins will not work properly. The thread ...
Use the spool cap that has been designed for this machine. The upper thread tension is bent or blunt. Loosen the upper thread tension. The needle is too tight. The area around the hole in the thread. Replace the bobbin case. Incorrect bobbins will not work properly. The thread ...
Users Manual - English
Page 103
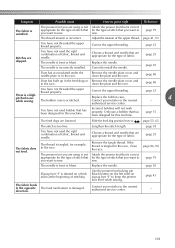
... incorrectly installed. Incorrect bobbins will not work properly. page 38 You have not threaded the upper thread properly. Replace the needle. Adjust the tension of stitch that has been designed for example, in the race. You have not threaded the upper thread properly. The needle is scratched. ...You have not used bobbin that you are appropriate for the type of the upper thread. The needle is bent or blunt. The thread tension is not appropriate for the type of stitch that are using is correct for the type of fabric, thread and needle. Replace the ...
... incorrectly installed. Incorrect bobbins will not work properly. page 38 You have not threaded the upper thread properly. Replace the needle. Adjust the tension of stitch that has been designed for example, in the race. You have not threaded the upper thread properly. The needle is scratched. ...You have not used bobbin that you are appropriate for the type of the upper thread. The needle is bent or blunt. The thread tension is not appropriate for the type of stitch that are using is correct for the type of fabric, thread and needle. Replace the ...
Users Manual - English
Page 104
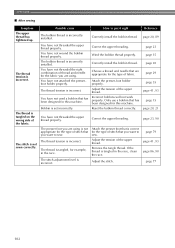
... you are appropriate for the type of fabric. Bobbin is incorrect. You have not threaded the upper thread properly. The thread tension is set incorrectly. Correct the upper threading. Remove the tangle thread. APPENDIX ■ After sewing Symptom The upper thread has tightened ...up. The thread tension is incorrect. How to sew. Correct the upper threading. Attach the presser-foot holder properly. Only use a bobbin that has been...
... you are appropriate for the type of fabric. Bobbin is incorrect. You have not threaded the upper thread properly. The thread tension is set incorrectly. Correct the upper threading. Remove the tangle thread. APPENDIX ■ After sewing Symptom The upper thread has tightened ...up. The thread tension is incorrect. How to sew. Correct the upper threading. Attach the presser-foot holder properly. Only use a bobbin that has been...


