Users Manual - English
Page 6
... ...9 Operation panel ...10 Spool pin ...10 USING YOUR SEWING MACHINE 12 Power supply precautions ...12 Power supply ...12 Foot controller ...13 Sewing speed controller (for models equipped with the start/stop button 13 Changing the needle stop position ...13 Changing the initial needle position ...14 Cancelling the operation beep ...14 THREADING...
... ...9 Operation panel ...10 Spool pin ...10 USING YOUR SEWING MACHINE 12 Power supply precautions ...12 Power supply ...12 Foot controller ...13 Sewing speed controller (for models equipped with the start/stop button 13 Changing the needle stop position ...13 Changing the initial needle position ...14 Cancelling the operation beep ...14 THREADING...
Users Manual - English
Page 7
3. APPENDIX ...79 STITCH SETTINGS ...79 Utility stitches ...79 Character stitches (for models equipped with character stitches 85 MAINTENANCE ...86 Restrictions on oiling ...86 Precautions on storing the machine ...86 Cleaning the machine surface ...... STITCHING 68 Fagoting ...69 Scallop stitching ...70 Smocking ...70 Shell tuck stitching ...71 Joining ...71 Heirloom stitching ...72 SEWING CHARACTERS (for models equipped with character stitches 73 Selecting characters ...73 Checking characters ...75 Deleting characters ...75 Sewing the character stitches ...76 ADJUSTING STITCHES (for...
3. APPENDIX ...79 STITCH SETTINGS ...79 Utility stitches ...79 Character stitches (for models equipped with character stitches 85 MAINTENANCE ...86 Restrictions on oiling ...86 Precautions on storing the machine ...86 Cleaning the machine surface ...... STITCHING 68 Fagoting ...69 Scallop stitching ...70 Smocking ...70 Shell tuck stitching ...71 Joining ...71 Heirloom stitching ...72 SEWING CHARACTERS (for models equipped with character stitches 73 Selecting characters ...73 Checking characters ...75 Deleting characters ...75 Sewing the character stitches ...76 ADJUSTING STITCHES (for...
Users Manual - English
Page 8
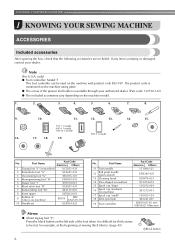
... foot "M" XE2137-001 8 Seam ripper XZ5082-001 9 Bobbin (4) (One is available through your dealer. Part Name Part Code Americas Others 1 Zigzag foot "J" (on the machine model. 1. 2. 3. 4. 5. 6. 7. 8. 9. 10. 11. 12. 13. 75/11 1 needle 90/14 1 needle 100/16 1 needle 16. 17. 18. 19. 90/14 1 needle 14. ...15. No. only) ● Foot controller: Model T This foot controller can be fed, for thick seams to be used on machine) 17 Spool cap (small) 18 Extra spool pin 19 Foot controller...
... foot "M" XE2137-001 8 Seam ripper XZ5082-001 9 Bobbin (4) (One is available through your dealer. Part Name Part Code Americas Others 1 Zigzag foot "J" (on the machine model. 1. 2. 3. 4. 5. 6. 7. 8. 9. 10. 11. 12. 13. 75/11 1 needle 90/14 1 needle 100/16 1 needle 16. 17. 18. 19. 90/14 1 needle 14. ...15. No. only) ● Foot controller: Model T This foot controller can be fed, for thick seams to be used on machine) 17 Spool cap (small) 18 Extra spool pin 19 Foot controller...

Users Manual - English
Page 9
...-002 XZ5051-001 Accessory compartment The accessories are stored in the bag, and then store the bag inside the flat bed attachment. Depending on the model you purchased, the following are not in a bag, they may be included with your machine. 1. 2. 3. 4. 5. 1 No. a Flat bed attachment b Storage compartment 7 If the accessories are...
...-002 XZ5051-001 Accessory compartment The accessories are stored in the bag, and then store the bag inside the flat bed attachment. Depending on the model you purchased, the following are not in a bag, they may be included with your machine. 1. 2. 3. 4. 5. 1 No. a Flat bed attachment b Storage compartment 7 If the accessories are...
Users Manual - English
Page 10
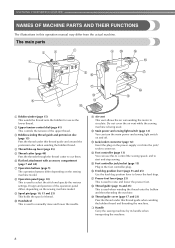
...b Upper tension-control dial (page 41) This controls the tension of thread. m Jack/socket connector (page 12) Insert the plug on the sewing machine model. q Presser foot lever (page 23) This is used to manually raise and lower the needle. j Handwheel This is being used to raise and lower the... presser foot. n Foot controller (page 13) You can turn the main power and sewing light switch on the sewing machine model. d Thread take-up lever (page 25) e Thread cutter (page 40) Pass the threads through the thread cutter to circulate. Do not cover the air ...
...b Upper tension-control dial (page 41) This controls the tension of thread. m Jack/socket connector (page 12) Insert the plug on the sewing machine model. q Presser foot lever (page 23) This is used to manually raise and lower the needle. j Handwheel This is being used to raise and lower the... presser foot. n Foot controller (page 13) You can turn the main power and sewing light switch on the sewing machine model. d Thread take-up lever (page 25) e Thread cutter (page 40) Pass the threads through the thread cutter to circulate. Do not cover the air ...
Users Manual - English
Page 11
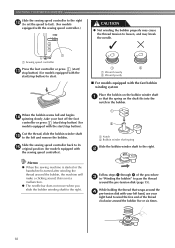
.... 9 For details, refer to "Sewing reinforcement stitches" (page 40). ■ Buttons provided on the sewing machine model. d Sewing speed controller (for models equipped with the sewing speed controller) Slide the sewing speed controller to easily perform various basic sewing machine operations. i ...for the selected stitching. 1 f Needle plate cover release Use when removing the needle plate cover. Attach the appropriate presser foot for models equipped with the needle threader) (page 26) b Buttonhole lever Lower the buttonhole lever when sewing buttonholes and bar tacks. Use ...
.... 9 For details, refer to "Sewing reinforcement stitches" (page 40). ■ Buttons provided on the sewing machine model. d Sewing speed controller (for models equipped with the sewing speed controller) Slide the sewing speed controller to easily perform various basic sewing machine operations. i ...for the selected stitching. 1 f Needle plate cover release Use when removing the needle plate cover. Attach the appropriate presser foot for models equipped with the needle threader) (page 26) b Buttonhole lever Lower the buttonhole lever when sewing buttonholes and bar tacks. Use ...
Users Manual - English
Page 12
.... (Press the "-" side to sew character stitches. b Stitch selection keys Press the stitch selection keys, and then select the number for models equipped with your finger to reduce the stitch length; press the "+" side to increase the stitch length.) d Stitch width adjustment key Press...indicator lights up when the character stitch key is pressed. KNOWING YOUR SEWING MACHINE Operation panel The operation panel, located on the sewing machine model. For details, refer to "Selecting a stitch" (page 37). The operation panel differs depending on the front of the selected stitch ...
.... (Press the "-" side to sew character stitches. b Stitch selection keys Press the stitch selection keys, and then select the number for models equipped with your finger to reduce the stitch length; press the "+" side to increase the stitch length.) d Stitch width adjustment key Press...indicator lights up when the character stitch key is pressed. KNOWING YOUR SEWING MACHINE Operation panel The operation panel, located on the sewing machine model. For details, refer to "Selecting a stitch" (page 37). The operation panel differs depending on the front of the selected stitch ...
Users Manual - English
Page 15
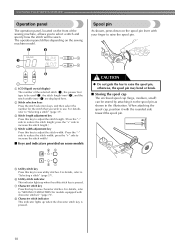
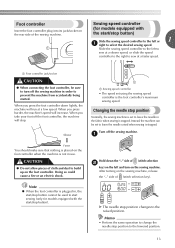
...When you take your foot off the foot controller, the machine will increase. Instead, the machine can be used to start sewing (only for models equipped with the start/stop button). Slower a Sewing speed controller • The speed set using the sewing speed controller is plugged in use...machine. a Faster You should make sure that nothing is placed on the foot controller when the machine is stopped. Sewing speed controller (for models equipped with the start /stop . Slide the sewing speed controller to the left and turn off the sewing machine. When you press harder...
...When you take your foot off the foot controller, the machine will increase. Instead, the machine can be used to start sewing (only for models equipped with the start/stop button). Slower a Sewing speed controller • The speed set using the sewing speed controller is plugged in use...machine. a Faster You should make sure that nothing is placed on the foot controller when the machine is stopped. Sewing speed controller (for models equipped with the start /stop . Slide the sewing speed controller to the left and turn off the sewing machine. When you press harder...

Users Manual - English
Page 17
...break. X The spool pin swings up. b CAUTION ● Do not grab the bar to raise the spool pin when winding the bobbin. Using other models, the machine will not work properly. If you use bobbins (part code: SA156, SFB: XA5539-151) that comes with this machine. Remove the spool ...have been designed for this machine or bobbins of the same type (part code: SA156, SFB: XA5539-151). Actual size 11.5 mm (7/16 inch) This model Other models As shown, press down on the fast bobbin winding, see page 18. 1 a Bobbin-winding thread guide b Bobbin winder shaft c Bobbin CAUTION ● Only...
...break. X The spool pin swings up. b CAUTION ● Do not grab the bar to raise the spool pin when winding the bobbin. Using other models, the machine will not work properly. If you use bobbins (part code: SA156, SFB: XA5539-151) that comes with this machine. Remove the spool ...have been designed for this machine or bobbins of the same type (part code: SA156, SFB: XA5539-151). Actual size 11.5 mm (7/16 inch) This model Other models As shown, press down on the fast bobbin winding, see page 18. 1 a Bobbin-winding thread guide b Bobbin winder shaft c Bobbin CAUTION ● Only...

Users Manual - English
Page 19
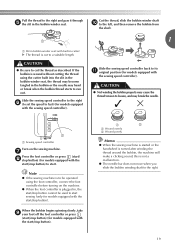
...is wound, when the thread runs low it in the bobbin. • Make sure to pull out 7 to 10 cm (2-3/4 to start sewing (only for models equipped with the start /stop the machine. a Spring on the sewing machine. k CAUTION ● Make sure you do not cut the thread completely, and ...and cause the needle to the right. i While holding the end of the thread, gently j press the foot controller or press (start/ stop button) (for models equipped with the start /stop button cannot be wound cleanly. Put the bobbin onto the bobbin winder shaft h and slide the bobbin winder shaft to...
...is wound, when the thread runs low it in the bobbin. • Make sure to pull out 7 to 10 cm (2-3/4 to start sewing (only for models equipped with the start /stop the machine. a Spring on the sewing machine. k CAUTION ● Make sure you do not cut the thread completely, and ...and cause the needle to the right. i While holding the end of the thread, gently j press the foot controller or press (start/ stop button) (for models equipped with the start /stop button cannot be wound cleanly. Put the bobbin onto the bobbin winder shaft h and slide the bobbin winder shaft to...
Users Manual - English
Page 20
... 15). a Sewing speed controller Press the foot controller or press (start/ m stop button) (for models equipped with the start/stop button) to start /stop button) (for models equipped with the sewing speed controller). this is turned after winding the thread around the bobbin five or six...The needle bar does not move when you slide the bobbin winding shaft to its p original position (for models equipped with the start . 1 2 a Wound evenly b Wound poorly ■ For models equipped with the fast bobbin winding system Place the bobbin on the shaft fits into the notch in "Winding...
... 15). a Sewing speed controller Press the foot controller or press (start/ m stop button) (for models equipped with the start/stop button) to start /stop button) (for models equipped with the sewing speed controller). this is turned after winding the thread around the bobbin five or six...The needle bar does not move when you slide the bobbin winding shaft to its p original position (for models equipped with the start . 1 2 a Wound evenly b Wound poorly ■ For models equipped with the fast bobbin winding system Place the bobbin on the shaft fits into the notch in "Winding...
Users Manual - English
Page 21
...the foot controller is cut the thread as described. g Press the foot controller or press (start/ h stop button) (for models equipped with the start /stop button) (for models equipped with the sewing speed controller). When the bobbin begins spinning slowly, take i your foot off the foot controller or press... the bobbin thread starts to start /stop button) to run out. Slide the sewing speed controller back to start sewing (only for models equipped with the sewing speed controller). Note ● If the sewing machine is to be operated using the cutter built into the slit...
...the foot controller is cut the thread as described. g Press the foot controller or press (start/ h stop button) (for models equipped with the start /stop button) (for models equipped with the sewing speed controller). When the bobbin begins spinning slowly, take i your foot off the foot controller or press... the bobbin thread starts to start /stop button) to run out. Slide the sewing speed controller back to start sewing (only for models equipped with the sewing speed controller). Note ● If the sewing machine is to be operated using the cutter built into the slit...
Users Manual - English
Page 22
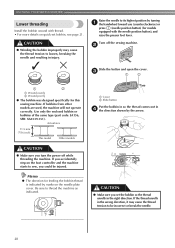
...the needle. 20 Raise the needle to its highest position by turning a the handwheel toward you (counterclockwise) or press (needle position button) (for models equipped with thread. • For more details on quick-set the bobbin so the thread unrolls in the wrong direction, it may cause the thread... sure you turn the power off the sewing machine. If the thread unrolls in the right direction. Actual size 11.5 mm (7/16 inch) This model Other models CAUTION ● Make sure you set bobbin, see page 21. a Cover b Slide button Put the bobbin in so the thread comes out in...
...the needle. 20 Raise the needle to its highest position by turning a the handwheel toward you (counterclockwise) or press (needle position button) (for models equipped with thread. • For more details on quick-set the bobbin so the thread unrolls in the wrong direction, it may cause the thread... sure you turn the power off the sewing machine. If the thread unrolls in the right direction. Actual size 11.5 mm (7/16 inch) This model Other models CAUTION ● Make sure you set bobbin, see page 21. a Cover b Slide button Put the bobbin in so the thread comes out in...
Users Manual - English
Page 23
... the slit. • Replace the cover so that the d end of the thread is indicated by the line in the diagram). ■ For models equipped with the quick-set the bobbin so the thread unrolls in f place (see arrow a), and then press lightly on the needle plate cover. ...spring Replace the bobbin cover. Be sure to its highest position by turning a the handwheel toward you set bobbin Memo ● The direction for models • If the thread is not correctly inserted through equipped with the needle position button), and the tension-adjusting spring of the thread, push ...
... the slit. • Replace the cover so that the d end of the thread is indicated by the line in the diagram). ■ For models equipped with the quick-set the bobbin so the thread unrolls in f place (see arrow a), and then press lightly on the needle plate cover. ...spring Replace the bobbin cover. Be sure to its highest position by turning a the handwheel toward you set bobbin Memo ● The direction for models • If the thread is not correctly inserted through equipped with the needle position button), and the tension-adjusting spring of the thread, push ...
Users Manual - English
Page 25
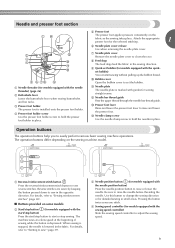
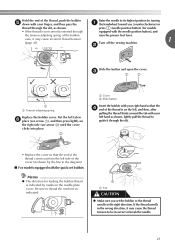
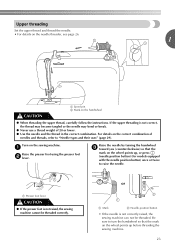
... needle. • For details on the needle threader, see page 26. 1 a Spool pin b Mark on the wheel points up , or press (needle position button) (for models equipped with the needle position button) once or twice to turn the handwheel so that the mark on the sewing machine. If the upper threading...
... needle. • For details on the needle threader, see page 26. 1 a Spool pin b Mark on the wheel points up , or press (needle position button) (for models equipped with the needle position button) once or twice to turn the handwheel so that the mark on the sewing machine. If the upper threading...
Users Manual - English
Page 28
... thread. ● If you incorrectly feed the thread you may cause sewing problems. ■ Using the needle threader (for models equipped with the needle threader). When using the needle threader (for models equipped with a 65/9 home sewing machine needle. However, the needle threader cannot be passed behind the needle bar thread l guide...
... thread. ● If you incorrectly feed the thread you may cause sewing problems. ■ Using the needle threader (for models equipped with the needle threader). When using the needle threader (for models equipped with a 65/9 home sewing machine needle. However, the needle threader cannot be passed behind the needle bar thread l guide...
Users Manual - English
Page 30
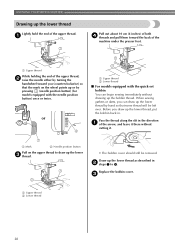
a Upper thread While holding the end of the arrow, and leave it . or a Upper thread b Lower thread ■ For models equipped with the needle position button) once or twice. c a Upper thread b Lower thread 28 a Pull out about 10 cm (4 inches) of both d threads and ... KNOWING YOUR SEWING MACHINE Drawing up the lower thread, put the bobbin back in b steps 1 to draw up or by pressing (needle position button) (for models equipped with the quick-set bobbin You can begin sewing immediately without cutting it there without drawing up the lower thread as described in . Before...
a Upper thread While holding the end of the arrow, and leave it . or a Upper thread b Lower thread ■ For models equipped with the needle position button) once or twice. c a Upper thread b Lower thread 28 a Pull out about 10 cm (4 inches) of both d threads and ... KNOWING YOUR SEWING MACHINE Drawing up the lower thread, put the bobbin back in b steps 1 to draw up or by pressing (needle position button) (for models equipped with the quick-set bobbin You can begin sewing immediately without cutting it there without drawing up the lower thread as described in . Before...
Users Manual - English
Page 32
... used as 65/9 to 100/16 needle, regardless of the fabric or thread. If the combination of the needle on the wheel points up. (With models equipped with thin needles (such as a substitute. ■ Transparent nylon thread Use a 90/14 to 75/11), the needle may bend or break. Do not...
... used as 65/9 to 100/16 needle, regardless of the fabric or thread. If the combination of the needle on the wheel points up. (With models equipped with thin needles (such as a substitute. ■ Transparent nylon thread Use a 90/14 to 75/11), the needle may bend or break. Do not...
Users Manual - English
Page 35
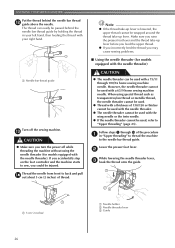
Note Models equipped with a needle threader ● You cannot use the needle threader to raise the needle from the fabric, and then raise the presser foot lever ...
Note Models equipped with a needle threader ● You cannot use the needle threader to raise the needle from the fabric, and then raise the presser foot lever ...
Users Manual - English
Page 36
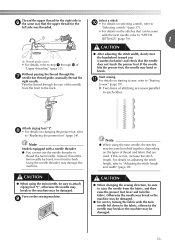
... the machine starts sewing. Raise the needle by turning the handwheel a toward you leave the power on and step on the wheel points up. (With models equipped with this machine. a Presser foot lever 34
... the machine starts sewing. Raise the needle by turning the handwheel a toward you leave the power on and step on the wheel points up. (With models equipped with this machine. a Presser foot lever 34


