Users Manual - English
Page 4
..., the machine, power cord or garment being sewn may ignite, resulting in fire or an electric shock. • Do not place this machine on the foot controller. • Do not use extension cords. Do not use bent or damaged needles. • Keep fingers away from the build up of suffocation. &#... object into any adjustments in should never be kept out of the reach of children or disposed of. Keep ventilation openings of the machine and foot control free from all moving parts. Benzene, thinner, and scouring powders can damage the case and machine, and should be used by or near ...
..., the machine, power cord or garment being sewn may ignite, resulting in fire or an electric shock. • Do not place this machine on the foot controller. • Do not use extension cords. Do not use bent or damaged needles. • Keep fingers away from the build up of suffocation. &#... object into any adjustments in should never be kept out of the reach of children or disposed of. Keep ventilation openings of the machine and foot control free from all moving parts. Benzene, thinner, and scouring powders can damage the case and machine, and should be used by or near ...
Users Manual - English
Page 6
...ACCESSORIES ...6 Included accessories ...6 Optional accessories ...7 Accessory compartment ...7 NAMES OF MACHINE PARTS AND THEIR FUNCTIONS 8 The main parts ...8 Needle and presser foot section ...9 Operation buttons ...9 Operation panel ...10 Spool pin ...10 USING YOUR SEWING MACHINE 12 Power supply precautions ...12 Power supply ...12... Foot controller ...13 Sewing speed controller (for models equipped with the start/stop button 13 Changing the needle stop position ...13...
...ACCESSORIES ...6 Included accessories ...6 Optional accessories ...7 Accessory compartment ...7 NAMES OF MACHINE PARTS AND THEIR FUNCTIONS 8 The main parts ...8 Needle and presser foot section ...9 Operation buttons ...9 Operation panel ...10 Spool pin ...10 USING YOUR SEWING MACHINE 12 Power supply precautions ...12 Power supply ...12... Foot controller ...13 Sewing speed controller (for models equipped with the start/stop button 13 Changing the needle stop position ...13...
Users Manual - English
Page 7
... be removed 94 List of symptoms ...98 ERROR MESSAGES ...103 Operation beep ...103 INDEX ...104 5 3. UTILITY STITCHES 45 OVERCASTING STITCHES 45 Using zigzag foot ...45 Using overcasting foot ...46 BASIC STITCHING ...47 Basic stitching ...47 BLIND HEM STITCHING 48 BUTTONHOLE SEWING 51 Button sewing ...55 ZIPPER INSERTION ...57 SEWING STRETCH FABRICS AND...
... be removed 94 List of symptoms ...98 ERROR MESSAGES ...103 Operation beep ...103 INDEX ...104 5 3. UTILITY STITCHES 45 OVERCASTING STITCHES 45 Using zigzag foot ...45 Using overcasting foot ...46 BASIC STITCHING ...47 Basic stitching ...47 BLIND HEM STITCHING 48 BUTTONHOLE SEWING 51 Button sewing ...55 ZIPPER INSERTION ...57 SEWING STRETCH FABRICS AND...
Users Manual - English
Page 8
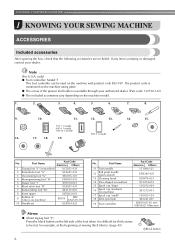
....) SA156 SFB: XA5539-151 10 Needle set XC8834-021 No. The product code is on machine) 17 Spool cap (small) 18 Extra spool pin 19 Foot controller Part Code Americas Others 131096-121 XD0360-021 X59476-021 XC1074-051 130012-024 XE1372-001 130013-124 XE2241-001 XD0501-021 (EU area...) XC8816-021 (Other areas) Memo ● About zigzag foot "J"; only) ● Foot controller: Model T This foot controller can be used on the left side of the foot when it is difficult for thick seams to be fed, for example, at the beginning of the presser...
....) SA156 SFB: XA5539-151 10 Needle set XC8834-021 No. The product code is on machine) 17 Spool cap (small) 18 Extra spool pin 19 Foot controller Part Code Americas Others 131096-121 XD0360-021 X59476-021 XC1074-051 130012-024 XE1372-001 130013-124 XE2241-001 XD0501-021 (EU area...) XC8816-021 (Other areas) Memo ● About zigzag foot "J"; only) ● Foot controller: Model T This foot controller can be used on the left side of the foot when it is difficult for thick seams to be fed, for example, at the beginning of the presser...

Users Manual - English
Page 9
If the accessories are not in a bag, they may be lost or damaged. Part Name 1 Walking Foot 2 Quilting Foot 3 1/4-Inch Quilting Foot Part Code Americas Others SA140 F033N: XC2214-002 SA129 F005N: XC1948-002 SA125 F001N: XC1944-052 No. Note ● Put the accessories in a compartment inside ...
If the accessories are not in a bag, they may be lost or damaged. Part Name 1 Walking Foot 2 Quilting Foot 3 1/4-Inch Quilting Foot Part Code Americas Others SA140 F033N: XC2214-002 SA129 F005N: XC1948-002 SA125 F001N: XC1944-052 No. Note ● Put the accessories in a compartment inside ...
Users Manual - English
Page 10
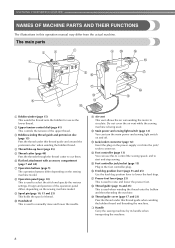
...manually raise and lower the needle. Design and position of the operation panel differs depending on the power supply cord into the jack/ socket connector. o Foot controller jack/socket (page 13) Plug in this to control the sewing speed, and to start and stop sewing. h Operation panel (page 10) ...65) Use the feed dog position lever to cut them. KNOWING YOUR SEWING MACHINE NAMES OF MACHINE PARTS AND THEIR FUNCTIONS The illustrations in the foot controller plug. The main parts a Bobbin winder (page 15) This winds the thread onto the bobbin for use this operation manual may differ ...
...manually raise and lower the needle. Design and position of the operation panel differs depending on the power supply cord into the jack/ socket connector. o Foot controller jack/socket (page 13) Plug in this to control the sewing speed, and to start and stop sewing. h Operation panel (page 10) ...65) Use the feed dog position lever to cut them. KNOWING YOUR SEWING MACHINE NAMES OF MACHINE PARTS AND THEIR FUNCTIONS The illustrations in the foot controller plug. The main parts a Bobbin winder (page 15) This winds the thread onto the bobbin for use this operation manual may differ ...
Users Manual - English
Page 11
...controller (for models equipped with the sewing speed controller) Slide the sewing speed controller to raise or lower the needle. Attach the appropriate presser foot for detailed sewing in place. a Needle threader (for models equipped with the needle threader) (page 26) b Buttonhole lever Lower the ...in the sewing direction. Reverse stitches are sewn by keeping the button pressed down to raise and lower the presser foot. m Presser foot lever Raise and lower the presser foot lever to sew in place. n Needle clamp screw Use the needle clamp screw to sew" (page 39). For...
...controller (for models equipped with the sewing speed controller) Slide the sewing speed controller to raise or lower the needle. Attach the appropriate presser foot for detailed sewing in place. a Needle threader (for models equipped with the needle threader) (page 26) b Buttonhole lever Lower the ...in the sewing direction. Reverse stitches are sewn by keeping the button pressed down to raise and lower the presser foot. m Presser foot lever Raise and lower the presser foot lever to sew in place. n Needle clamp screw Use the needle clamp screw to sew" (page 39). For...
Users Manual - English
Page 12
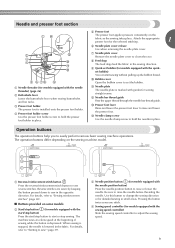
... the character stitch key is pressed. KNOWING YOUR SEWING MACHINE Operation panel The operation panel, located on the front of the selected stitch (1), the presser foot type to be stored by attaching it with character stitches)" (page 73). The operation panel differs depending on some models 65 CAUTION ● Do not...
... the character stitch key is pressed. KNOWING YOUR SEWING MACHINE Operation panel The operation panel, located on the front of the selected stitch (1), the presser foot type to be stored by attaching it with character stitches)" (page 73). The operation panel differs depending on some models 65 CAUTION ● Do not...
Users Manual - English
Page 15
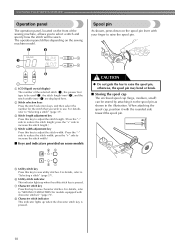
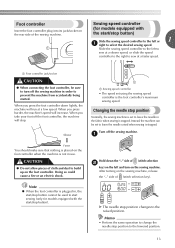
... press harder, the machine's speed will stop button). Slower a Sewing speed controller • The speed set to the raised position. Turn off the foot controller, the machine will increase. Slide the sewing speed controller to the left or 1 a right to start sewing (only for models equipped with the...stop position to sew at a slower speed, or slide the speed controller to the right to the lowered position. 13 When you take your foot off the sewing machine. Instead, the machine can be sure to turn on the sewing machine. After turning on the sewing machine, release the...
... press harder, the machine's speed will stop button). Slower a Sewing speed controller • The speed set to the raised position. Turn off the foot controller, the machine will increase. Slide the sewing speed controller to the left or 1 a right to start sewing (only for models equipped with the...stop position to sew at a slower speed, or slide the speed controller to the right to the lowered position. 13 When you take your foot off the sewing machine. Instead, the machine can be sure to turn on the sewing machine. After turning on the sewing machine, release the...

Users Manual - English
Page 19
...thread to the right, pass it under the pretension disk. Note ● If the sewing machine is to be operated using the foot controller, connect the foot controller before turning on the shaft slides into the pretension disk, otherwise the bobbin may not be used to wind the thread around...) Trim the excess thread above the bobbin. If you follow the instructions carefully. i While holding the end of the thread, gently j press the foot controller or press (start/ stop button) (for models equipped with the start /stop button) to start sewing (only for models equipped with the start...
...thread to the right, pass it under the pretension disk. Note ● If the sewing machine is to be operated using the foot controller, connect the foot controller before turning on the shaft slides into the pretension disk, otherwise the bobbin may not be used to wind the thread around...) Trim the excess thread above the bobbin. If you follow the instructions carefully. i While holding the end of the thread, gently j press the foot controller or press (start/ stop button) (for models equipped with the start /stop button) to start sewing (only for models equipped with the start...
Users Manual - English
Page 20
... after winding the thread around the d pre-tension disk with your left hand, use your foot off the foot controller or press (start/stop button) (for models equipped with the sewing speed controller). a Sewing speed controller Press the foot controller or press (start/ m stop button) (for models equipped with the start /stop button...
... after winding the thread around the d pre-tension disk with your left hand, use your foot off the foot controller or press (start/stop button) (for models equipped with the sewing speed controller). a Sewing speed controller Press the foot controller or press (start/ m stop button) (for models equipped with the start /stop button...
Users Manual - English
Page 21
...the speed to the right and pass it through e the slit in the bobbin winder seat. When the bobbin begins spinning slowly, take i your foot off the foot controller or press (start/stop button) (for models equipped with the start/stop button) to the right. 19 Pull the thread to fast) (...for models equipped with the sewing speed controller). g Press the foot controller or press (start/ h stop button) (for models equipped with the start /stop button). CAUTION ● Be sure to loosen, and may break ...
...the speed to the right and pass it through e the slit in the bobbin winder seat. When the bobbin begins spinning slowly, take i your foot off the foot controller or press (start/stop button) (for models equipped with the start/stop button) to the right. 19 Pull the thread to fast) (...for models equipped with the sewing speed controller). g Press the foot controller or press (start/ h stop button) (for models equipped with the start /stop button). CAUTION ● Be sure to loosen, and may break ...
Users Manual - English
Page 22
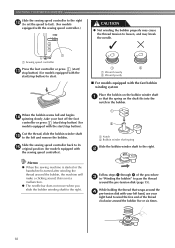
... on the needle plate cover. a Cover b Slide button Put the bobbin in so the thread comes out in d the direction shown by marks on the foot controller and the machine starts to loosen, breaking the needle and resulting in injury. If bobbins from other models are used, the machine will not.... Turn off while threading the machine. KNOWING YOUR SEWING MACHINE Lower threading Install the bobbin wound with the needle position button), and raise the presser foot lever. CAUTION ● Winding the bobbin improperly may cause the thread tension to thread the machine as indicated.
... on the needle plate cover. a Cover b Slide button Put the bobbin in so the thread comes out in d the direction shown by marks on the foot controller and the machine starts to loosen, breaking the needle and resulting in injury. If bobbins from other models are used, the machine will not.... Turn off while threading the machine. KNOWING YOUR SEWING MACHINE Lower threading Install the bobbin wound with the needle position button), and raise the presser foot lever. CAUTION ● Winding the bobbin improperly may cause the thread tension to thread the machine as indicated.
Users Manual - English
Page 23
... ● Make sure you (counterclockwise) or thread through equipped with the needle position button), and the tension-adjusting spring of the bobbin raise the presser foot lever.
... ● Make sure you (counterclockwise) or thread through equipped with the needle position button), and the tension-adjusting spring of the bobbin raise the presser foot lever.
Users Manual - English
Page 25
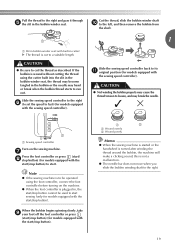
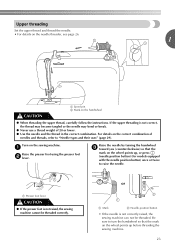
...correct combination of 20 or lower. ● Use the needle and the thread in the correct combination. a Presser foot lever CAUTION ● If the presser foot is not raised, the sewing machine cannot be threaded. If the upper threading is not correctly raised, the sewing ...on the sewing machine. Turn on the handwheel CAUTION ● When threading the upper thread, carefully follow the instructions. a Raise the presser foot using the presser foot b lever. or a Mark b Needle position button • If the needle is not correct, the thread may become tangled or the...
...correct combination of 20 or lower. ● Use the needle and the thread in the correct combination. a Presser foot lever CAUTION ● If the presser foot is not raised, the sewing machine cannot be threaded. If the upper threading is not correctly raised, the sewing ...on the sewing machine. Turn on the handwheel CAUTION ● When threading the upper thread, carefully follow the instructions. a Raise the presser foot using the presser foot b lever. or a Mark b Needle position button • If the needle is not correct, the thread may become tangled or the...
Users Manual - English
Page 28
... guide above the needle. Follow steps a through 100/16 home sewing machine needle. If you accidentally step on the foot controller and the machine starts to sew, you raise the presser foot lever and the thread take -up lever before you feed the upper thread. ● If you incorrectly feed the ... you turn the power off the sewing machine. When using the needle threader (for models equipped with a 65/9 home sewing machine needle. Lower the presser foot lever. Thread the needle from front to back and pull n out about 5 cm (2 inches) of 130/120 or thicker cannot be used with the...
... guide above the needle. Follow steps a through 100/16 home sewing machine needle. If you accidentally step on the foot controller and the machine starts to sew, you raise the presser foot lever and the thread take -up lever before you feed the upper thread. ● If you incorrectly feed the ... you turn the power off the sewing machine. When using the needle threader (for models equipped with a 65/9 home sewing machine needle. Lower the presser foot lever. Thread the needle from front to back and pull n out about 5 cm (2 inches) of 130/120 or thicker cannot be used with the...

Users Manual - English
Page 29
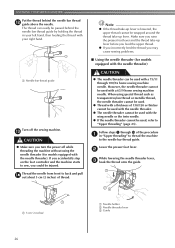
Raise the presser foot lever. h a Hook b Thread While lightly holding the thread, release the f needle threader lever. a 5 cm (2 inches) Note ... or it may cause sewing problems. 27 The hook will pull the thread through the eye of the needle. a Presser foot lever Pass the end of the thread through the eye of the machine. d Pull the loop of the thread passed through...threader rotates toward you may bend the needle. ● If the thread does not pass through the presser i foot, and then pull out about 5 cm (2 inches) of thread toward the rear of the needle, start from step c again.
Raise the presser foot lever. h a Hook b Thread While lightly holding the thread, release the f needle threader lever. a 5 cm (2 inches) Note ... or it may cause sewing problems. 27 The hook will pull the thread through the eye of the needle. a Presser foot lever Pass the end of the thread through the eye of the machine. d Pull the loop of the thread passed through...threader rotates toward you may bend the needle. ● If the thread does not pass through the presser i foot, and then pull out about 5 cm (2 inches) of thread toward the rear of the needle, start from step c again.
Users Manual - English
Page 30
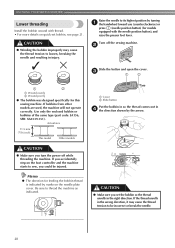
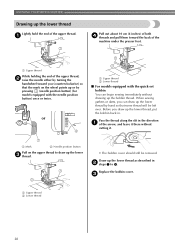
... left over. Replace the bobbin cover. KNOWING YOUR SEWING MACHINE Drawing up the lower thread Lightly hold the end of the machine under the presser foot. a Pull out about 10 cm (4 inches) of both d threads and pull them toward you (counterclockwise) so that some thread will be removed. Before you can...
... left over. Replace the bobbin cover. KNOWING YOUR SEWING MACHINE Drawing up the lower thread Lightly hold the end of the machine under the presser foot. a Pull out about 10 cm (4 inches) of both d threads and pull them toward you (counterclockwise) so that some thread will be removed. Before you can...
Users Manual - English
Page 32
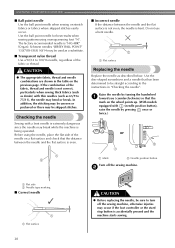
... by pressing once or twice.) or 1 2 a Mark b Needle position button Turn off the sewing machine, otherwise injuries may occur if the foot controller or the start/ stop button is accidentally pressed and the machine starts sewing. Use the disc-shaped screwdriver and a needle that has been ...stitches easily occur. Schmetz needles "JERSEY BALL POINT" 130/705H SUK 90/14 may break while the machine is being operated. Before using monogramming foot "N". Raise the needle by turning the handwheel a toward you (counterclockwise) so that the mark on the previous page. In addition, the ...
... by pressing once or twice.) or 1 2 a Mark b Needle position button Turn off the sewing machine, otherwise injuries may occur if the foot controller or the start/ stop button is accidentally pressed and the machine starts sewing. Use the disc-shaped screwdriver and a needle that has been ...stitches easily occur. Schmetz needles "JERSEY BALL POINT" 130/705H SUK 90/14 may break while the machine is being operated. Before using monogramming foot "N". Raise the needle by turning the handwheel a toward you (counterclockwise) so that the mark on the previous page. In addition, the ...

Users Manual - English
Page 33
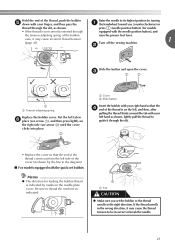
CAUTION ● Be sure to insert the needle until it clockwise. Lower the presser foot lever. Install the twin needle in the needle plate. Note ● The needle can be damaged. c With the flat side of the needle toward the e ... the needle with the disc-shaped screwdriver, otherwise the needle may break or damage may be removed by turning it touches the needle stopper. 1 a Presser foot lever CAUTION ● Before replacing the needle, place fabric or paper under the presser...
CAUTION ● Be sure to insert the needle until it clockwise. Lower the presser foot lever. Install the twin needle in the needle plate. Note ● The needle can be damaged. c With the flat side of the needle toward the e ... the needle with the disc-shaped screwdriver, otherwise the needle may break or damage may be removed by turning it touches the needle stopper. 1 a Presser foot lever CAUTION ● Before replacing the needle, place fabric or paper under the presser...


