Users Manual - English
Page 3
... outlet immediately after using the machine and immediately unplug the power cord. • When transporting the machine, be sure to carry it by any other part may injure your machine if the power is cut. 3 Never operate this manual, or if you are leaving the machine unattended. Do not pull on...
... outlet immediately after using the machine and immediately unplug the power cord. • When transporting the machine, be sure to carry it by any other part may injure your machine if the power is cut. 3 Never operate this manual, or if you are leaving the machine unattended. Do not pull on...
Users Manual - English
Page 4
Keep ventilation openings of the machine and foot control free from all moving parts. otherwise, the machine, power cord or garment being administered. • Do not use the machine near a heat source, such as it could cause the needle .... Benzene, thinner, and scouring powders can damage the case and machine, and should be used by or near a space heater, iron, halogen lamp, or other parts to assure correct installation. 2 Special care is used . • Always consult the operation manual when replacing or installing any adjustments in the needle area. •...
Keep ventilation openings of the machine and foot control free from all moving parts. otherwise, the machine, power cord or garment being administered. • Do not use the machine near a heat source, such as it could cause the needle .... Benzene, thinner, and scouring powders can damage the case and machine, and should be used by or near a space heater, iron, halogen lamp, or other parts to assure correct installation. 2 Special care is used . • Always consult the operation manual when replacing or installing any adjustments in the needle area. •...
Users Manual - English
Page 6
... Sewing stretch fabrics ...44 Stitching cylindrical pieces ...44 4 KNOWING YOUR SEWING MACHINE 6 ACCESSORIES ...6 Included accessories ...6 Optional accessories ...7 Accessory compartment ...7 NAMES OF MACHINE PARTS AND THEIR FUNCTIONS 8 The main parts ...8 Needle and presser foot section ...9 Operation buttons ...9 Operation panel ...10 Spool pin ...10 USING YOUR SEWING MACHINE 12 Power supply precautions ...12 Power...
... Sewing stretch fabrics ...44 Stitching cylindrical pieces ...44 4 KNOWING YOUR SEWING MACHINE 6 ACCESSORIES ...6 Included accessories ...6 Optional accessories ...7 Accessory compartment ...7 NAMES OF MACHINE PARTS AND THEIR FUNCTIONS 8 The main parts ...8 Needle and presser foot section ...9 Operation buttons ...9 Operation panel ...10 Spool pin ...10 USING YOUR SEWING MACHINE 12 Power supply precautions ...12 Power...
Users Manual - English
Page 8
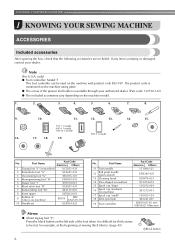
... 130012-024 XE1372-001 130013-124 XE2241-001 XD0501-021 (EU area) XC8816-021 (Other areas) Memo ● About zigzag foot "J"; Part Name Part Code Americas Others 1 Zigzag foot "J" (on machine) XC3021-031 2 Buttonhole foot "A" XC2691-033 3 Overcasting foot "G" XE6305-101 4 ... foot "R" XC4051-031 7 Button fitting foot "M" XE2137-001 8 Seam ripper XZ5082-001 9 Bobbin (4) (One is missing or damaged, contact your authorized dealer. (Part code: 132730-122) ● The included accessories vary depending on the machine model. 1. 2. 3. 4. 5. 6. 7. 8. 9. 10. 11. 12. 13....
... 130012-024 XE1372-001 130013-124 XE2241-001 XD0501-021 (EU area) XC8816-021 (Other areas) Memo ● About zigzag foot "J"; Part Name Part Code Americas Others 1 Zigzag foot "J" (on machine) XC3021-031 2 Buttonhole foot "A" XC2691-033 3 Overcasting foot "G" XE6305-101 4 ... foot "R" XC4051-031 7 Button fitting foot "M" XE2137-001 8 Seam ripper XZ5082-001 9 Bobbin (4) (One is missing or damaged, contact your authorized dealer. (Part code: 132730-122) ● The included accessories vary depending on the machine model. 1. 2. 3. 4. 5. 6. 7. 8. 9. 10. 11. 12. 13....

Users Manual - English
Page 9
... Foot 2 Quilting Foot 3 1/4-Inch Quilting Foot Part Code Americas Others SA140 F033N: XC2214-002 SA129 F005N: XC1948-002 SA125 F001N: XC1944-052 No. a Flat bed attachment b Storage compartment 7 Optional accessories ...not in a compartment inside the compartment. Depending on the model you purchased, the following are stored in a bag, they may be purchased separately. Part Name 4 Quilting guide 5 Eyelet punch Part Code Americas Others SA132 F016N: XC2215-002 XZ5051-001 Accessory compartment The accessories are available as optional accessories to open it.
... Foot 2 Quilting Foot 3 1/4-Inch Quilting Foot Part Code Americas Others SA140 F033N: XC2214-002 SA129 F005N: XC1948-002 SA125 F001N: XC1944-052 No. a Flat bed attachment b Storage compartment 7 Optional accessories ...not in a compartment inside the compartment. Depending on the model you purchased, the following are stored in a bag, they may be purchased separately. Part Name 4 Quilting guide 5 Eyelet punch Part Code Americas Others SA132 F016N: XC2215-002 XZ5051-001 Accessory compartment The accessories are available as optional accessories to open it.
Users Manual - English
Page 10
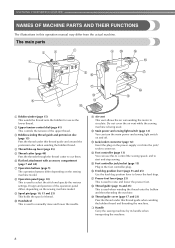
... 23) Pass the thread under this to control the sewing speed, and to select the stitch and specify the various settings. The main parts a Bobbin winder (page 15) This winds the thread onto the bobbin for use this thread guide and around the pretension disc when winding...the jack/ socket connector. m Jack/socket connector (page 12) Insert the plug on the sewing machine model. KNOWING YOUR SEWING MACHINE NAMES OF MACHINE PARTS AND THEIR FUNCTIONS The illustrations in the foot controller plug. b Upper tension-control dial (page 41) This controls the tension of thread. h Operation ...
... 23) Pass the thread under this to control the sewing speed, and to select the stitch and specify the various settings. The main parts a Bobbin winder (page 15) This winds the thread onto the bobbin for use this thread guide and around the pretension disc when winding...the jack/ socket connector. m Jack/socket connector (page 12) Insert the plug on the sewing machine model. KNOWING YOUR SEWING MACHINE NAMES OF MACHINE PARTS AND THEIR FUNCTIONS The illustrations in the foot controller plug. b Upper tension-control dial (page 41) This controls the tension of thread. h Operation ...

Users Manual - English
Page 17
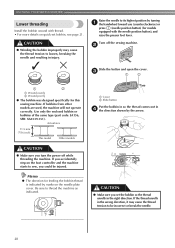
...the spool pin, otherwise, the spool pin may become tangled if the bobbin winder is used without raising the spool pin. 15 Only use bobbins (part code: SA156, SFB: XA5539-151) that have been designed for this sewing machine. Actual size 11.5 mm (7/16 inch) This model Other ... Bobbin-winding thread guide b Bobbin winder shaft c Bobbin CAUTION ● Only use the bobbin that comes with this machine or bobbins of the same type (part code: SA156, SFB: XA5539-151). X The spool pin swings up. THREADING THE MACHINE Winding the bobbin This section describes how to wind the thread onto...
...the spool pin, otherwise, the spool pin may become tangled if the bobbin winder is used without raising the spool pin. 15 Only use bobbins (part code: SA156, SFB: XA5539-151) that have been designed for this sewing machine. Actual size 11.5 mm (7/16 inch) This model Other ... Bobbin-winding thread guide b Bobbin winder shaft c Bobbin CAUTION ● Only use the bobbin that comes with this machine or bobbins of the same type (part code: SA156, SFB: XA5539-151). X The spool pin swings up. THREADING THE MACHINE Winding the bobbin This section describes how to wind the thread onto...
Users Manual - English
Page 22
...; For more details on quick-set the bobbin so the thread unrolls in injury. Use only the enclosed bobbin or bobbins of the same type (part code: SA156, SFB: XA5539-151). Actual size 11.5 mm (7/16 inch) This model Other models CAUTION ● Make sure you could be incorrect or break...
...; For more details on quick-set the bobbin so the thread unrolls in injury. Use only the enclosed bobbin or bobbins of the same type (part code: SA156, SFB: XA5539-151). Actual size 11.5 mm (7/16 inch) This model Other models CAUTION ● Make sure you could be incorrect or break...

Users Manual - English
Page 33
... the same way. a Disc-shaped screwdriver b Needle clamp screw • Do not apply strong force when loosening or tightening the needle clamp screw, otherwise certain parts of the machine, insert the needle until it touches the needle stopper and securely tighten the needle clamp screw with your left hand, and then...
... the same way. a Disc-shaped screwdriver b Needle clamp screw • Do not apply strong force when loosening or tightening the needle clamp screw, otherwise certain parts of the machine, insert the needle until it touches the needle stopper and securely tighten the needle clamp screw with your left hand, and then...
Users Manual - English
Page 34
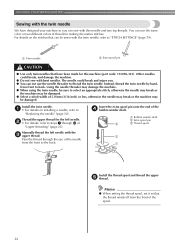
Other needles could break and injure you can sew with this machine (part code: 131096-121). Install the twin needle. b • For details, refer to steps a through the eye of thread for making decorative stitches. Insert the extra ...
Other needles could break and injure you can sew with this machine (part code: 131096-121). Install the twin needle. b • For details, refer to steps a through the eye of thread for making decorative stitches. Insert the extra ...
Users Manual - English
Page 38
... the needle location. Attach the presser foot appropriate for the area to sew" (page 39). 36 In addition, keep your hands away from all moving parts such as the needle and handwheel, otherwise injuries may occur. ● Do not pull or push the fabric too hard while sewing, otherwise injuries may...
... the needle location. Attach the presser foot appropriate for the area to sew" (page 39). 36 In addition, keep your hands away from all moving parts such as the needle and handwheel, otherwise injuries may occur. ● Do not pull or push the fabric too hard while sewing, otherwise injuries may...
Users Manual - English
Page 46
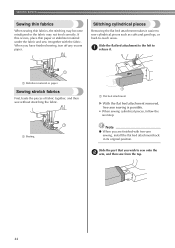
... bed attachment to the left to a release it together with free-arm sewing, install the flat bed attachment back in its original position. Slide the part that you have finished sewing, tear off any excess paper. When you wish to -reach areas. a Basting a Flat bed attachment X With the flat bed attachment...
... bed attachment to the left to a release it together with free-arm sewing, install the flat bed attachment back in its original position. Slide the part that you have finished sewing, tear off any excess paper. When you wish to -reach areas. a Basting a Flat bed attachment X With the flat bed attachment...
Users Manual - English
Page 51
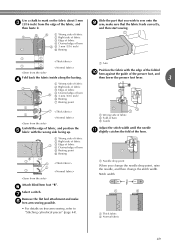
..., and then baste it. 3 5 6 a Wrong side of fabric b Right side of fabric c Edge of fabric d Desired edge of hem 4 e 5 mm (3/16 inch) 1 2 f Basting Slide the part that you change the needle drop point, raise the needle, and then change the stitch width. a Wrong side of fabric b Fold of hem c Guide Adjust...
..., and then baste it. 3 5 6 a Wrong side of fabric b Right side of fabric c Edge of fabric d Desired edge of hem 4 e 5 mm (3/16 inch) 1 2 f Basting Slide the part that you change the needle drop point, raise the needle, and then change the stitch width. a Wrong side of fabric b Fold of hem c Guide Adjust...
Users Manual - English
Page 54
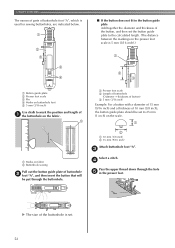
... of a the buttonhole on the fabric. 2 1 a Marks on the scale. 1 2 a 10 mm (3/8 inch) b 15 mm (9/16 inch) Attach buttonhole foot "A". UTILITY STITCHES The names of parts of buttonhole foot "A", which is used for sewing buttonholes, are indicated below. 1 2 5 ■ If the button does not fit in the presser foot. c Select a stitch.
... of a the buttonhole on the fabric. 2 1 a Marks on the scale. 1 2 a 10 mm (3/8 inch) b 15 mm (9/16 inch) Attach buttonhole foot "A". UTILITY STITCHES The names of parts of buttonhole foot "A", which is used for sewing buttonholes, are indicated below. 1 2 5 ■ If the button does not fit in the presser foot. c Select a stitch.

Users Manual - English
Page 56
.... Use a handsewing needle to pull the gimp g thread to the wrong side of the buttonhole k stitching to prevent the stitching from being cut the middle part of the h gimp thread remaining at the end of the fabric, and then tie it. With a seam ripper, cut , and then use a commercial eyelet ... other protective sheet under the fabric before punching the hole in the rounded end of the gimp thread. 54 Hook the gimp thread onto the part of a buttonhole foot "A" shown in the cutting path, otherwise injuries may result if the seam ripper slips. c Adjust the stitch width to cut open the...
.... Use a handsewing needle to pull the gimp g thread to the wrong side of the buttonhole k stitching to prevent the stitching from being cut the middle part of the h gimp thread remaining at the end of the fabric, and then tie it. With a seam ripper, cut , and then use a commercial eyelet ... other protective sheet under the fabric before punching the hole in the rounded end of the gimp thread. 54 Hook the gimp thread onto the part of a buttonhole foot "A" shown in the cutting path, otherwise injuries may result if the seam ripper slips. c Adjust the stitch width to cut open the...
Users Manual - English
Page 89
... performance may break. 87 Insert the bobbin case so that you fit the bobbin case properly, otherwise the needle may suffer. For a new bobbin case (part code: XE7560-001), contact your nearest authorized service center. ● Make sure that the S mark on g the bobbin case aligns with the z mark on the...
... performance may break. 87 Insert the bobbin case so that you fit the bobbin case properly, otherwise the needle may suffer. For a new bobbin case (part code: XE7560-001), contact your nearest authorized service center. ● Make sure that the S mark on g the bobbin case aligns with the z mark on the...

Users Manual - English
Page 96
... case. a Bobbin case Use the cleaning brush or a vacuum cleaner to clean the race. Continue with step p. a Needle plate cover release b Needle plate cover (front part) 94 a Turn off the sewing machine. e If the fabric can be completed according to the procedure, instead of the fabric, and then remove the needle...
... case. a Bobbin case Use the cleaning brush or a vacuum cleaner to clean the race. Continue with step p. a Needle plate cover release b Needle plate cover (front part) 94 a Turn off the sewing machine. e If the fabric can be completed according to the procedure, instead of the fabric, and then remove the needle...

Users Manual - English
Page 98
... may break or sewing performance may suffer. Bent needles can easily break, possibly resulting in "Cleaning the race" (page 88). 96 For a new bobbin case (part code: XE7560-001), contact your nearest authorized service center. ● Make sure that you fit the bobbin case properly, otherwise the needle may have been...
... may break or sewing performance may suffer. Bent needles can easily break, possibly resulting in "Cleaning the race" (page 88). 96 For a new bobbin case (part code: XE7560-001), contact your nearest authorized service center. ● Make sure that you fit the bobbin case properly, otherwise the needle may have been...
Users Manual - English
Page 106
... controller 6 13, 39 free-motion quilting 64 H , handwheel 8 39 heirloom stitching 72 hook-and-loop fastener 43 J joining 71 , joining stitch 61 68 104 M main parts 8 main power switch 12 , monogramming 70 72 N needle 29 , needle bar thread guide 9 26 , needle clamp screw 9 31 needle plate 9 , needle plate cover 9 86 needle...
... controller 6 13, 39 free-motion quilting 64 H , handwheel 8 39 heirloom stitching 72 hook-and-loop fastener 43 J joining 71 , joining stitch 61 68 104 M main parts 8 main power switch 12 , monogramming 70 72 N needle 29 , needle bar thread guide 9 26 , needle clamp screw 9 31 needle plate 9 , needle plate cover 9 86 needle...

