Users Manual - English
Page 7
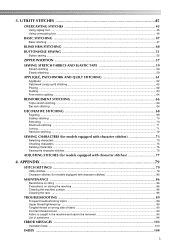
... (for models equipped with character stitches 85 MAINTENANCE ...86 Restrictions on oiling ...86 Precautions on storing the machine ...86 Cleaning the machine surface ...86 Cleaning the race ...86 TROUBLESHOOTING ...89 Frequent troubleshooting topics ...89 Upper thread tightened up ...... SEWING 51 Button sewing ...55 ZIPPER INSERTION ...57 SEWING STRETCH FABRICS AND ELASTIC TAPE 59 Stretch stitching ...59 Elastic attaching ...59 APPLIQUÉ, PATCHWORK AND QUILT STITCHING 61 Appliqués ...62 Patchwork (crazy quilt) stitching ...62 Piecing ...62 Quilting ...63 Free-motion quilting ...
... (for models equipped with character stitches 85 MAINTENANCE ...86 Restrictions on oiling ...86 Precautions on storing the machine ...86 Cleaning the machine surface ...86 Cleaning the race ...86 TROUBLESHOOTING ...89 Frequent troubleshooting topics ...89 Upper thread tightened up ...... SEWING 51 Button sewing ...55 ZIPPER INSERTION ...57 SEWING STRETCH FABRICS AND ELASTIC TAPE 59 Stretch stitching ...59 Elastic attaching ...59 APPLIQUÉ, PATCHWORK AND QUILT STITCHING 61 Appliqués ...62 Patchwork (crazy quilt) stitching ...62 Piecing ...62 Quilting ...63 Free-motion quilting ...
Users Manual - English
Page 37
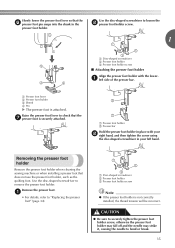
... holder in place with the lowera left hand. Remove the presser foot. Removing the presser foot holder Remove the presser foot holder when cleaning the sewing machine or when installing a presser foot that the g presser foot is securely attached. Use the disc-shaped screwdriver to bend or break. 35 Slowly lower the... disc-shaped screwdriver in the presser foot holder. a • For details, refer to check that does not use the presser foot holder, such as the quilting foot. Raise the presser foot lever to "Replacing the presser foot" (page 34).
... holder in place with the lowera left hand. Remove the presser foot. Removing the presser foot holder Remove the presser foot holder when cleaning the sewing machine or when installing a presser foot that the g presser foot is securely attached. Use the disc-shaped screwdriver to bend or break. 35 Slowly lower the... disc-shaped screwdriver in the presser foot holder. a • For details, refer to check that does not use the presser foot holder, such as the quilting foot. Raise the presser foot lever to "Replacing the presser foot" (page 34).

Users Manual - English
Page 53
A 40 40 40 34 34 - The maximum buttonhole length is accidentally pressed and the machine starts sewing. Secured buttoholes for quilting) Appliqué quilting, free- 3.5 (1/8) 1.4 (1/16) J 46 46 46 40 40 - - medium weight and thick 3.0-7.0 0.3-1.0 No... buttonholes for thick or furry fabrics 7.0 (1/4) 0.5 (1/32) 3.0-7.0 0.3-1.0 No No (1/8-1/4) (1/64-1/16) * Auto Rfc. motion quilting, satin stitching, button sewing 0.0-7.0 (0-1/4) 0.0-4.0 (0-3/16) No Yes Rfc. *Auto Rfc.: Automatic Reinforcement CAUTION ● Be sure to the back, as shown below. 1...
A 40 40 40 34 34 - The maximum buttonhole length is accidentally pressed and the machine starts sewing. Secured buttoholes for quilting) Appliqué quilting, free- 3.5 (1/8) 1.4 (1/16) J 46 46 46 40 40 - - medium weight and thick 3.0-7.0 0.3-1.0 No... buttonholes for thick or furry fabrics 7.0 (1/4) 0.5 (1/32) 3.0-7.0 0.3-1.0 No No (1/8-1/4) (1/64-1/16) * Auto Rfc. motion quilting, satin stitching, button sewing 0.0-7.0 (0-1/4) 0.0-4.0 (0-3/16) No Yes Rfc. *Auto Rfc.: Automatic Reinforcement CAUTION ● Be sure to the back, as shown below. 1...
Users Manual - English
Page 63
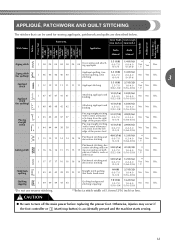
...quilting that can be used for quilting) Appliqué quilting, free- 3.5 (1/8) 1.4 (1/16) J 46 46 46 40 40 - - Attaching appliqués and binding 1.5 (1/16) 1.8 (1/16) 0.5-3.5 1.0-4.0 (1/32-1/8) (1/16-3/16) No No Rfc. Otherwise, injuries may occur if the foot controller or (start/stop button) is accidentally pressed and the machine starts sewing... 0.0-7.0 1.0-4.0 No No Rfc. (0-1/4) (1/16-3/16) Quilting stippling J 49 49 49 43 43 - - Pattern No. Zigzag stitch (for sewing appliqués, patchwork and quilts are described below. stitching (0-1/4) (0-3/16) 3 Appliqué...
...quilting that can be used for quilting) Appliqué quilting, free- 3.5 (1/8) 1.4 (1/16) J 46 46 46 40 40 - - Attaching appliqués and binding 1.5 (1/16) 1.8 (1/16) 0.5-3.5 1.0-4.0 (1/32-1/8) (1/16-3/16) No No Rfc. Otherwise, injuries may occur if the foot controller or (start/stop button) is accidentally pressed and the machine starts sewing... 0.0-7.0 1.0-4.0 No No Rfc. (0-1/4) (1/16-3/16) Quilting stippling J 49 49 49 43 43 - - Pattern No. Zigzag stitch (for sewing appliqués, patchwork and quilts are described below. stitching (0-1/4) (0-3/16) 3 Appliqué...

Users Manual - English
Page 64
... straight stitches at the right. Attach zigzag foot "J". Sew a piecing straight stitch 6.5 mm (1/4 inch) from either the right side or the left side of fabric together so the b pattern spans both pieces. b Select stitch or . You may be sewn with the machine. Patchwork (crazy quilt) stitching Fold the edge of the top piece...; Be careful that will be damaged. Baste the cut design in place on the fabric, do not apply glue to the needle or race, the machine may also be cut with the d needle dropping off the edge at the beginning and the end of fabric is used to hold the cut...
... straight stitches at the right. Attach zigzag foot "J". Sew a piecing straight stitch 6.5 mm (1/4 inch) from either the right side or the left side of fabric together so the b pattern spans both pieces. b Select stitch or . You may be sewn with the machine. Patchwork (crazy quilt) stitching Fold the edge of the top piece...; Be careful that will be damaged. Baste the cut design in place on the fabric, do not apply glue to the needle or race, the machine may also be cut with the d needle dropping off the edge at the beginning and the end of fabric is used to hold the cut...

Users Manual - English
Page 65
...(1/4 inch) ■ For a seam allowance on each side of the presser e foot, and then evenly guide the fabric while sewing. Quilts can easily be sewn using the optional walking foot and the optional quilting guide. ● Use the disc-shaped screwdriver to "Removing the presser foot holder" (page 35). d Place one hand on...presser foot and cause injury. ● Be sure to turn the handwheel toward the front of the machine to "Changing the needle position" (page 47). If the screw is called "quilting". Do not use the presser foot holder screw to attach the walking foot to be sewn with ...
...(1/4 inch) ■ For a seam allowance on each side of the presser e foot, and then evenly guide the fabric while sewing. Quilts can easily be sewn using the optional walking foot and the optional quilting guide. ● Use the disc-shaped screwdriver to "Removing the presser foot holder" (page 35). d Place one hand on...presser foot and cause injury. ● Be sure to turn the handwheel toward the front of the machine to "Changing the needle position" (page 47). If the screw is called "quilting". Do not use the presser foot holder screw to attach the walking foot to be sewn with ...
Users Manual - English
Page 106
... holder 9 35 , presser foot lever 9 23 Q quick-set bobbin 9, 21, 28 quilting 63 quilting foot 64 , quilting guide 63 64 R race 86 reinforcement stitching 40 , reverse/reinforcement stitch button 9 40 S scallop stitching 70 seam ripper 54 sewing machine needles 29 , sewing speed controller 9 13 sewing the character stitches 76 sleeve holes 66 smocking 70 spool cap 6 10...
... holder 9 35 , presser foot lever 9 23 Q quick-set bobbin 9, 21, 28 quilting 63 quilting foot 64 , quilting guide 63 64 R race 86 reinforcement stitching 40 , reverse/reinforcement stitch button 9 40 S scallop stitching 70 seam ripper 54 sewing machine needles 29 , sewing speed controller 9 13 sewing the character stitches 76 sleeve holes 66 smocking 70 spool cap 6 10...


