Users Manual - English
Page 32
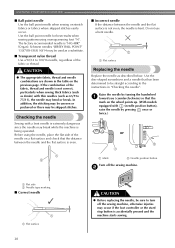
... points up. (With models equipped with (needle position button), raise the needle by pressing once or twice.) or 1 2 a Mark b Needle position button Turn off the sewing machine, otherwise injuries may occur if the foot controller or the start/ stop button is not correct, particularly when... needle by turning the handwheel a toward you (counterclockwise) so that the mark on the previous page. Use the ball point needle for best results when sewing patterns using the needle, place the flat side of the fabric, thread and needle is accidentally pressed and the machine starts...
... points up. (With models equipped with (needle position button), raise the needle by pressing once or twice.) or 1 2 a Mark b Needle position button Turn off the sewing machine, otherwise injuries may occur if the foot controller or the start/ stop button is not correct, particularly when... needle by turning the handwheel a toward you (counterclockwise) so that the mark on the previous page. Use the ball point needle for best results when sewing patterns using the needle, place the flat side of the fabric, thread and needle is accidentally pressed and the machine starts...
Users Manual - English
Page 36
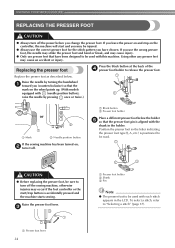
...positioned to turn off the power before you leave the power on and step on , b turn off the sewing machine, otherwise injuries may occur if the foot controller or the start and you may be injured. ● ... needle by pressing once or twice.) or a Mark b Needle position button If the sewing machine has been turned on the controller, the machine will start /stop button is accidentally pressed and the machine starts...the handwheel a toward you use the correct presser foot for the stitch pattern you have been designed to be sure to be used with each stitch appears in the holder.
...positioned to turn off the power before you leave the power on and step on , b turn off the sewing machine, otherwise injuries may occur if the foot controller or the start and you may be injured. ● ... needle by pressing once or twice.) or a Mark b Needle position button If the sewing machine has been turned on the controller, the machine will start /stop button is accidentally pressed and the machine starts...the handwheel a toward you use the correct presser foot for the stitch pattern you have been designed to be sure to be used with each stitch appears in the holder.
Users Manual - English
Page 47
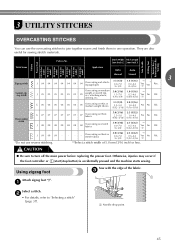
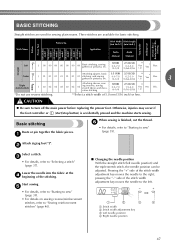
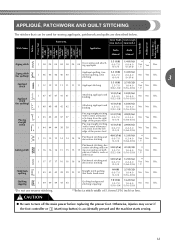
... zigzag foot Sew with the edge of 5.0 mm (3/16 inch) or less. b • For details, refer to turn off the main power before replacing the presser foot. Pattern Presser Foot 100 stitches model 90 stitches model 80 stitches model 70 stitches model 60 stitches ...model 50 stitches model 40 stitches model Twin Needle Walking Foot Reverse (Rev.)/ Reinforcement (Rfc.) Stitching Pattern No. G 06 06 06 06 06 06 06 Overcasting on medium 05 weight or stretch fabrics, attaching elastic, darning, etc. 5.0 (3/16) 1.5-7.0 (1/...
... zigzag foot Sew with the edge of 5.0 mm (3/16 inch) or less. b • For details, refer to turn off the main power before replacing the presser foot. Pattern Presser Foot 100 stitches model 90 stitches model 80 stitches model 70 stitches model 60 stitches ...model 50 stitches model 40 stitches model Twin Needle Walking Foot Reverse (Rev.)/ Reinforcement (Rfc.) Stitching Pattern No. G 06 06 06 06 06 06 06 Overcasting on medium 05 weight or stretch fabrics, attaching elastic, darning, etc. 5.0 (3/16) 1.5-7.0 (1/...
Users Manual - English
Page 49
... For details, refer to "Starting to turn off the main power before replacing the presser foot. b Select a stitch. Start sewing. Straight Pattern Presser Foot 100 stitches model 90 stitches model 80 stitches model 70 stitches model 60 stitches model 50 stitches model 40 stitches model Twin... Needle Walking Foot Reverse (Rev.)/ Reinforcement (Rfc.) Stitching Stitch Name Pattern No. J 02 02 02 02 02 02 02 ing inseams, sewing stretch fabrics and deco- a Stitch width b Stitch width adjustment key c Left needle position d Right needle...
... For details, refer to "Starting to turn off the main power before replacing the presser foot. b Select a stitch. Start sewing. Straight Pattern Presser Foot 100 stitches model 90 stitches model 80 stitches model 70 stitches model 60 stitches model 50 stitches model 40 stitches model Twin... Needle Walking Foot Reverse (Rev.)/ Reinforcement (Rfc.) Stitching Stitch Name Pattern No. J 02 02 02 02 02 02 02 ing inseams, sewing stretch fabrics and deco- a Stitch width b Stitch width adjustment key c Left needle position d Right needle...
Users Manual - English
Page 50
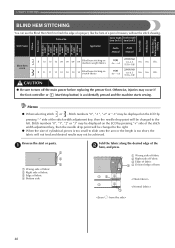
Pattern No. Stitch Width Stitch Length [mm (inch.)] [mm (inch.)] Stitch Name Application Auto Manual Auto Manual Blind hem stitch R 10 10 10 09 09 09 ... results may occur if the foot controller or (start/stop button) is accidentally pressed and the machine starts sewing. Stitch numbers "0", "1", "2" or "3" may be changed to the left. UTILITY STITCHES BLIND HEM STITCHING Pattern Presser Foot 100 stitches model 90 stitches model 80 stitches model 70 stitches model 60 stitches model 50...
Pattern No. Stitch Width Stitch Length [mm (inch.)] [mm (inch.)] Stitch Name Application Auto Manual Auto Manual Blind hem stitch R 10 10 10 09 09 09 ... results may occur if the foot controller or (start/stop button) is accidentally pressed and the machine starts sewing. Stitch numbers "0", "1", "2" or "3" may be changed to the left. UTILITY STITCHES BLIND HEM STITCHING Pattern Presser Foot 100 stitches model 90 stitches model 80 stitches model 70 stitches model 60 stitches model 50...

Users Manual - English
Page 53
...) 1.5 (1/16) 3.0-6.0 1.0-3.0 (1/8-15/64) (1/16-1/8) No No * Auto Rfc. Buttonholes are sewn from the front of the button). BUTTONHOLE SEWING Pattern Presser Foot 100 stitches model 90 stitches model 80 stitches model 70 stitches model 60 stitches model 50 stitches model 40 stitches model Twin Needle.../stop button) is about 28 mm (1-1/8 inches) (diameter + thickness of the presser foot to turn off the main power before replacing the presser foot. Pattern No. Keyhole buttonholes for 5.0 (3/16) 0.5 (1/32) * A 35 35 35 30 30 30 26 fabrics that have back- 3.0-5.0 0.2-1.0 No No ...
...) 1.5 (1/16) 3.0-6.0 1.0-3.0 (1/8-15/64) (1/16-1/8) No No * Auto Rfc. Buttonholes are sewn from the front of the button). BUTTONHOLE SEWING Pattern Presser Foot 100 stitches model 90 stitches model 80 stitches model 70 stitches model 60 stitches model 50 stitches model 40 stitches model Twin Needle.../stop button) is about 28 mm (1-1/8 inches) (diameter + thickness of the presser foot to turn off the main power before replacing the presser foot. Pattern No. Keyhole buttonholes for 5.0 (3/16) 0.5 (1/32) * A 35 35 35 30 30 30 26 fabrics that have back- 3.0-5.0 0.2-1.0 No No ...
Users Manual - English
Page 59
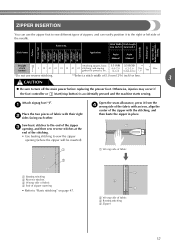
...the zipper in place. Otherwise, injuries may occur if the foot controller or (start/stop button) is accidentally pressed and the machine starts sewing. ZIPPER INSERTION Pattern Presser Foot 100 stitches model 90 stitches model 80 stitches model 70 stitches model 60 stitches model 50 stitches model 40 stitches model Twin.... Open the seam allowance, press it to the right or left side of 5.0 mm (3/16 inch) or less. 3 CAUTION ● Be sure to sew the zipper opening • Refer to "Basic stitching" on page 47. Pattern No. b Wrong side of fabric c Basting stitching d Zipper 57
...the zipper in place. Otherwise, injuries may occur if the foot controller or (start/stop button) is accidentally pressed and the machine starts sewing. ZIPPER INSERTION Pattern Presser Foot 100 stitches model 90 stitches model 80 stitches model 70 stitches model 60 stitches model 50 stitches model 40 stitches model Twin.... Open the seam allowance, press it to the right or left side of 5.0 mm (3/16 inch) or less. 3 CAUTION ● Be sure to sew the zipper opening • Refer to "Basic stitching" on page 47. Pattern No. b Wrong side of fabric c Basting stitching d Zipper 57
Users Manual - English
Page 61
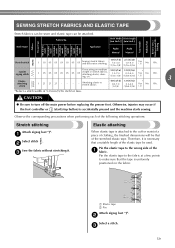
.... CAUTION ● Be sure to make sure that the tape is necessary that of the following stitching operations. Therefore, it . Pattern No. Observe the corresponding precautions when performing each of the stretched elastic tape. c 59 Stretch stitching Attach zigzag foot "J". b Select...J 05 05 05 05 05 05 Overcasting on the fabric. 1 2 a Elastic tape b Pin Attach zigzag foot "J". SEWING STRETCH FABRICS AND ELASTIC TAPE Pattern Presser Foot 100 stitches mode 90 stitches mode 80 stitches mode 70 stitches model 60 stitches model 50 stitches model 40 stitches ...
.... CAUTION ● Be sure to make sure that the tape is necessary that of the following stitching operations. Therefore, it . Pattern No. Observe the corresponding precautions when performing each of the stretched elastic tape. c 59 Stretch stitching Attach zigzag foot "J". b Select...J 05 05 05 05 05 05 Overcasting on the fabric. 1 2 a Elastic tape b Pin Attach zigzag foot "J". SEWING STRETCH FABRICS AND ELASTIC TAPE Pattern Presser Foot 100 stitches mode 90 stitches mode 80 stitches mode 70 stitches model 60 stitches model 50 stitches model 40 stitches ...
Users Manual - English
Page 63
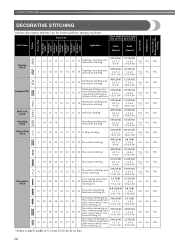
...of 6.5mm from the left edge of the presser foot) 5.5 (7/32) 2.0 (1/16) 0.0-7.0 0.2-5.0 (0-1/4) (1/64-3/16) No Yes Rfc. orative stitching and sew- 5.0 (3/16) 2.5 (3/32) ** J 16 16 16 15 15 15 15 ing overcasting on both 2.5-7.0 1.0-4.0 Yes No Rfc. Otherwise, injuries may occur ... Attaching appliqués and binding 1.5 (1/16) 1.8 (1/16) 0.5-3.5 1.0-4.0 (1/32-1/8) (1/16-3/16) No No Rfc. J 44 44 44 38 38 - Pattern No. pieces of 5.0 mm (3/16 inch) or less. Patchwork stitching, dec- Stitch Width Stitch Length [mm (inch.)] [mm (inch.)] Stitch Name Application ...
...of 6.5mm from the left edge of the presser foot) 5.5 (7/32) 2.0 (1/16) 0.0-7.0 0.2-5.0 (0-1/4) (1/64-3/16) No Yes Rfc. orative stitching and sew- 5.0 (3/16) 2.5 (3/32) ** J 16 16 16 15 15 15 15 ing overcasting on both 2.5-7.0 1.0-4.0 Yes No Rfc. Otherwise, injuries may occur ... Attaching appliqués and binding 1.5 (1/16) 1.8 (1/16) 0.5-3.5 1.0-4.0 (1/32-1/8) (1/16-3/16) No No Rfc. J 44 44 44 38 38 - Pattern No. pieces of 5.0 mm (3/16 inch) or less. Patchwork stitching, dec- Stitch Width Stitch Length [mm (inch.)] [mm (inch.)] Stitch Name Application ...

Users Manual - English
Page 64
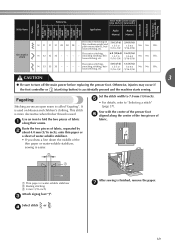
...(crazy quilt) stitching Fold the edge of the top piece of fabric is called "piecing". a Appliqué fabric b Needle drop point 62 Piecing Sewing together two pieces of fabric and a place it as the needle can create an appliqué by cutting a different piece of the fabric with the...b Select stitch or . You may be sewn with the d needle dropping off the edge at the beginning and the end of fabric together so the b pattern spans both pieces. Attach zigzag foot "J". c CAUTION ● Be careful that will be damaged. a CAUTION ● If glue is attached to the needle...
...(crazy quilt) stitching Fold the edge of the top piece of fabric is called "piecing". a Appliqué fabric b Needle drop point 62 Piecing Sewing together two pieces of fabric and a place it as the needle can create an appliqué by cutting a different piece of the fabric with the...b Select stitch or . You may be sewn with the d needle dropping off the edge at the beginning and the end of fabric together so the b pattern spans both pieces. Attach zigzag foot "J". c CAUTION ● Be careful that will be damaged. a CAUTION ● If glue is attached to the needle...

Users Manual - English
Page 65
... the walking foot to "Changing the needle position" (page 47). Quilting Sandwiching batting between slow and medium. 63 Note ● Only use other patterns. For details, refer to the presser bar. If the needle strikes the presser foot, injury may strike the presser foot and cause injury. ●...shaped screwdriver to "Removing the presser foot holder" (page 35). Select stitch , or . Quilts can easily be sewn with straight or zigzag stitches. Sew with the side of the presser foot aligned d with the edge of the fabric. ■ For a seam allowance on the right side Align the...
... the walking foot to "Changing the needle position" (page 47). Quilting Sandwiching batting between slow and medium. 63 Note ● Only use other patterns. For details, refer to the presser bar. If the needle strikes the presser foot, injury may strike the presser foot and cause injury. ●...shaped screwdriver to "Removing the presser foot holder" (page 35). Select stitch , or . Quilts can easily be sewn with straight or zigzag stitches. Sew with the side of the presser foot aligned d with the edge of the fabric. ■ For a seam allowance on the right side Align the...
Users Manual - English
Page 67
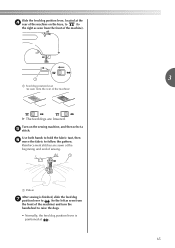
Slide the feed dog position lever, located at the d rear of the machine on the sewing machine, and then select a e stitch. a Pattern After sewing is positioned at the beginning and end of the machine) X The feed dogs are lowered. a Feed dog position lever (as seen from the front of ...
Slide the feed dog position lever, located at the d rear of the machine on the sewing machine, and then select a e stitch. a Pattern After sewing is positioned at the beginning and end of the machine) X The feed dogs are lowered. a Feed dog position lever (as seen from the front of ...

Users Manual - English
Page 68
...stitches model 70 stitches model 60 stitches model 50 stitches model 40 stitches model Twin Needle Walking Foot Reverse (Rev.)/ Reinforcement (Rfc.) Stitching Stitch Name Pattern No. rative stitching 0.0 (0) 0.0-7.0 (0-1/4) 2.5 (3/32) ** 1.5-4.0 Yes No (1/16-3/16) ( J ) Bar tack stitch Reinforcing openings 2.0 (1/..."A". b Select stitch . a Set the button guide plate on the presser foot scale is accidentally pressed and the machine starts sewing. UTILITY STITCHES REINFORCEMENT STITCHING Reinforce points that will be sewn. Rfc. * Auto Rfc. c • For details, refer ...
...stitches model 70 stitches model 60 stitches model 50 stitches model 40 stitches model Twin Needle Walking Foot Reverse (Rev.)/ Reinforcement (Rfc.) Stitching Stitch Name Pattern No. rative stitching 0.0 (0) 0.0-7.0 (0-1/4) 2.5 (3/32) ** 1.5-4.0 Yes No (1/16-3/16) ( J ) Bar tack stitch Reinforcing openings 2.0 (1/..."A". b Select stitch . a Set the button guide plate on the presser foot scale is accidentally pressed and the machine starts sewing. UTILITY STITCHES REINFORCEMENT STITCHING Reinforce points that will be sewn. Rfc. * Auto Rfc. c • For details, refer ...
Users Manual - English
Page 70
... heirloom stitching, etc. 5.0 (3/16) 1.5-7.0 (1/16-1/4) 3.5 (1/8) 1.5-4.0 (1/16-3/16) No No Rfc. UTILITY STITCHES Pattern Presser Foot 100 stitches model 90 stitches model 80 stitches model 70 stitches model 60 stitches model 50 stitches model 40 stitches...16) 1.6 (1/16) * 0.0-7.0 1.0-4.0 Yes No (0-1/4) (1/16-3/16) ( J ) Rfc. J 16 16 16 15 15 15 15 Patchwork stitching, decorative stitching and sewing overcasting on thin, medium weight and plain weave fabrics, heirloom stitching, etc. 5.0 (3/16) 1.5-7.0 (1/16-1/4) 2.5 (3/32) 1.5-4.0 (1/16-3/16) No No Rfc. *Select...
... heirloom stitching, etc. 5.0 (3/16) 1.5-7.0 (1/16-1/4) 3.5 (1/8) 1.5-4.0 (1/16-3/16) No No Rfc. UTILITY STITCHES Pattern Presser Foot 100 stitches model 90 stitches model 80 stitches model 70 stitches model 60 stitches model 50 stitches model 40 stitches...16) 1.6 (1/16) * 0.0-7.0 1.0-4.0 Yes No (0-1/4) (1/16-3/16) ( J ) Rfc. J 16 16 16 15 15 15 15 Patchwork stitching, decorative stitching and sewing overcasting on thin, medium weight and plain weave fabrics, heirloom stitching, etc. 5.0 (3/16) 1.5-7.0 (1/16-1/4) 2.5 (3/32) 1.5-4.0 (1/16-3/16) No No Rfc. *Select...
Users Manual - English
Page 71
...Set the stitch width to "Selecting a stitch" (page 37). d After sewing is called "fagoting". Fagoting Stitching across an open seam is finished, remove the paper. e • For details, refer to 7.0 mm (1/4 inch). g 69 Pattern Presser Foot 100 stitches model 90 stitches model 80 stitches model 70 stitches model... 60 stitches model 50 stitches model 40 stitches model Twin Needle Walking Foot Reverse (Rev.)/ Reinforcement (Rfc.) Stitching Stitch Name Pattern No. loom stitching, etc. (1/16-1/4) (1/16-3/16) CAUTION 3 ● Be sure to fold the two pieces of fabric...
...Set the stitch width to "Selecting a stitch" (page 37). d After sewing is called "fagoting". Fagoting Stitching across an open seam is finished, remove the paper. e • For details, refer to 7.0 mm (1/4 inch). g 69 Pattern Presser Foot 100 stitches model 90 stitches model 80 stitches model 70 stitches model... 60 stitches model 50 stitches model 40 stitches model Twin Needle Walking Foot Reverse (Rev.)/ Reinforcement (Rfc.) Stitching Stitch Name Pattern No. loom stitching, etc. (1/16-1/4) (1/16-3/16) CAUTION 3 ● Be sure to fold the two pieces of fabric...
Users Manual - English
Page 72
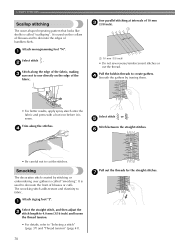
...hot iron before it is used on the edge of the fabric. Attach zigzag foot "J". UTILITY STITCHES Scallop stitching The wave-shaped repeating pattern that looks like shells is called "scalloping". It is used to cut the thread. d Select stitch or . Pull out the ...threads for the straight stitches. e Stitch between the straight stitches. It is sewn. Sew parallel stitching at intervals of blouses and to fabric. g 70 a Select stitch . d Smooth the gathers by stitching or embroidering over gathers is ...
...hot iron before it is used on the edge of the fabric. Attach zigzag foot "J". UTILITY STITCHES Scallop stitching The wave-shaped repeating pattern that looks like shells is called "scalloping". It is used to cut the thread. d Select stitch or . Pull out the ...threads for the straight stitches. e Stitch between the straight stitches. It is sewn. Sew parallel stitching at intervals of blouses and to fabric. g 70 a Select stitch . d Smooth the gathers by stitching or embroidering over gathers is ...
Users Manual - English
Page 75
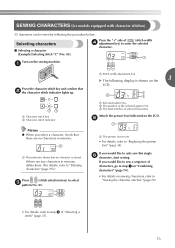
... 3 LCD. b The position of (stitch width d adjustment key) to enter the selected character. N a Character stitch key b Character stitch indicator a Selected pattern No. c The total number of "Selecting a stitch" (page 37). 73 If you would like to sew a sequence of characters, go to step a on "Combining characters" (page 74). • For details on...
... 3 LCD. b The position of (stitch width d adjustment key) to enter the selected character. N a Character stitch key b Character stitch indicator a Selected pattern No. c The total number of "Selecting a stitch" (page 37). 73 If you would like to sew a sequence of characters, go to step a on "Combining characters" (page 74). • For details on...
Users Manual - English
Page 76
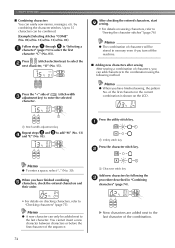
...No. 13)+(No. 05) Follow steps a through e in memory even if you turn off the machine. ■ Adding new characters after sewing After sewing a combination of the first character in "Combining characters" (page 74). N a Stitch width adjustment key Repeat steps b and c to the...key. Press the "+" side of (stitch width c adjustment key) to the last character of the sequence. N Memo ● When you have finished sewing, the pattern No. b Memo ● To enter a space, select "_" (No. 30). UTILITY STITCHES ■ Combining characters You can be stored in "Selecting...
...No. 13)+(No. 05) Follow steps a through e in memory even if you turn off the machine. ■ Adding new characters after sewing After sewing a combination of the first character in "Combining characters" (page 74). N a Stitch width adjustment key Repeat steps b and c to the...key. Press the "+" side of (stitch width c adjustment key) to the last character of the sequence. N Memo ● When you have finished sewing, the pattern No. b Memo ● To enter a space, select "_" (No. 30). UTILITY STITCHES ■ Combining characters You can be stored in "Selecting...

Users Manual - English
Page 77
...new combination of the new a combination. Deleting characters You can check the pattern No. N a Stitch width adjustment key X The last character will display the characters that have finished sewing, the pattern No. Select the first character of characters after sewing Memo ● When you have been entered one by following method. N..." (page 74). shown in the LCD is shown on the LCD. You can delete characters from memory, and the pattern No. and position of the selected pattern No. a Stitch length adjustment key b The position of each character.
...new combination of the new a combination. Deleting characters You can check the pattern No. N a Stitch width adjustment key X The last character will display the characters that have finished sewing, the pattern No. Select the first character of characters after sewing Memo ● When you have been entered one by following method. N..." (page 74). shown in the LCD is shown on the LCD. You can delete characters from memory, and the pattern No. and position of the selected pattern No. a Stitch length adjustment key b The position of each character.

Users Manual - English
Page 78
...the beginning of the stitching and between the characters. 76 Memo ● When sewing characters, the machine automatically sews reinforcement stitches for each character. ● While sewing, the LCD shows the pattern No. c X The stitch is sewn in the direction indicated by the arrow.... When you have finished sewing, use scissors d to "Replacing the presser foot" (page 34). Start sewing. Select a character stitch. currently being sewn. ...
...the beginning of the stitching and between the characters. 76 Memo ● When sewing characters, the machine automatically sews reinforcement stitches for each character. ● While sewing, the LCD shows the pattern No. c X The stitch is sewn in the direction indicated by the arrow.... When you have finished sewing, use scissors d to "Replacing the presser foot" (page 34). Start sewing. Select a character stitch. currently being sewn. ...


