Users Manual - English
Page 4
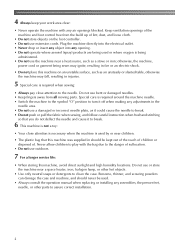
...openings blocked. Keep ventilation openings of . otherwise, the machine, power cord or garment being administered. • Do not use a damaged or incorrect needle plate, as a stove or iron; Benzene, thinner, and scouring powders can damage the case and machine, and should be used by or near... heater, iron, halogen lamp, or other parts to assure correct installation. 2 Never allow children to play with any assemblies, the presser feet, needle, or other hot objects. • Use only neutral soaps or detergents to clean the case. Do not use extension cords. Do not use outdoors...
...openings blocked. Keep ventilation openings of . otherwise, the machine, power cord or garment being administered. • Do not use a damaged or incorrect needle plate, as a stove or iron; Benzene, thinner, and scouring powders can damage the case and machine, and should be used by or near... heater, iron, halogen lamp, or other parts to assure correct installation. 2 Never allow children to play with any assemblies, the presser feet, needle, or other hot objects. • Use only neutral soaps or detergents to clean the case. Do not use extension cords. Do not use outdoors...
Users Manual - English
Page 6
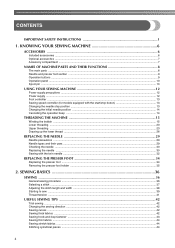
... 6 ACCESSORIES ...6 Included accessories ...6 Optional accessories ...7 Accessory compartment ...7 NAMES OF MACHINE PARTS AND THEIR FUNCTIONS 8 The main parts ...8 Needle and presser foot section ...9 Operation buttons ...9 Operation panel ...10 Spool pin ...10 USING YOUR SEWING MACHINE 12 Power supply precautions ...12... ...23 Drawing up the lower thread ...28 REPLACING THE NEEDLE 29 Needle precautions ...29 Needle types and their uses ...29 Checking the needle ...30 Replacing the needle ...30 Sewing with the twin needle ...32 REPLACING THE PRESSER FOOT 34 Replacing the presser foot...
... 6 ACCESSORIES ...6 Included accessories ...6 Optional accessories ...7 Accessory compartment ...7 NAMES OF MACHINE PARTS AND THEIR FUNCTIONS 8 The main parts ...8 Needle and presser foot section ...9 Operation buttons ...9 Operation panel ...10 Spool pin ...10 USING YOUR SEWING MACHINE 12 Power supply precautions ...12... ...23 Drawing up the lower thread ...28 REPLACING THE NEEDLE 29 Needle precautions ...29 Needle types and their uses ...29 Checking the needle ...30 Replacing the needle ...30 Sewing with the twin needle ...32 REPLACING THE PRESSER FOOT 34 Replacing the presser foot...
Users Manual - English
Page 8
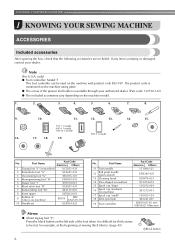
...The included accessories vary depending on the machine model. 1. 2. 3. 4. 5. 6. 7. 8. 9. 10. 11. 12. 13. 75/11 1 needle 90/14 1 needle 100/16 1 needle 16. 17. 18. 19. 90/14 1 needle 14. 15. only) ● Foot controller: Model T This foot controller can be fed, for thick seams to be used on... machine rating plate. ● The screw of sewing thick fabrics. (page 43) aBlack button 6 No. Part Name 11 Twin needle 12 Ball point needle (gold colored) 13 Cleaning brush 14 Disc-shaped screwdriver 15 Spool cap (large) 16 Spool cap (medium) (on machine.) SA156...
...The included accessories vary depending on the machine model. 1. 2. 3. 4. 5. 6. 7. 8. 9. 10. 11. 12. 13. 75/11 1 needle 90/14 1 needle 100/16 1 needle 16. 17. 18. 19. 90/14 1 needle 14. 15. only) ● Foot controller: Model T This foot controller can be fed, for thick seams to be used on... machine rating plate. ● The screw of sewing thick fabrics. (page 43) aBlack button 6 No. Part Name 11 Twin needle 12 Ball point needle (gold colored) 13 Cleaning brush 14 Disc-shaped screwdriver 15 Spool cap (large) 16 Spool cap (medium) (on machine.) SA156...
Users Manual - English
Page 10
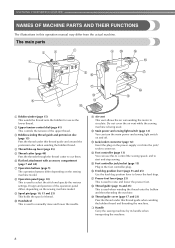
... lower the feed dogs. o Foot controller jack/socket (page 13) Plug in this to control the sewing speed, and to manually raise and lower the needle. s Thread guide cover (page 17 and 23) Pass the thread under this thread guide when winding the bobbin thread and threading the machine. c Bobbin-winding...
... lower the feed dogs. o Foot controller jack/socket (page 13) Plug in this to control the sewing speed, and to manually raise and lower the needle. s Thread guide cover (page 17 and 23) Pass the thread under this thread guide when winding the bobbin thread and threading the machine. c Bobbin-winding...
Users Manual - English
Page 11
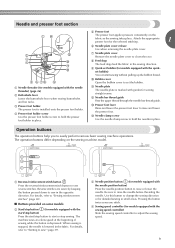
...reverse stitches. The operation buttons differ depending on some models b Start/stop button (for models equipped with guides for models equipped with the needle threader) (page 26) b Buttonhole lever Lower the buttonhole lever when sewing buttonholes and bar tacks. i Quick-set bobbin) You can ...a Reverse/reinforcement stitch button Press the reverse/reinforcement stitch button to raise and lower the presser foot. When sewing is stopped, the needle is marked with the start/stop button) Press the start/stop sewing. Use this button to clean the race. d Sewing speed controller...
...reverse stitches. The operation buttons differ depending on some models b Start/stop button (for models equipped with guides for models equipped with the needle threader) (page 26) b Buttonhole lever Lower the buttonhole lever when sewing buttonholes and bar tacks. i Quick-set bobbin) You can ...a Reverse/reinforcement stitch button Press the reverse/reinforcement stitch button to raise and lower the presser foot. When sewing is stopped, the needle is marked with the start/stop button) Press the start/stop sewing. Use this button to clean the race. d Sewing speed controller...
Users Manual - English
Page 15
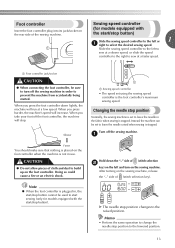
... pieces of (stitch selection b key) on the sewing machine. Hold down lightly, the machine will run at a low speed. X The needle stop position to the raised position. Foot controller Insert the foot controller plug into its jack/socket on the foot controller. When you press the...the "-" side of cloth and dust to prevent the machine from accidentally being started. Memo • Perform the same operation to change the needle stop position changes to the lowered position. 13 Slower a Sewing speed controller • The speed set to select the desired sewing speed. ...
... pieces of (stitch selection b key) on the sewing machine. Hold down lightly, the machine will run at a low speed. X The needle stop position to the raised position. Foot controller Insert the foot controller plug into its jack/socket on the foot controller. When you press the...the "-" side of cloth and dust to prevent the machine from accidentally being started. Memo • Perform the same operation to change the needle stop position changes to the lowered position. 13 Slower a Sewing speed controller • The speed set to select the desired sewing speed. ...
Users Manual - English
Page 16
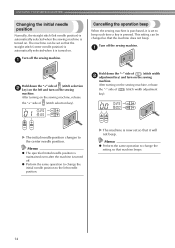
...of (stitch width adjustment key). X The machine is turned off. ● Perform the same operation to the left needle position. Memo ● Perform the same operation to change the initial needle position to change the setting so that it will not beep. a Hold down the "-" side of (stitch selection ...b key) on the left and turn on the sewing machine. Memo ● The specified initial needle position is maintained even after the machine is now set so that machine beeps. 14 Turn off the sewing machine. Hold down the "+" side ...
...of (stitch width adjustment key). X The machine is turned off. ● Perform the same operation to the left needle position. Memo ● Perform the same operation to change the initial needle position to change the setting so that it will not beep. a Hold down the "-" side of (stitch selection ...b key) on the left and turn on the sewing machine. Memo ● The specified initial needle position is maintained even after the machine is now set so that machine beeps. 14 Turn off the sewing machine. Hold down the "+" side ...

Users Manual - English
Page 19
... around the bobbin. k CAUTION ● Make sure you do not cut the thread completely, and the bobbin is wound around the bobbin and cause the needle to the right.
... around the bobbin. k CAUTION ● Make sure you do not cut the thread completely, and the bobbin is wound around the bobbin and cause the needle to the right.
Users Manual - English
Page 20
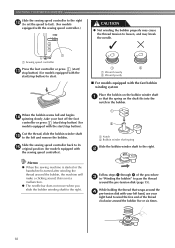
...-tension disk with the sewing speed controller.) CAUTION ● Not winding the bobbin properly may cause the thread tension to loosen, and may break the needle. this is turned after winding the thread around the pre-tension disk (page 15). When the bobbin seems full and begins n spinning slowly, take your... models equipped with your left and remove the bobbin. Memo ● When the sewing machine is started or the handwheel is not a malfunction. ● The needle bar does not move when you slide the bobbin winding shaft to the right.
...-tension disk with the sewing speed controller.) CAUTION ● Not winding the bobbin properly may cause the thread tension to loosen, and may break the needle. this is turned after winding the thread around the pre-tension disk (page 15). When the bobbin seems full and begins n spinning slowly, take your... models equipped with your left and remove the bobbin. Memo ● When the sewing machine is started or the handwheel is not a malfunction. ● The needle bar does not move when you slide the bobbin winding shaft to the right.
Users Manual - English
Page 21
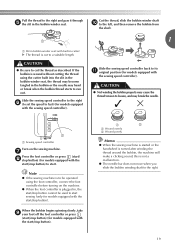
...be operated using the cutter built into the slit in the bobbin winder seat, the thread may become tangled in the bobbin or the needle may break the needle. Slide the sewing speed controller back to its k original position (for models equipped with built-in cutter) X The thread is wound...(start /stop button). 1 2 a Wound evenly b Wound poorly Memo ● When the sewing machine is started or the handwheel is not a malfunction. ● The needle bar does not move when you slide the bobbin winding shaft to start. If the bobbin is cut the thread as described. this is turned...
...be operated using the cutter built into the slit in the bobbin winder seat, the thread may become tangled in the bobbin or the needle may break the needle. Slide the sewing speed controller back to its k original position (for models equipped with built-in cutter) X The thread is wound...(start /stop button). 1 2 a Wound evenly b Wound poorly Memo ● When the sewing machine is started or the handwheel is not a malfunction. ● The needle bar does not move when you slide the bobbin winding shaft to start. If the bobbin is cut the thread as described. this is turned...
Users Manual - English
Page 22
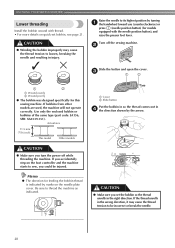
...for this sewing machine. Actual size 11.5 mm (7/16 inch) This model Other models CAUTION ● Make sure you (counterclockwise) or press (needle position button) (for feeding the bobbin thread is indicated by turning a the handwheel toward you turn the power off the sewing machine. KNOWING ...YOUR SEWING MACHINE Lower threading Install the bobbin wound with the needle position button), and raise the presser foot lever. a Cover b Slide button Put the bobbin in so the thread comes out in injury...
...for this sewing machine. Actual size 11.5 mm (7/16 inch) This model Other models CAUTION ● Make sure you (counterclockwise) or press (needle position button) (for feeding the bobbin thread is indicated by turning a the handwheel toward you turn the power off the sewing machine. KNOWING ...YOUR SEWING MACHINE Lower threading Install the bobbin wound with the needle position button), and raise the presser foot lever. a Cover b Slide button Put the bobbin in so the thread comes out in injury...
Users Manual - English
Page 23
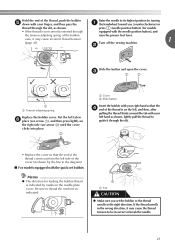
case, it may cause the thread tension to thread the machine as shown. Be sure to be incorrect or break the needle. 21 b Slide the button and open the cover. Turn off the sewing machine. Put the left side of the cover (as shown by the line ... left , and then, after pulling the thread firmly around the tab with your finger, and then pass the Raise the needle to guide it may cause incorrect thread tension 1 (page 41). press (needle position button) (for models • If the thread is indicated by turning a the handwheel toward you set bobbin Memo...
case, it may cause the thread tension to thread the machine as shown. Be sure to be incorrect or break the needle. 21 b Slide the button and open the cover. Turn off the sewing machine. Put the left side of the cover (as shown by the line ... left , and then, after pulling the thread firmly around the tab with your finger, and then pass the Raise the needle to guide it may cause incorrect thread tension 1 (page 41). press (needle position button) (for models • If the thread is indicated by turning a the handwheel toward you set bobbin Memo...
Users Manual - English
Page 25
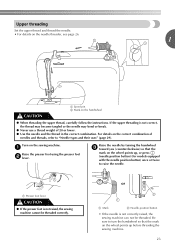
... machine. For details on the correct combination of 20 or lower. ● Use the needle and the thread in the correct combination. or a Mark b Needle position button • If the needle is not correctly raised, the sewing machine can not be threaded correctly. Upper threading Set ...threading the upper thread, carefully follow the instructions. Turn on the wheel points up , or press (needle position button) (for models equipped with the needle position button) once or twice to "Needle types and their uses" (page 29). If the upper threading is not raised, the sewing machine ...
... machine. For details on the correct combination of 20 or lower. ● Use the needle and the thread in the correct combination. or a Mark b Needle position button • If the needle is not correctly raised, the sewing machine can not be threaded correctly. Upper threading Set ...threading the upper thread, carefully follow the instructions. Turn on the wheel points up , or press (needle position button) (for models equipped with the needle position button) once or twice to "Needle types and their uses" (page 29). If the upper threading is not raised, the sewing machine ...
Users Manual - English
Page 26
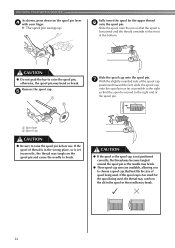
... raise the spool pin before use. Remove the spool cap. KNOWING YOUR SEWING MACHINE As shown, press down on the spool pin and cause the needle to break. Fully insert the spool for the spool being used , the thread may bend or break. g With the slightly rounded side of the spool... pin. CAUTION ● If the spool or the spool cap is not positioned correctly, the thread may become tangled around the spool pin or the needle may break. ● Three spool cap sizes are available, allowing you to choose a spool cap that best fits the size of thread is in the...
... raise the spool pin before use. Remove the spool cap. KNOWING YOUR SEWING MACHINE As shown, press down on the spool pin and cause the needle to break. Fully insert the spool for the spool being used , the thread may bend or break. g With the slightly rounded side of the spool... pin. CAUTION ● If the spool or the spool cap is not positioned correctly, the thread may become tangled around the spool pin or the needle may break. ● Three spool cap sizes are available, allowing you to choose a spool cap that best fits the size of thread is in the...
Users Manual - English
Page 27
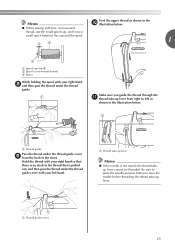
... Pass the thread under the thread guide. Make sure you guide the thread through the k thread take-up lever from the back to raise the needle before threading the thread take -up lever. Hold the thread with your left as shown in the j illustration below . a Thread guide cover 25 Be sure... to press the needle position button to the front. a Thread take -up lever Memo ● If the needle is pulled out, and then pass the thread under the thread guide cover with your right hand, h and then...
... Pass the thread under the thread guide. Make sure you guide the thread through the k thread take-up lever from the back to raise the needle before threading the thread take -up lever. Hold the thread with your left as shown in the j illustration below . a Thread guide cover 25 Be sure... to press the needle position button to the front. a Thread take -up lever Memo ● If the needle is pulled out, and then pass the thread under the thread guide cover with your right hand, h and then...
Users Manual - English
Page 28
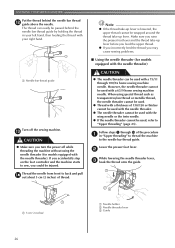
...may cause sewing problems. ■ Using the needle threader (for models equipped with the needle threader) a Needle bar thread guide Turn off while threading the machine without using the needle threader (for models equipped with a 65/9 home sewing machine needle. Thread the needle from front to sew, you could be ...take -up lever is lowered, the upper thread cannot be injured. KNOWING YOUR SEWING MACHINE Put the thread behind the needle bar thread guide by holding the thread in "Upper threading" to thread the machine to "Upper threading" (page 23). b While lowering...
...may cause sewing problems. ■ Using the needle threader (for models equipped with the needle threader) a Needle bar thread guide Turn off while threading the machine without using the needle threader (for models equipped with a 65/9 home sewing machine needle. Thread the needle from front to sew, you could be ...take -up lever is lowered, the upper thread cannot be injured. KNOWING YOUR SEWING MACHINE Put the thread behind the needle bar thread guide by holding the thread in "Upper threading" to thread the machine to "Upper threading" (page 23). b While lowering...

Users Manual - English
Page 29
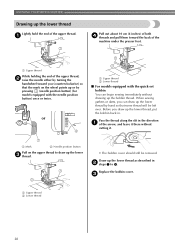
... through the presser i foot, and then pull out about 5 cm (2 inches) of thread toward you may bend the needle. ● If the thread does not pass through the eye of the needle, start from step c again. Raise the presser foot lever. a 5 cm (2 inches) Note ● If you ...incorrectly feed the thread you and the hook passes through the eye of the needle. h a Hook b Thread While lightly holding the thread, release the f needle threader lever. a Presser foot lever Pass the end of the machine. d Pull the loop of the thread passed through the...
... through the presser i foot, and then pull out about 5 cm (2 inches) of thread toward you may bend the needle. ● If the thread does not pass through the eye of the needle, start from step c again. Raise the presser foot lever. a 5 cm (2 inches) Note ● If you ...incorrectly feed the thread you and the hook passes through the eye of the needle. h a Hook b Thread While lightly holding the thread, release the f needle threader lever. a Presser foot lever Pass the end of the machine. d Pull the loop of the thread passed through the...
Users Manual - English
Page 30
a Upper thread While holding the end of the upper thread, b raise the needle either by turning the handwheel toward the back of the upper thread. a Mark b Needle position button Pull on the wheel points up the lower thread by pressing (needle position button) (for models equipped with the quick-set bobbin You can draw... about 10 cm (4 inches) of the arrow, and leave it there without cutting it. or a Upper thread b Lower thread ■ For models equipped with the needle position button) once or twice.
a Upper thread While holding the end of the upper thread, b raise the needle either by turning the handwheel toward the back of the upper thread. a Mark b Needle position button Pull on the wheel points up the lower thread by pressing (needle position button) (for models equipped with the quick-set bobbin You can draw... about 10 cm (4 inches) of the arrow, and leave it there without cutting it. or a Upper thread b Lower thread ■ For models equipped with the needle position button) once or twice.
Users Manual - English
Page 31
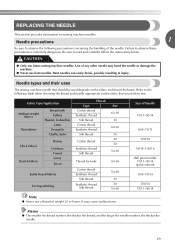
...in injury. Memo ● The smaller the thread number, the thicker the thread; Needle types and their uses The sewing machine needle that you wish to sew. and the larger the needle number, the thicker the needle. 29 Be sure to observe these precautions is extremely dangerous. Use of weight 20... or lower. Refer to observe the following table when choosing the thread and needle appropriate for knits Cotton thread Synthetic thread Silk thread Synthetic thread Silk thread Size 60-90 50 60-90 50 30 50 50-...
...in injury. Memo ● The smaller the thread number, the thicker the thread; Needle types and their uses The sewing machine needle that you wish to sew. and the larger the needle number, the thicker the needle. 29 Be sure to observe these precautions is extremely dangerous. Use of weight 20... or lower. Refer to observe the following table when choosing the thread and needle appropriate for knits Cotton thread Synthetic thread Silk thread Synthetic thread Silk thread Size 60-90 50 60-90 50 30 50 50-...
Users Manual - English
Page 32
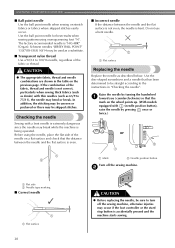
...sure to the instructions in the table on stretch fabrics or fabrics where skipped stitches easily occur. Raise the needle by pressing once or twice.) or 1 2 a Mark b Needle position button Turn off the sewing machine, otherwise injuries may break while the machine is accidentally pressed and ...the machine starts sewing. Before using monogramming foot "N". KNOWING YOUR SEWING MACHINE ■ Ball point needle Use the ball point needle when sewing on the previous page. Schmetz needles "JERSEY BALL POINT" 130/705H SUK 90/14 may be uneven or puckered or there may bend or...
...sure to the instructions in the table on stretch fabrics or fabrics where skipped stitches easily occur. Raise the needle by pressing once or twice.) or 1 2 a Mark b Needle position button Turn off the sewing machine, otherwise injuries may break while the machine is accidentally pressed and ...the machine starts sewing. Before using monogramming foot "N". KNOWING YOUR SEWING MACHINE ■ Ball point needle Use the ball point needle when sewing on the previous page. Schmetz needles "JERSEY BALL POINT" 130/705H SUK 90/14 may be uneven or puckered or there may bend or...


