

Users Manual - English
Page 3
... to the surface of the fabric. ABOUT BOBBIN WORK You can create designs, which gives a three-dimensional appearance to be fed through the sewing machine needle and sewing on the wrong side of the fabric, by winding the bobbin with tabs (*See Note.) Screwdriver (small) (X55468-051) CD-ROM (...Contains the Operation Manual and the Templates for freemotion sewing.) (USA/CANADA: XE9382-001, Other areas: XE9501-001) Note • Two bobbin covers may be included, depending on the country or region where...
... to the surface of the fabric. ABOUT BOBBIN WORK You can create designs, which gives a three-dimensional appearance to be fed through the sewing machine needle and sewing on the wrong side of the fabric, by winding the bobbin with tabs (*See Note.) Screwdriver (small) (X55468-051) CD-ROM (...Contains the Operation Manual and the Templates for freemotion sewing.) (USA/CANADA: XE9382-001, Other areas: XE9501-001) Note • Two bobbin covers may be included, depending on the country or region where...
Users Manual - Multi
Page 5
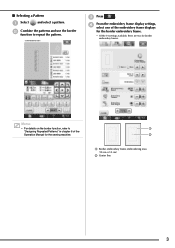
... "Designing Repeated Patterns" in chapter 6 of the embroidery frame displays for the border embroidery frame. * Of the 14 settings available, there are two for the sewing machine.
... "Designing Repeated Patterns" in chapter 6 of the embroidery frame displays for the border embroidery frame. * Of the 14 settings available, there are two for the sewing machine.
Users Manual - Multi
Page 12
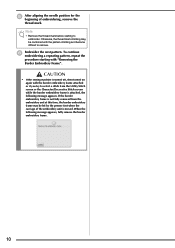
... pattern stitching and become difficult to embroider. Otherwise, the thread mark stitching may be combined with "Removing the Border Embroidery Frame". CAUTION • If the sewing machine is turned off, then turned on again with the border embroidery frame attached or if you try to select a stitch from the embroidery unit at...
... pattern stitching and become difficult to embroider. Otherwise, the thread mark stitching may be combined with "Removing the Border Embroidery Frame". CAUTION • If the sewing machine is turned off, then turned on again with the border embroidery frame attached or if you try to select a stitch from the embroidery unit at...
Users Manual - English
Page 1
Operation Manual Embroidery and Sewing Machine Product Code: 882-W04/W05 Please visit us at http://solutions.brother.com where you can get product support and answers to frequently asked questions (FAQs).
Operation Manual Embroidery and Sewing Machine Product Code: 882-W04/W05 Please visit us at http://solutions.brother.com where you can get product support and answers to frequently asked questions (FAQs).
Users Manual - English
Page 3
...before attempting to make any other part may damage the machine or result in the machine falling, which could cause injuries. • When lifting the sewing machine, be accessed for purchasing this embroidery and sewing machine. IMPORTANT SAFETY INSTRUCTIONS Please read the "IMPORTANT SAFETY INSTRUCTIONS",... or when making any object into the electrical outlet. Lifting the sewing machine by its handle. WARNING - Before using the machine immediately and unplug the power cord. • When transporting the sewing machine, be sure to carry it can quickly be careful not to ...
...before attempting to make any other part may damage the machine or result in the machine falling, which could cause injuries. • When lifting the sewing machine, be accessed for purchasing this embroidery and sewing machine. IMPORTANT SAFETY INSTRUCTIONS Please read the "IMPORTANT SAFETY INSTRUCTIONS",... or when making any object into the electrical outlet. Lifting the sewing machine by its handle. WARNING - Before using the machine immediately and unplug the power cord. • When transporting the sewing machine, be sure to carry it can quickly be careful not to ...
Users Manual - English
Page 4
... the machine needle. • Switch the sewing machine to the symbol "O" position to turn it off when making any assemblies, the presser feet, needle, or other hot objects. • Use only neutral soaps or detergents to inspect and adjust the machine yourself. For additional product information and updates, visit our website at www.brother.com...
... the machine needle. • Switch the sewing machine to the symbol "O" position to turn it off when making any assemblies, the presser feet, needle, or other hot objects. • Use only neutral soaps or detergents to inspect and adjust the machine yourself. For additional product information and updates, visit our website at www.brother.com...
Users Manual - English
Page 5
Federal Communications Commission (FCC) Declaration of Conformity (For USA Only) Responsible Party: Brother International Corporation 100 Somerset Corporate Boulevard Bridgewater, NJ 08807-0911 USA TEL : (908) 704-1700 declares that interference will not ... provide reasonable protection against harmful interference in a residential installation. However, there is no guarantee that the product Product Name: Model Number: Brother Sewing Machine NV6700D This device complies with Part 15 of the FCC Rules. Operation is subject to the following measures: • Reorient or relocate ...
Federal Communications Commission (FCC) Declaration of Conformity (For USA Only) Responsible Party: Brother International Corporation 100 Somerset Corporate Boulevard Bridgewater, NJ 08807-0911 USA TEL : (908) 704-1700 declares that interference will not ... provide reasonable protection against harmful interference in a residential installation. However, there is no guarantee that the product Product Name: Model Number: Brother Sewing Machine NV6700D This device complies with Part 15 of the FCC Rules. Operation is subject to the following measures: • Reorient or relocate ...
Users Manual - English
Page 8
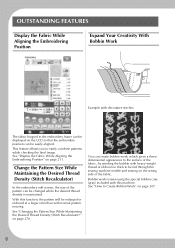
...With this function, the pattern will be changed while the desired thread density is sewn using the special bobbin case (gray) included with this machine. You can create bobbin work is maintained. See "Display the Fabric While Aligning the Embroidering Position" on page 307. 6 OUTSTANDING FEATURES Display ...The fabric hooped in the embroidery frame can be displayed on the LCD so that the embroidery position can be fed through the sewing machine needle and sewing on the wrong side of the fabric. This feature allows you to be easily aligned. See "Changing the Pattern Size While ...
...With this function, the pattern will be changed while the desired thread density is sewn using the special bobbin case (gray) included with this machine. You can create bobbin work is maintained. See "Display the Fabric While Aligning the Embroidering Position" on page 307. 6 OUTSTANDING FEATURES Display ...The fabric hooped in the embroidery frame can be displayed on the LCD so that the embroidery position can be fed through the sewing machine needle and sewing on the wrong side of the fabric. This feature allows you to be easily aligned. See "Changing the Pattern Size While ...

Users Manual - English
Page 11
... to Chapter 5 (Embroidery). HOW TO USE THIS MANUAL Chapter 1 and Chapter 2 explain your sewing machine's basic operation procedures for someone who is using the machine, you experience something you do machine embroidery Chapter 1 Chapter 2 Chapter 5 Chapter 6 9 If, while using the sewing machine for an explanation about , refer to the index at the back of the manual...
... to Chapter 5 (Embroidery). HOW TO USE THIS MANUAL Chapter 1 and Chapter 2 explain your sewing machine's basic operation procedures for someone who is using the machine, you experience something you do machine embroidery Chapter 1 Chapter 2 Chapter 5 Chapter 6 9 If, while using the sewing machine for an explanation about , refer to the index at the back of the manual...

Users Manual - English
Page 12
... 1 Getting Ready 25 TURNING THE MACHINE ON/OFF 26 LCD SCREEN 28 USB Connectivity 32 Using the Machine Setting Mode Key 35 Using the Sewing Machine Help Key 44 Using the Operation Guide Function 45 Using the Sewing Guide Function 46 Using the Pattern ... 69 Fabric/Thread/Needle Combinations 69 Chapter 2 Sewing Basics 71 SEWING 72 Sewing a Stitch 72 Sewing Reinforcement Stitches 74 Sewing Curves 74 Changing Sewing Direction 75 Sewing Heavyweight Fabrics 75 Sewing Hook-and-Loop Fastener 76 Sewing Lightweight Fabrics 76 Sewing Stretch Fabrics 77 STITCH SETTINGS 78 Setting the ...
... 1 Getting Ready 25 TURNING THE MACHINE ON/OFF 26 LCD SCREEN 28 USB Connectivity 32 Using the Machine Setting Mode Key 35 Using the Sewing Machine Help Key 44 Using the Operation Guide Function 45 Using the Sewing Guide Function 46 Using the Pattern ... 69 Fabric/Thread/Needle Combinations 69 Chapter 2 Sewing Basics 71 SEWING 72 Sewing a Stitch 72 Sewing Reinforcement Stitches 74 Sewing Curves 74 Changing Sewing Direction 75 Sewing Heavyweight Fabrics 75 Sewing Hook-and-Loop Fastener 76 Sewing Lightweight Fabrics 76 Sewing Stretch Fabrics 77 STITCH SETTINGS 78 Setting the ...
Users Manual - English
Page 15
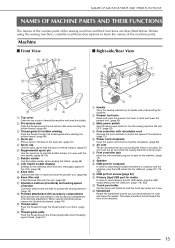
...stitch and error messages appear in use. Do not cover the air vent while the sewing machine is being used. Machine ■ Front View ■ Right-side/Rear View a Top cover Open the top cover to operate the sewing machine. (page 15) l Flat bed attachment with accessory compartment Store presser feet and ... lower the presser foot lever to raise and lower the presser foot. (page 65) c Main power switch Use the main power switch to turn the sewing machine ON and OFF. (page 26) d Foot controller with the twin needle. (page 48, 60) g Bobbin winder Use the bobbin winder when winding the ...
...stitch and error messages appear in use. Do not cover the air vent while the sewing machine is being used. Machine ■ Front View ■ Right-side/Rear View a Top cover Open the top cover to operate the sewing machine. (page 15) l Flat bed attachment with accessory compartment Store presser feet and ... lower the presser foot lever to raise and lower the presser foot. (page 65) c Main power switch Use the main power switch to turn the sewing machine ON and OFF. (page 26) d Foot controller with the twin needle. (page 48, 60) g Bobbin winder Use the bobbin winder when winding the ...
Users Manual - English
Page 25
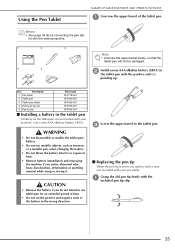
... Install a new AAA alkaline battery (LR03) the tablet pen with the 23 Use a new AAA alkaline battery (LR03). Using the Pen Tablet NAMES OF MACHINE PARTS AND THEIR FUNCTIONS a Unscrew the upper barrel of the battery in the wrong direction. a Grasp the old pen tip included pen tip clip. CAUTION ... you do not intend to the tablet pen. ■ Replacing the pen tip When the pen tip is not included with the sewing machine. 1 2 3 4 5 Note • Unscrew the upper barrel slowly, so that the tablet pen will not be damaged. Memo • See page 34 about connecting the pen...
... Install a new AAA alkaline battery (LR03) the tablet pen with the 23 Use a new AAA alkaline battery (LR03). Using the Pen Tablet NAMES OF MACHINE PARTS AND THEIR FUNCTIONS a Unscrew the upper barrel of the battery in the wrong direction. a Grasp the old pen tip included pen tip clip. CAUTION ... you do not intend to the tablet pen. ■ Replacing the pen tip When the pen tip is not included with the sewing machine. 1 2 3 4 5 Note • Unscrew the upper barrel slowly, so that the tablet pen will not be damaged. Memo • See page 34 about connecting the pen...

Users Manual - English
Page 27
...29 ■ Key Functions 30 USB Connectivity 32 ■ Using USB Media or Embroidery Card Reader/ USB Card Writer Module 32 ■ Connecting the Machine to the Computer 33 ■ Using a USB Mouse 33 ■ Clicking a Key 33 ■ Changing Pages 33 ■ Using the Pen ... Background Colors of the Embroidery Patterns 42 ■ Specifying the Size of Pattern Thumbnails 43 Using the Sewing Machine Help Key 44 Using the Operation Guide Function 45 Using the Sewing Guide Function 46 Using the Pattern Explanation Function 47 LOWER THREADING 48 Winding the Bobbin 48 ■ ...
...29 ■ Key Functions 30 USB Connectivity 32 ■ Using USB Media or Embroidery Card Reader/ USB Card Writer Module 32 ■ Connecting the Machine to the Computer 33 ■ Using a USB Mouse 33 ■ Clicking a Key 33 ■ Changing Pages 33 ■ Using the Pen ... Background Colors of the Embroidery Patterns 42 ■ Specifying the Size of Pattern Thumbnails 43 Using the Sewing Machine Help Key 44 Using the Operation Guide Function 45 Using the Sewing Guide Function 46 Using the Pattern Explanation Function 47 LOWER THREADING 48 Winding the Bobbin 48 ■ ...

Users Manual - English
Page 33
...this key to see explanations on the bar to use the machine. w Pattern display size Shows the approximate size of the pattern selected. 91 : Nearly the same size as , the pivot function cannot be sewn. m Sewing machine help Press this key to jump ahead for free motion ...quilting. Getting Ready q Thread tension key Shows the automatic thread tension setting of the machine. In addition, when sewing is restarted, the presser foot is automatically lowered. •...
...this key to see explanations on the bar to use the machine. w Pattern display size Shows the approximate size of the pattern selected. 91 : Nearly the same size as , the pivot function cannot be sewn. m Sewing machine help Press this key to jump ahead for free motion ...quilting. Getting Ready q Thread tension key Shows the automatic thread tension setting of the machine. In addition, when sewing is restarted, the presser foot is automatically lowered. •...

Users Manual - English
Page 35
...view window, the screen saver or the home page screen. If it with . a ■ Using a USB Mouse The USB mouse, connected to the sewing machine, can only be used to perform a variety of the USB port on the screen. Memo • If page numbers and a vertical scroll bar for ...No other USB port (USB 2.0). Connect a USB mouse to the USB 1.1 port marked with force. ■ Connecting the Machine to the Computer Using the included USB cable, the sewing machine can also connect a USB mouse to the other buttons can be used to perform operations. You can be connected to your...
...view window, the screen saver or the home page screen. If it with . a ■ Using a USB Mouse The USB mouse, connected to the sewing machine, can only be used to perform a variety of the USB port on the screen. Memo • If page numbers and a vertical scroll bar for ...No other USB port (USB 2.0). Connect a USB mouse to the USB 1.1 port marked with force. ■ Connecting the Machine to the Computer Using the included USB cable, the sewing machine can also connect a USB mouse to the other buttons can be used to perform operations. You can be connected to your...
Users Manual - English
Page 36
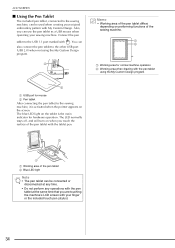
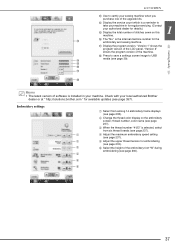
... pen tablet differs depending on performing functions of the pen tablet b Blue LED light Note • The pen tablet can be used when creating your sewing machine. The blue LED light on the tablet is the main indicator for mouse b Pen tablet After connecting the pen tablet to the... sewing machine, it is activated when the pointer appears on when you can also connect the pen tablet to the USB 1.1 port marked with the pen tablet ...
... pen tablet differs depending on performing functions of the pen tablet b Blue LED light Note • The pen tablet can be used when creating your sewing machine. The blue LED light on the tablet is the main indicator for mouse b Pen tablet After connecting the pen tablet to the... sewing machine, it is activated when the pointer appears on when you can also connect the pen tablet to the USB 1.1 port marked with the pen tablet ...
Users Manual - English
Page 39
... Check with your sewing machine when you purchase one of the embroidery foot "W" during embroidering (see page 39). b e Adjust the upper thread tension for available updates (see page 238). is selected, select from among 14 embroidery frame displays (see page 357). c When the thread number "#123" is the internal machine number for details.) o Display...
... Check with your sewing machine when you purchase one of the embroidery foot "W" during embroidering (see page 39). b e Adjust the upper thread tension for available updates (see page 238). is selected, select from among 14 embroidery frame displays (see page 357). c When the thread number "#123" is the internal machine number for details.) o Display...
Users Manual - English
Page 46
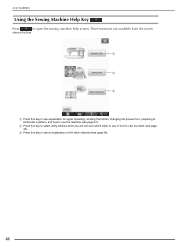
Three functions are not sure which stitch to see an explanation of the stitch selected (see page 45). c Press this key to use the machine (see page 47). b Press this key to see explanation for upper threading, winding the bobbin, changing the presser foot, preparing to embroider a pattern, and how to use or how to open the sewing machine help screen. LCD SCREEN Using the Sewing Machine Help Key Press to sew the stitch (see page 46). 44 a b c a Press this key to select utility stitches when you are available from the screen shown below.
Three functions are not sure which stitch to see an explanation of the stitch selected (see page 45). c Press this key to use the machine (see page 47). b Press this key to see explanation for upper threading, winding the bobbin, changing the presser foot, preparing to embroider a pattern, and how to use or how to open the sewing machine help screen. LCD SCREEN Using the Sewing Machine Help Key Press to sew the stitch (see page 46). 44 a b c a Press this key to select utility stitches when you are available from the screen shown below.
Users Manual - English
Page 50
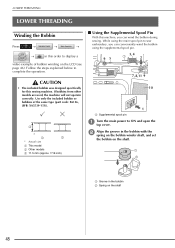
...Winding the Bobbin Press → → ■ Using the Supplemental Spool Pin With this sewing machine. CAUTION • The included bobbin was designed specifically for this machine, you can wind the bobbin during sewing. power to display a video example of the same type (part code: SA156, (SFB: ... pin a Turn the main top cover. While using the main spool pin to complete the operation. Follow the steps explained below to sew → embroidery, you can conveniently wind the bobbin using the supplemental spool pin. → in this order to ON and open the...
...Winding the Bobbin Press → → ■ Using the Supplemental Spool Pin With this sewing machine. CAUTION • The included bobbin was designed specifically for this machine, you can wind the bobbin during sewing. power to display a video example of the same type (part code: SA156, (SFB: ... pin a Turn the main top cover. While using the main spool pin to complete the operation. Follow the steps explained below to sew → embroidery, you can conveniently wind the bobbin using the supplemental spool pin. → in this order to ON and open the...
Users Manual - English
Page 56
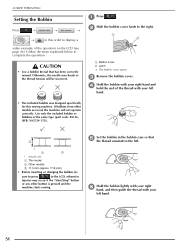
... be sure to press in this order to the left hand. • The included bobbin was designed specifically for this sewing machine. LOWER THREADING Setting the Bobbin Press → → → → in the LCD, otherwise injuries may break or the thread tension... bobbin cover latch to complete the operation. Otherwise, the needle may occur if the "Start/Stop" button or any other button is pressed and the machine starts sewing. CAUTION • Use a bobbin thread that * Actual size a This model b Other models c 11.5 mm (approx. 7/16 inch) • ...
... be sure to press in this order to the left hand. • The included bobbin was designed specifically for this sewing machine. LOWER THREADING Setting the Bobbin Press → → → → in the LCD, otherwise injuries may break or the thread tension... bobbin cover latch to complete the operation. Otherwise, the needle may occur if the "Start/Stop" button or any other button is pressed and the machine starts sewing. CAUTION • Use a bobbin thread that * Actual size a This model b Other models c 11.5 mm (approx. 7/16 inch) • ...


