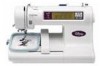
Users Manual - English
Page 2
... "O" position when making any adjustments in the needle area, such as described in the instruction manual. Close attention is necessary when the embroidery machine is intended for its intended use bent needles. 13. Keep fingers away from the accumulation of burns, fire, electric shock, or injury to the symbol "O" position which represents off, then remove plug from outlet. 9. Do not use as threading needle, changing needle, threading bobbin, or changing presser foot...
... "O" position when making any adjustments in the needle area, such as described in the instruction manual. Close attention is necessary when the embroidery machine is intended for its intended use bent needles. 13. Keep fingers away from the accumulation of burns, fire, electric shock, or injury to the symbol "O" position which represents off, then remove plug from outlet. 9. Do not use as threading needle, changing needle, threading bobbin, or changing presser foot...
Users Manual - English
Page 4
... needle while sewing. Do not store your embroidery machine beside a space heater, iron, or other moving parts. 2. Benzene, thinner, and scouring powders can damage the case and machine, and should never be sure to clean the case. Always consult the operation manual or use the "BASIC OPERATION" key when replacing or installing any other parts to change for improvement without notice. 1 Do not touch the balance wheel, thread...
... needle while sewing. Do not store your embroidery machine beside a space heater, iron, or other moving parts. 2. Benzene, thinner, and scouring powders can damage the case and machine, and should never be sure to clean the case. Always consult the operation manual or use the "BASIC OPERATION" key when replacing or installing any other parts to change for improvement without notice. 1 Do not touch the balance wheel, thread...

Users Manual - English
Page 5
... 5 "START/STOP" BUTTON 5 ACCESSORIES 6 OPTIONS 7 OPERATION (SELECTION KEYS) ........ 8 HOW TO USE THE LANGUAGE SELECTION KEY 11 How to clear the language selection 12 BOBBIN WINDING AND INSTALLATION 13 Setting the bobbin 15 UPPER THREADING 16 Auto needle threading device 17 PREPARATION BEFORE EMBROIDERING 18 Attaching stabilizer material 18 Embroidering different types of fabric 18 Setting the fabric in the embroidery frame 20 Fitting the embroidery frame to the machine 22 Removing the embroidery frame ...... 22 THREAD TENSION ADJUSTMENT....... 23 ADJUSTING...
... 5 "START/STOP" BUTTON 5 ACCESSORIES 6 OPTIONS 7 OPERATION (SELECTION KEYS) ........ 8 HOW TO USE THE LANGUAGE SELECTION KEY 11 How to clear the language selection 12 BOBBIN WINDING AND INSTALLATION 13 Setting the bobbin 15 UPPER THREADING 16 Auto needle threading device 17 PREPARATION BEFORE EMBROIDERING 18 Attaching stabilizer material 18 Embroidering different types of fabric 18 Setting the fabric in the embroidery frame 20 Fitting the embroidery frame to the machine 22 Removing the embroidery frame ...... 22 THREAD TENSION ADJUSTMENT....... 23 ADJUSTING...
Users Manual - English
Page 6
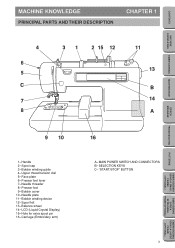
... FRAME (OPTIONAL) EMBROIDERING USING A LARGE FRAME (OPTIONAL) 3 Needle plate 11- Bobbin winding device 12- Presser foot 9- Upper thread tension dial 5- Needle threader 8- Handle 2- LCD (Liquid Crystal Display) 15- MAIN POWER SWITCH AND CONNECTORS B- CONTENTS MACHINE KNOWLEDGE EMBROIDERING MAINTENANCE MACHINE KNOWLEDGE PRINCIPAL PARTS AND THEIR DESCRIPTION CHAPTER 1 4 6 5 C 7 8 31 2 15 12 11 13 B 14 A ERROR MESSAGE TROUBLESHOOTING PATTERNS EMBROIDERING USING A SMALL FRAME (OPTIONAL) 9 10 1- Bobbin cover 10- Spool cap 3- Spool felt 13- Hole for extra spool pin 16-
... FRAME (OPTIONAL) EMBROIDERING USING A LARGE FRAME (OPTIONAL) 3 Needle plate 11- Bobbin winding device 12- Presser foot 9- Upper thread tension dial 5- Needle threader 8- Handle 2- LCD (Liquid Crystal Display) 15- MAIN POWER SWITCH AND CONNECTORS B- CONTENTS MACHINE KNOWLEDGE EMBROIDERING MAINTENANCE MACHINE KNOWLEDGE PRINCIPAL PARTS AND THEIR DESCRIPTION CHAPTER 1 4 6 5 C 7 8 31 2 15 12 11 13 B 14 A ERROR MESSAGE TROUBLESHOOTING PATTERNS EMBROIDERING USING A SMALL FRAME (OPTIONAL) 9 10 1- Bobbin cover 10- Spool cap 3- Spool felt 13- Hole for extra spool pin 16-
Users Manual - English
Page 7
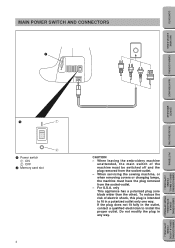
... of the machine must have the plug removed from the socket-outlet. - EMBROIDERING USING A EXTRA-SMALL FRAME (OPTIONAL) EMBROIDERING USING A LARGE FRAME (OPTIONAL) CONTENTS MACHINE KNOWLEDGE MAIN POWER SWITCH AND CONNECTORS 2 EMBROIDERING MAINTENANCE ERROR MESSAGE TROUBLESHOOTING PATTERNS EMBROIDERING USING A SMALL FRAME (OPTIONAL) 1 1 Power switch 1 ON 2 OFF 2 Memory card slot 4 CAUTION - When leaving the embroidery machine unattended, the main switch of electric shock, this plug is intended to install the proper...
... of the machine must have the plug removed from the socket-outlet. - EMBROIDERING USING A EXTRA-SMALL FRAME (OPTIONAL) EMBROIDERING USING A LARGE FRAME (OPTIONAL) CONTENTS MACHINE KNOWLEDGE MAIN POWER SWITCH AND CONNECTORS 2 EMBROIDERING MAINTENANCE ERROR MESSAGE TROUBLESHOOTING PATTERNS EMBROIDERING USING A SMALL FRAME (OPTIONAL) 1 1 Power switch 1 ON 2 OFF 2 Memory card slot 4 CAUTION - When leaving the embroidery machine unattended, the main switch of electric shock, this plug is intended to install the proper...
Users Manual - English
Page 8
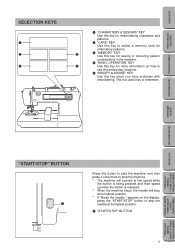
...) "START/STOP" BUTTON 1 Press this key when you have problems with embroidering. CONTENTS MACHINE KNOWLEDGE SELECTION KEYS 1 2 4 1 "CHARACTERS & DESIGNS" KEY Use this key for embroidering characters and patterns. 2 "CARD" KEY Use this key to select a memory card for embroidery patterns. 3 3 "MEMORY" KEY Use this key for saving or retrieving pattern combinations in the machine. 4 "BASIC OPERATION" KEY 5 Use this key for more to stop the machine. * The machine will operate at low speed...
...) "START/STOP" BUTTON 1 Press this key when you have problems with embroidering. CONTENTS MACHINE KNOWLEDGE SELECTION KEYS 1 2 4 1 "CHARACTERS & DESIGNS" KEY Use this key for embroidering characters and patterns. 2 "CARD" KEY Use this key to select a memory card for embroidery patterns. 3 3 "MEMORY" KEY Use this key for saving or retrieving pattern combinations in the machine. 4 "BASIC OPERATION" KEY 5 Use this key for more to stop the machine. * The machine will operate at low speed...

Users Manual - English
Page 16
... go. 1 Spool cap 2 Spool 3 Spool felt NOTE * If using a fine thread such as cross wound thread, remove the spool felt and slightly separate the spool cap from the bottom front of the spool. Connect the machine to wind a bobbin and set the lower thread. 1 1 "BASIC OPERATION" key 3 2 6 7 4 5 1 ERROR MESSAGE TROUBLESHOOTING PATTERNS EMBROIDERING USING A SMALL FRAME (OPTIONAL) 1 2 1 2 3 1. CONTENTS MACHINE KNOWLEDGE EMBROIDERING MAINTENANCE BOBBIN WINDING AND INSTALLATION How to the power supply and turn on the spool before using. 1 Cross wound thread 2 Spool cap (small...
... go. 1 Spool cap 2 Spool 3 Spool felt NOTE * If using a fine thread such as cross wound thread, remove the spool felt and slightly separate the spool cap from the bottom front of the spool. Connect the machine to wind a bobbin and set the lower thread. 1 1 "BASIC OPERATION" key 3 2 6 7 4 5 1 ERROR MESSAGE TROUBLESHOOTING PATTERNS EMBROIDERING USING A SMALL FRAME (OPTIONAL) 1 2 1 2 3 1. CONTENTS MACHINE KNOWLEDGE EMBROIDERING MAINTENANCE BOBBIN WINDING AND INSTALLATION How to the power supply and turn on the spool before using. 1 Cross wound thread 2 Spool cap (small...
Users Manual - English
Page 19
.... 2. Insert the extra spool pin into the hole on the machine. 1 1 "BASIC OPERATION" key 3 A * 1 2 4 EMBROIDERING MAINTENANCE ERROR MESSAGE TROUBLESHOOTING PATTERNS EMBROIDERING USING A SMALL FRAME (OPTIONAL) ** 1. Install the spool felt and the thread spool in that order, and then thread the upper thread. * Do not thread the thread onto bracket (A). * When sewing using the metallic thread, set thread tension control dial (B) to the "0" position. * When setting the thread spool, set it comes off from twisting as illustrated with metallic thread. 1. Lower the presser foot...
.... 2. Insert the extra spool pin into the hole on the machine. 1 1 "BASIC OPERATION" key 3 A * 1 2 4 EMBROIDERING MAINTENANCE ERROR MESSAGE TROUBLESHOOTING PATTERNS EMBROIDERING USING A SMALL FRAME (OPTIONAL) ** 1. Install the spool felt and the thread spool in that order, and then thread the upper thread. * Do not thread the thread onto bracket (A). * When sewing using the metallic thread, set thread tension control dial (B) to the "0" position. * When setting the thread spool, set it comes off from twisting as illustrated with metallic thread. 1. Lower the presser foot...
Users Manual - English
Page 26
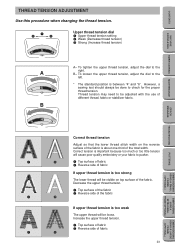
... "4" and "6". Upper thread tension dial 1 Upper thread tension setting 2 Weak (Decrease thread tension) 3 Strong (Increase thread tension) A- Decrease the upper thread tension. 1 Top surface of the fabric 2 Reverse side of the fabric is too strong The lower thread will cause poor quality embroidery or your fabric to the A right. CONTENTS MACHINE KNOWLEDGE EMBROIDERING MAINTENANCE THREAD TENSION ADJUSTMENT Use this procedure when changing the thread tension. To loosen the upper thread tension, adjust the dial to check for the proper thread tension. However, a sewing test should...
... "4" and "6". Upper thread tension dial 1 Upper thread tension setting 2 Weak (Decrease thread tension) 3 Strong (Increase thread tension) A- Decrease the upper thread tension. 1 Top surface of the fabric 2 Reverse side of the fabric is too strong The lower thread will cause poor quality embroidery or your fabric to the A right. CONTENTS MACHINE KNOWLEDGE EMBROIDERING MAINTENANCE THREAD TENSION ADJUSTMENT Use this procedure when changing the thread tension. To loosen the upper thread tension, adjust the dial to check for the proper thread tension. However, a sewing test should...
Users Manual - English
Page 28
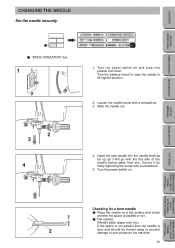
...) EMBROIDERING USING A LARGE FRAME (OPTIONAL) 1 2 Checking for a bent needle 1 Place the needle on . Turn the power switch off and lower the presser foot lever. Slide the needle out. 2 3 4 4. Insert the new needle into the needle shaft as far up as it by firmly tightening the screw with the flat side of the needle facing away from you. Secure it will go with a screwdriver. 5. CONTENTS MACHINE KNOWLEDGE EMBROIDERING MAINTENANCE CHANGING THE NEEDLE Set...
...) EMBROIDERING USING A LARGE FRAME (OPTIONAL) 1 2 Checking for a bent needle 1 Place the needle on . Turn the power switch off and lower the presser foot lever. Slide the needle out. 2 3 4 4. Insert the new needle into the needle shaft as far up as it by firmly tightening the screw with the flat side of the needle facing away from you. Secure it will go with a screwdriver. 5. CONTENTS MACHINE KNOWLEDGE EMBROIDERING MAINTENANCE CHANGING THE NEEDLE Set...
Users Manual - English
Page 29
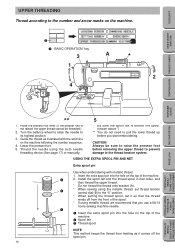
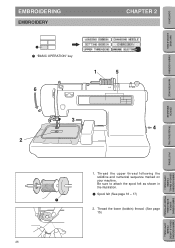
Thread the lower (bobbin) thread. (See page 15) 26 EMBROIDERING USING A LARGE FRAME (OPTIONAL) Be sure to attach the spool felt as shown in the illustration. 1 Spool felt (See page 16 - 17) 2. CONTENTS MACHINE KNOWLEDGE EMBROIDERING MAINTENANCE EMBROIDERING EMBROIDERY CHAPTER 2 1 1 "BASIC OPERATION" key 6 1 5 3 4 2 ERROR MESSAGE TROUBLESHOOTING PATTERNS EMBROIDERING USING A SMALL FRAME (OPTIONAL) EMBROIDERING USING A EXTRA-SMALL FRAME (OPTIONAL) 1. Thread the upper thread following the solidline and numerical sequence marked on your machine.
Thread the lower (bobbin) thread. (See page 15) 26 EMBROIDERING USING A LARGE FRAME (OPTIONAL) Be sure to attach the spool felt as shown in the illustration. 1 Spool felt (See page 16 - 17) 2. CONTENTS MACHINE KNOWLEDGE EMBROIDERING MAINTENANCE EMBROIDERING EMBROIDERY CHAPTER 2 1 1 "BASIC OPERATION" key 6 1 5 3 4 2 ERROR MESSAGE TROUBLESHOOTING PATTERNS EMBROIDERING USING A SMALL FRAME (OPTIONAL) EMBROIDERING USING A EXTRA-SMALL FRAME (OPTIONAL) 1. Thread the upper thread following the solidline and numerical sequence marked on your machine.
Users Manual - English
Page 35
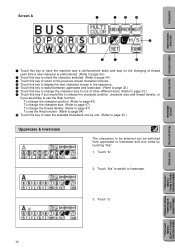
CONTENTS MACHINE KNOWLEDGE EMBROIDERING MAINTENANCE ERROR MESSAGE Screen A 1 2 3 4 6 5 7 8 1 Touch this key to have the machine sew a reinforcement stitch and stop for the changing of thread each time a new character is embroidered. (Refer to page 34.) 2 Touch this key to check the character selected. (Refer to page 34.) 3 Touch this key to return to the previous screen ...
CONTENTS MACHINE KNOWLEDGE EMBROIDERING MAINTENANCE ERROR MESSAGE Screen A 1 2 3 4 6 5 7 8 1 Touch this key to have the machine sew a reinforcement stitch and stop for the changing of thread each time a new character is embroidered. (Refer to page 34.) 2 Touch this key to check the character selected. (Refer to page 34.) 3 Touch this key to return to the previous screen ...
Users Manual - English
Page 46
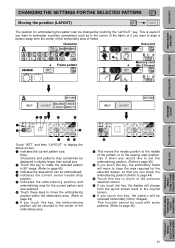
... center of the embroidery area of frame. Character One point Frame pattern Memory card (No.2 Flower) EMBROIDERING MAINTENANCE ERROR MESSAGE TROUBLESHOOTING PATTERNS EMBROIDERING USING A SMALL FRAME (OPTIONAL) 34 5 6 8 1 2 9 7 0A Touch "SET" and then "LAYOUT" to the sewing start position. This function cannot be changed by touching the "LAYOUT" key. This is useful if you want to page 46) 43 EMBROIDERING USING A EXTRA-SMALL FRAME (OPTIONAL) EMBROIDERING USING A LARGE FRAME (OPTIONAL...
... center of the embroidery area of frame. Character One point Frame pattern Memory card (No.2 Flower) EMBROIDERING MAINTENANCE ERROR MESSAGE TROUBLESHOOTING PATTERNS EMBROIDERING USING A SMALL FRAME (OPTIONAL) 34 5 6 8 1 2 9 7 0A Touch "SET" and then "LAYOUT" to the sewing start position. This function cannot be changed by touching the "LAYOUT" key. This is useful if you want to page 46) 43 EMBROIDERING USING A EXTRA-SMALL FRAME (OPTIONAL) EMBROIDERING USING A LARGE FRAME (OPTIONAL...
Users Manual - English
Page 51
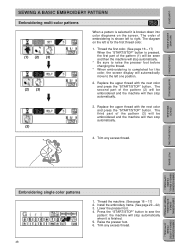
... raise the presser foot before changing the thread. * When embroidering is broken down into color diagrams on the left is for this color, the screen display will stop automatically. (3) 4. ERROR MESSAGE TROUBLESHOOTING PATTERNS EMBROIDERING USING A SMALL FRAME (OPTIONAL) EMBROIDERING USING A EXTRA-SMALL FRAME (OPTIONAL) Embroidering single color patterns 1. Install the embroidery frame. (See page 20 - 22) 3. CONTENTS MACHINE KNOWLEDGE EMBROIDERING MAINTENANCE SEWING A BASIC EMBROIDERY PATTERN Embroidering multi-color patterns (1) (2) (3) (2) (3) When a pattern is...
... raise the presser foot before changing the thread. * When embroidering is broken down into color diagrams on the left is for this color, the screen display will stop automatically. (3) 4. ERROR MESSAGE TROUBLESHOOTING PATTERNS EMBROIDERING USING A SMALL FRAME (OPTIONAL) EMBROIDERING USING A EXTRA-SMALL FRAME (OPTIONAL) Embroidering single color patterns 1. Install the embroidery frame. (See page 20 - 22) 3. CONTENTS MACHINE KNOWLEDGE EMBROIDERING MAINTENANCE SEWING A BASIC EMBROIDERY PATTERN Embroidering multi-color patterns (1) (2) (3) (2) (3) When a pattern is...
Users Manual - English
Page 57
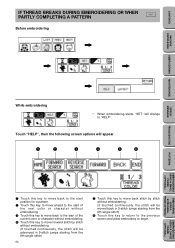
..., the stitch will change to begin. EMBROIDERING USING A EXTRA-SMALL FRAME (OPTIONAL) EMBROIDERING USING A LARGE FRAME (OPTIONAL) CONTENTS IF THREAD BREAKS DURING EMBROIDERING OR WHEN PARTLY COMPLETING A PATTERN Before embroidering MACHINE KNOWLEDGE EMBROIDERING MAINTENANCE ERROR MESSAGE TROUBLESHOOTING PATTERNS EMBROIDERING USING A SMALL FRAME (OPTIONAL) While embroidering * When embroidering starts, "SET" will be advanced in 9-stitch jumps starting from the 6th single stitch) 54 5 Touch this key to return to the previous screen and allow embroidery to "HELP".
..., the stitch will change to begin. EMBROIDERING USING A EXTRA-SMALL FRAME (OPTIONAL) EMBROIDERING USING A LARGE FRAME (OPTIONAL) CONTENTS IF THREAD BREAKS DURING EMBROIDERING OR WHEN PARTLY COMPLETING A PATTERN Before embroidering MACHINE KNOWLEDGE EMBROIDERING MAINTENANCE ERROR MESSAGE TROUBLESHOOTING PATTERNS EMBROIDERING USING A SMALL FRAME (OPTIONAL) While embroidering * When embroidering starts, "SET" will be advanced in 9-stitch jumps starting from the 6th single stitch) 54 5 Touch this key to return to the previous screen and allow embroidery to "HELP".

Users Manual - English
Page 58
... thread broke, touch "REVERSE SEARCH" to move back to the beginning of that color, and then touch "FORWARD" to move forward to just before the position where the thread broke or the bobbin ran out of the thread. * Cut the upper thread above the fabric in the frame and then remove the embroidery frame. Lower the presser foot lever and press the "START/STOP" button to adjust the stitch...
... thread broke, touch "REVERSE SEARCH" to move back to the beginning of that color, and then touch "FORWARD" to move forward to just before the position where the thread broke or the bobbin ran out of the thread. * Cut the upper thread above the fabric in the frame and then remove the embroidery frame. Lower the presser foot lever and press the "START/STOP" button to adjust the stitch...
Users Manual - English
Page 60
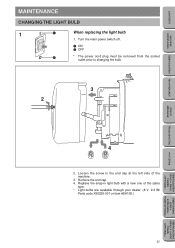
... bulb. 3 2 4 2. Replace the snap-in the end cap at the left side of the same type. * Light bulbs are available through your dealer. (8 V, 2.4 W/ Parts code X50228-001 or item #SA105.) ERROR MESSAGE TROUBLESHOOTING PATTERNS EMBROIDERING USING A SMALL FRAME (OPTIONAL) EMBROIDERING USING A EXTRA-SMALL FRAME (OPTIONAL) EMBROIDERING USING A LARGE FRAME (OPTIONAL) 57 Loosen the screw in light bulb with a new one of the machine. 3. Remove the end cap. 4. CONTENTS MACHINE KNOWLEDGE EMBROIDERING MAINTENANCE MAINTENANCE CHANGING THE LIGHT BULB 1 When replacing the light bulb...
... bulb. 3 2 4 2. Replace the snap-in the end cap at the left side of the same type. * Light bulbs are available through your dealer. (8 V, 2.4 W/ Parts code X50228-001 or item #SA105.) ERROR MESSAGE TROUBLESHOOTING PATTERNS EMBROIDERING USING A SMALL FRAME (OPTIONAL) EMBROIDERING USING A EXTRA-SMALL FRAME (OPTIONAL) EMBROIDERING USING A LARGE FRAME (OPTIONAL) 57 Loosen the screw in light bulb with a new one of the machine. 3. Remove the end cap. 4. CONTENTS MACHINE KNOWLEDGE EMBROIDERING MAINTENANCE MAINTENANCE CHANGING THE LIGHT BULB 1 When replacing the light bulb...
Users Manual - English
Page 62
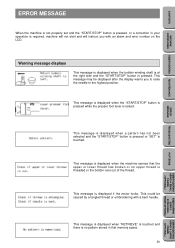
... that memory space. 59 PATTERNS EMBROIDERING USING A SMALL FRAME (OPTIONAL) EMBROIDERING USING A EXTRA-SMALL FRAME (OPTIONAL) EMBROIDERING USING A LARGE FRAME (OPTIONAL) CONTENTS MACHINE KNOWLEDGE EMBROIDERING MAINTENANCE ERROR MESSAGE TROUBLESHOOTING ERROR MESSAGE When the machine is not properly set and the "START/STOP" button is pressed, or a correction in that the upper or lower thread has broken or no upper thread is threaded or the bobbin runs out of the thread. This message is displayed when...
... that memory space. 59 PATTERNS EMBROIDERING USING A SMALL FRAME (OPTIONAL) EMBROIDERING USING A EXTRA-SMALL FRAME (OPTIONAL) EMBROIDERING USING A LARGE FRAME (OPTIONAL) CONTENTS MACHINE KNOWLEDGE EMBROIDERING MAINTENANCE ERROR MESSAGE TROUBLESHOOTING ERROR MESSAGE When the machine is not properly set and the "START/STOP" button is pressed, or a correction in that the upper or lower thread has broken or no upper thread is threaded or the bobbin runs out of the thread. This message is displayed when...
Users Manual - English
Page 65
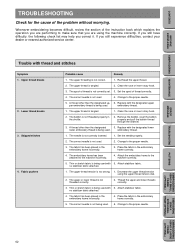
..., the following check list may help you still experience difficulties, contact your dealer or nearest authorized service center. Trouble with the designated lower lower embroidery thread is being used . The correct needle is being used . Attach the embroidery frame to make sure that you are using the upper thread tension dial. 2. CONTENTS MACHINE KNOWLEDGE EMBROIDERING MAINTENANCE ERROR MESSAGE TROUBLESHOOTING Check for the cause of thread correctly. 4. Fabric puckers Probable cause Remedy 1. The spool of the instruction book which explains the...
..., the following check list may help you still experience difficulties, contact your dealer or nearest authorized service center. Trouble with the designated lower lower embroidery thread is being used . The correct needle is being used . Attach the embroidery frame to make sure that you are using the upper thread tension dial. 2. CONTENTS MACHINE KNOWLEDGE EMBROIDERING MAINTENANCE ERROR MESSAGE TROUBLESHOOTING Check for the cause of thread correctly. 4. Fabric puckers Probable cause Remedy 1. The spool of the instruction book which explains the...

Users Manual - English
Page 67
... 1. Lower the presser foot. 4. Accordingly, if the upper thread is not threaded, the machine will not operate even if the "START/STOP" button is not correctly inserted. 2. Then turn the main power switch on page 59. 1. Thread scraps and dust have accumulated under the needle plate. 1. The needle is pressed. Press the "START/STOP" button. 2. Caution ● This machine is off, plug the unit in the off during embroidery. ERROR MESSAGE TROUBLESHOOTING PATTERNS EMBROIDERING USING...
... 1. Lower the presser foot. 4. Accordingly, if the upper thread is not threaded, the machine will not operate even if the "START/STOP" button is not correctly inserted. 2. Then turn the main power switch on page 59. 1. Thread scraps and dust have accumulated under the needle plate. 1. The needle is pressed. Press the "START/STOP" button. 2. Caution ● This machine is off, plug the unit in the off during embroidery. ERROR MESSAGE TROUBLESHOOTING PATTERNS EMBROIDERING USING...


