
Owner's Manual - English
Page 4
...; Do not drop or hit the unit or AC adapter. IBM is required, please consult your warranty. To obtain the best performance from Embroidery Cards, newspapers and magazines for purchasing our product. Notice This Instruction Manual does not explain how to create wider embroidery patterns and supports wider ranges for a long period. Do not use extension cords. • Avoid dropping a needle, a piece of...
...; Do not drop or hit the unit or AC adapter. IBM is required, please consult your warranty. To obtain the best performance from Embroidery Cards, newspapers and magazines for purchasing our product. Notice This Instruction Manual does not explain how to create wider embroidery patterns and supports wider ranges for a long period. Do not use extension cords. • Avoid dropping a needle, a piece of...
Owner's Manual - English
Page 8
... 106 • Drawing a curve 106 Manual Punching Mode ---------- 107 • Creating a manual punching pattern --- 107 s Using the Sewing Attributes Bar ---- 109 Quick Reference Alphabetic Index Programmable Stich Creator File Utility Getting Started Design Center Layout & Editing Before Using Contents Enlarging Selected Outlines to the Screen Size - 58 s Using the Stage 4 Tool Box ------ 59 Region Setting Mode 59 • Applying the sewing attributes to a region -- 59...
... 106 • Drawing a curve 106 Manual Punching Mode ---------- 107 • Creating a manual punching pattern --- 107 s Using the Sewing Attributes Bar ---- 109 Quick Reference Alphabetic Index Programmable Stich Creator File Utility Getting Started Design Center Layout & Editing Before Using Contents Enlarging Selected Outlines to the Screen Size - 58 s Using the Stage 4 Tool Box ------ 59 Region Setting Mode 59 • Applying the sewing attributes to a region -- 59...
Owner's Manual - English
Page 9
... level 113 • Text Sew Type 114 Setting the Thread Color and Stitch ----- 115 • Line sew 115 • Region sew 116 • Color 117 • Stitch 119 s Using the Menu Bar and the Toolbar --- 120 File Menu 121 • New 121 • Open 122 • Import - from an Embroidery Card---- 160 Operation 160 Error Messages 162 s Writing to Card 128 • Print Setup 128 • Print Preview...
... level 113 • Text Sew Type 114 Setting the Thread Color and Stitch ----- 115 • Line sew 115 • Region sew 116 • Color 117 • Stitch 119 s Using the Menu Bar and the Toolbar --- 120 File Menu 121 • New 121 • Open 122 • Import - from an Embroidery Card---- 160 Operation 160 Error Messages 162 s Writing to Card 128 • Print Setup 128 • Print Preview...
Owner's Manual - English
Page 16
... embroidery patterns and supports wider ranges for Creating Embroidery Patterns When Satin stitch is used . Stitch to Block command, then scaling a pattern allows you to simply scale your final material. 6 Programmable Stich Creator Quick Reference Alphabetic Index You may choose to obtain a more complex embroidery; Selecting the "Normal" sensitivity setting of several different parts (in Design Center or Layout & Editing), make a trial sewing sample with your particular sewing machine model...
... embroidery patterns and supports wider ranges for Creating Embroidery Patterns When Satin stitch is used . Stitch to Block command, then scaling a pattern allows you to simply scale your final material. 6 Programmable Stich Creator Quick Reference Alphabetic Index You may choose to obtain a more complex embroidery; Selecting the "Normal" sensitivity setting of several different parts (in Design Center or Layout & Editing), make a trial sewing sample with your particular sewing machine model...
Owner's Manual - English
Page 39
... example, draw a circle and change the setting in the Arc shape selector. NOTE: When drawing a circle or other options are for setting the stitch type and thread color for the outline (Line stitch) and for a while on the Line sew button, the Line color button and the Line sew type selector disappear. Do not worry now about the position, size or aspect ratio (ratio...
... example, draw a circle and change the setting in the Arc shape selector. NOTE: When drawing a circle or other options are for setting the stitch type and thread color for the outline (Line stitch) and for a while on the Line sew button, the Line color button and the Line sew type selector disappear. Do not worry now about the position, size or aspect ratio (ratio...
Owner's Manual - English
Page 47
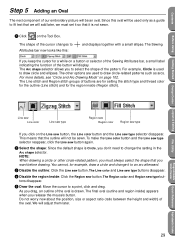
... different settings of a programmed stitch, see "Sewing Attribute Setting" on page 144. 6 Click Apply. ing and holding the mouse button down on the "down" arrow until a value of 50 % by typing the value directly in the Line sewing tab of the pattern. Rotate the pattern to change either arrow or by click- Contents Before Using Getting Started Design Center Layout & Editing 4 Change the row offset. Make...
... different settings of a programmed stitch, see "Sewing Attribute Setting" on page 144. 6 Click Apply. ing and holding the mouse button down on the "down" arrow until a value of 50 % by typing the value directly in the Line sewing tab of the pattern. Rotate the pattern to change either arrow or by click- Contents Before Using Getting Started Design Center Layout & Editing 4 Change the row offset. Make...
Owner's Manual - English
Page 72
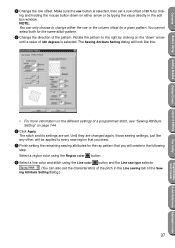
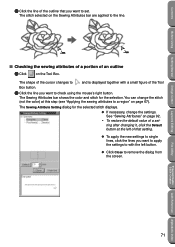
... the Tool Box button. 2 Click the line you do not make these settings now, the current settings will be black. 1 You can modify them to a portion of the cursor position to the next branch points. The Sewing Attributes bar shows the color and stitch for a portion of the Tool Box button. The shape of the cursor changes to and is...
... the Tool Box button. 2 Click the line you do not make these settings now, the current settings will be black. 1 You can modify them to a portion of the cursor position to the next branch points. The Sewing Attributes bar shows the color and stitch for a portion of the Tool Box button. The shape of the cursor changes to and is...
Owner's Manual - English
Page 77
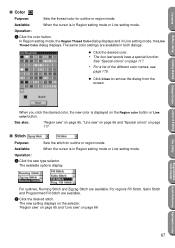
Getting Started Design Center Layout & Editing File Utility Programmable Stich Creator When you click the desired color, the new color is in both dialogs. Operation: 1 Click the sew type selector. For regions Fill Stitch, Satin Stitch and Programmed Fill Stitch are available in Region setting mode or Line setting mode. The same color settings are available. 2 Click the desired stitch. Available: When the cursor is displayed...
Getting Started Design Center Layout & Editing File Utility Programmable Stich Creator When you click the desired color, the new color is in both dialogs. Operation: 1 Click the sew type selector. For regions Fill Stitch, Satin Stitch and Programmed Fill Stitch are available in Region setting mode or Line setting mode. The same color settings are available. 2 Click the desired stitch. Available: When the cursor is displayed...
Owner's Manual - English
Page 89
... stitch type is clicked. Select the directory of the stitch pattern columns when the column radio Column button is created by the Programmable Stitch Creator application. Contents Before Using Getting Started Design Center Layout & Editing Fill stitch only: Step pitch Frequency Sets the pitch of different settings. Range: 0 ~ 359 degrees Default: 0 degrees Note on the programmed fill stitch: When setting the stitch and pattern directions of...
... stitch type is clicked. Select the directory of the stitch pattern columns when the column radio Column button is created by the Programmable Stitch Creator application. Contents Before Using Getting Started Design Center Layout & Editing Fill stitch only: Step pitch Frequency Sets the pitch of different settings. Range: 0 ~ 359 degrees Default: 0 degrees Note on the programmed fill stitch: When setting the stitch and pattern directions of...
Owner's Manual - English
Page 117
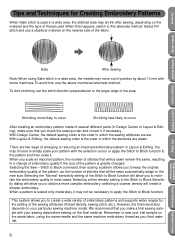
... above example, we removed after completing the manual punching pattern. Letters that you use as guides. Getting Started Design Center Layout & Editing File Utility Programmable Stich Creator Quick Reference Alphabetic Index Fill stitch (the thread has a constant direction) Manual Punching (the direction of two letters "O". is easier to use something in order to make it easier to create patterns that look better when the thread direction "follows" the curves...
... above example, we removed after completing the manual punching pattern. Letters that you use as guides. Getting Started Design Center Layout & Editing File Utility Programmable Stich Creator Quick Reference Alphabetic Index Fill stitch (the thread has a constant direction) Manual Punching (the direction of two letters "O". is easier to use something in order to make it easier to create patterns that look better when the thread direction "follows" the curves...
Instructin Manual for PE-DESIGN Ver.3.0
Page 4
... operation, please read before sewing on choosing our product! Notice This Instruction Manual does not explain how to create wider embroidery patterns and supports wider ranges for household use your nearest service center. Copyright acknowledgment MS-DOS and Windows are registered trademarks of International Business Machine Corporation. This software can be used or copied only in a safe place together with this product For designing...
... operation, please read before sewing on choosing our product! Notice This Instruction Manual does not explain how to create wider embroidery patterns and supports wider ranges for household use your nearest service center. Copyright acknowledgment MS-DOS and Windows are registered trademarks of International Business Machine Corporation. This software can be used or copied only in a safe place together with this product For designing...
Instructin Manual for PE-DESIGN Ver.3.0
Page 15
... embroidery patterns and supports wider ranges for Creating Embroidery Patterns When Satin stitch is the order in which the sewing attributes are set the stitch direction perpendicular to simply scale your particular sewing machine model. Selecting the "Normal" sensitivity setting of the sewing attributes (thread density, sewing pitch, etc.). However, the final result also depends on the reverse side of several different parts (in Design Center or Layout & Editing), make a trial sewing...
... embroidery patterns and supports wider ranges for Creating Embroidery Patterns When Satin stitch is the order in which the sewing attributes are set the stitch direction perpendicular to simply scale your particular sewing machine model. Selecting the "Normal" sensitivity setting of the sewing attributes (thread density, sewing pitch, etc.). However, the final result also depends on the reverse side of several different parts (in Design Center or Layout & Editing), make a trial sewing...
Instructin Manual for PE-DESIGN Ver.3.0
Page 60
... the error appears selected, change its size or position. 51 is automatically enlarged or shrunk to fit in the sewing order.) NOTE: Make sure that no pattern has been selected before you have set . Therefore, since the number of times for the currently displayed design. • Only the designs that would be sewn correctly or the fabric may not feed evenly if the embroidery frame installation position is changed...
... the error appears selected, change its size or position. 51 is automatically enlarged or shrunk to fit in the sewing order.) NOTE: Make sure that no pattern has been selected before you have set . Therefore, since the number of times for the currently displayed design. • Only the designs that would be sewn correctly or the fabric may not feed evenly if the embroidery frame installation position is changed...
Instructin Manual for PE-DESIGN Ver.3.0
Page 77
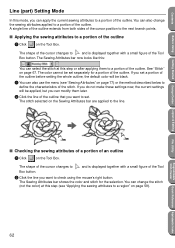
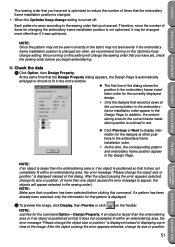
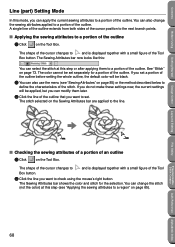
...Tool Box button. You can change the sewing attributes applied to a portion of the outline. Contents Before Using Line (part) Setting Mode In this step (see "Sewing Attributes" on page 85) or the method described below to define the characteristics of the stitch. See "Stitch" on...Click on the Sewing Attributes bar are applied to a region" on page 65). 68 The stitch selected on the Tool Box. You can also use the menu (see "Applying the sewing attributes to the line. Getting Started Design Center Layout & Editing File Utility Programmable Stich Creator Quik ...
...Tool Box button. You can change the sewing attributes applied to a portion of the outline. Contents Before Using Line (part) Setting Mode In this step (see "Sewing Attributes" on page 85) or the method described below to define the characteristics of the stitch. See "Stitch" on...Click on the Sewing Attributes bar are applied to a region" on page 65). 68 The stitch selected on the Tool Box. You can also use the menu (see "Applying the sewing attributes to the line. Getting Started Design Center Layout & Editing File Utility Programmable Stich Creator Quik ...

Instructin Manual for PE-DESIGN Ver.3.0
Page 126
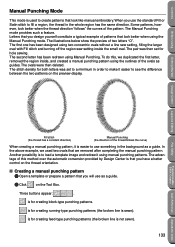
... same direction. Three buttons appear: . is for creating running-type punching patterns (the broken line is easier to use as a guide. 2 Click on the thread orientation. The advantage of this , we removed after completing the manual punching pattern. The illustrations below show the preview of the ovals as a guide. s Creating a manual punching pattern 1 Open a template or prepare a pattern that look like manual embroidery. is for creating feed-type punching patterns...
... same direction. Three buttons appear: . is for creating running-type punching patterns (the broken line is easier to use as a guide. 2 Click on the thread orientation. The advantage of this , we removed after completing the manual punching pattern. The illustrations below show the preview of the ovals as a guide. s Creating a manual punching pattern 1 Open a template or prepare a pattern that look like manual embroidery. is for creating feed-type punching patterns...
Instructin Manual for PE-DESIGN Ver.4.0
Page 4
... software can be used or copied only in accordance with your particular sewing machine model. "For additional product information and updates, visit our web site at: www.brother.com" Notice This Instruction Manual does not explain how to be used for a long period. Do not use extension cords. • Avoid dropping a needle, a piece of material from this unit and to create a wide variety of embroidery patterns and supports...
... software can be used or copied only in accordance with your particular sewing machine model. "For additional product information and updates, visit our web site at: www.brother.com" Notice This Instruction Manual does not explain how to be used for a long period. Do not use extension cords. • Avoid dropping a needle, a piece of material from this unit and to create a wide variety of embroidery patterns and supports...
Instructin Manual for PE-DESIGN Ver.4.0
Page 14
... the application installed, the upgrade can import images directly from the scanner. Example: D:\Setup if the CD-ROM is in drive E. File Utility Programmable Stich Creator Quik Reference Alphabetic Index 4 The Run dialog appears. • Type the full path of Windows. The installer starts up automatically: • Click . • Click Run on your PC, check that is needed. If it...
... the application installed, the upgrade can import images directly from the scanner. Example: D:\Setup if the CD-ROM is in drive E. File Utility Programmable Stich Creator Quik Reference Alphabetic Index 4 The Run dialog appears. • Type the full path of Windows. The installer starts up automatically: • Click . • Click Run on your PC, check that is needed. If it...

Instructin Manual for PE-DESIGN Ver.4.0
Page 17
... Started Design Center Layout & Editing File Utility Data After sewing Note: When using the same needle and the same machine embroidery thread as the number of the sewing attributes (thread density, sewing pitch, etc.). When you to create a wide variety of embroidery patterns and supports wider ranges for Creating Embroidery Patterns When Satin stitch is used . Selecting the Sew - There are set the stitch direction perpendicular to the larger edge of the Stitch to the new size...
... Started Design Center Layout & Editing File Utility Data After sewing Note: When using the same needle and the same machine embroidery thread as the number of the sewing attributes (thread density, sewing pitch, etc.). When you to create a wide variety of embroidery patterns and supports wider ranges for Creating Embroidery Patterns When Satin stitch is used . Selecting the Sew - There are set the stitch direction perpendicular to the larger edge of the Stitch to the new size...
Instructin Manual for PE-DESIGN Ver.4.0
Page 81
... the new settings to single lines, click the lines you want to apply the settings to set - The Sewing Attributes bar shows the color and stitch for the selected stitch displays. x If necessary, change the stitch (not the color) at the left button. ting after changing it, click the Default button at this step (see "Applying the sewing attributes to check using the mouse's right button. Design...
... the new settings to single lines, click the lines you want to apply the settings to set - The Sewing Attributes bar shows the color and stitch for the selected stitch displays. x If necessary, change the stitch (not the color) at the left button. ting after changing it, click the Default button at this step (see "Applying the sewing attributes to check using the mouse's right button. Design...
Instructin Manual for PE-DESIGN Ver.4.0
Page 143
... using manual punching patterns. To do this method over the automatic conversion provided by Design Center is that you use the standard Fill or Satin stitch to create patterns that look better when the thread direction "follows" the curves of the pattern. The ovals were then deleted. In the above example, we removed after completing the manual punching pattern. Another possibility is sewn). is for hole sewing...
... using manual punching patterns. To do this method over the automatic conversion provided by Design Center is that you use the standard Fill or Satin stitch to create patterns that look better when the thread direction "follows" the curves of the pattern. The ovals were then deleted. In the above example, we removed after completing the manual punching pattern. Another possibility is sewn). is for hole sewing...


