

Users Manual - English
Page 2
... should never be left unattended while plugged in the instruction manual. Replace bulb with any air openings blocked. WARNING - Use this embroidery machine only for its intended use outdoors. 7. Use only accessories recommended by pulling on cord. Never operate this manual. To reduce the risk of burns, fire, electric shock, or injury to...
... should never be left unattended while plugged in the instruction manual. Replace bulb with any air openings blocked. WARNING - Use this embroidery machine only for its intended use outdoors. 7. Use only accessories recommended by pulling on cord. Never operate this manual. To reduce the risk of burns, fire, electric shock, or injury to...

Users Manual - English
Page 5
CONTENTS CHAPTER 1 MACHINE KNOWLEDGE 3 PRINCIPAL PARTS AND THEIR DESCRIPTION 3 MAIN POWER SWITCH AND CONNECTORS 4 SELECTION KEYS 5 "START/STOP" BUTTON 5 ACCESSORIES 6 OPTIONS 7 OPERATION (SELECTION KEYS) ........ 8 HOW TO USE THE LANGUAGE SELECTION KEY 11 How to clear the ...EMBROIDERING 18 Attaching stabilizer material 18 Embroidering different types of fabric 18 Setting the fabric in the embroidery frame 20 Fitting the embroidery frame to the machine 22 Removing the embroidery frame ...... 22 THREAD TENSION ADJUSTMENT....... 23 ADJUSTING THE LCD SCREEN CONTRAST 24 If the LCD...
CONTENTS CHAPTER 1 MACHINE KNOWLEDGE 3 PRINCIPAL PARTS AND THEIR DESCRIPTION 3 MAIN POWER SWITCH AND CONNECTORS 4 SELECTION KEYS 5 "START/STOP" BUTTON 5 ACCESSORIES 6 OPTIONS 7 OPERATION (SELECTION KEYS) ........ 8 HOW TO USE THE LANGUAGE SELECTION KEY 11 How to clear the ...EMBROIDERING 18 Attaching stabilizer material 18 Embroidering different types of fabric 18 Setting the fabric in the embroidery frame 20 Fitting the embroidery frame to the machine 22 Removing the embroidery frame ...... 22 THREAD TENSION ADJUSTMENT....... 23 ADJUSTING THE LCD SCREEN CONTRAST 24 If the LCD...

Users Manual - English
Page 9
.... **** In some countries. ** An extra spool pin should be to turn the machine off the machine. Parts Name 1 Cleaning brush 2 Needle set itself and then turn off and then turn it on the machine while the embroidery frame is supplied as an accessory in place of 10 when ordered separately. (Parts Code) USA and Canada...
.... **** In some countries. ** An extra spool pin should be to turn the machine off the machine. Parts Name 1 Cleaning brush 2 Needle set itself and then turn off and then turn it on the machine while the embroidery frame is supplied as an accessory in place of 10 when ordered separately. (Parts Code) USA and Canada...
Users Manual - English
Page 70
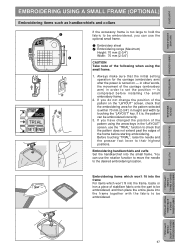
...the presser foot lever to the desired embroidering location. CONTENTS MACHINE KNOWLEDGE EMBROIDERING MAINTENANCE ERROR MESSAGE TROUBLESHOOTING EMBROIDERING USING A SMALL FRAME (OPTIONAL) Embroidering items such as handkerchiefs and collars If the accessory frame is too large to hold the fabric to be... correctly. 3. Embroidering handkerchiefs and cuffs Set the handkerchief into the frame together with the fabric to set the position - ABC 1 Embroidery sheet 2 Embroidering range (Maximum) Height: 70 mm (2-3/4") Width: 70 mm (2-3/4") CAUTION Take note of the pattern using the small...
...the presser foot lever to the desired embroidering location. CONTENTS MACHINE KNOWLEDGE EMBROIDERING MAINTENANCE ERROR MESSAGE TROUBLESHOOTING EMBROIDERING USING A SMALL FRAME (OPTIONAL) Embroidering items such as handkerchiefs and collars If the accessory frame is too large to hold the fabric to be... correctly. 3. Embroidering handkerchiefs and cuffs Set the handkerchief into the frame together with the fabric to set the position - ABC 1 Embroidery sheet 2 Embroidering range (Maximum) Height: 70 mm (2-3/4") Width: 70 mm (2-3/4") CAUTION Take note of the pattern using the small...


