
Users Manual - English
Page 4
CONGRATULATIONS ON CHOOSING OUR COMPUTER EMBROIDERY MACHINE Your machine is required, first follow the troubleshooting table in the card slot while your machine turns on the needle while sewing. To fully enjoy all of the operation manual to inspect and adjust the machine yourself. Remember to turn off the main ...power switch when inserting and removing the embroidery card. Do not use the "...
CONGRATULATIONS ON CHOOSING OUR COMPUTER EMBROIDERY MACHINE Your machine is required, first follow the troubleshooting table in the card slot while your machine turns on the needle while sewing. To fully enjoy all of the operation manual to inspect and adjust the machine yourself. Remember to turn off the main ...power switch when inserting and removing the embroidery card. Do not use the "...

Users Manual - English
Page 5
...18 Attaching stabilizer material 18 Embroidering different types of fabric 18 Setting the fabric in the embroidery frame 20 Fitting the embroidery frame to the machine 22 Removing the embroidery frame ...... 22 THREAD TENSION ADJUSTMENT....... 23 ADJUSTING THE LCD SCREEN CONTRAST 24 If the...the size of characters and frame patterns 47 Changing thread density of the stitch on characters and some frame patterns ... 47 SEWING A BASIC EMBROIDERY PATTERN 48 Embroidering multi-color patterns ..... 48 Embroidering single color patterns ... 48 Embroidering a single color pattern when "MULTI COLOR...
...18 Attaching stabilizer material 18 Embroidering different types of fabric 18 Setting the fabric in the embroidery frame 20 Fitting the embroidery frame to the machine 22 Removing the embroidery frame ...... 22 THREAD TENSION ADJUSTMENT....... 23 ADJUSTING THE LCD SCREEN CONTRAST 24 If the...the size of characters and frame patterns 47 Changing thread density of the stitch on characters and some frame patterns ... 47 SEWING A BASIC EMBROIDERY PATTERN 48 Embroidering multi-color patterns ..... 48 Embroidering single color patterns ... 48 Embroidering a single color pattern when "MULTI COLOR...

Users Manual - English
Page 7
... the plug does not fit fully in the outlet, contact a qualified electrician to fit in any way. When servicing the sewing machine, or when removing covers or changing lamps, the machine must be switched off and the plug removed from the socket-outlet. - only This appliance has a polarized plug (one... 1 1 Power switch 1 ON 2 OFF 2 Memory card slot 4 CAUTION - EMBROIDERING USING A EXTRA-SMALL FRAME (OPTIONAL) EMBROIDERING USING A LARGE FRAME (OPTIONAL) When leaving the embroidery machine unattended, the main switch of electric shock, this plug is intended to install the proper outlet.
... the plug does not fit fully in the outlet, contact a qualified electrician to fit in any way. When servicing the sewing machine, or when removing covers or changing lamps, the machine must be switched off and the plug removed from the socket-outlet. - only This appliance has a polarized plug (one... 1 1 Power switch 1 ON 2 OFF 2 Memory card slot 4 CAUTION - EMBROIDERING USING A EXTRA-SMALL FRAME (OPTIONAL) EMBROIDERING USING A LARGE FRAME (OPTIONAL) When leaving the embroidery machine unattended, the main switch of electric shock, this plug is intended to install the proper outlet.

Users Manual - English
Page 26
...and "6". Correct tension is important because too much or too little tension will cause poor quality embroidery or your fabric to check for the proper thread tension. Decrease the upper thread tension. 1... surface of fabric 2 Reverse side of different thread, fabric or stabilizer fabric. B- However, a sewing test should always be adjusted with the use of fabric If upper thread tension is too weak The...) EMBROIDERING USING A LARGE FRAME (OPTIONAL) CONTENTS MACHINE KNOWLEDGE EMBROIDERING MAINTENANCE THREAD TENSION ADJUSTMENT Use this procedure when changing the thread tension.
...and "6". Correct tension is important because too much or too little tension will cause poor quality embroidery or your fabric to check for the proper thread tension. Decrease the upper thread tension. 1... surface of fabric 2 Reverse side of different thread, fabric or stabilizer fabric. B- However, a sewing test should always be adjusted with the use of fabric If upper thread tension is too weak The...) EMBROIDERING USING A LARGE FRAME (OPTIONAL) CONTENTS MACHINE KNOWLEDGE EMBROIDERING MAINTENANCE THREAD TENSION ADJUSTMENT Use this procedure when changing the thread tension.
Users Manual - English
Page 32
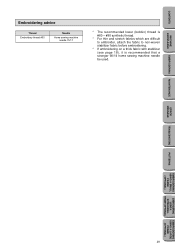
...TROUBLESHOOTING PATTERNS EMBROIDERING USING A SMALL FRAME (OPTIONAL) EMBROIDERING USING A EXTRA-SMALL FRAME (OPTIONAL) EMBROIDERING USING A LARGE FRAME (OPTIONAL) 29 CONTENTS MACHINE KNOWLEDGE Embroidering advice Thread Embroidery thread #50 Needle Home sewing machine needle 75/11 * The recommended lower (bobbin) thread is #60 - #90 synthetic thread. * For thin and stretch fabrics which are ...-woven stabilizer fabric before embroidering. * If embroidering on a thick fabric with stabilizer (see page 18), it is recommended that a stronger 90/14 home sewing machine needle be used.
...TROUBLESHOOTING PATTERNS EMBROIDERING USING A SMALL FRAME (OPTIONAL) EMBROIDERING USING A EXTRA-SMALL FRAME (OPTIONAL) EMBROIDERING USING A LARGE FRAME (OPTIONAL) 29 CONTENTS MACHINE KNOWLEDGE Embroidering advice Thread Embroidery thread #50 Needle Home sewing machine needle 75/11 * The recommended lower (bobbin) thread is #60 - #90 synthetic thread. * For thin and stretch fabrics which are ...-woven stabilizer fabric before embroidering. * If embroidering on a thick fabric with stabilizer (see page 18), it is recommended that a stronger 90/14 home sewing machine needle be used.
Users Manual - English
Page 46
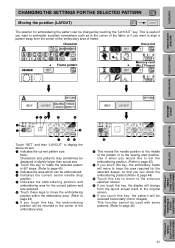
...embroidering position and embroidering area for the current pattern and size selected. 6 Touch these keys to move the embroidering position within the embroidery area. (Refer to page 44) 7 If you touch this key, the embroidering position will move to trace the area required ... PATTERNS EMBROIDERING USING A SMALL FRAME (OPTIONAL) 34 5 6 8 1 2 9 7 0A Touch "SET" and then "LAYOUT" to the sewing start position. CONTENTS MACHINE KNOWLEDGE CHANGING THE SETTINGS FOR THE SELECTED PATTERN Moving the position (LAYOUT) The position for the selected design, so that you touch this key...
...embroidering position and embroidering area for the current pattern and size selected. 6 Touch these keys to move the embroidering position within the embroidery area. (Refer to page 44) 7 If you touch this key, the embroidering position will move to trace the area required ... PATTERNS EMBROIDERING USING A SMALL FRAME (OPTIONAL) 34 5 6 8 1 2 9 7 0A Touch "SET" and then "LAYOUT" to the sewing start position. CONTENTS MACHINE KNOWLEDGE CHANGING THE SETTINGS FOR THE SELECTED PATTERN Moving the position (LAYOUT) The position for the selected design, so that you touch this key...

Users Manual - English
Page 51
.... The diagram on the screen. Lower the presser foot. 4. Raise the presser foot. 6. Press the "START/STOP" button to sew the pattern: the machine will automatically move to right. CONTENTS MACHINE KNOWLEDGE EMBROIDERING MAINTENANCE SEWING A BASIC EMBROIDERY PATTERN Embroidering multi-color patterns (1) (2) (3) (2) (3) When a pattern is selected it is for this color, the screen display will...
.... The diagram on the screen. Lower the presser foot. 4. Raise the presser foot. 6. Press the "START/STOP" button to sew the pattern: the machine will automatically move to right. CONTENTS MACHINE KNOWLEDGE EMBROIDERING MAINTENANCE SEWING A BASIC EMBROIDERY PATTERN Embroidering multi-color patterns (1) (2) (3) (2) (3) When a pattern is selected it is for this color, the screen display will...
Users Manual - English
Page 69
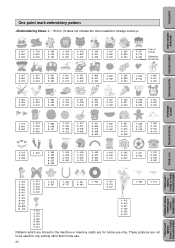
...point mark embroidery pattern MACHINE KNOWLEDGE EMBROIDERING MAINTENANCE 1...001 2...800 3...900 1...704 2...800 3...900 1...205 2...339 3...900 1...339 2...205 3...900 1...339 2...800 3...900 1...205 2...001 3...900 1...001 2...800 3...900 1...205 2...800 3...900 1...307 2...019 3...900 Order of sewing Embroidery thread color ...001 2...515 3...507 1...515 2...513 3...001 4...208 5...205 6...513 1...086 1...614 Patterns which are stored in the machine or memory cards are not to be used for home use . 66 EMBROIDERING USING A EXTRA-SMALL FRAME (OPTIONAL) EMBROIDERING USING A ...
...point mark embroidery pattern MACHINE KNOWLEDGE EMBROIDERING MAINTENANCE 1...001 2...800 3...900 1...704 2...800 3...900 1...205 2...339 3...900 1...339 2...205 3...900 1...339 2...800 3...900 1...205 2...001 3...900 1...001 2...800 3...900 1...205 2...800 3...900 1...307 2...019 3...900 Order of sewing Embroidery thread color ...001 2...515 3...507 1...515 2...513 3...001 4...208 5...205 6...513 1...086 1...614 Patterns which are stored in the machine or memory cards are not to be used for home use . 66 EMBROIDERING USING A EXTRA-SMALL FRAME (OPTIONAL) EMBROIDERING USING A ...


