Software Users Manual - English
Page 12
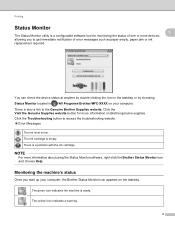
...Brother/MFC-XXXX on your computer, the Brother Status Monitor icon appears on Brother genuine supplies. There is empty. The ink cartridge is a problem with the ink cartridge. Click the Visit the Genuine Supplies website button for monitoring the status of error messages such as paper empty, paper jam... or ink replacement required. Printing Status Monitor 1 1 The Status Monitor utility is also a link to the Genuine Brother Supplies website. There is a configurable software tool for more ...
...Brother/MFC-XXXX on your computer, the Brother Status Monitor icon appears on Brother genuine supplies. There is empty. The ink cartridge is a problem with the ink cartridge. Click the Visit the Genuine Supplies website button for monitoring the status of error messages such as paper empty, paper jam... or ink replacement required. Printing Status Monitor 1 1 The Status Monitor utility is also a link to the Genuine Brother Supplies website. There is a configurable software tool for more ...

Software Users Manual - English
Page 32
Printing Advanced 2-sided Settings Some types of ink. 2-sided 2 (Slower print speed & less ink) Choose 2-sided 2 to print at a slower speed, using a normal amount of print media may need more drying time when using less ink. 1 1 24 Change Advanced 2-sided Settings if you have problems with smudged 2-sided prints or paper jams. Normal Choose Normal to print at a typical speed, using a normal amount of ink. 2-sided 1 (Slower print speed) Choose 2-sided 1 to print the same speed as using 2-sided 1, but using the 2-sided feature.
Printing Advanced 2-sided Settings Some types of ink. 2-sided 2 (Slower print speed & less ink) Choose 2-sided 2 to print at a slower speed, using a normal amount of print media may need more drying time when using less ink. 1 1 24 Change Advanced 2-sided Settings if you have problems with smudged 2-sided prints or paper jams. Normal Choose Normal to print at a typical speed, using a normal amount of ink. 2-sided 1 (Slower print speed) Choose 2-sided 1 to print the same speed as using 2-sided 1, but using the 2-sided feature.

Software Users Manual - English
Page 135
...Mac OS X v10.6.x) a Run the System Preferences, select Print & Fax, then choose the machine. You can also check the device status by launching Brother Status Monitor. (Mac OS X v10.5.8) a Run the System Preferences, select Print & Fax, then choose the machine. b Click Open Print Queue, ... software tool for monitoring the status of ControlCenter2. Updating the machine's status If you to see error messages such as paper empty, paper jam or ink replacement. The Status Monitor will start up . Select the Utility tab then click Open Printer Utility. b Click Open Print...
...Mac OS X v10.6.x) a Run the System Preferences, select Print & Fax, then choose the machine. You can also check the device status by launching Brother Status Monitor. (Mac OS X v10.5.8) a Run the System Preferences, select Print & Fax, then choose the machine. b Click Open Print Queue, ... software tool for monitoring the status of ControlCenter2. Updating the machine's status If you to see error messages such as paper empty, paper jam or ink replacement. The Status Monitor will start up . Select the Utility tab then click Open Printer Utility. b Click Open Print...

Software Users Manual - English
Page 146
...print in both directions offering faster print speeds. Other Print Options 8 You can choose the Paper Thickness and Bi-Directional Printing settings. Paper Thickness 8 You can choose Paper Thickness from Regular, Thick and Envelope. Bi-Directional Printing When Bi-Directional Printing... same speed as using 2-sided 1, but slower printing speeds. 138 Change Advanced 2-sided Settings if you have problems with smudged 2-sided prints or paper jams. Normal Choose Normal to print at a typical speed, using a normal amount of ink. 2-sided 1 (Slower print speed...
...print in both directions offering faster print speeds. Other Print Options 8 You can choose the Paper Thickness and Bi-Directional Printing settings. Paper Thickness 8 You can choose Paper Thickness from Regular, Thick and Envelope. Bi-Directional Printing When Bi-Directional Printing... same speed as using 2-sided 1, but slower printing speeds. 138 Change Advanced 2-sided Settings if you have problems with smudged 2-sided prints or paper jams. Normal Choose Normal to print at a typical speed, using a normal amount of ink. 2-sided 1 (Slower print speed...
Users Manual Basic - English
Page 12
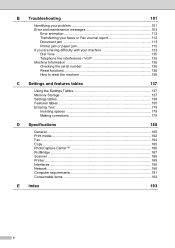
B Troubleshooting 101 Identifying your problem 101 Error and maintenance messages 103 Error animation 112 Transferring your faxes or Fax Journal report 112 Document jam 113 Printer jam or paper jam 115 If you are having difficulty with your machine 122 Dial Tone ...135 Telephone line interference / VoIP 135 Machine Information 136 Checking the serial number...
B Troubleshooting 101 Identifying your problem 101 Error and maintenance messages 103 Error animation 112 Transferring your faxes or Fax Journal report 112 Document jam 113 Printer jam or paper jam 115 If you are having difficulty with your machine 122 Dial Tone ...135 Telephone line interference / VoIP 135 Machine Information 136 Checking the serial number...

Users Manual Basic - English
Page 34
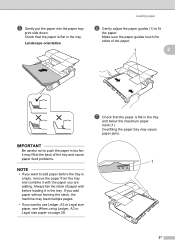
... combine it with the mark for the paper size you must load the paper in . Make sure that the paper is not curled or wrinkled. Chapter 2 c Gently press and slide the paper guides (1) to push the paper in too far; Check that the triangular... mark (2) on page 22. • If you are using . 1 2 e Gently put the paper into the paper tray print side down. Always fan the stack of the paper orientation, see Loading smaller paper (Photo, Photo L and envelopes) on the paper guide (1) lines up with the paper you want to avoid paper jams...
... combine it with the mark for the paper size you must load the paper in . Make sure that the paper is not curled or wrinkled. Chapter 2 c Gently press and slide the paper guides (1) to push the paper in too far; Check that the triangular... mark (2) on page 22. • If you are using . 1 2 e Gently put the paper into the paper tray print side down. Always fan the stack of the paper orientation, see Loading smaller paper (Photo, Photo L and envelopes) on the paper guide (1) lines up with the paper you want to avoid paper jams...

Users Manual Basic - English
Page 35
Loading paper f Gently adjust the paper guides (1) to fit the paper. Overfilling the paper tray may cause paper jams. i Slowly push the paper tray completely into the machine. 1 j While holding the paper tray in the tray and below the maximum paper mark (1). h Close the output paper tray cover. 1 2 g Check that the paper is flat in place, pull out the paper support (1) until it clicks, and then unfold the paper support flap (2). 2 1 21 Make sure the paper guides touch the sides of the paper.
Loading paper f Gently adjust the paper guides (1) to fit the paper. Overfilling the paper tray may cause paper jams. i Slowly push the paper tray completely into the machine. 1 j While holding the paper tray in the tray and below the maximum paper mark (1). h Close the output paper tray cover. 1 2 g Check that the paper is flat in place, pull out the paper support (1) until it clicks, and then unfold the paper support flap (2). 2 1 21 Make sure the paper guides touch the sides of the paper.

Users Manual Basic - English
Page 40
... stack of paper well to fit the paper size. Chapter 2 Loading paper in paper tray #2 (MFC-J4710DW) 2 NOTE • You can use only Ledger, Letter, Legal, A3 or A4 size plain paper in Tray #2. • For details of the paper orientation, see Paper orientation and capacity of the machine. c Gently press and slide the paper guides (1) to avoid paper jams and misfeeds...
... stack of paper well to fit the paper size. Chapter 2 Loading paper in paper tray #2 (MFC-J4710DW) 2 NOTE • You can use only Ledger, Letter, Legal, A3 or A4 size plain paper in Tray #2. • For details of the paper orientation, see Paper orientation and capacity of the machine. c Gently press and slide the paper guides (1) to avoid paper jams and misfeeds...
Users Manual Basic - English
Page 41
... the tray and below the maximum paper mark (1). If you add paper without fanning the stack, the machine may cause paper jams. 1 27 Overfilling the paper tray may feed multiple pages. • If you want to use Ledger, A3 or Legal size paper, see When using Ledger, A3 or Legal size paper on page 28. g Check that...
... the tray and below the maximum paper mark (1). If you add paper without fanning the stack, the machine may cause paper jams. 1 27 Overfilling the paper tray may feed multiple pages. • If you want to use Ledger, A3 or Legal size paper, see When using Ledger, A3 or Legal size paper on page 28. g Check that...

Users Manual Basic - English
Page 44
... the stack of paper well before the tray is flat in the tray. If you want to avoid paper jams and misfeeds. Make sure that the paper is not curled or wrinkled. it with the mark for the paper size you are using. 1 2 h Gently put the paper into the paper tray print side ...down. Check that the paper is empty, remove the paper from the tray and combine...
... the stack of paper well before the tray is flat in the tray. If you want to avoid paper jams and misfeeds. Make sure that the paper is not curled or wrinkled. it with the mark for the paper size you are using. 1 2 h Gently put the paper into the paper tray print side ...down. Check that the paper is empty, remove the paper from the tray and combine...

Users Manual Basic - English
Page 45
k Lower the paper tray cover. 1 2 l Slowly push the paper tray completely into the machine. Make sure the paper guides touch the sides of the paper. j Check that the paper is flat in the tray and below the maximum paper mark (1). Loading paper i Gently adjust the paper guides (1) to fit the paper. Overfilling the paper tray may cause paper jams. 1 m Lift up the paper tray cover. 31
k Lower the paper tray cover. 1 2 l Slowly push the paper tray completely into the machine. Make sure the paper guides touch the sides of the paper. j Check that the paper is flat in the tray and below the maximum paper mark (1). Loading paper i Gently adjust the paper guides (1) to fit the paper. Overfilling the paper tray may cause paper jams. 1 m Lift up the paper tray cover. 31

Users Manual Basic - English
Page 49
... Landscape orientation • DO NOT put more than one sheet of paper in the manual feed slot at any one time. Doing this may cause a paper jam. Doing this may cause a paper jam. • For details of the paper orientation, see Paper orientation and capacity of the paper trays on face up. Using Ledger, A3, Legal, A5...
... Landscape orientation • DO NOT put more than one sheet of paper in the manual feed slot at any one time. Doing this may cause a paper jam. Doing this may cause a paper jam. • For details of the paper orientation, see Paper orientation and capacity of the paper trays on face up. Using Ledger, A3, Legal, A5...
Users Manual Basic - English
Page 52
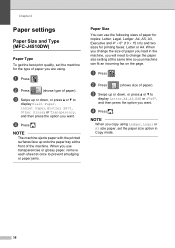
...up onto the paper tray at once to prevent smudging or paper jams. Paper Size 2 You can fit an incoming fax on the page. When you change the paper size setting at the same time so your machine can use transparencies or glossy paper, remove each ...Paper, Inkjet Paper, Brother BP71, Other Glossy or Transparency, and then press the option you want . b Press (shows type of paper). a Press . d Press . NOTE When you copy using Ledger, Legal or A3 size paper, set the machine for printing faxes: Letter or A4. Chapter 2 Paper settings 2 Paper Size and Type (MFC-J4510DW) 2 Paper...
...up onto the paper tray at once to prevent smudging or paper jams. Paper Size 2 You can fit an incoming fax on the page. When you change the paper size setting at the same time so your machine can use transparencies or glossy paper, remove each ...Paper, Inkjet Paper, Brother BP71, Other Glossy or Transparency, and then press the option you want . b Press (shows type of paper). a Press . d Press . NOTE When you copy using Ledger, Legal or A3 size paper, set the machine for printing faxes: Letter or A4. Chapter 2 Paper settings 2 Paper Size and Type (MFC-J4510DW) 2 Paper...
Users Manual Basic - English
Page 53
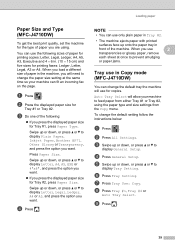
...down, or press a or b to change the paper size setting at once to prevent smudging or paper jams. Tray use in . (10 15 cm) and five sizes for Tray #1 or Tray #2. Loading paper Paper Size and Type (MFC-J4710DW) 2 To get the best print quality, set ...61620; 6 in Copy mode (MFC-J4710DW) 2 You can use for copies. b Press All Settings. c Swipe up or down , or press a or b to display Plain Paper, Inkjet Paper, Brother BP71, Other Glossy or Transparency, and press the option you press the displayed paper size for Tray #2, press Paper Size. f Press Tray Setting...
...down, or press a or b to change the paper size setting at once to prevent smudging or paper jams. Tray use in . (10 15 cm) and five sizes for Tray #1 or Tray #2. Loading paper Paper Size and Type (MFC-J4710DW) 2 To get the best print quality, set ...61620; 6 in Copy mode (MFC-J4710DW) 2 You can use for copies. b Press All Settings. c Swipe up or down , or press a or b to display Plain Paper, Inkjet Paper, Brother BP71, Other Glossy or Transparency, and press the option you press the displayed paper size for Tray #2, press Paper Size. f Press Tray Setting...
Users Manual Basic - English
Page 54
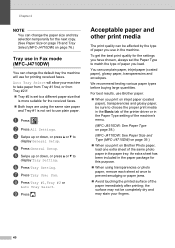
... or paper jams. Avoid touching the printed surface of paper you use in the Paper Type setting of the machine's menu. (MFC-J4510DW: See Paper Type on page 38.) (MFC-J4710DW: See Paper Size and Type (MFC-J4710DW) on page 39.) When you load. g Press Tray Use: Fax. Acceptable paper and other print media 2 The print quality can use Brother paper. ...
... or paper jams. Avoid touching the printed surface of paper you use in the Paper Type setting of the machine's menu. (MFC-J4510DW: See Paper Type on page 38.) (MFC-J4710DW: See Paper Size and Type (MFC-J4710DW) on page 39.) When you load. g Press Tray Use: Fax. Acceptable paper and other print media 2 The print quality can use Brother paper. ...

Users Manual Basic - English
Page 120
...cleaning the machine requires, the faster these components are : 1 After a paper jam has been cleared, the machine automatically cleans itself after a period of non-Brother ink may cause frequent cleanings because non-Brother ink could cause poor print quality which is full. For example, frequently ... flushes for cleaning are periodic maintenance items, the replacement is nearly full. NOTE Repairs resulting from your machine serviced. (See Brother numbers on and off will fill up . Error Message Ink Absorber Full Cause The ink absorber box or flushing box is resolved...
...cleaning the machine requires, the faster these components are : 1 After a paper jam has been cleared, the machine automatically cleans itself after a period of non-Brother ink may cause frequent cleanings because non-Brother ink could cause poor print quality which is full. For example, frequently ... flushes for cleaning are periodic maintenance items, the replacement is nearly full. NOTE Repairs resulting from your machine serviced. (See Brother numbers on and off will fill up . Error Message Ink Absorber Full Cause The ink absorber box or flushing box is resolved...
Users Manual Basic - English
Page 122
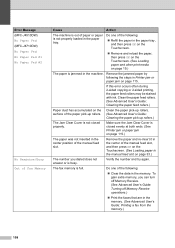
...jam or paper jam on the surface of the following: Refill the paper in the paper tray, and then press OK on the Touchscreen. Remove and reload the paper, then press OK on the Touchscreen. (See Loading paper and other print media on page 19.) The paper is jammed in the machine. Remove the jammed paper... the memory. (See Advanced User's Guide: Printing a fax from the memory.) 108 Error Message (MFC-J4510DW) No Paper Fed (MFC-J4710DW) No Paper Fed No Paper Fed #1 No Paper Fed #2 No Response/Busy Out of Fax Memory Cause Action The machine is out of the manual ...
...jam or paper jam on the surface of the following: Refill the paper in the paper tray, and then press OK on the Touchscreen. Remove and reload the paper, then press OK on the Touchscreen. (See Loading paper and other print media on page 19.) The paper is jammed in the machine. Remove the jammed paper... the memory. (See Advanced User's Guide: Printing a fax from the memory.) 108 Error Message (MFC-J4510DW) No Paper Fed (MFC-J4710DW) No Paper Fed No Paper Fed #1 No Paper Fed #2 No Response/Busy Out of Fax Memory Cause Action The machine is out of the manual ...

Users Manual Basic - English
Page 123
.... Delete unused files from your memory card or USB Flash memory drive to the correct paper size. Paper Jam [Front] The paper is jammed in the manual feed slot. Paper Jam [Front,Rear] The paper is jammed in the manual feed slot. Make sure the paper guides are using does not have enough free space to scan the document. one...
.... Delete unused files from your memory card or USB Flash memory drive to the correct paper size. Paper Jam [Front] The paper is jammed in the manual feed slot. Paper Jam [Front,Rear] The paper is jammed in the manual feed slot. Make sure the paper guides are using does not have enough free space to scan the document. one...

Users Manual Basic - English
Page 129
... look carefully inside the machine above and below the Jam Clear Flap for any pieces of the machine. B 1 115 c Pull out the jammed paper (1). Printer jam or paper jam B Take out the jammed paper depending on where it is jammed in the front of the machine B If the Touchscreen shows Paper Jam [Front], follow these steps: a Unplug the machine from the...
... look carefully inside the machine above and below the Jam Clear Flap for any pieces of the machine. B 1 115 c Pull out the jammed paper (1). Printer jam or paper jam B Take out the jammed paper depending on where it is jammed in the front of the machine B If the Touchscreen shows Paper Jam [Front], follow these steps: a Unplug the machine from the...

Users Manual Basic - English
Page 130
... cover (1). 1 d Pull the jammed paper out of the machine. NOTE If there is a repeat paper jam, a small piece of paper may be stuck in the machine. (See Additional paper jam clear operations on page 120.) Paper is jammed in the back of the machine. b Open the Jam Clear Cover (1) at the back of... the machine B If the Touchscreen shows Paper Jam [Rear], follow these ...
... cover (1). 1 d Pull the jammed paper out of the machine. NOTE If there is a repeat paper jam, a small piece of paper may be stuck in the machine. (See Additional paper jam clear operations on page 120.) Paper is jammed in the back of the machine. b Open the Jam Clear Cover (1) at the back of... the machine B If the Touchscreen shows Paper Jam [Rear], follow these ...


