Users Manual - English
Page 149
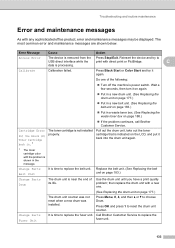
... press 1 to replace the fuser unit. 133 Calibrate Calibration failed. Call Brother Customer Service to reset the drum unit counter. Error Message Cause Action Access Error The device is time to choose Drum. Do one . (See Replacing the drum unit on page 183.) Use the drum unit until you have a print quality problem; then replace the...
... press 1 to replace the fuser unit. 133 Calibrate Calibration failed. Call Brother Customer Service to reset the drum unit counter. Error Message Cause Action Access Error The device is time to choose Drum. Do one . (See Replacing the drum unit on page 183.) Use the drum unit until you have a print quality problem; then replace the...
Users Manual - English
Page 198
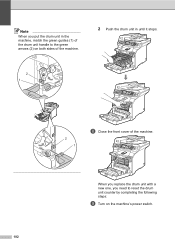
Note When you need to the green arrows (2) on the machine's power switch. 182 When you replace the drum unit with a new one, you put the drum unit in until it stops. 2 1 2 1 h Close the front cover of the drum unit handle to reset the drum unit counter by completing the following steps: i Turn on both sides of the machine. 2 Push the drum unit in the machine, match the green guides (1) of the machine.
Note When you need to the green arrows (2) on the machine's power switch. 182 When you replace the drum unit with a new one, you put the drum unit in until it stops. 2 1 2 1 h Close the front cover of the drum unit handle to reset the drum unit counter by completing the following steps: i Turn on both sides of the machine. 2 Push the drum unit in the machine, match the green guides (1) of the machine.

Users Manual - English
Page 199
... touch it, it could degrade print quality. The LCD shows the parts name which needs to be reset the counter. 84.Reset Menu Drum Select ab or OK k Press a or b to reset the drum unit counter. l Press 1 to choose Drum. If you must replace the belt unit: Change Parts Belt Unit CAUTION DO NOT touch the...
... touch it, it could degrade print quality. The LCD shows the parts name which needs to be reset the counter. 84.Reset Menu Drum Select ab or OK k Press a or b to reset the drum unit counter. l Press 1 to choose Drum. If you must replace the belt unit: Change Parts Belt Unit CAUTION DO NOT touch the...

Users Manual - English
Page 203
C 2 1 h Close the front cover of the machine. When you replace the belt unit with a new one, you put the drum unit in until it stops. Note When you need to the green arrows (2) on both sides of the machine. 2 1 Troubleshooting and routine maintenance 2 Push the drum unit in the machine, match the green guides (1) of the drum unit handle to reset the belt unit counter by completing the following steps: i Turn on the machine's power switch. 187
C 2 1 h Close the front cover of the machine. When you replace the belt unit with a new one, you put the drum unit in until it stops. Note When you need to the green arrows (2) on both sides of the machine. 2 1 Troubleshooting and routine maintenance 2 Push the drum unit in the machine, match the green guides (1) of the drum unit handle to reset the belt unit counter by completing the following steps: i Turn on the machine's power switch. 187
Users Manual - English
Page 219
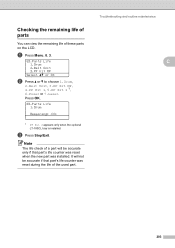
Press OK. 83.Parts Life 1.Drum Remaining: XX% 1 PF Kit 2 appears only when the optional LT-100CL tray is installed. c Press Stop/Exit. Troubleshooting and routine maintenance C 203 Note The life ... view the remaining life of the used part. It will be accurate if that part's life counter was reset when the new part was reset during the life of these parts on the LCD. a Press Menu, 8, 3. 83.Parts Life 1.Drum 2.Belt Unit 3.PF Kit MP Select ab or OK b Press a or b to choose...
Press OK. 83.Parts Life 1.Drum Remaining: XX% 1 PF Kit 2 appears only when the optional LT-100CL tray is installed. c Press Stop/Exit. Troubleshooting and routine maintenance C 203 Note The life ... view the remaining life of the used part. It will be accurate if that part's life counter was reset when the new part was reset during the life of these parts on the LCD. a Press Menu, 8, 3. 83.Parts Life 1.Drum 2.Belt Unit 3.PF Kit MP Select ab or OK b Press a or b to choose...
Users Manual - English
Page 237
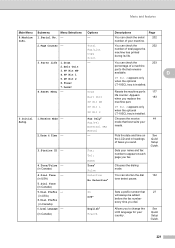
... Mode - See Quick Setup Guide. 221 Menu and features Main Menu Submenu Menu Selections Options Descriptions Page 8.Machine 1.Serial No. - - Drum Belt Unit PF Kit MP Resets the machine part's 177 life counter. Manual 2.Date & Time - - Setup Guide. 3.Station ID - Puts the date and time on...faxes you replace the 183 machine part. PF Kit 1 PF Kit 2 PF Kit 2 appears only when the optional LT-100CL tray is installed. 4.Reset Menu - Appears when you send. Fax: Tel: Name: Sets your country. You can shorten the dial 132 No Detection* tone detect pause. ...
... Mode - See Quick Setup Guide. 221 Menu and features Main Menu Submenu Menu Selections Options Descriptions Page 8.Machine 1.Serial No. - - Drum Belt Unit PF Kit MP Resets the machine part's 177 life counter. Manual 2.Date & Time - - Setup Guide. 3.Station ID - Puts the date and time on...faxes you replace the 183 machine part. PF Kit 1 PF Kit 2 PF Kit 2 appears only when the optional LT-100CL tray is installed. 4.Reset Menu - Appears when you send. Fax: Tel: Name: Sets your country. You can shorten the dial 132 No Detection* tone detect pause. ...


