Users Manual - English
Page 36
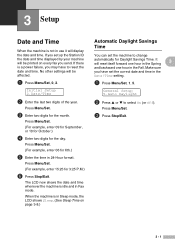
No other settings will reset itself forward one hour in the Spring 3 and backward one hour in the Fall. Press Menu/Set. (For example, enter 09 for September, or 10 for October.) 4 Enter two digits for 6th.) 5 Enter the time ... select On (or Off). Press Menu/Set. (For example, enter 15:25 for Daylight Savings Time. General Setup 5.Auto Daylight 2 Press ▲ or ▼ to reset the date and time. Press Menu/Set. 3 Enter two digits for the month. Make sure you send.
No other settings will reset itself forward one hour in the Spring 3 and backward one hour in the Fall. Press Menu/Set. (For example, enter 09 for September, or 10 for October.) 4 Enter two digits for 6th.) 5 Enter the time ... select On (or Off). Press Menu/Set. (For example, enter 15:25 for Daylight Savings Time. General Setup 5.Auto Daylight 2 Press ▲ or ▼ to reset the date and time. Press Menu/Set. 3 Enter two digits for the month. Make sure you send.
Users Manual - English
Page 43
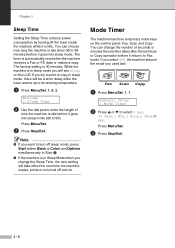
The factory setting is in Sleep Mode when you change the number of time the machine is automatically reset when the machine receives a Fax or PC data or makes a copy. Press Menu/Set. 3 Press Stop/Exit. Note ■ If you will see Sleep on ...the LCD. General Setup 1.Mode Timer 2 Press ▲ or ▼ to turn off sleep mode, press Start (either Black or Color) and Options simultaneously in Step 2. ■ If the machine is in sleep mode you want to select 0 Sec, 30 Secs, 1 Min, 2 Mins, 5 Mins or Off...
The factory setting is in Sleep Mode when you change the number of time the machine is automatically reset when the machine receives a Fax or PC data or makes a copy. Press Menu/Set. 3 Press Stop/Exit. Note ■ If you will see Sleep on ...the LCD. General Setup 1.Mode Timer 2 Press ▲ or ▼ to turn off sleep mode, press Start (either Black or Color) and Options simultaneously in Step 2. ■ If the machine is in sleep mode you want to select 0 Sec, 30 Secs, 1 Min, 2 Mins, 5 Mins or Off...
Users Manual - English
Page 75
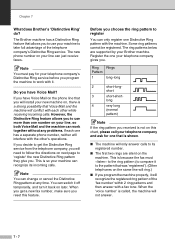
.... If each other 's operations. short 3 short-short- The new phone number on later. Chapter 7 What does Brother's 'Distinctive Ring' do? If you decide to get a new fax number, make sure you reset this chart, please call your telephone company's Distinctive Ring service before you . Note You can switch it off... time. Some ring patterns cannot be registered. Note You must «listen» to the ring pattern (to register You can only register one your line, so both Voice Mail and the machine can just receive faxes. When the 'voice number' is not on the machine.
.... If each other 's operations. short 3 short-short- The new phone number on later. Chapter 7 What does Brother's 'Distinctive Ring' do? If you decide to get a new fax number, make sure you reset this chart, please call your telephone company's Distinctive Ring service before you . Note You can switch it off... time. Some ring patterns cannot be registered. Note You must «listen» to the ring pattern (to register You can only register one your line, so both Voice Mail and the machine can just receive faxes. When the 'voice number' is not on the machine.
Users Manual - English
Page 82
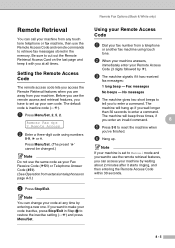
...you 've finished. 6 Hang up. If you to enter a command. The machine will beep three times, if you enter an invalid command. 8 5 Press 9 0 to reset the machine when you are away from a telephone or another fax machine using numbers 0-9, or #. Press Menu/Set. (The preset ' ' cannot be changed.) Note Do... not use the same code as your Fax Receive Code ( 51) or Telephone Answer Code (#51). (See Operation from any time by entering a new one. Note You can access your machine by ). 3 The machine signals if it has received fax messages: 1 long beep - Note If your machine is ...
...you 've finished. 6 Hang up. If you to enter a command. The machine will beep three times, if you enter an invalid command. 8 5 Press 9 0 to reset the machine when you are away from a telephone or another fax machine using numbers 0-9, or #. Press Menu/Set. (The preset ' ' cannot be changed.) Note Do... not use the same code as your Fax Receive Code ( 51) or Telephone Answer Code (#51). (See Operation from any time by entering a new one. Note You can access your machine by ). 3 The machine signals if it has received fax messages: 1 long beep - Note If your machine is ...
Users Manual - English
Page 84
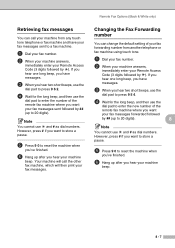
...immediately enter your machine beep. Note You cannot use and # as dial numbers. If you hear one long beep, you have messages. 3 When you hear your Remote Access Code (3 digits followed by ). If you hear one long beep, you have messages. 3 When you hear two short beeps, use the dial pad to... ## (up to enter the number of your fax forwarding number from any touch tone telephone or fax machine and have your fax messages sent to reset the machine when you've finished. 6 Hang up after you want to store a pause. 5 Press 9 0 to a fax machine. 1 Dial your fax number. 2 When your...
...immediately enter your machine beep. Note You cannot use and # as dial numbers. If you hear one long beep, you have messages. 3 When you hear your Remote Access Code (3 digits followed by ). If you hear one long beep, you have messages. 3 When you hear two short beeps, use the dial pad to... ## (up to enter the number of your fax forwarding number from any touch tone telephone or fax machine and have your fax messages sent to reset the machine when you've finished. 6 Hang up after you want to store a pause. 5 Press 9 0 to a fax machine. 1 Dial your fax number. 2 When your...
Users Manual - English
Page 111
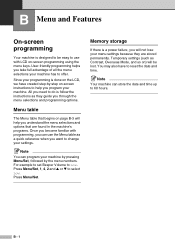
... follow the instructions as a quick reference when you program your settings. Press Menu/Set. Since your programming is done on the LCD, we have to reset the date and time. Note You can program your machine by pressing Menu/Set, followed by -step on ) will be easy to use the Menu...
... follow the instructions as a quick reference when you program your settings. Press Menu/Set. Since your programming is done on the LCD, we have to reset the date and time. Note You can program your machine by pressing Menu/Set, followed by -step on ) will be easy to use the Menu...
Users Manual - English
Page 119
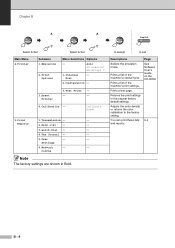
... setting. Adjusts the color density or returns the color calibration to exit Descriptions Selects the emulation mode. Configuration - 3. Test Print - - - 4. Network - - Prints a list of the machine's print settings. Prints a list of the machine's internal fonts. Reset Printer 3. Calibration -... settings. Page See Software User's Guide on the CD-ROM 9-2 B - 9 Calibrate Reset 5. Reports 2. Fax Journal - - 5. Internal - Print 1. Prints a test page. Print Options Menu Selections Options - User - - Printer Submenu 1. Emulation 2. Quick-Dial - -...
... setting. Adjusts the color density or returns the color calibration to exit Descriptions Selects the emulation mode. Configuration - 3. Test Print - - - 4. Network - - Prints a list of the machine's print settings. Prints a list of the machine's internal fonts. Reset Printer 3. Calibration -... settings. Page See Software User's Guide on the CD-ROM 9-2 B - 9 Calibrate Reset 5. Reports 2. Fax Journal - - 5. Internal - Print 1. Prints a test page. Print Options Menu Selections Options - User - - Printer Submenu 1. Emulation 2. Quick-Dial - -...
Users Manual - English
Page 122
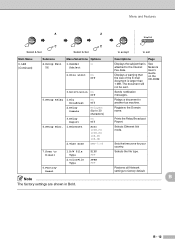
... Ethernet link mode. Selects the file type. Menu and Features Select & Set Select & Set Main Menu 6. Sender - Setup Relay 6. Scan to another fax machine. Factory Reset 1. ColorFile Type TIFF PDF JPEG PDF Note The factory settings are shown in Bold. See Network User's Guide on the CD-ROM Sends notification messages...
... Ethernet link mode. Selects the file type. Menu and Features Select & Set Select & Set Main Menu 6. Sender - Setup Relay 6. Scan to another fax machine. Factory Reset 1. ColorFile Type TIFF PDF JPEG PDF Note The factory settings are shown in Bold. See Network User's Guide on the CD-ROM Sends notification messages...
Users Manual - English
Page 135
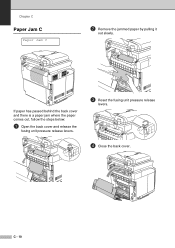
C - 10 If paper has passed behind the back cover and there is a paper jam where the paper comes out, follow the steps below: 1 Open the back cover and release the fusing unit pressure release levers. 3 Reset the fusing unit pressure release levers. 4 Close the back cover. Chapter C Paper Jam C Paper Jam C 2 Remove the jammed paper by pulling it out slowly.
C - 10 If paper has passed behind the back cover and there is a paper jam where the paper comes out, follow the steps below: 1 Open the back cover and release the fusing unit pressure release levers. 3 Reset the fusing unit pressure release levers. 4 Close the back cover. Chapter C Paper Jam C Paper Jam C 2 Remove the jammed paper by pulling it out slowly.
Users Manual - English
Page 159
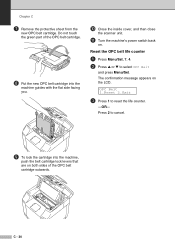
... with the flat side facing you. 0 Close the inside cover, and then close the scanner unit. Reset the OPC belt life counter 1 Press Menu/Set, 7, 4. 2 Press ▲ or ▼ to reset the life counter. -OR- OPC Belt 1.Reset 2.Exit 3 Press 1 to select OPC Belt and press Menu/Set. The confirmation message appears on...
... with the flat side facing you. 0 Close the inside cover, and then close the scanner unit. Reset the OPC belt life counter 1 Press Menu/Set, 7, 4. 2 Press ▲ or ▼ to reset the life counter. -OR- OPC Belt 1.Reset 2.Exit 3 Press 1 to select OPC Belt and press Menu/Set. The confirmation message appears on...

Users Manual - English
Page 162
...bearings that it latches under the scanner unit. Do not apply force! It could damage both the fusing unit and the machine. Press 2 to reset the life counter. -OR- Do not put pressure on the LCD. If it should go in easily. Troubleshooting and routine maintenance Replacing the ... not, make sure the fusing unit connector is free to the power supply. C C - 37 Fusing Unit 1.Reset 2.Exit 3 Press 1 to cancel. Be sure to check how to select Fusing Unit and press Menu/Set. Reset the Fusing Unit life counter 1 Press Menu/Set, 7, 4. 2 Press ▲ or ▼ to connect...
...bearings that it latches under the scanner unit. Do not apply force! It could damage both the fusing unit and the machine. Press 2 to reset the life counter. -OR- Do not put pressure on the LCD. If it should go in easily. Troubleshooting and routine maintenance Replacing the ... not, make sure the fusing unit connector is free to the power supply. C C - 37 Fusing Unit 1.Reset 2.Exit 3 Press 1 to cancel. Be sure to check how to select Fusing Unit and press Menu/Set. Reset the Fusing Unit life counter 1 Press Menu/Set, 7, 4. 2 Press ▲ or ▼ to connect...
Users Manual - English
Page 165
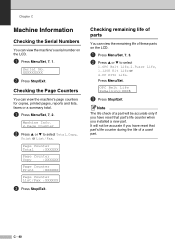
.../Set. Note The life check of these parts on the LCD. 1 Press Menu/Set, 7, 1. It will be accurate if you have reset that part's life counter when you have reset that part's life counter during the life of parts You can view the machine's page counters for copies, printed pages, reports and...
.../Set. Note The life check of these parts on the LCD. 1 Press Menu/Set, 7, 1. It will be accurate if you have reset that part's life counter when you have reset that part's life counter during the life of parts You can view the machine's page counters for copies, printed pages, reports and...
Users Manual - English
Page 192
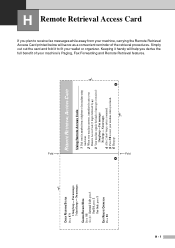
... a convenient reminder of messages it handy will help you plan to fit your wallet or organizer. No messages. 4 After 2 short beeps, enter a command. 5 Press 9 0 to reset your machine when you finish. 6 Hang up. 4 1 H Remote Retrieval Access Card If you derive the full benefit of your Remote Access Code (3 digits followed by...
... a convenient reminder of messages it handy will help you plan to fit your wallet or organizer. No messages. 4 After 2 short beeps, enter a command. 5 Press 9 0 to reset your machine when you finish. 6 Hang up. 4 1 H Remote Retrieval Access Card If you derive the full benefit of your Remote Access Code (3 digits followed by...
Software Users Manual - English
Page 14
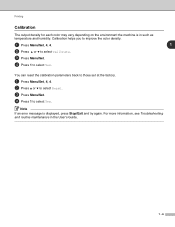
... information, see Troubleshooting and routine maintenance in such as temperature and humidity. Printing Calibration The output density for each color may vary depending on the environment the machine is displayed, press Stop/Exit and try again. Calibration helps you to improve the... color density. 1 Press Menu/Set, 4, 4. 1 2 Press ▲ or ▼ to select Calibrate. 3 Press Menu/Set. 4 Press 1 to select Yes. You can reset the calibration parameters back to those set at the factory. 1 Press Menu...
... information, see Troubleshooting and routine maintenance in such as temperature and humidity. Printing Calibration The output density for each color may vary depending on the environment the machine is displayed, press Stop/Exit and try again. Calibration helps you to improve the... color density. 1 Press Menu/Set, 4, 4. 1 2 Press ▲ or ▼ to select Calibrate. 3 Press Menu/Set. 4 Press 1 to select Yes. You can reset the calibration parameters back to those set at the factory. 1 Press Menu...
Software Users Manual - English
Page 93
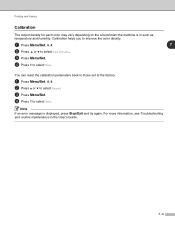
...Press Menu/Set. 4 Press 1 to select Yes. Printing and Faxing Calibration The output density for each color may vary depending on the environment the machine is displayed, press Stop/Exit and try again. You can reset the calibration parameters back to those set at the factory. 1 Press Menu/Set, 4, 4. 2 Press... ▲ or ▼ to select Reset 3 Press Menu/Set. 4 Press 1 to select Yes. Note If an error ...
...Press Menu/Set. 4 Press 1 to select Yes. Printing and Faxing Calibration The output density for each color may vary depending on the environment the machine is displayed, press Stop/Exit and try again. You can reset the calibration parameters back to those set at the factory. 1 Press Menu/Set, 4, 4. 2 Press... ▲ or ▼ to select Reset 3 Press Menu/Set. 4 Press 1 to select Yes. Note If an error ...
Network Users Manual - English
Page 8
... problems ...10-1 CD-ROM is inserted, but does not start automatically 10-1 How to reset the Brother print server to factory default 10-1 Network print software installation problems 10-1 The Brother print server is not found during setup of the network print software installation or from the printer... driver of the Brother machine in Windows 10-1 The Brother print server is not found using the Simple Network Configuration capabilities of Mac OS® X...10-1 Printing problems...10-4 Print ...
... problems ...10-1 CD-ROM is inserted, but does not start automatically 10-1 How to reset the Brother print server to factory default 10-1 Network print software installation problems 10-1 The Brother print server is not found during setup of the network print software installation or from the printer... driver of the Brother machine in Windows 10-1 The Brother print server is not found using the Simple Network Configuration capabilities of Mac OS® X...10-1 Printing problems...10-4 Print ...

Network Users Manual - English
Page 33
... Auto/100B-FD/100B-HD/10B-FD/10B-HD. 3 Press Menu/Set. 4 Press Stop/Exit. This change is valid after the print server has been reset (default is the time difference between your country time zone. Front Panel Setup Setup Misc. Auto allows the print server to exit the configuration menu...
... Auto/100B-FD/100B-HD/10B-FD/10B-HD. 3 Press Menu/Set. 4 Press Stop/Exit. This change is valid after the print server has been reset (default is the time difference between your country time zone. Front Panel Setup Setup Misc. Auto allows the print server to exit the configuration menu...
Network Users Manual - English
Page 34
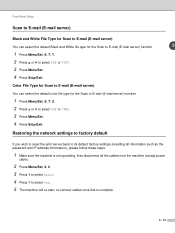
... cables from the machine (except power cable). 2 Press Menu/Set, 6, 0. 3 Press 1 to select Reset. 4 Press 1 to select Yes. 5 The machine will re-start, re-connect cables once this is complete. 3 - 15 Color File Type for Scan to E-mail (E-mail server) You can select the default Black and White file.../Exit. Front Panel Setup Scan to E-mail (E-mail server) Black and White File Type for Scan to E-mail (E-mail server) You can select the default color file type for the Scan to E-mail (E-mail server) function. 3 1 Press Menu/Set, 6, 7, 1. 2 Press ▲ or ▼ to select PDF or TIFF. 3...
... cables from the machine (except power cable). 2 Press Menu/Set, 6, 0. 3 Press 1 to select Reset. 4 Press 1 to select Yes. 5 The machine will re-start, re-connect cables once this is complete. 3 - 15 Color File Type for Scan to E-mail (E-mail server) You can select the default Black and White file.../Exit. Front Panel Setup Scan to E-mail (E-mail server) Black and White File Type for Scan to E-mail (E-mail server) You can select the default color file type for the Scan to E-mail (E-mail server) function. 3 1 Press Menu/Set, 6, 7, 1. 2 Press ▲ or ▼ to select PDF or TIFF. 3...
Network Users Manual - English
Page 78
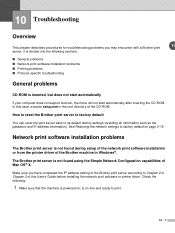
... printer driver of Mac OS® X. 10 Troubleshooting Overview This chapter describes procedures for troubleshooting problems you have completed the IP address setting of the Brother print server according to factory default on -line and ready to its default factory settings (resetting all information such as the password and IP address information).
... printer driver of Mac OS® X. 10 Troubleshooting Overview This chapter describes procedures for troubleshooting problems you have completed the IP address setting of the Brother print server according to factory default on -line and ready to its default factory settings (resetting all information such as the password and IP address information).
Network Users Manual - English
Page 80
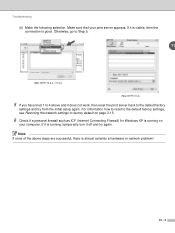
... it is visible, then the connection is almost certainly a hardware or network problem! 10 - 3 If it is running , temporarily turn it does not work, then reset the print server back to factory default on page 3-15. 6 Check if a personal firewall such as ICF (Internet Connecting Firewall) for Windows XP is running...
... it is visible, then the connection is almost certainly a hardware or network problem! 10 - 3 If it is running , temporarily turn it does not work, then reset the print server back to factory default on page 3-15. 6 Check if a personal firewall such as ICF (Internet Connecting Firewall) for Windows XP is running...


