Basic User's Guide - English
Page 9
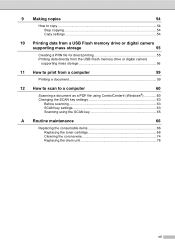
... ControlCenter4 (Windows 60 Changing the SCAN key settings 63 Before scanning 63 SCAN key settings 63 Scanning using the SCAN key 65 A Routine maintenance 66 Replacing the consumable items 66 Replacing the toner cartridge 68 Cleaning the corona wire 74 Replacing the drum unit 76 vii
... ControlCenter4 (Windows 60 Changing the SCAN key settings 63 Before scanning 63 SCAN key settings 63 Scanning using the SCAN key 65 A Routine maintenance 66 Replacing the consumable items 66 Replacing the toner cartridge 68 Cleaning the corona wire 74 Replacing the drum unit 76 vii
Basic User's Guide - English
Page 78
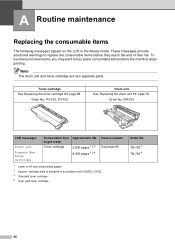
...Toner Low Prepare New Toner Cartridge. TN-720, TN-750 Drum unit See Replacing the drum unit uu page 76. Order No. These messages provide advanced warnings to replace the consumable items before the machine stops printing. A Routine maintenance A Replacing the consumable items A The following messages appear on the ... is declared in the Ready mode. TN-720 3 TN-750 4 66 Toner cartridge See Replacing the toner cartridge uu page 68. Order No. To avoid any inconvenience, you may want to replace See page 68. 1 Letter or A4 size single-sided pages. 2 Approx. Consumable item to...
...Toner Low Prepare New Toner Cartridge. TN-720, TN-750 Drum unit See Replacing the drum unit uu page 76. Order No. These messages provide advanced warnings to replace the consumable items before the machine stops printing. A Routine maintenance A Replacing the consumable items A The following messages appear on the ... is declared in the Ready mode. TN-720 3 TN-750 4 66 Toner cartridge See Replacing the toner cartridge uu page 68. Order No. To avoid any inconvenience, you may want to replace See page 68. 1 Letter or A4 size single-sided pages. 2 Approx. Consumable item to...
Basic User's Guide - English
Page 79
... the used consumable according to http://www.brother.com/original/index.html for each of the toner cartridges is approximate and may vary by type of replacement will need to clean the machine regularly and replace the consumable items when the following messages ...are displayed on the complexity of printed pages, percentage of coverage and type of media used consumable items to the Brother collection program. LCD messages Replace Toner Replace Parts Drum Consumable item to replace Toner cartridge Drum unit Approximate life 3,000 pages 1 2 5 8,000 pages 1 2 6 30,000 pages 1 3 4 How...
... the used consumable according to http://www.brother.com/original/index.html for each of the toner cartridges is approximate and may vary by type of replacement will need to clean the machine regularly and replace the consumable items when the following messages ...are displayed on the complexity of printed pages, percentage of coverage and type of media used consumable items to the Brother collection program. LCD messages Replace Toner Replace Parts Drum Consumable item to replace Toner cartridge Drum unit Approximate life 3,000 pages 1 2 5 8,000 pages 1 2 6 30,000 pages 1 3 4 How...
Basic User's Guide - English
Page 81
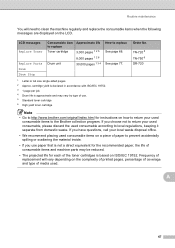
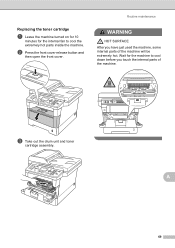
Routine maintenance WARNING HOT SURFACE After you touch the internal parts of the machine will be extremely hot. Wait for the internal fan to cool down before you have just used the machine, some internal parts of the machine. A 69 b Press the front cover release button and then open the front cover. c Take out the drum unit and toner cartridge assembly. Replacing the toner cartridge A a Leave the machine turned on for 10 minutes for the machine to cool the extremely hot parts inside the machine.
Routine maintenance WARNING HOT SURFACE After you touch the internal parts of the machine will be extremely hot. Wait for the internal fan to cool down before you have just used the machine, some internal parts of the machine. A 69 b Press the front cover release button and then open the front cover. c Take out the drum unit and toner cartridge assembly. Replacing the toner cartridge A a Leave the machine turned on for 10 minutes for the machine to cool the extremely hot parts inside the machine.
Basic User's Guide - English
Page 84
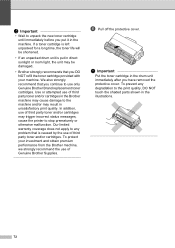
.../or cartridges. If a toner cartridge is left unpacked for a long time, the toner life will be shortened. • If an unpacked drum unit is caused by the use of Genuine Brother Supplies. In addition, use of third party toner and/or cartridges in the illustrations. 72 f Pull off the protective cover. Our..., the unit may result in the machine. Important • Wait to unpack the new toner cartridge until immediately before you continue to use only Genuine Brother Brand replacement toner cartridges. We also strongly recommend that is put it in unsatisfactory print quality.
.../or cartridges. If a toner cartridge is left unpacked for a long time, the toner life will be shortened. • If an unpacked drum unit is caused by the use of Genuine Brother Supplies. In addition, use of third party toner and/or cartridges in the illustrations. 72 f Pull off the protective cover. Our..., the unit may result in the machine. Important • Wait to unpack the new toner cartridge until immediately before you continue to use only Genuine Brother Brand replacement toner cartridges. We also strongly recommend that is put it in unsatisfactory print quality.

Basic User's Guide - English
Page 85
If you replace a toner cartridge, DO NOT turn off the machine's power switch or open the front...Note Be sure to return the tab to Ready mode. 73 g Put the new toner cartridge firmly into the drum unit until the LCD clears the Please Wait message and returns to the home position (a) (1). Routine maintenance h Clean the ...corona wire inside the drum unit by gently sliding the green tab from the drum unit. Note Make sure that you hear it may have a vertical stripe. A j Close the front ...
If you replace a toner cartridge, DO NOT turn off the machine's power switch or open the front...Note Be sure to return the tab to Ready mode. 73 g Put the new toner cartridge firmly into the drum unit until the LCD clears the Please Wait message and returns to the home position (a) (1). Routine maintenance h Clean the ...corona wire inside the drum unit by gently sliding the green tab from the drum unit. Note Make sure that you hear it may have a vertical stripe. A j Close the front ...
Basic User's Guide - English
Page 88
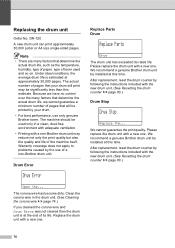
...; Printing with a new one . We cannot guarantee the print quality. Please replace the drum unit with a non-Brother drum unit may be significantly less than this estimate. After replacement, reset the drum counter by following the instructions included with a new one. The corona wire has... but also the quality and life of a non-Brother drum unit. Please replace the drum unit with the new drum unit. (See Resetting the drum counter uu page 80.) Drum Stop A Drum Stop Replace the... After replacement, reset the drum counter by following the instructions included with a new one...
...; Printing with a new one . We cannot guarantee the print quality. Please replace the drum unit with a non-Brother drum unit may be significantly less than this estimate. After replacement, reset the drum counter by following the instructions included with a new one. The corona wire has... but also the quality and life of a non-Brother drum unit. Please replace the drum unit with the new drum unit. (See Resetting the drum counter uu page 80.) Drum Stop A Drum Stop Replace the... After replacement, reset the drum counter by following the instructions included with a new one...
Basic User's Guide - English
Page 89
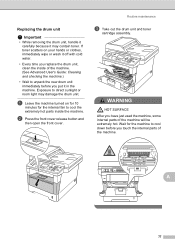
... clothes, immediately wipe or wash it off with cold water. • Every time you have just used the machine, some internal parts of the machine. WARNING HOT SURFACE After you replace the drum unit, clean the inside of the machine. (See Advanced User's Guide: Cleaning and checking the machine.) • Wait to cool...
... clothes, immediately wipe or wash it off with cold water. • Every time you have just used the machine, some internal parts of the machine. WARNING HOT SURFACE After you replace the drum unit, clean the inside of the machine. (See Advanced User's Guide: Cleaning and checking the machine.) • Wait to cool...
Basic User's Guide - English
Page 92
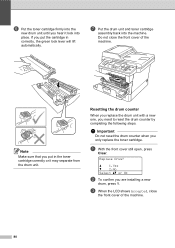
f Put the toner cartridge firmly into the new drum unit until you only replace the toner cartridge. Important Do not reset the drum counter when you hear it may separate from the drum unit. If you are installing a new drum, press 1. Do not close the front cover of the machine. a 1....completing the following steps. a With the front cover still open, press Clear. Replace Drum? c When the LCD shows Accepted, close the front cover of the machine. 80 Resetting the drum counter A When you replace the drum unit with a new one, you put the cartridge in the toner cartridge ...
f Put the toner cartridge firmly into the new drum unit until you only replace the toner cartridge. Important Do not reset the drum counter when you hear it may separate from the drum unit. If you are installing a new drum, press 1. Do not close the front cover of the machine. a 1....completing the following steps. a With the front cover still open, press Clear. Replace Drum? c When the LCD shows Accepted, close the front cover of the machine. 80 Resetting the drum counter A When you replace the drum unit with a new one, you put the cartridge in the toner cartridge ...
Basic User's Guide - English
Page 95
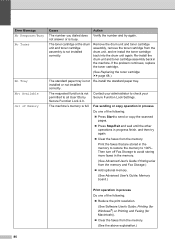
... Cooling Down The temperature of the drum Make sure that surround the exhaust outlet, and then leave the machine turned on but do not use is Contact your administrator to be replaced. Down, and Wait for several ...Message Cause Action Access Denied The function you will pause its not blocked by yourself. Put the drum unit and toner cartridge assembly back in . Comm.Error Poor telephone line quality caused a communication error... consumable items may need more help, the Brother Solutions Center offers the latest FAQs and troubleshooting tips: Visit us at http://solutions...
... Cooling Down The temperature of the drum Make sure that surround the exhaust outlet, and then leave the machine turned on but do not use is Contact your administrator to be replaced. Down, and Wait for several ...Message Cause Action Access Denied The function you will pause its not blocked by yourself. Put the drum unit and toner cartridge assembly back in . Comm.Error Poor telephone line quality caused a communication error... consumable items may need more help, the Brother Solutions Center offers the latest FAQs and troubleshooting tips: Visit us at http://solutions...
Basic User's Guide - English
Page 96
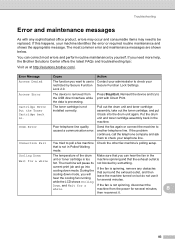
... The fuser cover is jammed in the top of the machine. Error Message Cover is Open DIMM Error Disconnected Document Jam DR Mode in Use Drum Error Cause Action The front cover is not completely closed. Close the ADF cover of the ADF unit uu page 91 or Using the automatic... document feeder (ADF) uu page 24. Clean the corona wire on again. If this error message appears again, replace the DIMM with a new one. (See Advanced User's Guide: Installing extra memory.) The other person or other person's fax machine stopped the call. The document...
... The fuser cover is jammed in the top of the machine. Error Message Cover is Open DIMM Error Disconnected Document Jam DR Mode in Use Drum Error Cause Action The front cover is not completely closed. Close the ADF cover of the ADF unit uu page 91 or Using the automatic... document feeder (ADF) uu page 24. Clean the corona wire on again. If this error message appears again, replace the DIMM with a new one. (See Advanced User's Guide: Installing extra memory.) The other person or other person's fax machine stopped the call. The document...
Basic User's Guide - English
Page 97
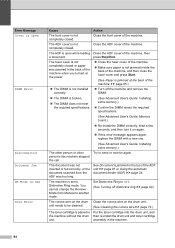
... is not correctly loaded in the multi-purpose tray (MP tray) uu page 11.) No HUB Support A USB hub device is time to replace the drum unit. Jam Tray 1 Jam Tray 2 Limit Exceeded The paper is jammed in the MP tray. The printing limit set to the USB direct...the See Paper is not Close the back cover of the machine is jammed inside the machine machine. direct interface. uu page 98. Replace the drum unit. (See Replacing the drum unit uu page 77.) Duplex Disabled The back of the machine. closed completely. uu page 93. Troubleshooting Error Message Cause Action...
... is not correctly loaded in the multi-purpose tray (MP tray) uu page 11.) No HUB Support A USB hub device is time to replace the drum unit. Jam Tray 1 Jam Tray 2 Limit Exceeded The paper is jammed in the MP tray. The printing limit set to the USB direct...the See Paper is not Close the back cover of the machine is jammed inside the machine machine. direct interface. uu page 98. Replace the drum unit. (See Replacing the drum unit uu page 77.) Duplex Disabled The back of the machine. closed completely. uu page 93. Troubleshooting Error Message Cause Action...
Basic User's Guide - English
Page 98
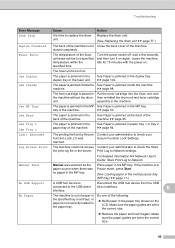
... in the machine. not answer or is not installed correctly. The toner cartridge or the drum unit and toner cartridge assembly is busy. If the problem continues, replace the toner cartridge. (See Replacing the toner cartridge uu page 68.) The standard paper tray is full. The machine's memory...you dialed does Verify the number and try again. Clear the faxes from the memory. (See the above explanation.) 86 Remove the drum unit and toner cartridge assembly, remove the toner cartridge from the memory and Fax Storage.) Add optional memory. (See Advanced User's ...
... in the machine. not answer or is not installed correctly. The toner cartridge or the drum unit and toner cartridge assembly is busy. If the problem continues, replace the toner cartridge. (See Replacing the toner cartridge uu page 68.) The standard paper tray is full. The machine's memory...you dialed does Verify the number and try again. Clear the faxes from the memory. (See the above explanation.) 86 Remove the drum unit and toner cartridge assembly, remove the toner cartridge from the memory and Fax Storage.) Add optional memory. (See Advanced User's ...
Basic User's Guide - English
Page 99
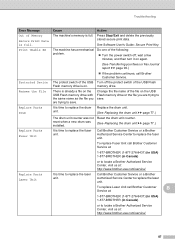
... memory drive is full. Replace the drum unit. (See Replacing the drum unit uu page 77.) The drum unit counter was installed. (See Replacing the drum unit uu page 77.) Replace Parts Fuser Unit It is full. reset when a new drum was not Reset the drum unit counter. To replace Laser Unit call Brother Customer B Service at: 1-877-BROTHER (1-877-276-8437) (in...
... memory drive is full. Replace the drum unit. (See Replacing the drum unit uu page 77.) The drum unit counter was installed. (See Replacing the drum unit uu page 77.) Replace Parts Fuser Unit It is full. reset when a new drum was not Reset the drum unit counter. To replace Laser Unit call Brother Customer B Service at: 1-877-BROTHER (1-877-276-8437) (in...
Basic User's Guide - English
Page 127
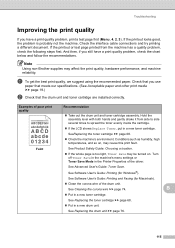
...from side to side several times to spread the toner evenly inside the cartridge. If the LCD shows Replace Toner, put in the Printer Properties of the drum unit. Hold the assembly level with both hands and gently shake it from the machine has a quality problem, ...correctly. See Product Safety Guide: Choosing a location. If the whole page is probably not the machine. See Replacing the drum unit uu page 76. 115 Note Using non-Brother supplies may cause this print fault. SeeReplacing the toner cartridge uu page 68. Check the machine's environment. Check...
...from side to side several times to spread the toner evenly inside the cartridge. If the LCD shows Replace Toner, put in the Printer Properties of the drum unit. Hold the assembly level with both hands and gently shake it from the machine has a quality problem, ...correctly. See Product Safety Guide: Choosing a location. If the whole page is probably not the machine. See Replacing the drum unit uu page 76. 115 Note Using non-Brother supplies may cause this print fault. SeeReplacing the toner cartridge uu page 68. Check the machine's environment. Check...
Basic User's Guide - English
Page 128
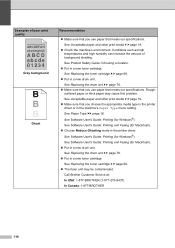
... uu page 68. Put in a new drum unit. See Replacing the drum unit uu page 76. Make sure that you use paper that you use paper that meets our specifications. Call Brother Customer Service at: In USA: 1-877-BROTHER (1-877-276-8437) In Canada: 1-877-BROTHER 116 Examples of background shading. Roughsurfaced paper or...
... uu page 68. Put in a new drum unit. See Replacing the drum unit uu page 76. Make sure that you use paper that you use paper that meets our specifications. Call Brother Customer Service at: In USA: 1-877-BROTHER (1-877-276-8437) In Canada: 1-877-BROTHER 116 Examples of background shading. Roughsurfaced paper or...
Basic User's Guide - English
Page 129
... at: In USA: 1-877-BROTHER (1-877-276-8437) In Canada: 1-877-BROTHER Make sure that you use paper that meets our specifications. See Software User's Guide: Printing and Faxing (for Windows®). Put in a new drum unit. B 117 Put in a new drum unit. Be sure to return ... Software User's Guide: Printing (for Macintosh). Check the machine's environment. Conditions such as high humidity can cause hollow print. See Replacing the drum unit uu page 76. The fuser unit may be contaminated. Put in the machine's Paper Type menu setting or use thinner paper ...
... at: In USA: 1-877-BROTHER (1-877-276-8437) In Canada: 1-877-BROTHER Make sure that you use paper that meets our specifications. See Software User's Guide: Printing and Faxing (for Windows®). Put in a new drum unit. B 117 Put in a new drum unit. Be sure to return ... Software User's Guide: Printing (for Macintosh). Check the machine's environment. Conditions such as high humidity can cause hollow print. See Replacing the drum unit uu page 76. The fuser unit may be contaminated. Put in the machine's Paper Type menu setting or use thinner paper ...
Basic User's Guide - English
Page 130
... Windows®). SeeReplacing the drum unit uu page 76. Clean the corona wire inside the drum unit. White lines, bands or ribbing across the page Check the machine's environment. See Replacing the drum unit uu page 76. Put in a new drum unit. Lines across the page 118 See Replacing the drum unit uu page 76.
... Windows®). SeeReplacing the drum unit uu page 76. Clean the corona wire inside the drum unit. White lines, bands or ribbing across the page Check the machine's environment. See Replacing the drum unit uu page 76. Put in a new drum unit. Lines across the page 118 See Replacing the drum unit uu page 76.
Basic User's Guide - English
Page 131
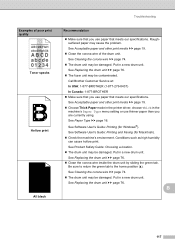
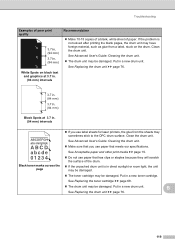
... may sometimes stick to the OPC drum surface. Put in a new toner cartridge. See Replacing the toner cartridge uu page 68. The drum unit may be damaged. See Replacing the drum unit uu page 76. Clean the drum unit. Put in a new drum unit. Troubleshooting Examples of poor print... quality White Spots on the drum. Put in . (94 mm) ...
... may sometimes stick to the OPC drum surface. Put in a new toner cartridge. See Replacing the toner cartridge uu page 68. The drum unit may be damaged. See Replacing the drum unit uu page 76. Clean the drum unit. Put in a new drum unit. Troubleshooting Examples of poor print... quality White Spots on the drum. Put in . (94 mm) ...

Basic User's Guide - English
Page 132
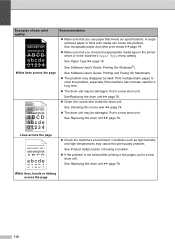
...61550; Clean the corona wire inside the machine and around the drum unit and toner cartridge. The toner cartridge may be damaged. See Replacing the toner cartridge uu page 68. The drum unit may be contaminated. Call Brother Customer Service at the home position (a). The toner ... Make sure the green tab of paper, sticky notes or dust is at : In USA: 1-877-BROTHER (1-877-276-8437) In Canada: 1-877-BROTHER Make sure that the back cover is loaded correctly in a new drum unit. See Replacing the toner cartridge uu page 68. The...
...61550; Clean the corona wire inside the machine and around the drum unit and toner cartridge. The toner cartridge may be damaged. See Replacing the toner cartridge uu page 68. The drum unit may be contaminated. Call Brother Customer Service at the home position (a). The toner ... Make sure the green tab of paper, sticky notes or dust is at : In USA: 1-877-BROTHER (1-877-276-8437) In Canada: 1-877-BROTHER Make sure that the back cover is loaded correctly in a new drum unit. See Replacing the toner cartridge uu page 68. The...


