Users Manual - English
Page 212
... 36 setting up Groups for 65 Brother accessories and supplies iii Brother numbers i Customer Service i FAQs (frequently asked questions) ..........i product support i service centers ii Solutions Center i warranties iv, v, vii ... ...... 57 Consumable items 190 Control panel overview 6 ControlCenter See Software User's Guide on the CD-ROM Copy brightness 91 color saturation 92 contrast 92 enlarge...91 using scanner glass 11 Cordless handset (MFC-885CW only) See Digital Cordless Handset BCL-D10 User's Guide Cordless phone (non-Brother 59 Custom Ringing 50 Custom telephone features ...
... 36 setting up Groups for 65 Brother accessories and supplies iii Brother numbers i Customer Service i FAQs (frequently asked questions) ..........i product support i service centers ii Solutions Center i warranties iv, v, vii ... ...... 57 Consumable items 190 Control panel overview 6 ControlCenter See Software User's Guide on the CD-ROM Copy brightness 91 color saturation 92 contrast 92 enlarge...91 using scanner glass 11 Cordless handset (MFC-885CW only) See Digital Cordless Handset BCL-D10 User's Guide Cordless phone (non-Brother 59 Custom Ringing 50 Custom telephone features ...
Software & Network Users Manual - English
Page 114
...any description, for example "Brother Scanner". 2 In Name or IP address (for network scanning by entering the information below to On. UDP Port number information for Firewall configuration UDP Port Nework Scanning Network PC-Fax External Port number Internal Port number 54925 54925 54926... 192.168.0.12) of service: - Port number 137 also supports printing, PhotoCapture Center® and Remote Setup over the network. 8 For Windows®XP SP2 users 8 a Click the Start button, Control Panel, Network and Internet Connection and then Windows Firewall. Enter "Localhost". 108 c...
...any description, for example "Brother Scanner". 2 In Name or IP address (for network scanning by entering the information below to On. UDP Port number information for Firewall configuration UDP Port Nework Scanning Network PC-Fax External Port number Internal Port number 54925 54925 54926... 192.168.0.12) of service: - Port number 137 also supports printing, PhotoCapture Center® and Remote Setup over the network. 8 For Windows®XP SP2 users 8 a Click the Start button, Control Panel, Network and Internet Connection and then Windows Firewall. Enter "Localhost". 108 c...

Software & Network Users Manual - English
Page 122
...9 To control special printing features, choose Print Settings in the User's Guide. 116 This setting may cause some slight blurring of text. • See Resolution in Specifications in the Print dialog box. You can choose the Quality, Slow Drying Paper, Media Type, Color/Grayscale, ...Paper Thickness, Bi-Directional Printing, Mirror Printing and Reverse Printing settings. Click the Support button to display the links to the Brother Solutions Center and Genuine Supplies websites. 9 Note • Check Slow Drying ...
...9 To control special printing features, choose Print Settings in the User's Guide. 116 This setting may cause some slight blurring of text. • See Resolution in Specifications in the Print dialog box. You can choose the Quality, Slow Drying Paper, Media Type, Color/Grayscale, ...Paper Thickness, Bi-Directional Printing, Mirror Printing and Reverse Printing settings. Click the Support button to display the links to the Brother Solutions Center and Genuine Supplies websites. 9 Note • Check Slow Drying ...
Software & Network Users Manual - English
Page 137
...; 7 User's Guide can be prompted to download Presto!® PageManager® from the Brother Solutions Center. For Mac OSX® 10.3.9 or greater users, you need to download the software from the Brother Solutions Center website. PageManager icon. You can scan an image, recognize the text, and edit it ...Enhance, crop and rotate images, or open them with an image-editing program of free disk space 131 Features 10 „ OCR: In one step you can easily manage your documents, edit your E-mail and files and read documents with most image editors and word processing programs, ...
...; 7 User's Guide can be prompted to download Presto!® PageManager® from the Brother Solutions Center. For Mac OSX® 10.3.9 or greater users, you need to download the software from the Brother Solutions Center website. PageManager icon. You can scan an image, recognize the text, and edit it ...Enhance, crop and rotate images, or open them with an image-editing program of free disk space 131 Features 10 „ OCR: In one step you can easily manage your documents, edit your E-mail and files and read documents with most image editors and word processing programs, ...

Quick Setup Guide - English
Page 3
...Using the SecureEasySetup™ or AOSS™ software to configure your machine for a wireless network ...28 Using the Setup Wizard from the control panel LAN menu for wireless network configuration 30 Installing FaceFilter Studio...34 Macintosh® For USB Interface Users (For Mac OS® X...; software to configure your station ID ...13 Setting tone or pulse dialing mode ...13 Choosing a Receive Mode ...14 Setting up the Message Center...14 Sending in the Product Registration and Test Sheet (USA only 15 STEP 2 - Setting Up the Machine Removing the protective parts ...5 Connecting...
...Using the SecureEasySetup™ or AOSS™ software to configure your machine for a wireless network ...28 Using the Setup Wizard from the control panel LAN menu for wireless network configuration 30 Installing FaceFilter Studio...34 Macintosh® For USB Interface Users (For Mac OS® X...; software to configure your station ID ...13 Setting tone or pulse dialing mode ...13 Choosing a Receive Mode ...14 Setting up the Message Center...14 Sending in the Product Registration and Test Sheet (USA only 15 STEP 2 - Setting Up the Machine Removing the protective parts ...5 Connecting...

Quick Setup Guide - English
Page 6
Fax 12:45 1 Dial Pad 2 Fax and telephone keys 3 Mode keys 4 Menu keys 5 Start keys 6 Stop/Exit key 7 LCD (Liquid Crystal Display) 8 Ink key 9 Fax Preview key 10 Microphone 11 On/Off key 12 Message Center keys For the details of the control panel, see Control panel overview in Chapter 1 of the User's Guide. 4 Getting Started Control panel 2 Mem.
Fax 12:45 1 Dial Pad 2 Fax and telephone keys 3 Mode keys 4 Menu keys 5 Start keys 6 Stop/Exit key 7 LCD (Liquid Crystal Display) 8 Ink key 9 Fax Preview key 10 Microphone 11 On/Off key 12 Message Center keys For the details of the control panel, see Control panel overview in Chapter 1 of the User's Guide. 4 Getting Started Control panel 2 Mem.

Network Users Manual - English
Page 6
... 1 Overview...1 Network features...2 Network printing...2 Network scanning ...2 Network PC-FAX (Not available for DCP models 2 Network PhotoCapture Center™...2 Management utilities...2 Types of Network Connections...4 Network Connection Example ...4 Wireless network connection example 6 Protocols...8 TCP/IP protocols ... wireless network 22 Using the Setup Wizard from the control panel 22 Using the SecureEasySetup™ or AOSS™ software to configure your machine for a wireless network...24 Using the Brother automatic installer application on the CD-ROM to configure ...
... 1 Overview...1 Network features...2 Network printing...2 Network scanning ...2 Network PC-FAX (Not available for DCP models 2 Network PhotoCapture Center™...2 Management utilities...2 Types of Network Connections...4 Network Connection Example ...4 Wireless network connection example 6 Protocols...8 TCP/IP protocols ... wireless network 22 Using the Setup Wizard from the control panel 22 Using the SecureEasySetup™ or AOSS™ software to configure your machine for a wireless network...24 Using the Brother automatic installer application on the CD-ROM to configure ...

Network Users Manual - English
Page 44
... 169.254.x.x IP address to be shown on your computer, following the steps below: 1 Click Start and then Control Panel. 2 Click Network and Internet and then Network and Sharing Center icon. 3 Click Connect to a network. 4 You can temporarily change the wireless settings on your PC, following ... and then Control Panel. 2 Click Network Connections icon. 3 Select and right click Wireless Network Connection. Wireless Configuration for Windows® m To communicate with the install skipping steps 11, 12 and 13. • For Windows® XP SP2 users you can see the Brother wireless machine ...
... 169.254.x.x IP address to be shown on your computer, following the steps below: 1 Click Start and then Control Panel. 2 Click Network and Internet and then Network and Sharing Center icon. 3 Click Connect to a network. 4 You can temporarily change the wireless settings on your PC, following ... and then Control Panel. 2 Click Network Connections icon. 3 Select and right click Wireless Network Connection. Wireless Configuration for Windows® m To communicate with the install skipping steps 11, 12 and 13. • For Windows® XP SP2 users you can see the Brother wireless machine ...

Network Users Manual - English
Page 60
...). 52 and check the Network Connection Details. are numbers between 1 and 254). • For Windows Vista™ users: You can see the Brother wireless machine in the list. Click Next. 4 Note • If a message to restart your PC appears after the wireless settings have been changed..., restart your computer, following the steps below : 1 Click Start and then Control Panel. 2 Click Network and Internet and then Network and Sharing Center icon. 3 Click Connect to a network. 4 You can temporarily change the wireless settings on your PC and ...
...). 52 and check the Network Connection Details. are numbers between 1 and 254). • For Windows Vista™ users: You can see the Brother wireless machine in the list. Click Next. 4 Note • If a message to restart your PC appears after the wireless settings have been changed..., restart your computer, following the steps below : 1 Click Start and then Control Panel. 2 Click Network and Internet and then Network and Sharing Center icon. 3 Click Connect to a network. 4 You can temporarily change the wireless settings on your PC and ...

Network Users Manual - English
Page 113
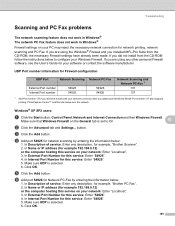
...Firewall on your computer may encounter when using the machine. Windows® XP SP2 users: 10 a Click the Start button, Control Panel, Network and Internet Connections. If, after inserting the CD-ROM. In this case, you are unable to resolve your computer... Make sure that Off (not recommended) is inserted, but does not start automatically 10 If your problem, please visit the Brother Solutions Center at: http://solutions.brother.com This chapter is divided into the following sections: „ General problems „ Network print software installation problems „...
...Firewall on your computer may encounter when using the machine. Windows® XP SP2 users: 10 a Click the Start button, Control Panel, Network and Internet Connections. If, after inserting the CD-ROM. In this case, you are unable to resolve your computer... Make sure that Off (not recommended) is inserted, but does not start automatically 10 If your problem, please visit the Brother Solutions Center at: http://solutions.brother.com This chapter is divided into the following sections: „ General problems „ Network print software installation problems „...
Network Users Manual - English
Page 117
... have already been made. Port number 137 also supports printing, PhotoCapture Center™ and Remote Setup over the network. In Internal Port Number for example, "Brother PC Fax". 2. Make sure UDP is selected. 6. Windows® XP SP2 users: 10 a Click the Start button, Control Panel, Network and Internet Connection and then Windows Firewall. In...
... have already been made. Port number 137 also supports printing, PhotoCapture Center™ and Remote Setup over the network. In Internal Port Number for example, "Brother PC Fax". 2. Make sure UDP is selected. 6. Windows® XP SP2 users: 10 a Click the Start button, Control Panel, Network and Internet Connection and then Windows Firewall. In...


