
Users Manual - English
Page 9
button ...76 Back...77 OK ...77 LEDs ...77 LCD ...77 Back light (HL-3070CW only) ...78 LCD messages ...78 Reprinting documents...79...118 Waste toner box ...122 Cleaning ...128 Cleaning the outside of the printer 128 Cleaning the LED head ...130 Cleaning the corona wires ...131 Cleaning the drum unit ...134 Cleaning the paper pick-up roller...140 6 Troubleshooting 142 ... paper tray 148 Jam Rear (Paper jam behind the back cover 149 Jam Inside (Paper jam inside the printer 151 Improving the print quality...154 Solving print problems ...161 viii 3 Control Panel 75 Control panel ...75 Buttons...
button ...76 Back...77 OK ...77 LEDs ...77 LCD ...77 Back light (HL-3070CW only) ...78 LCD messages ...78 Reprinting documents...79...118 Waste toner box ...122 Cleaning ...128 Cleaning the outside of the printer 128 Cleaning the LED head ...130 Cleaning the corona wires ...131 Cleaning the drum unit ...134 Cleaning the paper pick-up roller...140 6 Troubleshooting 142 ... paper tray 148 Jam Rear (Paper jam behind the back cover 149 Jam Inside (Paper jam inside the printer 151 Improving the print quality...154 Solving print problems ...161 viii 3 Control Panel 75 Control panel ...75 Buttons...
Users Manual - English
Page 83
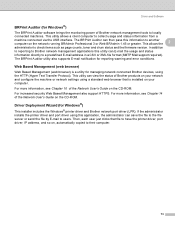
...client computer to check items such as page counts, toner and drum status and the firmware version. Driver and Software BRPrint Auditor (for Windows®) 2 The BRPrint Auditor software brings the monitoring power of Brother products on your network and configure the machine or network settings... Transfer Protocol). The BRPrint Auditor utility also supports E-mail notification for Windows®) 2 This installer includes the Windows® printer driver and Brother network port driver (LPR). This utility can then pass this utility can save the file to the file server or send ...
...client computer to check items such as page counts, toner and drum status and the firmware version. Driver and Software BRPrint Auditor (for Windows®) 2 The BRPrint Auditor software brings the monitoring power of Brother products on your network and configure the machine or network settings... Transfer Protocol). The BRPrint Auditor utility also supports E-mail notification for Windows®) 2 This installer includes the Windows® printer driver and Brother network port driver (LPR). This utility can then pass this utility can save the file to the file server or send ...
Users Manual - English
Page 94
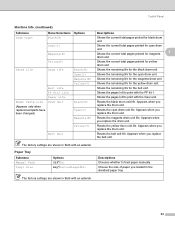
... factory settings are shown in Bold with an asterisk. 84 Yellow(Y) Resets the yellow drum unit life. Choose the size of paper you replace the drum unit. Magenta(M) Resets the magenta drum unit life. The factory settings are shown in Bold with an asterisk. Control Panel ...Machine Info. (continued) Submenu Menu Selections Options Descriptions Drum Count Black(K) Shows the current total pages printed for the yellow drum unit. Fuser Life Shows the pages left to feed paper manually. Yellow(Y) Shows the remaining life...
... factory settings are shown in Bold with an asterisk. 84 Yellow(Y) Resets the yellow drum unit life. Choose the size of paper you replace the drum unit. Magenta(M) Resets the magenta drum unit life. The factory settings are shown in Bold with an asterisk. Control Panel ...Machine Info. (continued) Submenu Menu Selections Options Descriptions Drum Count Black(K) Shows the current total pages printed for the yellow drum unit. Fuser Life Shows the pages left to feed paper manually. Yellow(Y) Shows the remaining life...
Users Manual - English
Page 101
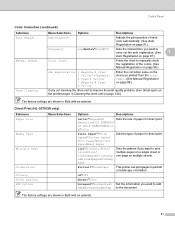
...Regist. Portrait*/Landscape This printer can print pages in Bold with an asterisk. On*/Off Normal*/Fine Document*/Document&St Set the information you want to print multiple pages on a single sheet or one page on multiple sheets. Control Panel Color Correction (continued) Submenu...See Small spots on the printed pages in Cleaning the drum unit on page 98.) Carry out cleaning the drum unit to the document. Drum Cleaning Menu Selections Options Descriptions Registration Adjusts the print position of each color automatically. (See Auto Registration on page 97.) Frequency...
...Regist. Portrait*/Landscape This printer can print pages in Bold with an asterisk. On*/Off Normal*/Fine Document*/Document&St Set the information you want to print multiple pages on a single sheet or one page on multiple sheets. Control Panel Color Correction (continued) Submenu...See Small spots on the printed pages in Cleaning the drum unit on page 98.) Carry out cleaning the drum unit to the document. Drum Cleaning Menu Selections Options Descriptions Registration Adjusts the print position of each color automatically. (See Auto Registration on page 97.) Frequency...
Users Manual - English
Page 112
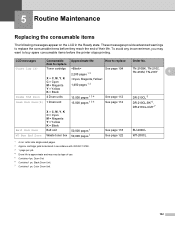
... messages appear on the LCD in accordance with ISO/IEC 19798. 3 1 page per job. 4 Drum life is approximate and may want to replace Order No. These messages provide advanced warnings to replace the consumable items before the printer stops printing. Toner Low (X) Toner cartridge X = C, M, Y, K C = Cyan M = Magenta ...1 See page 122 WT-200CL 1 A4 or Letter size single-sided pages. 2 Approx. Drum Set. 6 Contains 1 pc. cartridge yield is declared in the Ready state. Color Drum Unit. 102 LCD messages Consumable Approximate life item to replace How to buy spare consumable items ...
... messages appear on the LCD in accordance with ISO/IEC 19798. 3 1 page per job. 4 Drum life is approximate and may want to replace Order No. These messages provide advanced warnings to replace the consumable items before the printer stops printing. Toner Low (X) Toner cartridge X = C, M, Y, K C = Cyan M = Magenta ...1 See page 122 WT-200CL 1 A4 or Letter size single-sided pages. 2 Approx. Drum Set. 6 Contains 1 pc. cartridge yield is declared in the Ready state. Color Drum Unit. 102 LCD messages Consumable Approximate life item to replace How to buy spare consumable items ...
Users Manual - English
Page 113
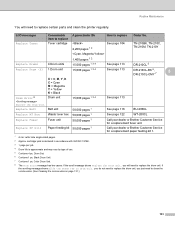
... kit 50,000 pages 1 Call your dealer or Brother Customer Service for a replacement paper feeding kit 1. 1 A4 or Letter size single-sided pages. 2 Approx. Color Drum Unit. 8 The Drum Error message has two cases: If the scroll message shows Replace the Drum Unit. you just need to clean the corona wires...in accordance with ISO/IEC 19798. 3 1 page per job. 4 Drum life is approximate and may vary by type of use. 5 Contains 4 pc. Routine Maintenance You will need to replace certain parts and clean the printer regularly. If the scrolling message shows Slide the Green tab on page 131...
... kit 50,000 pages 1 Call your dealer or Brother Customer Service for a replacement paper feeding kit 1. 1 A4 or Letter size single-sided pages. 2 Approx. Color Drum Unit. 8 The Drum Error message has two cases: If the scroll message shows Replace the Drum Unit. you just need to clean the corona wires...in accordance with ISO/IEC 19798. 3 1 page per job. 4 Drum life is approximate and may vary by type of use. 5 Contains 4 pc. Routine Maintenance You will need to replace certain parts and clean the printer regularly. If the scrolling message shows Slide the Green tab on page 131...
Users Manual - English
Page 115
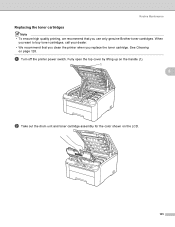
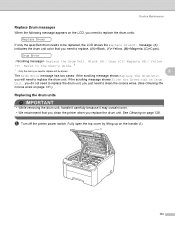
When you want to buy toner cartridges, call your dealer. • We recommend that you replace the toner cartridge. Routine Maintenance Replacing the toner cartridges 5 Note • To ensure high quality printing, we recommend that you clean the printer when you use only genuine Brother toner cartridges. See Cleaning on the LCD. 105 a Turn off the printer power switch. Fully open the top cover by lifting up on the handle (1). 1 5 b Take out the drum unit and toner cartridge assembly for the color shown on page 128.
When you want to buy toner cartridges, call your dealer. • We recommend that you replace the toner cartridge. Routine Maintenance Replacing the toner cartridges 5 Note • To ensure high quality printing, we recommend that you clean the printer when you use only genuine Brother toner cartridges. See Cleaning on the LCD. 105 a Turn off the printer power switch. Fully open the top cover by lifting up on the handle (1). 1 5 b Take out the drum unit and toner cartridge assembly for the color shown on page 128.
Users Manual - English
Page 116
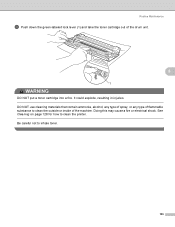
Doing this may cause a fire or electrical shock. DO NOT use cleaning materials that contain ammonia, alcohol, any type of spray, or any type of flammable substance to clean the outside or inside of the drum unit. 5 1 WARNING DO NOT put a toner cartridge into a fire. See Cleaning on page 128 for how to inhale toner. 106 Be careful not to clean the printer. It could explode, resulting in injuries. Routine Maintenance c Push down the green-labeled lock lever (1) and take the toner cartridge out of the machine.
Doing this may cause a fire or electrical shock. DO NOT use cleaning materials that contain ammonia, alcohol, any type of spray, or any type of flammable substance to clean the outside or inside of the drum unit. 5 1 WARNING DO NOT put a toner cartridge into a fire. See Cleaning on page 128 for how to inhale toner. 106 Be careful not to clean the printer. It could explode, resulting in injuries. Routine Maintenance c Push down the green-labeled lock lever (1) and take the toner cartridge out of the machine.

Users Manual - English
Page 117
...seal up the toner cartridge tightly in a suitable bag so that you place the drum unit and toner cartridge assembly on a clean, flat surface with a sheet of the cartridge. • Go to http://www.brother-usa.com/environment/ for instructions on your hands or clothes, wipe or wash it...used toner cartridge according to local regulations, keeping it in case you accidentally spill or scatter toner. • To prevent damage to the printer from domestic waste. Routine Maintenance IMPORTANT • We recommend that toner powder does not spill out of disposable paper or cloth underneath it ...
...seal up the toner cartridge tightly in a suitable bag so that you place the drum unit and toner cartridge assembly on a clean, flat surface with a sheet of the cartridge. • Go to http://www.brother-usa.com/environment/ for instructions on your hands or clothes, wipe or wash it...used toner cartridge according to local regulations, keeping it in case you accidentally spill or scatter toner. • To prevent damage to the printer from domestic waste. Routine Maintenance IMPORTANT • We recommend that toner powder does not spill out of disposable paper or cloth underneath it ...
Users Manual - English
Page 118
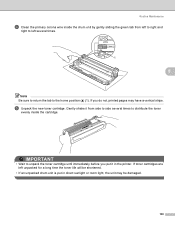
... unpack the toner cartridge until immediately before you do not, printed pages may be damaged. 108 Routine Maintenance d Clean the primary corona wire inside the drum unit by gently sliding the green tab from side to side several times. 1 5 Note Be sure to return the tab to distribute the toner evenly... you put it from left to right and right to left unpacked for a long time the toner life will be shortened. • If an unpacked drum unit is put in the printer.
... unpack the toner cartridge until immediately before you do not, printed pages may be damaged. 108 Routine Maintenance d Clean the primary corona wire inside the drum unit by gently sliding the green tab from side to side several times. 1 5 Note Be sure to return the tab to distribute the toner evenly... you put it from left to right and right to left unpacked for a long time the toner life will be shortened. • If an unpacked drum unit is put in the printer.

Users Manual - English
Page 119
... cartridge provided with your investment and obtain premium performance from the Brother machine, we strongly recommend the use of genuine Brother supplies. Inside the printer (Top View) 5 Inside the printer (Back View) IMPORTANT For USA and Canada Brother strongly recommends that you continue to the drum unit or other part of this machine. Our warranty coverage...
... cartridge provided with your investment and obtain premium performance from the Brother machine, we strongly recommend the use of genuine Brother supplies. Inside the printer (Top View) 5 Inside the printer (Back View) IMPORTANT For USA and Canada Brother strongly recommends that you continue to the drum unit or other part of this machine. Our warranty coverage...
Users Manual - English
Page 120
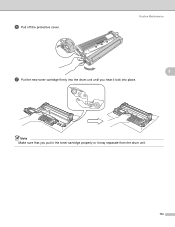
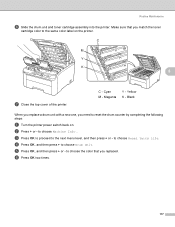
Routine Maintenance 5 g Put the new toner cartridge firmly into the drum unit until you put in the toner cartridge properly or it lock into place. Note Make sure that you hear it may separate from the drum unit. 110 f Pull off the protective cover.
Routine Maintenance 5 g Put the new toner cartridge firmly into the drum unit until you put in the toner cartridge properly or it lock into place. Note Make sure that you hear it may separate from the drum unit. 110 f Pull off the protective cover.

Users Manual - English
Page 121
Black j Turn the printer power switch back on the printer. C M Y K 5 i Close the top cover of the printer. Routine Maintenance h Slide the drum unit and toner cartridge assembly into the printer. Make sure that you match the toner cartridge color to the same color label on . Magenta Y - Note DO NOT turn off the printer power switch or open the top cover until the LCD shows Ready. 111 Cyan M - C - Yellow K -
Black j Turn the printer power switch back on the printer. C M Y K 5 i Close the top cover of the printer. Routine Maintenance h Slide the drum unit and toner cartridge assembly into the printer. Make sure that you match the toner cartridge color to the same color label on . Magenta Y - Note DO NOT turn off the printer power switch or open the top cover until the LCD shows Ready. 111 Cyan M - C - Yellow K -
Users Manual - English
Page 122
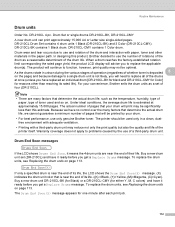
..., (C)=Cyan). To replace the drum units, see Replacing the drum units on page 113. DR-210CL Drum Set contains 4 drum units 1 Black (DR-210CL-BK) and 3 Color (DR-210CL-CMY). As the drums rotate in the paper path. Under ideal conditions, the average drum life is near the end of... pc. DR-210CL-BK contains 1 Black drum. Drum End Soon(X) If only a specified drum is near the end of the drum life. The printer should be optimal. Drum wear and tear occurs due to problems caused by your convenience, Brother sells the drum units as a reasonable determinant of their life...
..., (C)=Cyan). To replace the drum units, see Replacing the drum units on page 113. DR-210CL Drum Set contains 4 drum units 1 Black (DR-210CL-BK) and 3 Color (DR-210CL-CMY). As the drums rotate in the paper path. Under ideal conditions, the average drum life is near the end of... pc. DR-210CL-BK contains 1 Black drum. Drum End Soon(X) If only a specified drum is near the end of the drum life. The printer should be optimal. Drum wear and tear occurs due to problems caused by your convenience, Brother sells the drum units as a reasonable determinant of their life...
Users Manual - English
Page 123
you will be replaced, the LCD shows the Replace Drum(X) message. (X) indicates the drum unit color that you clean the printer when you replace the drum unit. See Cleaning on Drum Unit. a Turn off the printer power switch. Black (K)/ Cyan (C)/ Magenta (M)/ Yellow (Y). you do not need to replace the drum unit, you just need to clean the corona wires...
you will be replaced, the LCD shows the Replace Drum(X) message. (X) indicates the drum unit color that you clean the printer when you replace the drum unit. See Cleaning on Drum Unit. a Turn off the printer power switch. Black (K)/ Cyan (C)/ Magenta (M)/ Yellow (Y). you do not need to replace the drum unit, you just need to clean the corona wires...

Users Manual - English
Page 124
...on page 128 for the color shown on the LCD. 5 c Push down the green-labeled lock lever (1) and take the toner cartridge out of flammable substance to inhale toner. 114 Routine Maintenance b Take out the drum unit and toner cartridge assembly for how to clean the printer. Doing this may cause... a fire or electrical shock. It could explode, resulting in injuries. DO NOT use cleaning materials that contain ammonia, alcohol, any type of spray, or any type of the drum unit. 1 WARNING DO NOT put a toner ...
...on page 128 for the color shown on the LCD. 5 c Push down the green-labeled lock lever (1) and take the toner cartridge out of flammable substance to inhale toner. 114 Routine Maintenance b Take out the drum unit and toner cartridge assembly for how to clean the printer. Doing this may cause... a fire or electrical shock. It could explode, resulting in injuries. DO NOT use cleaning materials that contain ammonia, alcohol, any type of spray, or any type of the drum unit. 1 WARNING DO NOT put a toner ...

Users Manual - English
Page 125
...If you choose not to return your local waste disposal office. 115 If you place the drum unit and toner cartridge assembly on a clean, flat surface with a sheet of the cartridge. • Go to http://www.brother-usa.com/environment/ for instructions on how to return the used toner cartridge according to local... problems, DO NOT touch the shaded parts shown in case you accidentally spill or scatter toner. • To prevent damage to seal up the drum unit tightly in a suitable bag so that you have questions, call your used toner cartridge, please discard the used toner cartridge to the...
...If you choose not to return your local waste disposal office. 115 If you place the drum unit and toner cartridge assembly on a clean, flat surface with a sheet of the cartridge. • Go to http://www.brother-usa.com/environment/ for instructions on how to return the used toner cartridge according to local... problems, DO NOT touch the shaded parts shown in case you accidentally spill or scatter toner. • To prevent damage to seal up the drum unit tightly in a suitable bag so that you have questions, call your used toner cartridge, please discard the used toner cartridge to the...
Users Manual - English
Page 126
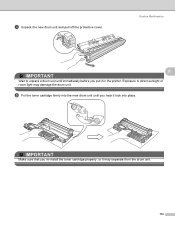
IMPORTANT Make sure that you re-install the toner cartridge properly, or it may damage the drum unit. Exposure to unpack a drum unit until you put it lock into place. e Put the toner cartridge firmly into the new drum unit until immediately before you hear it in the printer. Routine Maintenance 5 IMPORTANT Wait to direct sunlight or room light may separate from the drum unit. 116 d Unpack the new drum unit and pull off the protective cover.
IMPORTANT Make sure that you re-install the toner cartridge properly, or it may damage the drum unit. Exposure to unpack a drum unit until you put it lock into place. e Put the toner cartridge firmly into the new drum unit until immediately before you hear it in the printer. Routine Maintenance 5 IMPORTANT Wait to direct sunlight or room light may separate from the drum unit. 116 d Unpack the new drum unit and pull off the protective cover.
Users Manual - English
Page 127
.... b Press + or - f Press OK two times. 117 Make sure that you match the toner cartridge color to reset the drum counter by completing the following steps: a Turn the printer power switch back on the printer. Cyan M - Yellow K - to the next menu level, and then press + or - c Press OK to proceed to choose Machine Info...
.... b Press + or - f Press OK two times. 117 Make sure that you match the toner cartridge color to reset the drum counter by completing the following steps: a Turn the printer power switch back on the printer. Cyan M - Yellow K - to the next menu level, and then press + or - c Press OK to proceed to choose Machine Info...
Users Manual - English
Page 129
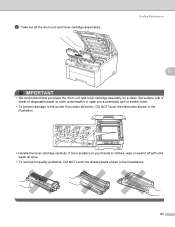
...; We recommend that you place the drum unit and toner cartridge assembly on your hands or clothes, wipe or wash it off with a sheet of disposable paper or cloth underneath it in case you accidentally spill or scatter toner. • To prevent damage to the printer from static electricity, DO NOT touch...; To avoid print quality problems, DO NOT touch the shaded parts shown in the illustration. • Handle the toner cartridge carefully. b Take out all the drum unit and toner cartridge assemblies.
...; We recommend that you place the drum unit and toner cartridge assembly on your hands or clothes, wipe or wash it off with a sheet of disposable paper or cloth underneath it in case you accidentally spill or scatter toner. • To prevent damage to the printer from static electricity, DO NOT touch...; To avoid print quality problems, DO NOT touch the shaded parts shown in the illustration. • Handle the toner cartridge carefully. b Take out all the drum unit and toner cartridge assemblies.


