

Parts Manual - English
Page 4
.... Presser foot mechanism (Embroidery frame) F2 . PC . Presser foot mechanism (Border frame set 41 (09E54216AC ; Upper threading mechanism 3 (BES-1216AC) 55 41 . Motor mechanism . . . . 77 X. Option parts) 95 39 AA2 Boring device set ; Accessories 97 Ga Gauge parts List 100 45 Op. Option parts) F4. Lower shaft mechanism Si 13 5. Boring device set ) . Needle bar flip-up mechanism (BES-916AC) 52 . Presser foot mechanism (Tubular frame ; Option parts) F3 . Presser foot mechanism (Embroidery -frame set 37 (BE5.916AC ; Feed guide...
.... Presser foot mechanism (Embroidery frame) F2 . PC . Presser foot mechanism (Border frame set 41 (09E54216AC ; Upper threading mechanism 3 (BES-1216AC) 55 41 . Motor mechanism . . . . 77 X. Option parts) 95 39 AA2 Boring device set ; Accessories 97 Ga Gauge parts List 100 45 Op. Option parts) F4. Lower shaft mechanism Si 13 5. Boring device set ) . Needle bar flip-up mechanism (BES-916AC) 52 . Presser foot mechanism (Tubular frame ; Option parts) F3 . Presser foot mechanism (Embroidery -frame set 37 (BE5.916AC ; Feed guide...
Parts Manual - English
Page 13
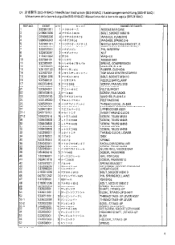
...•ci 1 /, lit '7 sr4 9 7--v 35)(8 1 7i.a. SOCKET (FT) M3.5X3.5 UPPER COVER ASSY INNER THREAD GUIDE SCREW, TRUSS M5X5 SCREW, TRUSS NE4X8 SCREW, TRUSS M4X8 LOWER COVER SCREW, TRUSS M4X8 THREAD GUIDE, LOWER DISK SPRING SHOULDER SCREW, M3 SCREW, TRUSS M4X8 GUIDE RAIL, NEEDLE BAR SCREW, PAN M4X8 RAIL FOR CASE SCREW, PAN maxi 0 SPRING BRACKET SET SCREW, SOCKET (CP) M4X6 LINEAR GUIDE BOLT, SOCKET M3X10 PIN, SPRING ROLL AW5 RSR BASE BOLT, SOCKET M6X12 49 50 51...
...•ci 1 /, lit '7 sr4 9 7--v 35)(8 1 7i.a. SOCKET (FT) M3.5X3.5 UPPER COVER ASSY INNER THREAD GUIDE SCREW, TRUSS M5X5 SCREW, TRUSS NE4X8 SCREW, TRUSS M4X8 LOWER COVER SCREW, TRUSS M4X8 THREAD GUIDE, LOWER DISK SPRING SHOULDER SCREW, M3 SCREW, TRUSS M4X8 GUIDE RAIL, NEEDLE BAR SCREW, PAN M4X8 RAIL FOR CASE SCREW, PAN maxi 0 SPRING BRACKET SET SCREW, SOCKET (CP) M4X6 LINEAR GUIDE BOLT, SOCKET M3X10 PIN, SPRING ROLL AW5 RSR BASE BOLT, SOCKET M6X12 49 50 51...

Parts Manual - English
Page 53
... SPRING, TWIST A PIN, SPRIVIG ROLL AW3 COLLAR THREAD N /PPER ASSY KNIFE, ;T-NIPPER DISC RETAINING RING, CS4 SPRING SHOULDER SCREW. B-WINDE R DISC ;TENSION TENSION SPRING NUT, TENSION GUIDE PLATE, ;6-WINDER SCREW, PAN (S/P WASHER) M4X8 SCREW, PAN NI5X10 SPOOL SHAFT WASHER, SPRING 2-5 NUT, 1 MS SPOOL MAT WASHER, PLAIN M 6 ;St ti6 040 46 F. -M BOBBIN WINDER SET, C BOBBIN WINDER ASSY SCREW, TRUSS M3X6 SCREW, M2.6X5.5 WASHER, SPRING 2.2.6 SHAFT, ;R-WINDFR SET SCREW, SOCKET (CP) M3X3 BOBBIN PRESSER BOBBIN WINDER CLAW SETSCREW, SOCKET (CP) SIVI4.37 LEVER, ; fij - B-WINDER...
... SPRING, TWIST A PIN, SPRIVIG ROLL AW3 COLLAR THREAD N /PPER ASSY KNIFE, ;T-NIPPER DISC RETAINING RING, CS4 SPRING SHOULDER SCREW. B-WINDE R DISC ;TENSION TENSION SPRING NUT, TENSION GUIDE PLATE, ;6-WINDER SCREW, PAN (S/P WASHER) M4X8 SCREW, PAN NI5X10 SPOOL SHAFT WASHER, SPRING 2-5 NUT, 1 MS SPOOL MAT WASHER, PLAIN M 6 ;St ti6 040 46 F. -M BOBBIN WINDER SET, C BOBBIN WINDER ASSY SCREW, TRUSS M3X6 SCREW, M2.6X5.5 WASHER, SPRING 2.2.6 SHAFT, ;R-WINDFR SET SCREW, SOCKET (CP) M3X3 BOBBIN PRESSER BOBBIN WINDER CLAW SETSCREW, SOCKET (CP) SIVI4.37 LEVER, ; fij - B-WINDER...
Parts Manual - English
Page 103
... device sit (BES-916AC; CODE QTY 6.4)14 NAME OF PARTS R,.I 2 2-1 2-1-1 2-1-2 2-1-3 2.1-4 4.4 2-3 336393001 536402001 536403001 536404000 532482001 100360003 64041/911.11 519951001 I . 0 SCREW. N-PLATE NEEDLE HOLE PLATE,I IP... Soncierrithehes)/ Jeu Occenoites (BES-1216AC; PIM 1 *-0 ii3lisi/149t. 1 al - 9 '..- 7 A 9n V 1 9 1 AU Its ale,. 1 nu Syt f *0 2 425 *.)2 98 I - V 1.-/P/I 4I- FLAT SM2.38 1--bUAKU ASSY, ;13-134VICE BORING KNIFE SET I I 8I- Option parts)/ Anbausatz (BES-1216AC...
... device sit (BES-916AC; CODE QTY 6.4)14 NAME OF PARTS R,.I 2 2-1 2-1-1 2-1-2 2-1-3 2.1-4 4.4 2-3 336393001 536402001 536403001 536404000 532482001 100360003 64041/911.11 519951001 I . 0 SCREW. N-PLATE NEEDLE HOLE PLATE,I IP... Soncierrithehes)/ Jeu Occenoites (BES-1216AC; PIM 1 *-0 ii3lisi/149t. 1 al - 9 '..- 7 A 9n V 1 9 1 AU Its ale,. 1 nu Syt f *0 2 425 *.)2 98 I - V 1.-/P/I 4I- FLAT SM2.38 1--bUAKU ASSY, ;13-134VICE BORING KNIFE SET I I 8I- Option parts)/ Anbausatz (BES-1216AC...

Instruction Manual - English
Page 5
... by Brother. Any problems in injury. • When threading the needle • When replacing the bobbin and needle • When not using the machine. CAUTION Sewing This sewing machine should only be used by operators who have been removed, be absolutely sure to re-install them to their original positions and check that if a needle breaks, parts of the broken needle may enter your eyes and injury may operate if the start switch...
... by Brother. Any problems in injury. • When threading the needle • When replacing the bobbin and needle • When not using the machine. CAUTION Sewing This sewing machine should only be used by operators who have been removed, be absolutely sure to re-install them to their original positions and check that if a needle breaks, parts of the broken needle may enter your eyes and injury may operate if the start switch...
Instruction Manual - English
Page 10
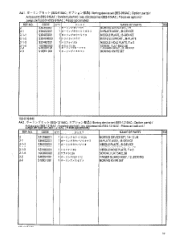
... explanations on machine operation during embroidering. Configuration of this manual This manual consists of the following chapters: Chapter 1 Preparation of Embroidery Machine This Chapter describes the specifications, installation and preparatory procedures of embroidering processes. Chapter 5 Setting This Chapter describes procedures of Machine Provides information on the operation panel and briefly reviews the flow of starting up the machine. Chapter 6 Operation of setting the machine and working environment. BES-916AC (9 needles) - BES-1216AC...
... explanations on machine operation during embroidering. Configuration of this manual This manual consists of the following chapters: Chapter 1 Preparation of Embroidery Machine This Chapter describes the specifications, installation and preparatory procedures of embroidering processes. Chapter 5 Setting This Chapter describes procedures of Machine Provides information on the operation panel and briefly reviews the flow of starting up the machine. Chapter 6 Operation of setting the machine and working environment. BES-916AC (9 needles) - BES-1216AC...
Instruction Manual - English
Page 14
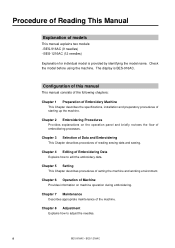
... Selection of Data 49 Registration of Bobbin 26 4-3 Replacing and Selecting Needle 27 4-4 Connection to Needle Bar Case 23 4. Preparation for Embroidering 24 4-1 Upper Threading 24 4-2 Replacement of Embroidery Data from Floppy Disk 49 Reading from Memory 52 12 BES-916AC • BES-1216AC Names of Embroidery Machine 1. Contents SAFETY INSTRUCTIONS 1 Before Starting Operation 6 Procedure of Reading This Manual 8 Screen Composition 10 Chapter 1 Preparation of Machine Components 19 3. Specifications 18 2.
... Selection of Data 49 Registration of Bobbin 26 4-3 Replacing and Selecting Needle 27 4-4 Connection to Needle Bar Case 23 4. Preparation for Embroidering 24 4-1 Upper Threading 24 4-2 Replacement of Embroidery Data from Floppy Disk 49 Reading from Memory 52 12 BES-916AC • BES-1216AC Names of Embroidery Machine 1. Contents SAFETY INSTRUCTIONS 1 Before Starting Operation 6 Procedure of Reading This Manual 8 Screen Composition 10 Chapter 1 Preparation of Machine Components 19 3. Specifications 18 2.

Instruction Manual - English
Page 17
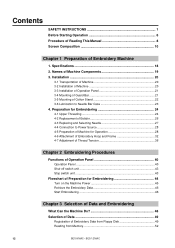
...Adjustment of Presser Foot Height 135 4. Adjustment of Thread Trimmer 136 5. Adjusting Needle Bar Height 130 2. Cleaning 124 1-1 Cleaning and Lubrication of Rotary Hook 124 1-2 Cleaning of Timing Between Needle and Rotary Hook 134 3. Adjustment of Needle Plate 125 2. Adjusting the Belt Tension 138 Chapter 9 Error code list Chapter 10 Troubleshooting Mechanical Section 144 Electrical Section 146 Connection and Installation of Optional Equipment Attaching Bobbin Winder 152 BES-916AC • BES-1216AC 15 Chapter 7 Maintenance 1. Thread Wiper Adjustment 137 6. Oiling...
...Adjustment of Presser Foot Height 135 4. Adjustment of Thread Trimmer 136 5. Adjusting Needle Bar Height 130 2. Cleaning 124 1-1 Cleaning and Lubrication of Rotary Hook 124 1-2 Cleaning of Timing Between Needle and Rotary Hook 134 3. Adjustment of Needle Plate 125 2. Adjusting the Belt Tension 138 Chapter 9 Error code list Chapter 10 Troubleshooting Mechanical Section 144 Electrical Section 146 Connection and Installation of Optional Equipment Attaching Bobbin Winder 152 BES-916AC • BES-1216AC 15 Chapter 7 Maintenance 1. Thread Wiper Adjustment 137 6. Oiling...
Instruction Manual - English
Page 20
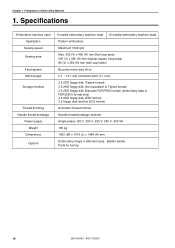
Chapter 1 Preparation of Embroidery Machine 1. Specifications Embroidery machine used Application Sewing speed Sewing area Feed system Stitch length Storage medium Thread trimming Needle thread breakage Power supply Weight Dimensions Options 9 needle embroidery machine head 12 needle embroidery machine head Pattern embroidery Maximum 1200 rpm Max. 300 (V) x 450 (H) mm (flat hoop area) 300 (V) x 450 (H) mm (tubuler square hoop area) 85 (V) x 360 (H) mm (with cap frame) By pulse motor wire drive 0.1 ~ 12.7 mm (minimum pitch: 0.1 mm) 3.5 2DD floppy disk (Tajima...
Chapter 1 Preparation of Embroidery Machine 1. Specifications Embroidery machine used Application Sewing speed Sewing area Feed system Stitch length Storage medium Thread trimming Needle thread breakage Power supply Weight Dimensions Options 9 needle embroidery machine head 12 needle embroidery machine head Pattern embroidery Maximum 1200 rpm Max. 300 (V) x 450 (H) mm (flat hoop area) 300 (V) x 450 (H) mm (tubuler square hoop area) 85 (V) x 360 (H) mm (with cap frame) By pulse motor wire drive 0.1 ~ 12.7 mm (minimum pitch: 0.1 mm) 3.5 2DD floppy disk (Tajima...

Instruction Manual - English
Page 27
... upper section into thread guide A and lower thread guide u. 7. Pass it from the lower side, lead it around the thread guide, and then pass it through the presser foot. Wind the thread clockwise once around thread breakage pulley w. 3. Do not pass it on the spring. 4. Do not pass it through the presser foot. Push up . 6. Pass the thread through the hole of the needle bar thread guide i and pass it through the hole of lower thread guide...
... upper section into thread guide A and lower thread guide u. 7. Pass it from the lower side, lead it around the thread guide, and then pass it through the presser foot. Wind the thread clockwise once around thread breakage pulley w. 3. Do not pass it on the spring. 4. Do not pass it through the presser foot. Push up . 6. Pass the thread through the hole of the needle bar thread guide i and pass it through the hole of lower thread guide...
Instruction Manual - English
Page 28
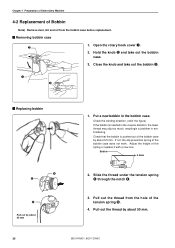
... of Embroidery Machine 4-2 Replacement of Bobbin Note) Remove dust, lint and oil from the hole of the tension spring t. 4. q e Replacing bobbin r t t Pull out by about 50 mm. 26 BES-916AC • BES-1216AC Put a new bobbin in embroidering. Pull out the thread by about 0.5 mm. Pull out the thread from the bobbin case before replacement. If not, the slip prevention spring of the spring or replace it with a new one. Adjust the height of the bobbin case...
... of Embroidery Machine 4-2 Replacement of Bobbin Note) Remove dust, lint and oil from the hole of the tension spring t. 4. q e Replacing bobbin r t t Pull out by about 50 mm. 26 BES-916AC • BES-1216AC Put a new bobbin in embroidering. Pull out the thread by about 0.5 mm. Pull out the thread from the bobbin case before replacement. If not, the slip prevention spring of the spring or replace it with a new one. Adjust the height of the bobbin case...
Instruction Manual - English
Page 31
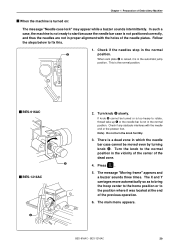
... message "Needle case lock" may appear while a buzzer sounds intermittently. Chapter 1 Preparation of Embroidery Machine When the machine is a dead zone in which the needle bar case cannot be turned or is too heavy to rotate, thread take-up q or the needle bar is not positioned correctly, and thus the needles are not in proper alignment with the needle end or the presser foot. BES-916AC BES-1216AC...
... message "Needle case lock" may appear while a buzzer sounds intermittently. Chapter 1 Preparation of Embroidery Machine When the machine is a dead zone in which the needle bar case cannot be turned or is too heavy to rotate, thread take-up q or the needle bar is not positioned correctly, and thus the needles are not in proper alignment with the needle end or the presser foot. BES-916AC BES-1216AC...

Instruction Manual - English
Page 34
... embroidering. Attach square frame t. 3. Make an adjustment using screw y. 32 BES-916AC • BES-1216AC As shown in Figure B, fit the right metal part to the screw. As shown in Figure A, fit the left metal part of the square frame to the screw. Chapter 1 Preparation of Embroidery Machine 4-6 Attachment of the X carriage into the inner holes. 2. Attach flat hoop frame (assembly) q to X carriage w, and tighten two screws e. Loosen two screws...
... embroidering. Attach square frame t. 3. Make an adjustment using screw y. 32 BES-916AC • BES-1216AC As shown in Figure B, fit the right metal part to the screw. As shown in Figure A, fit the left metal part of the square frame to the screw. Chapter 1 Preparation of Embroidery Machine 4-6 Attachment of the X carriage into the inner holes. 2. Attach flat hoop frame (assembly) q to X carriage w, and tighten two screws e. Loosen two screws...
Instruction Manual - English
Page 35
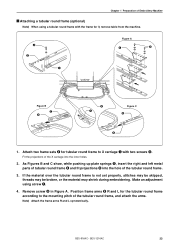
... embroidering. Make an adjustment using a tubular round frame with two screws e. Attach two frame sets w for it, remove table from the machine. As Figures B and C show, while pushing up plate springs t, insert the right and left metal parts of tubular round frame r and fit projections y into the hole of the X carriage into the inner holes. 2. Remove screw o in Figure A. Fit the projections of the tubular round frame. 3. Position frame arms...
... embroidering. Make an adjustment using a tubular round frame with two screws e. Attach two frame sets w for it, remove table from the machine. As Figures B and C show, while pushing up plate springs t, insert the right and left metal parts of tubular round frame r and fit projections y into the hole of the X carriage into the inner holes. 2. Remove screw o in Figure A. Fit the projections of the tubular round frame. 3. Position frame arms...

Instruction Manual - English
Page 101
... changed settings are stored and the previous screen is displayed. Press the END button. Speeds up the startup speed of the main shaft when using a frame other than the cap frame. 1. The following startup speed can be set . Speeds up the main shaft at the normal speed. Select with . 5. Select "Motive Speed" with . 3. BES-916AC • BES-1216AC 99 Select the type of...
... changed settings are stored and the previous screen is displayed. Press the END button. Speeds up the startup speed of the main shaft when using a frame other than the cap frame. 1. The following startup speed can be set . Speeds up the main shaft at the normal speed. Select with . 5. Select "Motive Speed" with . 3. BES-916AC • BES-1216AC 99 Select the type of...

Instruction Manual - English
Page 109
Either thick or thin cloth can be selected. Select with . 5. The changed settings are stored and the previous screen is displayed. Chapter 5 Setting 2. Feed Timing The timing of needle drop and hoop movement can be adjusted according to the cloth thickness. Press the END button. Press the END button. The changed settings are stored and the previous screen is set as the standard thickness. 1. Press three times. 2. Thin cloth is displayed. Press . 4. Select the thickness with . 3. BES-916AC • BES-1216AC 107
Either thick or thin cloth can be selected. Select with . 5. The changed settings are stored and the previous screen is displayed. Chapter 5 Setting 2. Feed Timing The timing of needle drop and hoop movement can be adjusted according to the cloth thickness. Press the END button. Press the END button. The changed settings are stored and the previous screen is set as the standard thickness. 1. Press three times. 2. Thin cloth is displayed. Press . 4. Select the thickness with . 3. BES-916AC • BES-1216AC 107

Instruction Manual - English
Page 135
... screw y of the pulley q and fix the upper shaft. Insert the bottom dead center gauge e into the hole of the needle bar clamp t, then move the needle bar up and down the needle bar clamp so that the top dead center stopper u does not hit the needle bar guide rail !0 at this time. Insert the positioning bar w into the rotary hook r. 4. Set the needle bar at the lowest position. 2. After adjustment is set in the clockwise direction. 3. Note) Make...
... screw y of the pulley q and fix the upper shaft. Insert the bottom dead center gauge e into the hole of the needle bar clamp t, then move the needle bar up and down the needle bar clamp so that the top dead center stopper u does not hit the needle bar guide rail !0 at this time. Insert the positioning bar w into the rotary hook r. 4. Set the needle bar at the lowest position. 2. After adjustment is set in the clockwise direction. 3. Note) Make...
Instruction Manual - English
Page 146
... the thread pass through the hole center of the presser foot? Needle (presser foot) interference • Is the embroidery hoop too small? Not embroidered properly • Is the material edge caught in the sewing data. Does the lower thread come out from the bobbin case smoothly? with embroidery hoop • Check the size and needle start position in the machine? (Are embroidery hoop and other related parts operating correctly?) • Is the material stretched properly? • Is thread tension proper...
... the thread pass through the hole center of the presser foot? Needle (presser foot) interference • Is the embroidery hoop too small? Not embroidered properly • Is the material edge caught in the sewing data. Does the lower thread come out from the bobbin case smoothly? with embroidery hoop • Check the size and needle start position in the machine? (Are embroidery hoop and other related parts operating correctly?) • Is the material stretched properly? • Is thread tension proper...

Instruction Manual - English
Page 147
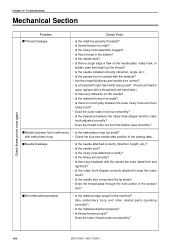
...; Is the presser foot lifted at a certain point in one cycle • Is the thread take-up stopped due to interference with the upper case cover? [Adjustment] Thread take-up Upper case cover Bolt Needle case Thread take-up operating lever Loosen the hexagon socket head cap screw of the thread takeup operating lever and adjust the take-up movable range. Chapter 10 Troubleshooting Problem Machine operation abnormal Check Point • Is any set screw of the...
...; Is the presser foot lifted at a certain point in one cycle • Is the thread take-up stopped due to interference with the upper case cover? [Adjustment] Thread take-up Upper case cover Bolt Needle case Thread take-up operating lever Loosen the hexagon socket head cap screw of the thread takeup operating lever and adjust the take-up movable range. Chapter 10 Troubleshooting Problem Machine operation abnormal Check Point • Is any set screw of the...

Instruction Manual - English
Page 149
... loose.) The needle bar case lock error occurs. • Is the INDEX motor rotating? If there is no problem, lower the thread breakage sensitivity value of the head PCB is abnormally heavy, adjust the color change pulley. BES-916AC • BES-1216AC 147 screw of the INDEX motor. Also replace the main PCB with a new one. • Manually turn the thread breakage sensor pulley while switching the needle bar from the needle bar position...
... loose.) The needle bar case lock error occurs. • Is the INDEX motor rotating? If there is no problem, lower the thread breakage sensitivity value of the head PCB is abnormally heavy, adjust the color change pulley. BES-916AC • BES-1216AC 147 screw of the INDEX motor. Also replace the main PCB with a new one. • Manually turn the thread breakage sensor pulley while switching the needle bar from the needle bar position...


