Brother International XR53 Support and Manuals
Get Help and Manuals for this Brother International item
View All Support Options Below
Free Brother International XR53 manuals!
Problems with Brother International XR53?
Ask a Question
Free Brother International XR53 manuals!
Problems with Brother International XR53?
Ask a Question
Popular Brother International XR53 Manual Pages
Operation Manual - Page 4
...17 Lower threading (for models equipped with a quick-set bobbin 18 Upper threading 19 Using the needle threader (for models equipped with a twin needle (Option 27 Thread tension 29
3. APPENDIX 47
MAINTENANCE 47 Restrictions on oiling 47 Precautions on storing the machine 47 Cleaning 47
TROUBLESHOOTING 49 INDEX 52
3 CONTENTS
IMPORTANT SAFETY INSTRUCTIONS 1
1. USING ATTACHMENTS...
Operation Manual - Page 5
...the machine model.
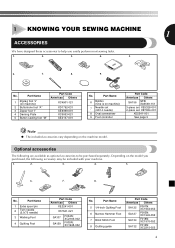
Part Name
5 1/4-inch Quilting Foot
6 Narrow Hemmer Foot
7 Blind Stitch Foot
8 Quilting guide
Part Code
Americas Others
SA125
F001N: XC1944-052
SA127
F003N: XC1945-052
SA134
F018N: XC1976-052
SA132
F016N: XC2215-052
4 No.
Optional accessories
The following accessory may be purchased separately.
No. Part Name
6
Bobbin (One is on machine)
7
Needle set...
Operation Manual - Page 6

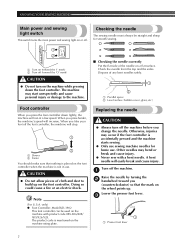
KNOWING YOUR SEWING MACHINE
THE MAIN PARTS
654 3 2 1 7
E
8
9
D
0
A
C B
1 Bobbin winder (Page 15) This winds the thread onto the bobbin for 220-240V area The foot controller part code differs depending on the country or region.
I
H Foot controller jack / socket (Page 6) Plug in the reverse direction. Foot Controller: Model KD-1902 for 110-120V area
KD-1902 for...
Operation Manual - Page 7

...Do not allow the power cord to install the proper outlet. These things may result. Connect the power supply plug to correctly operate the machine.
(For U.S.A. Do not modify the...plug (one way.
USING YOUR SEWING MACHINE
1
WARNING
● Use only regular household electricity for repairs before continuing use. ● Unplug the power cord if the machine is not to
remove it still ...
Operation Manual - Page 8
...bobbin cover, glass, etc.)
Replacing the needle
CAUTION
● Always turn on the machine while pressing down lightly, the machine will easily break and cause ...code is accidentally pressed and the machine starts sewing.
● Only use sewing machine needles for smooth sewing.
1 2
1 Turn on (toward you
(counterclockwise) so that nothing is placed on the foot controller when the machine...
Operation Manual - Page 9
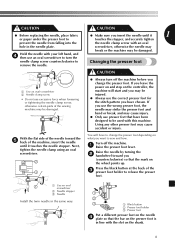
... parts of the 3 presser foot holder to
Changing the presser foot
remove the needle.
Press the black button at the back of the sewing machine may... be damaged.
Using any other presser foot may be damaged.
● Always turn the
needle clamp screw counterclockwise to release the presser
foot.
1
1 Use an oval screwdriver
2 Needle stopper
3 Needle
Install...
Operation Manual - Page 10
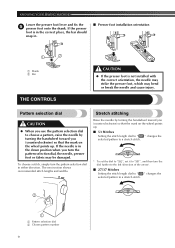
KNOWING YOUR SEWING MACHINE
Lower the presser foot lever and fix the 5 presser foot onto the shank. If the needle is not installed with the correct orientation, the ...mark on the wheel points up . ■ 53 Stitches
Setting the stitch length dial to " 1 " changes the selected pattern to a stretch stitch.
* To set the dial to "SS2", set it to a stretch stitch.
2
1
1 Pattern selection dial...
Operation Manual - Page 16
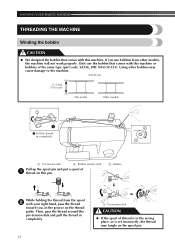
..., or is set incorrectly, the thread may cause damage to the machine. Only use bobbins from the spool 2 with this machine or bobbins of thread is in completely.
2 3
1 Pre-tension disk
2 Bobbin winder shaft
Pull up the spool pin and put a spool of 1 thread on the thread guide. KNOWING YOUR SEWING MACHINE
THREADING THE MACHINE
Winding the...
Operation Manual - Page 17
... and begins 9 spinning slowly, take your foot off the foot
controller. Note
● When the sewing machine is started or the handwheel is not a malfunction.
● The needle bar does not move when you follow the instructions carefully.
Press the foot controller to start unexpectedly and cause personal injury or damage to the...
Operation Manual - Page 18

... using the quick-set the bobbin so ...details on the foot controller and the machine starts to sew, you
(counterclockwise) and raise the presser foot lever. KNOWING YOUR SEWING MACHINE
CAUTION
● Not winding the bobbin... you turn off the machine while threading. Remove the bobbin cover by the arrow.
1
2
1 Wound evenly 2 Wound poorly
Lower threading
Install the bobbin wound with your...
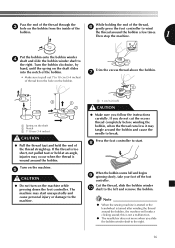
Operation Manual - Page 20

...; When threading the upper thread, carefully follow the instructions. CAUTION
● If the spool of thread is in the wrong place, or is set incorrectly, the thread may bend or break.
●... COMBINATIONS" on the wheel
19 KNOWING YOUR SEWING MACHINE
Upper threading
2
2
3 4
1 5
1 Spool pin 2 Thread guide (back) 3 Thread guide (front)
4 Thread take-up . • If the needle is ...
Operation Manual - Page 21
...; If your sewing machine is equipped with your right hand.
1
1 Spring
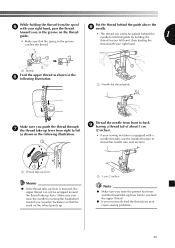
Feed the upper thread as shown in the 6 following illustration.
1
1 Needle bar thread guide
Make sure you guide the thread through 7 the thread take-up lever before you feed the upper thread.
● If you incorrectly feed the thread you may cause sewing problems.
20...
Operation Manual - Page 22
... through 100/16 home sewing machine needle. KNOWING YOUR SEWING MACHINE
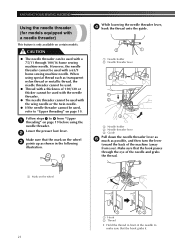
Using the needle threader (for models equipped with a needle threader)
This feature is only available on the wheel
1
12
1 Hook 2 Thread
• Hold the thread in the following
illustration.
1
While lowering the needle threader lever, 4 hook the thread onto the guide.
2
1
1 Needle holder 2 Needle threader...
Operation Manual - Page 24
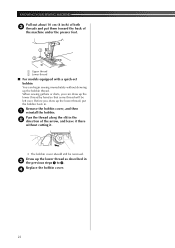
...of the machine under the presser foot.
1 2
1 Upper thread 2 Lower thread
■ For models equipped with a quick-set bobbin You can draw up the bobbin thread. Before you can begin sewing immediately without... removed. KNOWING YOUR SEWING MACHINE Pull out about 10 cm (4 inch) of both
3 threads and put the bobbin back in 3 the previous steps 1 to 3. Replace the bobbin cover. 4
23...
Operation Manual - Page 50

... machine. Use the oval screwdriver to the left. The bobbin-winder shaft is scratched.
Correctly install the needle. How to sew.
Use the foot controller properly. The needle is scratched. The area around the hole in the thread. The presser foot you need additional help, the Brother Solutions Center offers the latest FAQs and troubleshooting...
Brother International XR53 Reviews
We have not received any reviews for Brother International yet.