Users Manual - English
Page 15
...Printer to Print Remaining Data (When Printing is Halted 6-23 6.10 Cleaning the Density Sensor 6-24 CHAPTER 7 PAPER JAMS ...7-1 7.1 Clearing Paper Jams ...7-1 7.2 Paper Jams in the Multi-purpose Tray 7-3 7.3 Paper Jams in the Paper Tray 7-4 7.4 Paper Jams Between the Print Head Cartridge and the Fuser Cartridge 7-6 Paper jams around the print head cartridge... 7-6 Paper jams around the fuser cartridge 7-8 Paper longer than 355.6 mm (14 in.) jams...
...Printer to Print Remaining Data (When Printing is Halted 6-23 6.10 Cleaning the Density Sensor 6-24 CHAPTER 7 PAPER JAMS ...7-1 7.1 Clearing Paper Jams ...7-1 7.2 Paper Jams in the Multi-purpose Tray 7-3 7.3 Paper Jams in the Paper Tray 7-4 7.4 Paper Jams Between the Print Head Cartridge and the Fuser Cartridge 7-6 Paper jams around the print head cartridge... 7-6 Paper jams around the fuser cartridge 7-8 Paper longer than 355.6 mm (14 in.) jams...

Users Manual - English
Page 16
... A.1 Introduction to the Optional and Consumable Items A-1 A.1.1 Options ...A-1 Hard Disk ...A-1 2 Tray Module...A-1 Memory Expansion Card ...A-1 A.1.2 Consumable Items ...A-2 Toner Cartridges ...A-2 Print Head Cartridge ...A-2 Transfer Roll Cartridge ...A-2 A.2 Getting Product Support Information A-3 A.3 General Specifications ...A-4 A.3.1 Printer Specifications...A-4 A.3.2 Network Specifications...A-7 Common Specifications ...A-7 TCP/IP Specifications ...A-7 NetBIOS Specifications ...A-7 NetWare Specifications...A-7 AppleTalk Specifications ...A-7 A.3.3 Printable Area ...A-8 A.4 Life Span...
... A.1 Introduction to the Optional and Consumable Items A-1 A.1.1 Options ...A-1 Hard Disk ...A-1 2 Tray Module...A-1 Memory Expansion Card ...A-1 A.1.2 Consumable Items ...A-2 Toner Cartridges ...A-2 Print Head Cartridge ...A-2 Transfer Roll Cartridge ...A-2 A.2 Getting Product Support Information A-3 A.3 General Specifications ...A-4 A.3.1 Printer Specifications...A-4 A.3.2 Network Specifications...A-7 Common Specifications ...A-7 TCP/IP Specifications ...A-7 NetBIOS Specifications ...A-7 NetWare Specifications...A-7 AppleTalk Specifications ...A-7 A.3.3 Printable Area ...A-8 A.4 Life Span...
Users Manual - English
Page 26
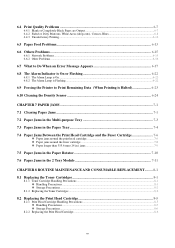
...to this guide for procedures on Handling Consumables WARNING Never put a print head cartridge into an open flame. It can explode, resulting in injuries. Rinse... get toner in your eyes, rinse them . It can explode, resulting in injuries. Never put a toner cartridge into an open flame. Notes on clearing paper jams and how to use them abundantly in injuries. Others ...• Do not open flame. Never put a transfer roll cartridge into an open consumables until you swallow toner, induce vomiting and consult your skin, wash it with water...
...to this guide for procedures on Handling Consumables WARNING Never put a print head cartridge into an open flame. It can explode, resulting in injuries. Rinse... get toner in your eyes, rinse them . It can explode, resulting in injuries. Never put a toner cartridge into an open flame. Notes on clearing paper jams and how to use them abundantly in injuries. Others ...• Do not open flame. Never put a transfer roll cartridge into an open consumables until you swallow toner, induce vomiting and consult your skin, wash it with water...

Users Manual - English
Page 27
xxvii Loose toner can spill inside the printer and deteriorate print quality. Loose toner can spill inside the printer and deteriorate print quality. • Do not tilt or shake the print head cartridges or transfer roll cartridges when removing them temporarily. • When you remove the transfer roll cartridge from the printer because the waste toner collection box is full, do not attempt to empty the waste toner box and reuse the cartridge, as toner may spill inside the printer and cause damage.
xxvii Loose toner can spill inside the printer and deteriorate print quality. Loose toner can spill inside the printer and deteriorate print quality. • Do not tilt or shake the print head cartridges or transfer roll cartridges when removing them temporarily. • When you remove the transfer roll cartridge from the printer because the waste toner collection box is full, do not attempt to empty the waste toner box and reuse the cartridge, as toner may spill inside the printer and cause damage.

Users Manual - English
Page 43
... ventilation intake grilles are never obstructed. Use button B to clear paper jams, replace the print head cartridge, or transfer roll cartridge. Open to open the whole front cover. Allows internal heat to prevent paper from overheating. Allows air to enter the printer to prevent it off. The shaded part of the illustration above. Use this tray...
... ventilation intake grilles are never obstructed. Use button B to clear paper jams, replace the print head cartridge, or transfer roll cartridge. Open to open the whole front cover. Allows internal heat to prevent paper from overheating. Allows air to enter the printer to prevent it off. The shaded part of the illustration above. Use this tray...
Users Manual - English
Page 45
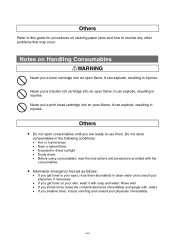
... to fuse the toner to replace the print head cartridge and fuser unit. Internal View 23 24 25 26 27 No. Images are initially created as an electrical charge on the print head surface to the paper and collects used toner. Touching the fuser cartridge can cause burns. 3-3 With duplex printing, it turns the paper over after the...
... to fuse the toner to replace the print head cartridge and fuser unit. Internal View 23 24 25 26 27 No. Images are initially created as an electrical charge on the print head surface to the paper and collects used toner. Touching the fuser cartridge can cause burns. 3-3 With duplex printing, it turns the paper over after the...

Users Manual - English
Page 115
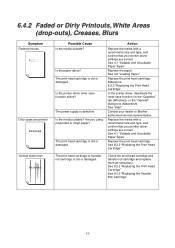
Replace the print head cartridge. The print head cartridge is defective. See 8.2.2 "Replacing the Print Head Cartridge" The power supply is old or damaged. Contact your dealer or Brother authorized service representative. The power supply is old or damaged. Action Remove the paper stack from the tray, fan it, and reinsert it. The print head cartridge is defective. Replace the print head cartridge. See 8.2.2 "Replacing the Print Head Cartridge" Contact...
Replace the print head cartridge. The print head cartridge is defective. See 8.2.2 "Replacing the Print Head Cartridge" The power supply is old or damaged. Contact your dealer or Brother authorized service representative. The power supply is old or damaged. Action Remove the paper stack from the tray, fan it, and reinsert it. The print head cartridge is defective. Replace the print head cartridge. See 8.2.2 "Replacing the Print Head Cartridge" Contact...
Users Manual - English
Page 116
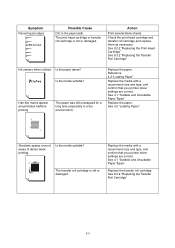
... dealer or Brother authorized service representative. Is the media suitable? See 4.1 "Suitable and Unsuitable Paper Types" Replace the print head cartridge. Are you using preprinted or inkjet paper? The print head cartridge is old or damaged. See 4.2 "Loading Paper" Replace the print head cartridge. Check the print head cartridge and transfer roll cartridge and replace them as necessary. Reference 8.2.2 "Replacing the Print Head Cartridge" In the printer driver...
... dealer or Brother authorized service representative. Is the media suitable? See 4.1 "Suitable and Unsuitable Paper Types" Replace the print head cartridge. Are you using preprinted or inkjet paper? The print head cartridge is old or damaged. See 4.2 "Loading Paper" Replace the print head cartridge. Check the print head cartridge and transfer roll cartridge and replace them as necessary. Reference 8.2.2 "Replacing the Print Head Cartridge" In the printer driver...
Users Manual - English
Page 117
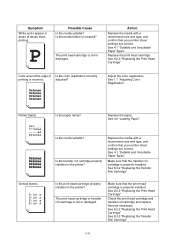
... (especially in the paper path. See 8.3.2 "Replacing the Transfer Roll Cartridge" 6-9 Replace the media with a recommend size and type, and confirm that your printer driver settings are correct. Is the media suitable? See 8.2.2 "Replacing the Print Head Cartridge" See 8.3.2 "Replacing the Transfer Roll Cartridge" Ink smears when rubbed. The print head cartridge or transfer roll cartridge is old or damaged.
... (especially in the paper path. See 8.3.2 "Replacing the Transfer Roll Cartridge" 6-9 Replace the media with a recommend size and type, and confirm that your printer driver settings are correct. Is the media suitable? See 8.2.2 "Replacing the Print Head Cartridge" See 8.3.2 "Replacing the Transfer Roll Cartridge" Ink smears when rubbed. The print head cartridge or transfer roll cartridge is old or damaged.
Users Manual - English
Page 118
... printer? See 8.3.2 "Replacing the Transfer Roll Cartridge" Is the print head cartridge properly installed in the printer? See 8.2.2 "Replacing the Print Head Cartridge" Color around the edge of dense black printing. See 4.1 "Suitable and Unsuitable Paper Types" Make sure that the print head cartridge is properly installed. Make sure that the transfer roll cartridge is properly installed. See 8.2.2 "Replacing the Print Head Cartridge" Check the print head cartridge and transfer roll cartridge...
... printer? See 8.3.2 "Replacing the Transfer Roll Cartridge" Is the print head cartridge properly installed in the printer? See 8.2.2 "Replacing the Print Head Cartridge" Color around the edge of dense black printing. See 4.1 "Suitable and Unsuitable Paper Types" Make sure that the print head cartridge is properly installed. Make sure that the transfer roll cartridge is properly installed. See 8.2.2 "Replacing the Print Head Cartridge" Check the print head cartridge and transfer roll cartridge...

Users Manual - English
Page 126
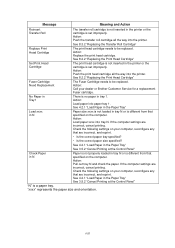
...B, open the front cover and remove the jammed media. See Chapter 7 "Paper Jams" There is paper jammed in the printer. Action: Replace the print head cartridge. Action: Grip the levers at each end of the density sensor. Action: Press button A, open the front cover and ...in the Paper Rotator" There is paper jammed in the printer. Action: Remove the transfer roll cartridge and check the cleanliness of the yellow toner cartridge with your fingers, then push down firmly to rotate the levers forward to check the density sensor. See 8.2.2 "Replacing the Print Head Cartridge" 6-18
...B, open the front cover and remove the jammed media. See Chapter 7 "Paper Jams" There is paper jammed in the printer. Action: Replace the print head cartridge. Action: Grip the levers at each end of the density sensor. Action: Press button A, open the front cover and ...in the Paper Rotator" There is paper jammed in the printer. Action: Remove the transfer roll cartridge and check the cleanliness of the yellow toner cartridge with your fingers, then push down firmly to rotate the levers forward to check the density sensor. See 8.2.2 "Replacing the Print Head Cartridge" 6-18
Users Manual - English
Page 128
... N. Action: Replace the print head cartridge. Action: Load paper into the printer. Action: Load paper xxxx into the printer. If the computer settings are incorrect, cancel printing. See 4.2.1 "Load Paper in the printer or the cartridge is set improperly. See 8.3.2 "Replacing the Transfer Roll Cartridge" Replace Print Head Cartridge The print head cartridge needs to be replaced. See 8.2.2 "Replacing the Print Head Cartridge" Set Print Head Cartridge The print head cartridge is not inserted...
... N. Action: Replace the print head cartridge. Action: Load paper into the printer. Action: Load paper xxxx into the printer. If the computer settings are incorrect, cancel printing. See 4.2.1 "Load Paper in the printer or the cartridge is set improperly. See 8.3.2 "Replacing the Transfer Roll Cartridge" Replace Print Head Cartridge The print head cartridge needs to be replaced. See 8.2.2 "Replacing the Print Head Cartridge" Set Print Head Cartridge The print head cartridge is not inserted...
Users Manual - English
Page 135
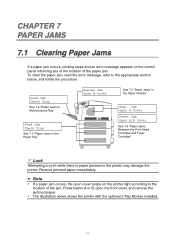
... 7 PAPER JAMS 7.1 Clearing Paper Jams If a paper jam occurs, printing stops and an error message appears on the printer light according to the location of the paper jam. Jam Open A-Cover Fuser Jam Open A/B Cover See 7.4 "Paper Jams Between the Print Head Cartridge and Fuser Cartridge" Look Attempting to the appropriate section below, and follow the...
... 7 PAPER JAMS 7.1 Clearing Paper Jams If a paper jam occurs, printing stops and an error message appears on the printer light according to the location of the paper jam. Jam Open A-Cover Fuser Jam Open A/B Cover See 7.4 "Paper Jams Between the Print Head Cartridge and Fuser Cartridge" Look Attempting to the appropriate section below, and follow the...
Users Manual - English
Page 140
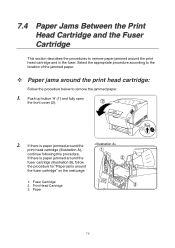
Push up button 'A' (1) and fully open the front cover (2). 2. Paper 7-6 Print Head Cartridge 3. If there is paper jammed around the fuser cartridge (Illustration B), follow the procedure for "Paper jams around the print head cartridge and in the fuser. Fuser Cartridge 2. Paper jams around the print head cartridge (Illustration A), continue following this procedure. Select the appropriate procedure according to the location of the...
Push up button 'A' (1) and fully open the front cover (2). 2. Paper 7-6 Print Head Cartridge 3. If there is paper jammed around the fuser cartridge (Illustration B), follow the procedure for "Paper jams around the print head cartridge and in the fuser. Fuser Cartridge 2. Paper jams around the print head cartridge (Illustration A), continue following this procedure. Select the appropriate procedure according to the location of the...
Users Manual - English
Page 141
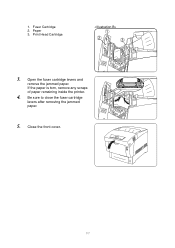
1. Open the fuser cartridge levers and remove the jammed paper. Close the front cover. 7-7 Print Head Cartridge 3. If the paper is torn, remove any scraps of paper remaining inside the printer. 4. Fuser Cartridge 2. Paper 3. Be sure to close the fuser cartridge levers after removing the jammed paper. 5.
1. Open the fuser cartridge levers and remove the jammed paper. Close the front cover. 7-7 Print Head Cartridge 3. If the paper is torn, remove any scraps of paper remaining inside the printer. 4. Fuser Cartridge 2. Paper 3. Be sure to close the fuser cartridge levers after removing the jammed paper. 5.
Users Manual - English
Page 151
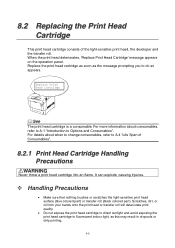
... roll. Handling Precautions • Make sure that nothing touches or scratches the light-sensitive print head surface (blue colored part) or transfer roll (black colored part). Replace the print head cartridge as soon as this may result in dropouts or dirty printing. 8-5 See The print head cartridge is a consumable. It can explode, causing injuries. Scratches, dirt, or oil from your hands...
... roll. Handling Precautions • Make sure that nothing touches or scratches the light-sensitive print head surface (blue colored part) or transfer roll (black colored part). Replace the print head cartridge as soon as this may result in dropouts or dirty printing. 8-5 See The print head cartridge is a consumable. It can explode, causing injuries. Scratches, dirt, or oil from your hands...

Users Manual - English
Page 152
... aluminum package for storage. • Store print head cartridges away from the printer before it is not recommended may spill inside the printer and cause damage. • To ensure good print quality, keep the print head cartridge level when handling it. • Only use print head cartridges recommended by Brother. Storage Precautions • Do not unpack new print head cartridges until you are ready to 80...
... aluminum package for storage. • Store print head cartridges away from the printer before it is not recommended may spill inside the printer and cause damage. • To ensure good print quality, keep the print head cartridge level when handling it. • Only use print head cartridges recommended by Brother. Storage Precautions • Do not unpack new print head cartridges until you are ready to 80...
Users Manual - English
Page 153
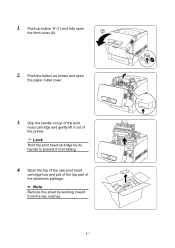
Grip the handle on top of the printer. Push the button as shown and open the front cover (2). 2. 1. Look Hold the print head cartridge by working inward from falling. 4. Open the top of the new print head cartridge box and pull of the top part of the aluminum package. ✏ Note Remove the sheet by its 1 handle to prevent it out of the print head cartridge and gently lift it from the two notches. 8-7 Push up button 'A' (1) and fully open the paper outlet cover. 3.
Grip the handle on top of the printer. Push the button as shown and open the front cover (2). 2. 1. Look Hold the print head cartridge by working inward from falling. 4. Open the top of the new print head cartridge box and pull of the top part of the aluminum package. ✏ Note Remove the sheet by its 1 handle to prevent it out of the print head cartridge and gently lift it from the two notches. 8-7 Push up button 'A' (1) and fully open the paper outlet cover. 3.

Users Manual - English
Page 154
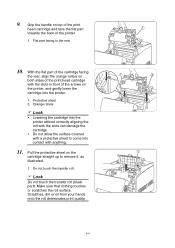
... the aluminum package from the box. 6. 5. Do not allow the cartridge to transport the printer over long distances in case you need to touch anything when removing it from the left and right. 7. Remove the tape from the print head cartridge (2). 8-8 Look Lift the print head cartridge by the 2 handle. Remove the polystyrene packing and open the top...
... the aluminum package from the box. 6. 5. Do not allow the cartridge to transport the printer over long distances in case you need to touch anything when removing it from the left and right. 7. Remove the tape from the print head cartridge (2). 8-8 Look Lift the print head cartridge by the 2 handle. Remove the polystyrene packing and open the top...
Users Manual - English
Page 155
... the slots in front of the arrows on the printer, and gently lower the cartridge into contact with anything. 11. 9. Pull the protective sheet on top of the print head cartridge and face the flat part towards the back of the print head cartridge with the slots can damage the cartridge. Scratches, dirt or oil from your hands onto...
... the slots in front of the arrows on the printer, and gently lower the cartridge into contact with anything. 11. 9. Pull the protective sheet on top of the print head cartridge and face the flat part towards the back of the print head cartridge with the slots can damage the cartridge. Scratches, dirt or oil from your hands onto...


