
Users Manual - English
Page 2
..., and Driver Updates: http://solutions.brother.com (USA Only) For Brother Accessories & Supplies: http://www.brothermall.com ii SERVICE CENTERS (Canada Only) For service center addresses in Canada, call 1-800-284-4357. You can get instant answers to any fax machine, not just the one from within that country. This is available 24 hours a day, 7 days a week. Brother Laser Printer HL-4000CN Series User's Guide (For...
..., and Driver Updates: http://solutions.brother.com (USA Only) For Brother Accessories & Supplies: http://www.brothermall.com ii SERVICE CENTERS (Canada Only) For service center addresses in Canada, call 1-800-284-4357. You can get instant answers to any fax machine, not just the one from within that country. This is available 24 hours a day, 7 days a week. Brother Laser Printer HL-4000CN Series User's Guide (For...
Users Manual - English
Page 3
... by the HL-4000CN are registered trademarks or trademarks of Adobe Systems Incorporated. Centronics is a registered trademark of respective companies. PostScript is a trademark of this user's guide are four- This printer contains UFST and Micro Type from Agfa Division. PANTONE Colors generated by qualified Pantone-licensed software packages. registered mark. The contents of this manual and the specifications of Genicom...
... by the HL-4000CN are registered trademarks or trademarks of Adobe Systems Incorporated. Centronics is a registered trademark of respective companies. PostScript is a trademark of this user's guide are four- This printer contains UFST and Micro Type from Agfa Division. PANTONE Colors generated by qualified Pantone-licensed software packages. registered mark. The contents of this manual and the specifications of Genicom...
Users Manual - English
Page 4
... in order to operate the equipment. Important A shielded interface cable should be determined by turning the equipment off and on a circuit different from that the products Product Name: Model Number: Product Options: Brother Laser Printer HL-4000CN HL-4000CN ALL complies with the instructions, may cause harmful interference to the following measures: - could void the user's authority to ensure compliance with the limits for help...
... in order to operate the equipment. Important A shielded interface cable should be determined by turning the equipment off and on a circuit different from that the products Product Name: Model Number: Product Options: Brother Laser Printer HL-4000CN HL-4000CN ALL complies with the instructions, may cause harmful interference to the following measures: - could void the user's authority to ensure compliance with the limits for help...
Users Manual - English
Page 12
...Adjusting Color Registration 1-1 Printing the Color Registration Chart 1-1 Determining values ...1-2 Entering Values...1-2 1.2 Configuring the Printer on a Network 1-4 1.2.1 Setting an IP Address...1-4 Set the IP address acquisition method to 'Panel 1-4 Setting the IP Address...1-6 Setting the Subnet Mask...1-7 Setting the Gateway Address ...1-8 1.2.2 Setting Protocols...1-9 Changing Protocol Settings...1-10 1.2.3 Confirming Settings...1-12 CHAPTER 2 INSTALLING THE PRINTER DRIVER 2-1 2.1 Installing the Printer Driver (Windows 2-1 2.1.1 Installing the Printer Driver ...2-1 2.1.2 Upgrading...
...Adjusting Color Registration 1-1 Printing the Color Registration Chart 1-1 Determining values ...1-2 Entering Values...1-2 1.2 Configuring the Printer on a Network 1-4 1.2.1 Setting an IP Address...1-4 Set the IP address acquisition method to 'Panel 1-4 Setting the IP Address...1-6 Setting the Subnet Mask...1-7 Setting the Gateway Address ...1-8 1.2.2 Setting Protocols...1-9 Changing Protocol Settings...1-10 1.2.3 Confirming Settings...1-12 CHAPTER 2 INSTALLING THE PRINTER DRIVER 2-1 2.1 Installing the Printer Driver (Windows 2-1 2.1.1 Installing the Printer Driver ...2-1 2.1.2 Upgrading...
Users Manual - English
Page 13
...the Control Panel...3-15 3.6 Changing the Configuration for Options 3-16 3.6.1 In Windows...3-17 3.6.2 On a Macintosh computer ...3-18 3.7 Printing on Envelopes, Transparency Sheets, and Custom-size (Long) Paper 3-19 3.7.1 Printing on Envelopes...3-19 Printer Driver Settings (for envelopes 3-20 3.7.2 Printing on Transparency Sheets ...3-22 Printer Driver Settings (for transparency sheets 3-23 3.7.3 Printing Custom-size Paper ...3-24 Setting a User Defined Size ...3-24 How to Print ...3-25 Printer Driver Settings (for Custom-size (Long) Paper 3-26 3.8 Duplex Printing...3-27 Types of Duplex...
...the Control Panel...3-15 3.6 Changing the Configuration for Options 3-16 3.6.1 In Windows...3-17 3.6.2 On a Macintosh computer ...3-18 3.7 Printing on Envelopes, Transparency Sheets, and Custom-size (Long) Paper 3-19 3.7.1 Printing on Envelopes...3-19 Printer Driver Settings (for envelopes 3-20 3.7.2 Printing on Transparency Sheets ...3-22 Printer Driver Settings (for transparency sheets 3-23 3.7.3 Printing Custom-size Paper ...3-24 Setting a User Defined Size ...3-24 How to Print ...3-25 Printer Driver Settings (for Custom-size (Long) Paper 3-26 3.8 Duplex Printing...3-27 Types of Duplex...
Users Manual - English
Page 14
CHAPTER 5 CONTROL PANEL 5-1 5.1 Control Panel Functionality 5-1 5.1.1 LED Indicators ...5-2 5.1.2 Display ...5-3 Print screen...5-3 Menu screen ...5-3 5.1.3 Buttons ...5-4 5.2 Basic Menu Operation...5-5 5.2.1 Menu Structure and Basic Operations ...5-5 Resetting the printer settings ...5-5 5.2.2 What to do if you make a Mistake? ...5-6 5.3 List of Menu Items...5-7 5.3.1 System Settings ...5-7 Power Save Time ...5-7 Error Alarm ...5-8 Job Timeout...5-9 Panel Language ...5-9 Auto Log Print ...5-9 ID Print...5-9 Text Print ...5-10 5.3.2 Maintenance Mode ...5-10 Init NVM...5-10 Security ...5-11 ...
CHAPTER 5 CONTROL PANEL 5-1 5.1 Control Panel Functionality 5-1 5.1.1 LED Indicators ...5-2 5.1.2 Display ...5-3 Print screen...5-3 Menu screen ...5-3 5.1.3 Buttons ...5-4 5.2 Basic Menu Operation...5-5 5.2.1 Menu Structure and Basic Operations ...5-5 Resetting the printer settings ...5-5 5.2.2 What to do if you make a Mistake? ...5-6 5.3 List of Menu Items...5-7 5.3.1 System Settings ...5-7 Power Save Time ...5-7 Error Alarm ...5-8 Job Timeout...5-9 Panel Language ...5-9 Auto Log Print ...5-9 ID Print...5-9 Text Print ...5-10 5.3.2 Maintenance Mode ...5-10 Init NVM...5-10 Security ...5-11 ...

Users Manual - English
Page 32
... lower line of the screen returns to the next step without restarting the printer. 1-5 Setup IP Address Panel * When the value is set has a '*' displayed next to it . ↓ 7. Setup IP Address DHCP * The value currently set , a '*' appears next to it . 9. Continue to the 'Setup IP Address'. ↓ Look Only restart the printer after setting the gateway 1 address at the last step. Press the button once. Setup IP Address Panel...
... lower line of the screen returns to the next step without restarting the printer. 1-5 Setup IP Address Panel * When the value is set has a '*' displayed next to it . ↓ 7. Setup IP Address DHCP * The value currently set , a '*' appears next to it . 9. Continue to the 'Setup IP Address'. ↓ Look Only restart the printer after setting the gateway 1 address at the last step. Press the button once. Setup IP Address Panel...

Users Manual - English
Page 36
... described in this section. Move on to 1.2.3 "Confirming Settings". 3 Supported Protocols • For TCP/IP(LPD) → [LPD] protocol • For port 9100 → [Port9100] protocol • For IPP ...network for information about the operation of the default Protocol settings, follow the steps outlined in this section when you do not need to change any of the control panel. 1-9 Normally you connect a new printer to 5.2 "Basic Menu Operation" for the first time. This concludes the printer settings. 1.2.2 Setting Protocols Look When the printer is shipped from the factory...
... described in this section. Move on to 1.2.3 "Confirming Settings". 3 Supported Protocols • For TCP/IP(LPD) → [LPD] protocol • For port 9100 → [Port9100] protocol • For IPP ...network for information about the operation of the default Protocol settings, follow the steps outlined in this section when you do not need to change any of the control panel. 1-9 Normally you connect a new printer to 5.2 "Basic Menu Operation" for the first time. This concludes the printer settings. 1.2.2 Setting Protocols Look When the printer is shipped from the factory...
Users Manual - English
Page 40
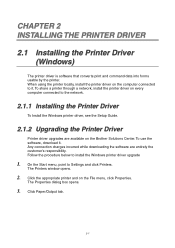
... File menu, click Properties. Click Paper/Output tab. 2-1 To share a printer through a network, install the printer driver on every computer connected to it . On the Start menu, point to install the Windows printer driver upgrade 1. The Printers window opens. 2. The Properties dialog box opens. 3. To use the software, download it . When using the printer locally, install the printer driver on the computer connected to the network. 2.1.1 Installing the Printer Driver To Install the Windows printer driver, see the Setup Guide. 2.1.2 Upgrading the Printer Driver Printer driver upgrades...
... File menu, click Properties. Click Paper/Output tab. 2-1 To share a printer through a network, install the printer driver on every computer connected to it . On the Start menu, point to install the Windows printer driver upgrade 1. The Printers window opens. 2. The Properties dialog box opens. 3. To use the software, download it . When using the printer locally, install the printer driver on the computer connected to the network. 2.1.1 Installing the Printer Driver To Install the Windows printer driver, see the Setup Guide. 2.1.2 Upgrading the Printer Driver Printer driver upgrades...
Users Manual - English
Page 42
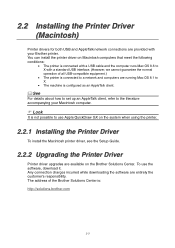
... system when using the printer. 0 2.2.1 Installing the Printer Driver To install the Macintosh printer driver, see the Setup Guide. 2.2.2 Upgrading the Printer Driver Printer driver upgrades are entirely the customer's responsibility. Any connection charges incurred while downloading the software are available on Macintosh computers that meet the following conditions: • The printer is connected with a USB cable and the computer runs Mac OS 8.6 to X with your Macintosh computer. See For details about how to set up...
... system when using the printer. 0 2.2.1 Installing the Printer Driver To install the Macintosh printer driver, see the Setup Guide. 2.2.2 Upgrading the Printer Driver Printer driver upgrades are entirely the customer's responsibility. Any connection charges incurred while downloading the software are available on Macintosh computers that meet the following conditions: • The printer is connected with a USB cable and the computer runs Mac OS 8.6 to X with your Macintosh computer. See For details about how to set up...
Users Manual - English
Page 44
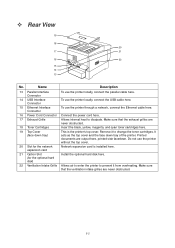
... cover and the face down tray) This is installed here. 21 Option Slot (for the optional hard disk) Install the optional hard disk here. 22 Ventilation Intake Grille Allows air to enter the printer to change the toner cartridges. Make sure that the ventilation intake grilles are output here, printed side facedown. Do not use the printer through a network, connect the Ethernet cable here. 16 Power Cord Connector Connect the power cord here. 17 Exhaust Grille Allows internal...
... cover and the face down tray) This is installed here. 21 Option Slot (for the optional hard disk) Install the optional hard disk here. 22 Ventilation Intake Grille Allows air to enter the printer to change the toner cartridges. Make sure that the ventilation intake grilles are output here, printed side facedown. Do not use the printer through a network, connect the Ethernet cable here. 16 Power Cord Connector Connect the power cord here. 17 Exhaust Grille Allows internal...
Users Manual - English
Page 61
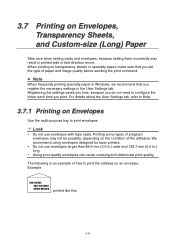
... printed side or text direction errors. Printing some types of preglued envelopes may result in .) long. For details about the User Settings tab, refer to Help. 3.7.1 Printing on Envelopes Use the multi-purpose tray to configure the driver each time you print. We recommend using envelopes designed for laser printers. Do not use envelopes with tape seals. Using poor-quality envelopes can cause creasing and deteriorate print quality. 3.7 Printing on Envelopes, Transparency Sheets, and Custom-size (Long) Paper Take care when setting cards and envelopes, because setting...
... printed side or text direction errors. Printing some types of preglued envelopes may result in .) long. For details about the User Settings tab, refer to Help. 3.7.1 Printing on Envelopes Use the multi-purpose tray to configure the driver each time you print. We recommend using envelopes designed for laser printers. Do not use envelopes with tape seals. Using poor-quality envelopes can cause creasing and deteriorate print quality. 3.7 Printing on Envelopes, Transparency Sheets, and Custom-size (Long) Paper Take care when setting cards and envelopes, because setting...

Users Manual - English
Page 73
... using envelopes designed for this printer is defined as 'specialty paper'. When printing on rigid cardboard, the image position may not be possible, depending on coated paper, feed the sheets one by a white frame). Recommended Paper Recommended paper for laser printers. They are uncut with labels covering the whole sheet. Do not use full color transparency sheets (bordered by one time, which can cause the sheets to as follows: Paper Type Plain paper Recycled paper...
... using envelopes designed for this printer is defined as 'specialty paper'. When printing on rigid cardboard, the image position may not be possible, depending on coated paper, feed the sheets one by a white frame). Recommended Paper Recommended paper for laser printers. They are uncut with labels covering the whole sheet. Do not use full color transparency sheets (bordered by one time, which can cause the sheets to as follows: Paper Type Plain paper Recycled paper...
Users Manual - English
Page 98
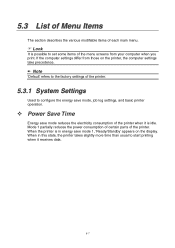
... possible to set some items of the printer. 5.3.1 System Settings Used to configure the energy save mode reduces the electricity consumption of the printer. Look It is in this state, the printer takes slightly more time than usual to the factory settings of the menu screens from your computer when you 0 print. If the computer settings differ from those on the display. 5.3 List of Menu Items The...
... possible to set some items of the printer. 5.3.1 System Settings Used to configure the energy save mode reduces the electricity consumption of the printer. Look It is in this state, the printer takes slightly more time than usual to the factory settings of the menu screens from your computer when you 0 print. If the computer settings differ from those on the display. 5.3 List of Menu Items The...
Users Manual - English
Page 118
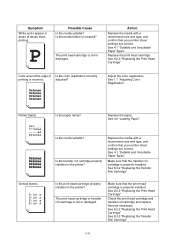
... installed in the printer? See 4.1 "Suitable and Unsuitable Paper Types" Make sure that the print head cartridge is properly installed. Make sure that the transfer roll cartridge is properly installed. See 8.2.2 "Replacing the Print Head Cartridge" Color around the edge of dense black printing. Replace the paper. The print head cartridge or transfer roll cartridge is old or damaged. See 4.2 "Loading Paper" Is the media suitable? adjusted? See 8.2.2 "Replacing the Print Head Cartridge" Check the print head cartridge and transfer roll cartridge and replace...
... installed in the printer? See 4.1 "Suitable and Unsuitable Paper Types" Make sure that the print head cartridge is properly installed. Make sure that the transfer roll cartridge is properly installed. See 8.2.2 "Replacing the Print Head Cartridge" Color around the edge of dense black printing. Replace the paper. The print head cartridge or transfer roll cartridge is old or damaged. See 4.2 "Loading Paper" Is the media suitable? adjusted? See 8.2.2 "Replacing the Print Head Cartridge" Check the print head cartridge and transfer roll cartridge and replace...

Users Manual - English
Page 119
... the transfer roll cartridge properly installed in the printer? Is the paper guide in the Paper Tray/Changing the Paper Size from A5" 6-11 If you cannot remove the obstruction, turn off and remove the jammed paper or foreign object. See 4.2.1 "Load Paper in the Paper Tray" See 4.2.2 "Load A5 Paper in the multi-purpose tray set correctly? See 4.2.2 "Load A5 Paper in the Paper Tray/Changing the Paper Size from A5" Set the paper guide in the paper tray. Make sure that your dealer or Brother authorized service...
... the transfer roll cartridge properly installed in the printer? Is the paper guide in the Paper Tray/Changing the Paper Size from A5" 6-11 If you cannot remove the obstruction, turn off and remove the jammed paper or foreign object. See 4.2.1 "Load Paper in the Paper Tray" See 4.2.2 "Load A5 Paper in the multi-purpose tray set correctly? See 4.2.2 "Load A5 Paper in the Paper Tray/Changing the Paper Size from A5" Set the paper guide in the paper tray. Make sure that your dealer or Brother authorized service...

Users Manual - English
Page 124
... the paper tray properly inserted into the printer. Turn off the printer and contact your dealer or Brother authorized service representative. Is the printer level? 6.6.2 Other Problems Symptom Cannot print in color Paper does not feed from the printer There is condensation in the printer Possible Cause Is the printer driver set the energy save mode timeout. Action Change the printer driver settings in the printer driver. On the control panel, set in the "Paper/Output" or "Graphics" tab (Windows), or...
... the paper tray properly inserted into the printer. Turn off the printer and contact your dealer or Brother authorized service representative. Is the printer level? 6.6.2 Other Problems Symptom Cannot print in color Paper does not feed from the printer There is condensation in the printer Possible Cause Is the printer driver set the energy save mode timeout. Action Change the printer driver settings in the printer driver. On the control panel, set in the "Paper/Output" or "Graphics" tab (Windows), or...

Users Manual - English
Page 126
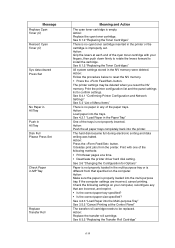
... Cartridge and Fuser Cartridge" There is empty. See 8.2.2 "Replacing the Print Head Cartridge" 6-18 Action: Replace the print head cartridge. Action: Replace the yellow toner cartridge. Message Replace Yellow Toner (Y) Reinsert Yellow Toner (Y) CTD Sensor Need Maintenance Clean Up CTD Sensor Regi Jam Open A-Cover Fuser Jam Open A/B-Cover Duplex Jam Open B-Cover Feed Jam Check Tray Print Head Cart ID Error Meaning and Action The yellow toner cartridge is paper jammed in the paper rotator used for duplex printing. Action: Press button B, open the front cover and remove the jammed media...
... Cartridge and Fuser Cartridge" There is empty. See 8.2.2 "Replacing the Print Head Cartridge" 6-18 Action: Replace the print head cartridge. Action: Replace the yellow toner cartridge. Message Replace Yellow Toner (Y) Reinsert Yellow Toner (Y) CTD Sensor Need Maintenance Clean Up CTD Sensor Regi Jam Open A-Cover Fuser Jam Open A/B-Cover Duplex Jam Open B-Cover Feed Jam Check Tray Print Head Cart ID Error Meaning and Action The yellow toner cartridge is paper jammed in the paper rotator used for duplex printing. Action: Press button B, open the front cover and remove the jammed media...
Users Manual - English
Page 127
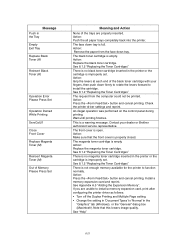
... correct paper size specified? Check the following methods: • Print fewer pages at each end of the cyan toner cartridge with one of Menu Items" There is no cyan toner cartridge inserted in the multi-purpose tray or is properly loaded into the Multi-purpose Tray" See 3.5.2 "Cancel Printing at the Control Panel" The transfer roll cartridge needs to install the cartridge. Message Replace Cyan Toner (C) Reinsert Cyan Toner (C) Sys data cleared Press Set No Paper in All Tray Push...
... correct paper size specified? Check the following methods: • Print fewer pages at each end of the cyan toner cartridge with one of Menu Items" There is no cyan toner cartridge inserted in the multi-purpose tray or is properly loaded into the Multi-purpose Tray" See 3.5.2 "Cancel Printing at the Control Panel" The transfer roll cartridge needs to install the cartridge. Message Replace Cyan Toner (C) Reinsert Cyan Toner (C) Sys data cleared Press Set No Paper in All Tray Push...
Users Manual - English
Page 129
... all paper trays completely back into the printer. Action: Replace the black toner cartridge. An illegal operation was performed on the control panel during printing. Install a memory expansion card and reprint. The face down tray. The black toner cartridge is empty. Action: Grip the levers at each end of the trays are unable to install a memory expansion card, print after configuring the printer driver as follows: • Turn off the Duplex Printing and Multiple Page setting. • Change the setting in 'Document Types' to...
... all paper trays completely back into the printer. Action: Replace the black toner cartridge. An illegal operation was performed on the control panel during printing. Install a memory expansion card and reprint. The face down tray. The black toner cartridge is empty. Action: Grip the levers at each end of the trays are unable to install a memory expansion card, print after configuring the printer driver as follows: • Turn off the Duplex Printing and Multiple Page setting. • Change the setting in 'Document Types' to...


