User Manual
Page 4
... adapter (Europe only 17 Connecting the audio from your TV 18 Using the IR emitter 20 iv TAB 4 TAB 3 TAB 2 English CONTROLS AND INDICATORS 22 The display 22 The remote control 22 OPERATION 30 Watching TV 30 Setting up the Lifestyle remote to control the TV 30 Selecting the TV screen shape 31 Setting the audio delay compensation 31 Changing the HDMI Image View 31 Controlling a cable or satellite box 32 Programming the Bose remote to turn...
... adapter (Europe only 17 Connecting the audio from your TV 18 Using the IR emitter 20 iv TAB 4 TAB 3 TAB 2 English CONTROLS AND INDICATORS 22 The display 22 The remote control 22 OPERATION 30 Watching TV 30 Setting up the Lifestyle remote to control the TV 30 Selecting the TV screen shape 31 Setting the audio delay compensation 31 Changing the HDMI Image View 31 Controlling a cable or satellite box 32 Programming the Bose remote to turn...
User Manual
Page 5
... radio 44 Presets 44 Headphone listening 44 Settings Options 45 System maintenance 50 Replacing the remote control batteries 50 Changing remote control switch settings .......... 50 TAB TAB 6 TAB TAB TABLE OF CONTENTS REFERENCE 50 Protecting and caring for your system 52 Cleaning the media center 53 Setting up a second room with sound 54 Bose® link-compatible products make it easy ... 54 Bose® link remote switch settings 55 Troubleshooting 56 Contacting Customer Service...
... radio 44 Presets 44 Headphone listening 44 Settings Options 45 System maintenance 50 Replacing the remote control batteries 50 Changing remote control switch settings .......... 50 TAB TAB 6 TAB TAB TABLE OF CONTENTS REFERENCE 50 Protecting and caring for your system 52 Cleaning the media center 53 Setting up a second room with sound 54 Bose® link-compatible products make it easy ... 54 Bose® link remote switch settings 55 Troubleshooting 56 Contacting Customer Service...
User Manual
Page 6
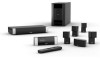
... -use system delivers superior performance for choosing a Bose® Lifestyle® V-Class™ home theater system. TAB TAB TAB 6Italiano TAB 5 INSTALLATION Welcome Thank you for both music and video programming. This elegant and easy-to help you set up your system: Setup Guide If you through basic system installation, including: • System placement • Speaker connections • Display/media center interconnections • TV/video connections • Audio connections • System power connections...
... -use system delivers superior performance for choosing a Bose® Lifestyle® V-Class™ home theater system. TAB TAB TAB 6Italiano TAB 5 INSTALLATION Welcome Thank you for both music and video programming. This elegant and easy-to help you set up your system: Setup Guide If you through basic system installation, including: • System placement • Speaker connections • Display/media center interconnections • TV/video connections • Audio connections • System power connections...
User Manual
Page 7
... system setup, and get the best possible sound. • Antenna connections Illustrates how to connect the AM and FM antennas. • TV sensor setup Shows how to enable the TV to turn on the display and remote control. • Remote control setup Shows how to set up the remote to control devices. 3 We encourage you to view the DVD immediately after you set up your Lifestyle® system and connect your DVD player using the Setup Guide.
... system setup, and get the best possible sound. • Antenna connections Illustrates how to connect the AM and FM antennas. • TV sensor setup Shows how to enable the TV to turn on the display and remote control. • Remote control setup Shows how to set up the remote to control devices. 3 We encourage you to view the DVD immediately after you set up your Lifestyle® system and connect your DVD player using the Setup Guide.
User Manual
Page 18
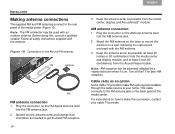
... FM antenna connection 1. Cable radio as needed to get the best FM reception. 14 TAB 4 TAB 3 TAB 2 English 3. This cable connects to the FM antenna jack on . Keep the antenna as far as possible from the Acoustimass module. Note: AM reception can be used with the AM antenna. 3. TAB TAB TAB 6Italiano TAB 5 INSTALLATION Making antenna connections The supplied AM and FM antennas connect to the rear panel of the media center...
... FM antenna connection 1. Cable radio as needed to get the best FM reception. 14 TAB 4 TAB 3 TAB 2 English 3. This cable connects to the FM antenna jack on . Keep the antenna as far as possible from the Acoustimass module. Note: AM reception can be used with the AM antenna. 3. TAB TAB TAB 6Italiano TAB 5 INSTALLATION Making antenna connections The supplied AM and FM antennas connect to the rear panel of the media center...
User Manual
Page 22
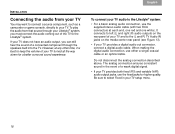
... can still hear the sound of a connected component through the speakers built into the TV. It connects to left (L) and right (R) audio outputs on the rear panel of your TV and to the (L and R) TV Audio IN jacks on the media center rear panel (see Figure 13). • If your TV audio to your TV. When making the digital audio connection, use the supplied stereo audio cable (with two RCA connectors at any other...
... can still hear the sound of a connected component through the speakers built into the TV. It connects to left (L) and right (R) audio outputs on the rear panel of your TV and to the (L and R) TV Audio IN jacks on the media center rear panel (see Figure 13). • If your TV audio to your TV. When making the digital audio connection, use the supplied stereo audio cable (with two RCA connectors at any other...
User Manual
Page 25
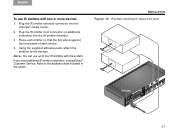
...; media center. 2. If you need additional IR emitter extenders, contact Bose® Customer Service. TAB TAB 6 TAB TAB INSTALLATION Fi gu re 1 5 IR emitters positioned on device front panel 21 Place each emitter so that the flat side is against the front panel of each device. 4. Plug the IR emitter extender connector into the IR emitter extender. 3. Using the supplied...
...; media center. 2. If you need additional IR emitter extenders, contact Bose® Customer Service. TAB TAB 6 TAB TAB INSTALLATION Fi gu re 1 5 IR emitters positioned on device front panel 21 Place each emitter so that the flat side is against the front panel of each device. 4. Plug the IR emitter extender connector into the IR emitter extender. 3. Using the supplied...

User Manual
Page 27
...; "Controlling a cable or satellite box" on page 32 • "Controlling DVD playback" on page 34 • "Setting up to view videotapes" on page 36 • "Setting up an auxiliary (AUX) source" on page 38 • "Listening to your system. English TAB 2 TAB 3 TAB The remote control The advanced radio frequency remote control works from almost anywhere in your Lifestyle® system, the remote can be programmed to control each remote control button is...
...; "Controlling a cable or satellite box" on page 32 • "Controlling DVD playback" on page 34 • "Setting up to view videotapes" on page 36 • "Setting up an auxiliary (AUX) source" on page 38 • "Listening to your system. English TAB 2 TAB 3 TAB The remote control The advanced radio frequency remote control works from almost anywhere in your Lifestyle® system, the remote can be programmed to control each remote control button is...
User Manual
Page 28
... . • Input - Mute - Some buttons may not be set up to control the associated source. Selects the TV as a DVD player, that outputs video and/or audio and can function properly, your remote control while reading the following pages. Turns the TV on and off , selecting the last used source at turn-on page 53.) • CBL-SAT - Turns your Lifestyle® system. Before many of the buttons can connect to your...
... . • Input - Mute - Some buttons may not be set up to control the associated source. Selects the TV as a DVD player, that outputs video and/or audio and can function properly, your remote control while reading the following pages. Turns the TV on and off , selecting the last used source at turn-on page 53.) • CBL-SAT - Turns your Lifestyle® system. Before many of the buttons can connect to your...

User Manual
Page 29
... • DVD - Selects the built-in AM radio tuner set to the station last selected. Turns your Lifestyle® system on if it was off . • AUX - Selects the source device plugged into the DVD connectors. Turns the VCR on and off . • On/Off - FM - Selects the built-in FM radio tuner, set to the station last selected. TAB TAB 6 TAB TAB CONTROLS AND INDICATORS Menu and navigation buttons Settings - System - Menu - Displays the options menu for...
... • DVD - Selects the built-in AM radio tuner set to the station last selected. Turns your Lifestyle® system on if it was off . • AUX - Selects the source device plugged into the DVD connectors. Turns the VCR on and off . • On/Off - FM - Selects the built-in FM radio tuner, set to the station last selected. TAB TAB 6 TAB TAB CONTROLS AND INDICATORS Menu and navigation buttons Settings - System - Menu - Displays the options menu for...
User Manual
Page 35
... TAB 6 TAB TAB OPERATION Setting the audio delay compensation You may notice that the audio is 2 (to compensate for information and illustrations on the remote. Each value (1-8) adds 30 milliseconds of your TV screen is initially set turned all the way down and select , then press ENTER. 3. Changing the HDMI Image View You can use the Audio Delay setting to display the Settings menu on the display module or TV by...
... TAB 6 TAB TAB OPERATION Setting the audio delay compensation You may notice that the audio is 2 (to compensate for information and illustrations on the remote. Each value (1-8) adds 30 milliseconds of your TV screen is initially set turned all the way down and select , then press ENTER. 3. Changing the HDMI Image View You can use the Audio Delay setting to display the Settings menu on the display module or TV by...
User Manual
Page 36
... does not turn off , you have a working code, enter it below, then press ENTER. On the TV, select the video input that is connected to your Lifestyle® system, you can set up the remote to control the cable or satellite box involves selecting the correct cable or satellite box code. 1. To display the Lifestyle® system menu on the TV, press System. (See "The remote control" on operating the remote.) 4. Move...
... does not turn off , you have a working code, enter it below, then press ENTER. On the TV, select the video input that is connected to your Lifestyle® system, you can set up the remote to control the cable or satellite box involves selecting the correct cable or satellite box code. 1. To display the Lifestyle® system menu on the TV, press System. (See "The remote control" on operating the remote.) 4. Move...
User Manual
Page 40
... 5 OPERATION Setting up to view videotapes Once your VCR is connected to your Lifestyle® system, you can now use the Lifestyle® remote to VCR Device and press ENTER. 7. Select the first device code in the list. 12. Turn on operating the remote.) 4. To display the Setup menu, select press ENTER. , then TAB 4 TAB 3 TAB 2 English 6. Continue selecting codes until you find one that is connected to make...
... 5 OPERATION Setting up to view videotapes Once your VCR is connected to your Lifestyle® system, you can now use the Lifestyle® remote to VCR Device and press ENTER. 7. Select the first device code in the list. 12. Turn on operating the remote.) 4. To display the Setup menu, select press ENTER. , then TAB 4 TAB 3 TAB 2 English 6. Continue selecting codes until you find one that is connected to make...

User Manual
Page 42
... Lifestyle® remote, press AUX. 4. Make the system menu appear on the TV by pressing the right arrow. 6. Select the type of device from that source, the Lifestyle® remote should control most of the functions of your device and press ENTER. 10. Programming the Bose® remote to control the AUX device Setting up the remote to control that is turned on. 1. Select the first device code in the...
... Lifestyle® remote, press AUX. 4. Make the system menu appear on the TV by pressing the right arrow. 6. Select the type of device from that source, the Lifestyle® remote should control most of the functions of your device and press ENTER. 10. Programming the Bose® remote to control the AUX device Setting up the remote to control that is turned on. 1. Select the first device code in the...

User Manual
Page 44
... system menu is connected to AUX, VCR, DVD, or CBL•SAT, the Image View button functions. The Image View (aspect ratio) control that is output from your Lifestyle® system to TV, the Image View button has no effect. TAB TAB TAB 6Italiano TAB 5 OPERATION Controlling the (HDMI) Image View You can be set to a widescreen (16:9 aspect ratio) HDTV through the HDMI OUT connector. To change the display format that...
... system menu is connected to AUX, VCR, DVD, or CBL•SAT, the Image View button functions. The Image View (aspect ratio) control that is output from your Lifestyle® system to TV, the Image View button has no effect. TAB TAB TAB 6Italiano TAB 5 OPERATION Controlling the (HDMI) Image View You can be set to a widescreen (16:9 aspect ratio) HDTV through the HDMI OUT connector. To change the display format that...

User Manual
Page 49
... DVD player. English TAB 2 TAB 3 TAB Setting the coaxial audio source One of the two coaxial (coax) digital audio connectors on the right side of the media center as you face it. It is assigned to avoid extreme volume when using headphones, especially for extended periods. To view the settings menu: 1. To change the resolution of the video output to "None, TV, VCR, CBL·SAT or AUX...
... DVD player. English TAB 2 TAB 3 TAB Setting the coaxial audio source One of the two coaxial (coax) digital audio connectors on the right side of the media center as you face it. It is assigned to avoid extreme volume when using headphones, especially for extended periods. To view the settings menu: 1. To change the resolution of the video output to "None, TV, VCR, CBL·SAT or AUX...
User Manual
Page 57
... with music. Capable of different power ratings, plus the proper cables and adapters to more , it can direct the audio from two different sound sources (such as AM/FM tuner, DVD, or AUX) to these rooms through two independent audio streams. In additional rooms where you have speakers (beyond the main room where the media center is located), you want it to preset each remote for...
... with music. Capable of different power ratings, plus the proper cables and adapters to more , it can direct the audio from two different sound sources (such as AM/FM tuner, DVD, or AUX) to these rooms through two independent audio streams. In additional rooms where you have speakers (beyond the main room where the media center is located), you want it to preset each remote for...

User Manual
Page 60
..., make sure the voltage selection switch on the bottom of the media center power supply is set to match the local power rating. • Increase the volume. • Check to see if MUTE is lit on the display. Multi-pin connector at the other end is firmly seated in the media center Main Speaker jack. - Make sure that the audio input cable: - Connector is , press the Mute button on the remote control...
..., make sure the voltage selection switch on the bottom of the media center power supply is set to match the local power rating. • Increase the volume. • Check to see if MUTE is lit on the display. Multi-pin connector at the other end is firmly seated in the media center Main Speaker jack. - Make sure that the audio input cable: - Connector is , press the Mute button on the remote control...
User Manual
Page 61
...; remote behaves erratically • Momentarily disconnect the video cable (HDMI, composite, S-video, or component) to see the problem below.) • Contact Bose Customer Service for the source being played. • Make sure that the left and right front speakers are connected to the front speaker jacks, and the left and right surround speakers are using a plasma display TV, make sure the media center power source is connected at both ends. • Select 3- Too much sound from surround speakers • Select 5-speaker mode...
...; remote behaves erratically • Momentarily disconnect the video cable (HDMI, composite, S-video, or component) to see the problem below.) • Contact Bose Customer Service for the source being played. • Make sure that the left and right front speakers are connected to the front speaker jacks, and the left and right surround speakers are using a plasma display TV, make sure the media center power source is connected at both ends. • Select 3- Too much sound from surround speakers • Select 5-speaker mode...
User Manual
Page 62
... station. FM sound is correct for some stations. Select the 2-speaker mode in an upright position. • Move antennas farther from media center, display module, TV, or other electronic equipment. • Select another nearby or behaves erratically Lifestyle® system. (See "Changing remote control switch settings" on screen, though the TV audio functions • Check the TV video input selection. VCR, CBL·SAT, or AUX • Make sure that component is noisy in surround mode...
... station. FM sound is correct for some stations. Select the 2-speaker mode in an upright position. • Move antennas farther from media center, display module, TV, or other electronic equipment. • Select another nearby or behaves erratically Lifestyle® system. (See "Changing remote control switch settings" on screen, though the TV audio functions • Check the TV video input selection. VCR, CBL·SAT, or AUX • Make sure that component is noisy in surround mode...

