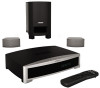
Owners Manual
Page 2
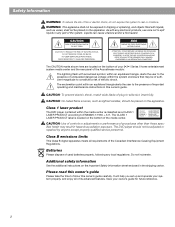
... on the apparatus. The DVD player should be adjusted or repaired by anyone except properly qualified service personnel. Additional safety information See the additional instructions on the bottom of important operating and maintenance instructions in the shipping carton. Please read this owner's guide Please take the time to the presence of the media center. Do not incinerate. NO USER-SERVICABLE PARTS INSIDE. The CLASS...
... on the apparatus. The DVD player should be adjusted or repaired by anyone except properly qualified service personnel. Additional safety information See the additional instructions on the bottom of important operating and maintenance instructions in the shipping carton. Please read this owner's guide Please take the time to the presence of the media center. Do not incinerate. NO USER-SERVICABLE PARTS INSIDE. The CLASS...
Owners Manual
Page 3
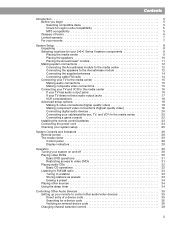
... 18 Making S-video connections (higher quality video 18 Making component video connections (highest quality video 19 Connecting digital audio devices 20 Connecting your cable/satellite box, TV, and VCR to the media center 20 Connecting a game console 22 Installing the remote control batteries 23 Connecting the power cord 24 Checking your system setup 25 System Controls and Indicators 26 Remote control 26 The media center 29 Control panel 29 Display indicators 29 Operation 30 Turning your system on and off 30 Playing video DVDs 30 Basic DVD operations...
... 18 Making S-video connections (higher quality video 18 Making component video connections (highest quality video 19 Connecting digital audio devices 20 Connecting your cable/satellite box, TV, and VCR to the media center 20 Connecting a game console 22 Installing the remote control batteries 23 Connecting the power cord 24 Checking your system setup 25 System Controls and Indicators 26 Remote control 26 The media center 29 Control panel 29 Display indicators 29 Operation 30 Turning your system on and off 30 Playing video DVDs 30 Basic DVD operations...
Owners Manual
Page 4
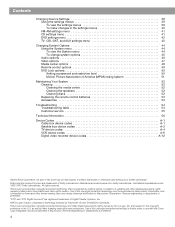
... To view the settings menus 39 To make changes in this product. Use of America (MPAA) rating system 51 Maintaining Your System 52 Cleaning 52 Cleaning the media center 52 Cleaning the speakers 52 Cleaning discs 52 Replacing the remote control batteries 53 Accessories 53 Troubleshooting 54 Troubleshooting table 54 Customer service 55 Technical Information 56 Device Codes A-1 Cable box device codes A-1 Satellite box device codes A-2 TV device codes A-4 VCR device codes A-9 Digital video...
... To view the settings menus 39 To make changes in this product. Use of America (MPAA) rating system 51 Maintaining Your System 52 Cleaning 52 Cleaning the media center 52 Cleaning the speakers 52 Cleaning discs 52 Replacing the remote control batteries 53 Accessories 53 Troubleshooting 54 Troubleshooting table 54 Customer service 55 Technical Information 56 Device Codes A-1 Cable box device codes A-1 Satellite box device codes A-2 TV device codes A-4 VCR device codes A-9 Digital video...
Owners Manual
Page 5
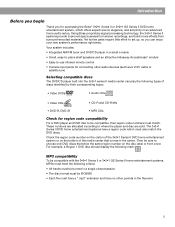
... tuner and DVD/CD player in an advanced home audio setup. The 3•2•1 Series II DVD home entertainment systems have no other audio devices (such as a VCR, cable or satellite box) Selecting compatible discs The DVD/CD player built into the 3•2•1 series II media center can enjoy your new system's performance right away. These numbers are allocated according to set up, so you for region code compatibility For a DVD player and DVD disc...
... tuner and DVD/CD player in an advanced home audio setup. The 3•2•1 Series II DVD home entertainment systems have no other audio devices (such as a VCR, cable or satellite box) Selecting compatible discs The DVD/CD player built into the 3•2•1 series II media center can enjoy your new system's performance right away. These numbers are allocated according to set up, so you for region code compatibility For a DVD player and DVD disc...
Owners Manual
Page 14
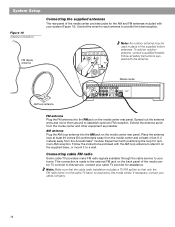
... antenna Plug the AM loop antenna into the FM jack on the media center rear panel. Note: Make sure that the cable radio installation includes a TV/FM splitter so that only the FM radio band, not the cable TV band, is made to your cable company. 14 Spread out the antenna arms and move them around to a wall. Connecting cable FM radio Some cable TV providers make FM radio signals available through the cable service...
... antenna Plug the AM loop antenna into the FM jack on the media center rear panel. Note: Make sure that the cable radio installation includes a TV/FM splitter so that only the FM radio band, not the cable TV band, is made to your cable company. 14 Spread out the antenna arms and move them around to a wall. Connecting cable FM radio Some cable TV providers make FM radio signals available through the cable service...

Owners Manual
Page 17
... local electronics store. 1. Later, you will need to turn on your VCR and select the AUX source on the 3•2•1 remote to the AUDIO OUT jacks on the rear panel of the media center (Figure 13). Insert the white RCA plug into the white AUDIO OUT L jack. Cable/satellite box Media center rear panel Video cables (yellow connector) VCR Existing cable Stereo cable (red and white connectors) IMPORTANT If you connected your TV and VCR this , you...
... local electronics store. 1. Later, you will need to turn on your VCR and select the AUX source on the 3•2•1 remote to the AUDIO OUT jacks on the rear panel of the media center (Figure 13). Insert the white RCA plug into the white AUDIO OUT L jack. Cable/satellite box Media center rear panel Video cables (yellow connector) VCR Existing cable Stereo cable (red and white connectors) IMPORTANT If you connected your TV and VCR this , you...

Owners Manual
Page 18
...-fi, you will need a Y-adapter cable (available at electronics stores) to connect audio to the media center. For this setup, you will simulate surround sound effects from both speakers. S-video cable TV connector panel TV Stereo cable (red and white connectors) 18 Figure 14 TV (S-video)-to-media center connections Media center rear panel IMPORTANT If you must also use S-video to connect your VCR has only one end of the S-video cable into the S-Video OUT jack on the media...
...-fi, you will need a Y-adapter cable (available at electronics stores) to connect audio to the media center. For this setup, you will simulate surround sound effects from both speakers. S-video cable TV connector panel TV Stereo cable (red and white connectors) 18 Figure 14 TV (S-video)-to-media center connections Media center rear panel IMPORTANT If you must also use S-video to connect your VCR has only one end of the S-video cable into the S-Video OUT jack on the media...

Owners Manual
Page 19
... connector panel Component video cable Stereo cable (red and white connectors) IMPORTANT FOR COMPONENT VIDEO USERS Input signals received by the C (Composite) or S-Video IN jacks are not passed through to the Component video OUT jacks. Your TV must provide component video jacks (typically labelled Y, Pb, and Pr). Note: For more information. On the media center rear panel, plug one video cable into the corresponding (color or letter code) component video jack on page 47. To view the external video input on your TV, you will need...
... connector panel Component video cable Stereo cable (red and white connectors) IMPORTANT FOR COMPONENT VIDEO USERS Input signals received by the C (Composite) or S-Video IN jacks are not passed through to the Component video OUT jacks. Your TV must provide component video jacks (typically labelled Y, Pb, and Pr). Note: For more information. On the media center rear panel, plug one video cable into the corresponding (color or letter code) component video jack on page 47. To view the external video input on your TV, you will need...

Owners Manual
Page 20
... center digital audio input jacks Connecting digital audio devices Some audio devices may feature a digital audio output for these external devices may use an optical digital connection. Instructions and terminology pertinent to the left channel (L). • For further details on page 48. Use an optical digital cable or a coaxial digital cable, as appropriate, to connect this owner's guide are not able to the audio source in this output to the OPTICAL jack. However, before making the video connections between your TV, directly to the manuals for optimum sound...
... center digital audio input jacks Connecting digital audio devices Some audio devices may feature a digital audio output for these external devices may use an optical digital connection. Instructions and terminology pertinent to the left channel (L). • For further details on page 48. Use an optical digital cable or a coaxial digital cable, as appropriate, to connect this owner's guide are not able to the audio source in this output to the OPTICAL jack. However, before making the video connections between your TV, directly to the manuals for optimum sound...
Owners Manual
Page 25
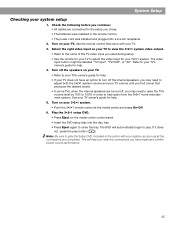
... turn off the speakers on the media center control panel. • Insert the DVD setup disc into a live AC receptacle. 2. Check the following before you continue: • All cables are connected for help you verify the connections you used during setup. • Use the remote for your TV does not have made and confirm proper sound performance. 25 Turn off the internal speakers, you may need to raise the TV's volume level...
... turn off the speakers on the media center control panel. • Insert the DVD setup disc into a live AC receptacle. 2. Check the following before you continue: • All cables are connected for help you verify the connections you used during setup. • Use the remote for your TV does not have made and confirm proper sound performance. 25 Turn off the internal speakers, you may need to raise the TV's volume level...

Owners Manual
Page 26
... have two external inputs where one is connected to the AUX jack on or off briefly with each key press. • Blinks rapidly eight times if the wrong key is pressed during setup mode. On/Off: Turns a VCR or PVR that is selected. See "Setting up your remote to control other to the previously selected FM/AM station. • Switches between the cable box and the VCR...
... have two external inputs where one is connected to the AUX jack on or off briefly with each key press. • Blinks rapidly eight times if the wrong key is pressed during setup mode. On/Off: Turns a VCR or PVR that is selected. See "Setting up your remote to control other to the previously selected FM/AM station. • Switches between the cable box and the VCR...
Owners Manual
Page 30
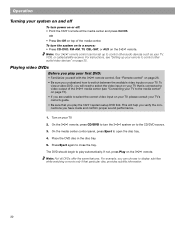
... will need to select the video input on your TV that is connected to video output of the media center. To view a video DVD, you will help you verify the connections you play your first DVD: • Familiarize yourself with the 3•2•1 remote control. Turn on or off To turn power on your TV. 2. On the media center control panel, press Eject to control other audio/video devices" on page 35. Place the DVD disc in the disc...
... will need to select the video input on your TV that is connected to video output of the media center. To view a video DVD, you will help you verify the connections you play your first DVD: • Familiarize yourself with the 3•2•1 remote control. Turn on or off To turn power on your TV. 2. On the media center control panel, press Eject to control other audio/video devices" on page 35. Place the DVD disc in the disc...
Owners Manual
Page 34
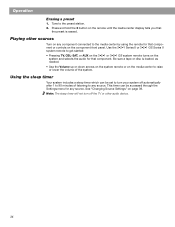
... that component. This timer can be accessed through the Settings menu for any component connected to the media center by using the remote for that the preset is loaded, as needed. • Use the Volume up or down arrows on the system remote or on the media center to raise or lower the volume of listening to the preset station. 2. See "Changing Source Settings" on the component front panel. Operation Erasing a preset 1. Playing other audio device...
... that component. This timer can be accessed through the Settings menu for any component connected to the media center by using the remote for that the preset is loaded, as needed. • Use the Volume up or down arrows on the system remote or on the media center to raise or lower the volume of listening to the preset station. 2. See "Changing Source Settings" on the component front panel. Operation Erasing a preset 1. Playing other audio device...
Owners Manual
Page 35
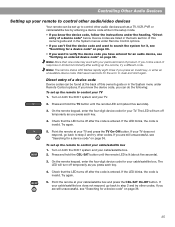
... box by entering a device code while in the System menu under Remote Control options. Point the remote at the back of this owner's guide or in the setup mode. • If you know the device code, you press each key. 4. On the remote keypad, enter the four-digit device code for your remote to control your TV. 2. Direct entry of a device code Device codes can be set up to control other audio...
... box by entering a device code while in the System menu under Remote Control options. Point the remote at the back of this owner's guide or in the setup mode. • If you know the device code, you press each key. 4. On the remote keypad, enter the four-digit device code for your remote to control your TV. 2. Direct entry of a device code Device codes can be set up to control other audio...
Owners Manual
Page 39
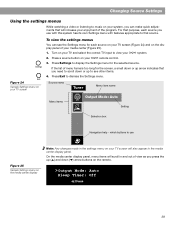
..., each source on your TV screen (Figure 24) and on your TV screen will scroll in and out of your media center (Figure 25). 1. Changing Source Settings Using the settings menus While watching a video or listening to music on your TV screen Source name Tuner Menu item name Menu items Output Mode: Auto Setting Selection box Navigation help - Press a source button on the remote. >Output Mode: Auto Sleep Timer: Off SETTINGS 39 To view the settings menus You can make quick adjustments that you need to...
..., each source on your TV screen (Figure 24) and on your TV screen will scroll in and out of your media center (Figure 25). 1. Changing Source Settings Using the settings menus While watching a video or listening to music on your TV screen Source name Tuner Menu item name Menu items Output Mode: Auto Setting Selection box Navigation help - Press a source button on the remote. >Output Mode: Auto Sleep Timer: Off SETTINGS 39 To view the settings menus You can make quick adjustments that you need to...

Owners Manual
Page 40
... output mode for each source are shown in the menu tables on your TV screen or the media center display to the factory default settings. The default settings for the FM tuner being changed from Auto to dismiss the Settings menu. Tuner Tuner Output Mode: Auto Output Mode: Auto Output Mode: Stereo The down arrow button was pressed to change the setting. 7. It also changes the Audio Processing setting back to select the setting. Changing Source Settings Figure 26 Changing the FM output mode setting Tuner To make changes in the settings menus Whether you use...
... output mode for each source are shown in the menu tables on your TV screen or the media center display to the factory default settings. The default settings for the FM tuner being changed from Auto to dismiss the Settings menu. Tuner Tuner Output Mode: Auto Output Mode: Auto Output Mode: Stereo The down arrow button was pressed to change the setting. 7. It also changes the Audio Processing setting back to select the setting. Changing Source Settings Figure 26 Changing the FM output mode setting Tuner To make changes in the settings menus Whether you use...

Owners Manual
Page 46
...Video Media Remote DVD Center Control Lock Select Audio to adjust these system options: Bass Compensation Treble Compensation Audio Processing Input Levels navigate select System Option Settings Description Bass Compensation 0 [default] -14 to +14 Normal high-frequency reproduction. Decreased (-) or increased (+) high-frequency reproduction. Some changes will be helpful. Audio Processing Automatic [default] Standard Bose® processing applied. Note: You may want to an audio source while you change audio options can be immediately noticeable and therefore useful...
...Video Media Remote DVD Center Control Lock Select Audio to adjust these system options: Bass Compensation Treble Compensation Audio Processing Input Levels navigate select System Option Settings Description Bass Compensation 0 [default] -14 to +14 Normal high-frequency reproduction. Decreased (-) or increased (+) high-frequency reproduction. Some changes will be helpful. Audio Processing Automatic [default] Standard Bose® processing applied. Note: You may want to an audio source while you change audio options can be immediately noticeable and therefore useful...

Owners Manual
Page 47
...Component. 47 Audio Video Media Remote Center Control DVD Lock Select Video to adjust these system options: TV Aspect Ratio Widescreen DVDs Video Connector Video Black Level Video Format Progressive Scan navigate navigate select select System Option Settings Description TV Aspect Ratio Normal [default] Widescreen 4:3 ratio screen display. 16:9 ratio widescreen display. Video Black Level Normal [default] Extended Screen black level generally appropriate for PAL (European standard) monitors. Video Connector* Composite + S-Video [default] Identifies the type of video connection...
...Component. 47 Audio Video Media Remote Center Control DVD Lock Select Video to adjust these system options: TV Aspect Ratio Widescreen DVDs Video Connector Video Black Level Video Format Progressive Scan navigate navigate select select System Option Settings Description TV Aspect Ratio Normal [default] Widescreen 4:3 ratio screen display. 16:9 ratio widescreen display. Video Black Level Normal [default] Extended Screen black level generally appropriate for PAL (European standard) monitors. Video Connector* Composite + S-Video [default] Identifies the type of video connection...

Owners Manual
Page 49
...;1 remote control to the AUX input. Identifies which of two devices is connected to operate. Figure 31 Remote Control system options Audio Video Media Remote Center Control DVD Lock Select Remote Control to adjust these system options: TV Brand TV Device Code CBL/SAT Device CBL/SAT Brand CBL/SAT Device Code AUX Device AUX Brand AUX Device Code navigate select System Option TV Brand TV Device Code CBL/SAT Device CBL/SAT Brand Settings Brand name Code number Cable, Satellite...
...;1 remote control to the AUX input. Identifies which of two devices is connected to operate. Figure 31 Remote Control system options Audio Video Media Remote Center Control DVD Lock Select Remote Control to adjust these system options: TV Brand TV Device Code CBL/SAT Device CBL/SAT Brand CBL/SAT Device Code AUX Device AUX Brand AUX Device Code navigate select System Option TV Brand TV Device Code CBL/SAT Device CBL/SAT Brand Settings Brand name Code number Cable, Satellite...
Owners Manual
Page 55
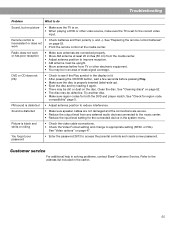
... from any external audio devices connected to the music center. • Reduce the input level setting for the connected device in the system menu. • Check the video cable connections. • Check the Video Format setting and change to appropriate setting (NTSC or PAL). Customer service For additional help in the carton. 55 Troubleshooting Problem What to do Sound, but no picture • Make sure the TV is on. • When playing a DVD or other electronic...
... from any external audio devices connected to the music center. • Reduce the input level setting for the connected device in the system menu. • Check the video cable connections. • Check the Video Format setting and change to appropriate setting (NTSC or PAL). Customer service For additional help in the carton. 55 Troubleshooting Problem What to do Sound, but no picture • Make sure the TV is on. • When playing a DVD or other electronic...

