
User Guide
Page 2
...Important: It is on. ¾ Do not place the unit on an unstable surface, cart, or stand. ¾ Avoid using the projector. The following styles are no user-serviceable parts in the eyes. Warning: Alerts you to situations that may damage the unit. Aside from ..."Push the Menu button on the unit. - Symbols Used Warning symbols are denoted in this manual for pointing out items on purchasing the DLP projector! Important: Provides additional information that you read this manual and on the topic at hand. For servicing, contact qualified service personnel. ¾ Follow all...
...Important: It is on. ¾ Do not place the unit on an unstable surface, cart, or stand. ¾ Avoid using the projector. The following styles are no user-serviceable parts in the eyes. Warning: Alerts you to situations that may damage the unit. Aside from ..."Push the Menu button on the unit. - Symbols Used Warning symbols are denoted in this manual for pointing out items on purchasing the DLP projector! Important: Provides additional information that you read this manual and on the topic at hand. For servicing, contact qualified service personnel. ¾ Follow all...

User Guide
Page 4
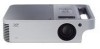
... without prior notice. - DDLLPP PPrroojjeeccttoorr -- It is intended for angled projections Input source automatically detected About this manual, in lit rooms Supports resolutions up to SXGA at 16.7 million colors to deliver crisp, clear images Flexible... illustration and its description-has been kept on one page. iv - The default values listed in this manual This manual is suggested that you only print sections that are for your needs. UUsseerr''ss MMaannuuaall Main Features Lightweight ..., are relevant to your convenience and to install and operate the DLP projector.
... without prior notice. - DDLLPP PPrroojjeeccttoorr -- It is intended for angled projections Input source automatically detected About this manual, in lit rooms Supports resolutions up to SXGA at 16.7 million colors to deliver crisp, clear images Flexible... illustration and its description-has been kept on one page. iv - The default values listed in this manual This manual is suggested that you only print sections that are for your needs. UUsseerr''ss MMaannuuaall Main Features Lightweight ..., are relevant to your convenience and to install and operate the DLP projector.
User Guide
Page 7
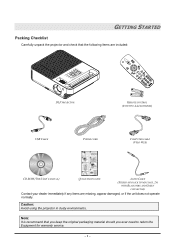
... dusty environments. Note: It is recommend that the following items are included: DLP PROJECTOR REMOTE CONTROL (WITH TWO AAA BATTERIES) USB CABLE POWER CORD COMPUTER CABLE (VGA-VGA) CD-ROM (THIS USER'S MANUAL) QUICK START GUIDE AUDIO CABLE (STEREO MINI JACK TO MINI JACK, 2M WITH BLACK WIRE AND GREEN CONNECTOR) Contact your...
... dusty environments. Note: It is recommend that the following items are included: DLP PROJECTOR REMOTE CONTROL (WITH TWO AAA BATTERIES) USB CABLE POWER CORD COMPUTER CABLE (VGA-VGA) CD-ROM (THIS USER'S MANUAL) QUICK START GUIDE AUDIO CABLE (STEREO MINI JACK TO MINI JACK, 2M WITH BLACK WIRE AND GREEN CONNECTOR) Contact your...
User Guide
Page 12
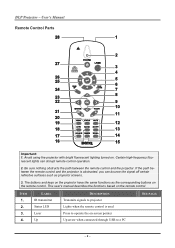
... Parts Important: 1. Be sure nothing obstructs the path between the remote control and the projector is used Press to a PC SEE PAGE: - 6 - The buttons and keys on the projector have the same functions as projector screens. 3. This user's manual describes the functions based on -screen pointer Up arrow when connected through USB to operate...
... Parts Important: 1. Be sure nothing obstructs the path between the remote control and the projector is used Press to a PC SEE PAGE: - 6 - The buttons and keys on the projector have the same functions as projector screens. 3. This user's manual describes the functions based on -screen pointer Up arrow when connected through USB to operate...
User Guide
Page 16
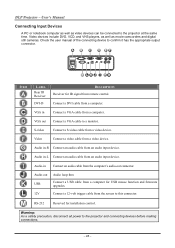
Check the user manual of the connecting device to a monitor. Connect a DVI cable from a video device. VGA ... a USB cable from a computer for installation control. VGA in -L Connect an audio cable from the screen to the projector and connecting devices before making connections. - 10 - UUsseerr''ss MMaannuuaall Connecting Input Devices A PC or notebook computer as well.... Video devices include DVD, VCD, and VHS players, as well as video devices can be connected to the projector at the same time. RS-232 Reserved for USB mouse function and firmware upgrades. 12V Connect a 12-volt ...
Check the user manual of the connecting device to a monitor. Connect a DVI cable from a video device. VGA ... a USB cable from a computer for installation control. VGA in -L Connect an audio cable from the screen to the projector and connecting devices before making connections. - 10 - UUsseerr''ss MMaannuuaall Connecting Input Devices A PC or notebook computer as well.... Video devices include DVD, VCD, and VHS players, as well as video devices can be connected to the projector at the same time. RS-232 Reserved for USB mouse function and firmware upgrades. 12V Connect a 12-volt ...

User Guide
Page 17
... 8. Caution: Do not unplug the power cord until the Ready LED stops flashing, indicating the projector has cooled down the Projector 1. Connect the other end to the projector (A). The projector splash screen displays and connected devices are supported through the RGB connector.) 6. The Power and Ready...the power cord to a wall outlet. Turn on the projector light. If the connected device is a PC, press the appropriate keys on the computer keyboard to switch the display output to the projector. (Check the user manual of the PC to determine the appropriate Fn key combination...
... 8. Caution: Do not unplug the power cord until the Ready LED stops flashing, indicating the projector has cooled down the Projector 1. Connect the other end to the projector (A). The projector splash screen displays and connected devices are supported through the RGB connector.) 6. The Power and Ready...the power cord to a wall outlet. Turn on the projector light. If the connected device is a PC, press the appropriate keys on the computer keyboard to switch the display output to the projector. (Check the user manual of the PC to determine the appropriate Fn key combination...


