

User Guide
Page 2
... situations. For servicing, contact qualified service personnel. ¾ Follow all warnings and cautions in the unit. The following styles are no user-serviceable parts in this manual for pointing out items on purchasing the DLP projector! DANGER: Do not point the laser in this manual to alert you to open the unit case. Aside from the projection lamp, there are used on the unit...
... situations. For servicing, contact qualified service personnel. ¾ Follow all warnings and cautions in the unit. The following styles are no user-serviceable parts in this manual for pointing out items on purchasing the DLP projector! DANGER: Do not point the laser in this manual to alert you to open the unit case. Aside from the projection lamp, there are used on the unit...
User Guide
Page 3
... lamp: ¾ Unplug the power cord. ¾ Allow the lamp to Replacing the Projection Lamp on the power cord. Cleaning the Projector ¾ Unplug the power cord before cleaning. Refer to cool for about one hour. PPrreeffaaccee Power Safety ¾ Only use for a prolonged period. Regulatory Warnings Before installing and using the projector, read the regulatory notices in use the supplied power cord. ¾ Do not place anything on page 29 for clear and safe instructions...
... lamp: ¾ Unplug the power cord. ¾ Allow the lamp to Replacing the Projection Lamp on the power cord. Cleaning the Projector ¾ Unplug the power cord before cleaning. Refer to cool for about one hour. PPrreeffaaccee Power Safety ¾ Only use for a prolonged period. Regulatory Warnings Before installing and using the projector, read the regulatory notices in use the supplied power cord. ¾ Do not place anything on page 29 for clear and safe instructions...

User Guide
Page 4
... lit rooms Supports resolutions up to SXGA at 16.7 million colors to deliver crisp, clear images Flexible setup allows for front and rear projections Line-of-vision projections remain square, with advanced keystone correction for angled projections Input source automatically detected About this manual This manual is suggested that you only print sections that are for end users and describes how to help save paper...
... lit rooms Supports resolutions up to SXGA at 16.7 million colors to deliver crisp, clear images Flexible setup allows for front and rear projections Line-of-vision projections remain square, with advanced keystone correction for angled projections Input source automatically detected About this manual This manual is suggested that you only print sections that are for end users and describes how to help save paper...

User Guide
Page 5
... Setup...21 User Color ...23 CONFIG MENU ...24 UTILITY MENU ...25 Utility Menu Functions Available for Connected Source 26 TOOL MENU ...27 STATUS MENU ...28 MAINTENANCE AND SECURITY...29 REPLACING THE PROJECTION LAMP...29 Resetting the Lamp...32 CLEANING THE PROJECTOR...32 Cleaning the Lens ...33 Cleaning the Case ...33 USING THE KENSINGTON® LOCK ...33 TROUBLESHOOTING ...34 COMMON PROBLEMS AND SOLUTIONS ...34 TIPS FOR TROUBLESHOOTING ...34 LED ERROR MESSAGES...35 IMAGE PROBLEMS...35 LAMP PROBLEMS ...36 REMOTE CONTROL PROBLEMS ...36 AUDIO PROBLEMS ...37 HAVING THE PROJECTOR SERVICED...
... Setup...21 User Color ...23 CONFIG MENU ...24 UTILITY MENU ...25 Utility Menu Functions Available for Connected Source 26 TOOL MENU ...27 STATUS MENU ...28 MAINTENANCE AND SECURITY...29 REPLACING THE PROJECTION LAMP...29 Resetting the Lamp...32 CLEANING THE PROJECTOR...32 Cleaning the Lens ...33 Cleaning the Case ...33 USING THE KENSINGTON® LOCK ...33 TROUBLESHOOTING ...34 COMMON PROBLEMS AND SOLUTIONS ...34 TIPS FOR TROUBLESHOOTING ...34 LED ERROR MESSAGES...35 IMAGE PROBLEMS...35 LAMP PROBLEMS ...36 REMOTE CONTROL PROBLEMS ...36 AUDIO PROBLEMS ...37 HAVING THE PROJECTOR SERVICED...
User Guide
Page 7
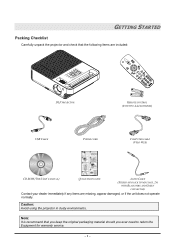
Caution: Avoid using the projector in dusty environments. GETTING STARTED Packing Checklist Carefully unpack the projector and check that you keep the original packaging material should you ever need to return the Equipment for warranty service. - 1 - Note: It is recommend that the following items are included: DLP PROJECTOR REMOTE CONTROL (WITH TWO AAA BATTERIES) USB CABLE POWER CORD COMPUTER CABLE (VGA-VGA) CD-ROM (THIS USER'S MANUAL) QUICK START GUIDE AUDIO CABLE (STEREO MINI JACK...
Caution: Avoid using the projector in dusty environments. GETTING STARTED Packing Checklist Carefully unpack the projector and check that you keep the original packaging material should you ever need to return the Equipment for warranty service. - 1 - Note: It is recommend that the following items are included: DLP PROJECTOR REMOTE CONTROL (WITH TWO AAA BATTERIES) USB CABLE POWER CORD COMPUTER CABLE (VGA-VGA) CD-ROM (THIS USER'S MANUAL) QUICK START GUIDE AUDIO CABLE (STEREO MINI JACK...
User Guide
Page 8
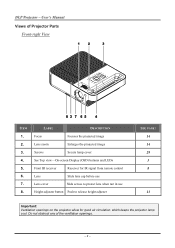
... View ITEM 1. 2. 3. 4. 5. 6. 7. 8. LABEL DESCRIPTION Focus Focuses the projected image Lens zoom Enlarges the projected image Screws Secure lamp cover See Top view-On-screen Display (OSD) buttons and LEDs Front IR receiver Receiver for IR signal from remote control Lens Slide lens cap before use Lens cover Slide across to protect lens when not in use Height-adjuster button Push to release height adjuster SEE PAGE: 14 14 29 3 8 13 Important: Ventilation openings on the projector allow for good air circulation, which keeps the projector lamp...
... View ITEM 1. 2. 3. 4. 5. 6. 7. 8. LABEL DESCRIPTION Focus Focuses the projected image Lens zoom Enlarges the projected image Screws Secure lamp cover See Top view-On-screen Display (OSD) buttons and LEDs Front IR receiver Receiver for IR signal from remote control Lens Slide lens cap before use Lens cover Slide across to protect lens when not in use Height-adjuster button Push to release height adjuster SEE PAGE: 14 14 29 3 8 13 Important: Ventilation openings on the projector allow for good air circulation, which keeps the projector lamp...
User Guide
Page 9
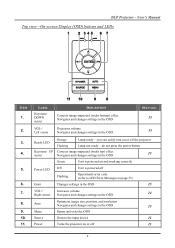
... 15 Green Unit is powered on and working correctly Power LED Off Flashing Unit is powered off Operational error code (refer to LED Error Messages on page 35) Enter Changes settings in the OSD 15 VOL+/ Right cursor Increases volume Navigates and changes settings in the OSD 14 Auto Optimizes image size, position, and resolution Navigates and changes settings in the OSD 15 Menu Opens and exits the OSD Source Detects the input device 11 Power Turns the projector on...
... 15 Green Unit is powered on and working correctly Power LED Off Flashing Unit is powered off Operational error code (refer to LED Error Messages on page 35) Enter Changes settings in the OSD 15 VOL+/ Right cursor Increases volume Navigates and changes settings in the OSD 14 Auto Optimizes image size, position, and resolution Navigates and changes settings in the OSD 15 Menu Opens and exits the OSD Source Detects the input device 11 Power Turns the projector on...
User Guide
Page 10
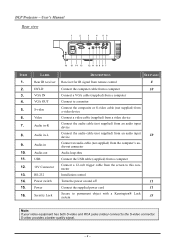
... 10 Connect a VGA cable (supplied) from a computer Connect to a monitor Connect the composite or S-video cable (not supplied) from a video device Connect a video cable (supplied) from a video device Connect the audio cable (not supplied) from an audio input device Connect the audio cable (not supplied) from an audio input device 10 Connect an audio cable (not supplied) from the computer's audio-out connector Audio loop-thru Connect the USB cable (supplied) from a computer Connect a 12-volt trigger cable from the screen to this connector Installation control Turns the power on...
... 10 Connect a VGA cable (supplied) from a computer Connect to a monitor Connect the composite or S-video cable (not supplied) from a video device Connect a video cable (supplied) from a video device Connect the audio cable (not supplied) from an audio input device Connect the audio cable (not supplied) from an audio input device 10 Connect an audio cable (not supplied) from the computer's audio-out connector Audio loop-thru Connect the USB cable (supplied) from a computer Connect a 12-volt trigger cable from the screen to this connector Installation control Turns the power on...
User Guide
Page 12
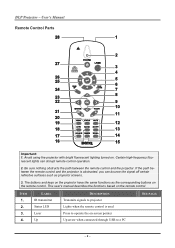
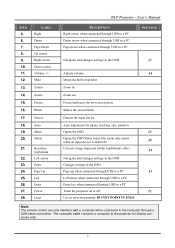
... when connected through USB to projector Lights when the remote control is obstructed, you can disrupt remote control operation. 2. The buttons and keys on the remote control. DDLLPP PPrroojjeeccttoorr -- UUsseerr''ss MMaannuuaall Remote Control Parts Important: 1. If the path between the remote control and the projector. Certain high-frequency fluorescent lights can bounce the signal off certain reflective surfaces such as the corresponding buttons on the projector have the same functions as projector screens. 3. This user's manual...
... when connected through USB to projector Lights when the remote control is obstructed, you can disrupt remote control operation. 2. The buttons and keys on the remote control. DDLLPP PPrroojjeeccttoorr -- UUsseerr''ss MMaannuuaall Remote Control Parts Important: 1. If the path between the remote control and the projector. Certain high-frequency fluorescent lights can bounce the signal off certain reflective surfaces such as the corresponding buttons on the projector have the same functions as projector screens. 3. This user's manual...
User Guide
Page 13
... Turns the projector on or off 11 Use as on -screen picture Makes the screen blank Detects the input device Auto adjustment for phase, tracking, size, position Opens the OSD 15 Opens the OSD Status menu (the menu only opens when an input device is detected) 28 Corrects image-trapezoid (wider top/bottom) effect 14 Navigates and changes settings in the OSD Changes settings in the OSD Page up when connected through USB to...
... Turns the projector on or off 11 Use as on -screen picture Makes the screen blank Detects the input device Auto adjustment for phase, tracking, size, position Opens the OSD 15 Opens the OSD Status menu (the menu only opens when an input device is detected) 28 Corrects image-trapezoid (wider top/bottom) effect 14 Navigates and changes settings in the OSD Changes settings in the OSD Page up when connected through USB to...
User Guide
Page 16
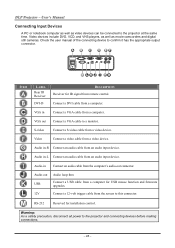
... the projector at the same time. Warning: As a safety precaution, disconnect all power to confirm it has the appropriate output connector. UUsseerr''ss MMaannuuaall Connecting Input Devices A PC or notebook computer as well as movie camcorders and digital still cameras. Connect a DVI cable from remote control. Audio-out USB Audio loop-thru Connect a USB cable from a computer for USB mouse function and firmware upgrades. 12V Connect a 12-volt trigger cable from the screen...
... the projector at the same time. Warning: As a safety precaution, disconnect all power to confirm it has the appropriate output connector. UUsseerr''ss MMaannuuaall Connecting Input Devices A PC or notebook computer as well as movie camcorders and digital still cameras. Connect a DVI cable from remote control. Audio-out USB Audio loop-thru Connect a USB cable from a computer for USB mouse function and firmware upgrades. 12V Connect a 12-volt trigger cable from the screen...

User Guide
Page 17
... change display output.) See Setting an Access Password (Security Lock) on the projector light. Slide the lens cover. 2. Connect the power cord to a wall outlet. The projector splash screen displays and connected devices are supported through the RGB connector.) 6. When the "Power Off?/ Press "Power" again to turn off the main Power switch when the Ready LED stops flashing. The projector turns off " message appears, press the Power button. Caution: Do not unplug the power cord until the Ready LED stops flashing, indicating the projector...
... change display output.) See Setting an Access Password (Security Lock) on the projector light. Slide the lens cover. 2. Connect the power cord to a wall outlet. The projector splash screen displays and connected devices are supported through the RGB connector.) 6. When the "Power Off?/ Press "Power" again to turn off the main Power switch when the Ready LED stops flashing. The projector turns off " message appears, press the Power button. Caution: Do not unplug the power cord until the Ready LED stops flashing, indicating the projector...
User Guide
Page 18
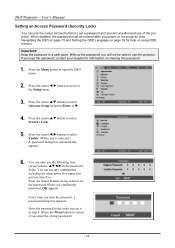
... MMaannuuaall Setting an Access Password (Security Lock) You can use of the projector. Press the cursor W X button to move to open the OSD menu. 2. Press the Menu button to the Setup menu. 3. Without the password, you will not be entered after you lose the password, contact your reseller for help on clearing the password. 1. Press the cursor buttons in the order you enter the wrong password.) - 12 - Every time...
... MMaannuuaall Setting an Access Password (Security Lock) You can use of the projector. Press the cursor W X button to move to open the OSD menu. 2. Press the Menu button to the Setup menu. 3. Without the password, you will not be entered after you lose the password, contact your reseller for help on clearing the password. 1. Press the cursor buttons in the order you enter the wrong password.) - 12 - Every time...
User Guide
Page 20
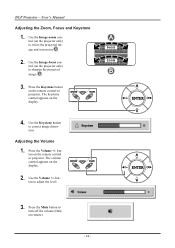
... projected image A . 3. The volume control appears on the remote control or projector. Press the Keystone button on the display. 2. Use the Keystone button to adjust the level. 3. Press the Volume +/- Use the Volume +/- Press the Mute button to turn off the volume (Only on the projector only) to resize the projected image and screen size B . 2. UUsseerr''ss MMaannuuaall Adjusting the Zoom, Focus and Keystone 1. DDLLPP PPrroojjeeccttoorr -- Use the Image-focus control (on remote). - 14 - The keystone control appears on the display. 4. button to correct image...
... projected image A . 3. The volume control appears on the remote control or projector. Press the Keystone button on the display. 2. Use the Keystone button to adjust the level. 3. Press the Volume +/- Use the Volume +/- Press the Mute button to turn off the volume (Only on the projector only) to resize the projected image and screen size B . 2. UUsseerr''ss MMaannuuaall Adjusting the Zoom, Focus and Keystone 1. DDLLPP PPrroojjeeccttoorr -- Use the Image-focus control (on remote). - 14 - The keystone control appears on the display. 4. button to correct image...
User Guide
Page 26
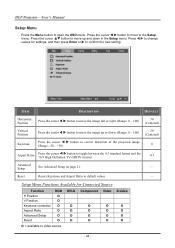
... Setup on page 21. - Press W X to change values for Connected Source Function H Position V Position Keystone correction Aspect Ratio Advanced Setup Reset RGB O O O O O O DVI-D O O O O Component O O O O Video S-video O O O O O O O O O = available to the Setup menu. UUsseerr''ss MMaannuuaall Setup Menu Press the Menu button to confirm the new setting. Press the cursor ST button to move the image up and down . (Range: 0 - 100) 50 (Centered) Keystone Press the cursor W X button to correct distortion of the projected image...
... Setup on page 21. - Press W X to change values for Connected Source Function H Position V Position Keystone correction Aspect Ratio Advanced Setup Reset RGB O O O O O O DVI-D O O O O Component O O O O Video S-video O O O O O O O O O = available to the Setup menu. UUsseerr''ss MMaannuuaall Setup Menu Press the Menu button to confirm the new setting. Press the cursor ST button to move the image up and down . (Range: 0 - 100) 50 (Centered) Keystone Press the cursor W X button to correct distortion of the projected image...
User Guide
Page 27
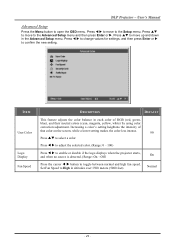
... Advanced Setup menu. Set Fan Speed to toggle between normal and high fan speed. Press W X to adjust the selected color. (Range: 0 - 100) Press W X to select a color. Press ST to enable or disable if the logo displays when the projector starts, and when no source is detected. (Range: On - Increasing a color's setting heightens the intensity of RGB (red, green, blue), and their neutral colors (cyan, magenta, yellow, white) by using color correction adjustment. Press W X to change...
... Advanced Setup menu. Set Fan Speed to toggle between normal and high fan speed. Press W X to adjust the selected color. (Range: 0 - 100) Press W X to select a color. Press ST to enable or disable if the logo displays when the projector starts, and when no source is detected. (Range: On - Increasing a color's setting heightens the intensity of RGB (red, green, blue), and their neutral colors (cyan, magenta, yellow, white) by using color correction adjustment. Press W X to change...

User Guide
Page 34
... replacing the lamp, this item should be reset. Shows the number of hours the lamp has been in the Status menu. Press the cursor ST button to move to choose the lamp mode. (Range: Eco, Normal) Note: 230w/280w are only for video mode. ITEM Video Information Active Source Software Version Lamp Hours Lamp Mode Lamp Hour Reset DESCRIPTION DEFAULT Displays the resolution and refresh rate for RGB/DVI-D mode. DDLLPP PPrroojjeeccttoorr -- Normal Eco mode uses less power and extends lamp life...
... replacing the lamp, this item should be reset. Shows the number of hours the lamp has been in the Status menu. Press the cursor ST button to move to choose the lamp mode. (Range: Eco, Normal) Note: 230w/280w are only for video mode. ITEM Video Information Active Source Software Version Lamp Hours Lamp Mode Lamp Hour Reset DESCRIPTION DEFAULT Displays the resolution and refresh rate for RGB/DVI-D mode. DDLLPP PPrroojjeeccttoorr -- Normal Eco mode uses less power and extends lamp life...
User Guide
Page 38
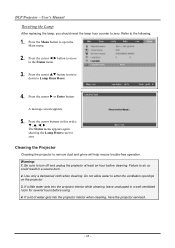
S; Cleaning the Projector Cleaning the projector to open the Main menu. 2. Warning: 1. Be sure to the Status menu. 3. Use only a dampened cloth when cleaning. Press the Menu button to remove dust and grime will help ensure trouble-free operation. Press the cursor ST button to move to turn off and unplug the projector at least an hour before using. 4. Press the cursor buttons in a severe burn. 2. The Status menu appears again showing the Lamp Hours reset to zero. Failure to Lamp Hour Reset. 4. UUsseerr...
S; Cleaning the Projector Cleaning the projector to open the Main menu. 2. Warning: 1. Be sure to the Status menu. 3. Use only a dampened cloth when cleaning. Press the Menu button to remove dust and grime will help ensure trouble-free operation. Press the cursor ST button to move to turn off and unplug the projector at least an hour before using. 4. Press the cursor buttons in a severe burn. 2. The Status menu appears again showing the Lamp Hours reset to zero. Failure to Lamp Hour Reset. 4. UUsseerr...
User Guide
Page 40
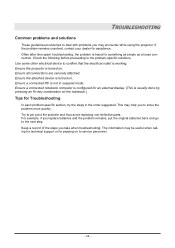
... for Troubleshooting In each problem-specific section, try the steps in suspend mode. Ensure a connected notebook computer is configured for an external display. (This is turned on . Keep a record of the steps you take when troubleshooting: The information may encounter while using the projector. Use some other electrical device to pin point the problem and thus avoid replacing non-defective parts. Ensure a connected PC is working. Try...
... for Troubleshooting In each problem-specific section, try the steps in suspend mode. Ensure a connected notebook computer is configured for an external display. (This is turned on . Keep a record of the steps you take when troubleshooting: The information may encounter while using the projector. Use some other electrical device to pin point the problem and thus avoid replacing non-defective parts. Ensure a connected PC is working. Try...
User Guide
Page 42
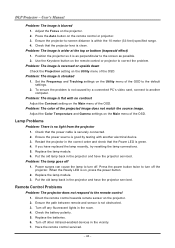
Adjust the Focus on the remote control or projector to the default settings. 2. Use the Keystone button on the projector. 2. Lamp Problems Problem: There is securely connected. 2. Check that the power cable is no contrast Adjust the Contrast setting on the Utility menu of the OSD to correct the problem. Problem: The lamp goes off other Infrared-enabled devices in the projector and have the projector serviced. Put the old lamp back in the vicinity. 7. Press the Auto button on , press...
Adjust the Focus on the remote control or projector to the default settings. 2. Use the Keystone button on the projector. 2. Lamp Problems Problem: There is securely connected. 2. Check that the power cable is no contrast Adjust the Contrast setting on the Utility menu of the OSD to correct the problem. Problem: The lamp goes off other Infrared-enabled devices in the projector and have the projector serviced. Put the old lamp back in the vicinity. 7. Press the Auto button on , press...


