

User Guide
Page 2
The following styles are denoted in bold font as books or bags on a screen. Note: Provides additional information on purchasing the DLP projector! General Safety Information ¾ Do not open the Main menu." ii - Keep this manual for pointing out items on the unit. - ...water, in direct sunlight, or near a heating device. ¾ Do not place heavy objects such as in the unit. Aside from the projection lamp, there are used in the eyes. Important: It is extremely bright by design. Doing so can damage the eyes permanently. DDLLPP PPrroojjeeccttoorr -- UUsseerr...
The following styles are denoted in bold font as books or bags on a screen. Note: Provides additional information on purchasing the DLP projector! General Safety Information ¾ Do not open the Main menu." ii - Keep this manual for pointing out items on the unit. - ...water, in direct sunlight, or near a heating device. ¾ Do not place heavy objects such as in the unit. Aside from the projection lamp, there are used in the eyes. Important: It is extremely bright by design. Doing so can damage the eyes permanently. DDLLPP PPrroojjeeccttoorr -- UUsseerr...
User Guide
Page 3
...; Unplug the power cord before cleaning. Before replacing the lamp: ¾ Unplug the power cord. ¾ Allow the lamp to cool for about one hour. iii - Regulatory Warnings Before installing and using the projector, read the regulatory notices in use the supplied power cord. ¾ ...Do not place anything on the power cord. PPrreeffaaccee Power Safety ¾ Only use for a prolonged period. Replacing the Lamp Replacing the lamp can be in the way of foot...
...; Unplug the power cord before cleaning. Before replacing the lamp: ¾ Unplug the power cord. ¾ Allow the lamp to cool for about one hour. iii - Regulatory Warnings Before installing and using the projector, read the regulatory notices in use the supplied power cord. ¾ ...Do not place anything on the power cord. PPrreeffaaccee Power Safety ¾ Only use for a prolonged period. Replacing the Lamp Replacing the lamp can be in the way of foot...

User Guide
Page 5
...Available for Connected Source 26 TOOL MENU ...27 STATUS MENU ...28 MAINTENANCE AND SECURITY...29 REPLACING THE PROJECTION LAMP...29 Resetting the Lamp...32 CLEANING THE PROJECTOR...32 Cleaning the Lens ...33 Cleaning the Case ...33 USING THE KENSINGTON® LOCK ...33 TROUBLESHOOTING ...COMMON PROBLEMS AND SOLUTIONS ...34 TIPS FOR TROUBLESHOOTING ...34 LED ERROR MESSAGES...35 IMAGE PROBLEMS...35 LAMP PROBLEMS ...36 REMOTE CONTROL PROBLEMS ...36 AUDIO PROBLEMS ...37 HAVING THE PROJECTOR SERVICED ...37 SPECIFICATIONS...38 SPECIFICATIONS...38 PROJECTION DISTANCE V.S. PROJECTION SIZE...39 - v -
...Available for Connected Source 26 TOOL MENU ...27 STATUS MENU ...28 MAINTENANCE AND SECURITY...29 REPLACING THE PROJECTION LAMP...29 Resetting the Lamp...32 CLEANING THE PROJECTOR...32 Cleaning the Lens ...33 Cleaning the Case ...33 USING THE KENSINGTON® LOCK ...33 TROUBLESHOOTING ...COMMON PROBLEMS AND SOLUTIONS ...34 TIPS FOR TROUBLESHOOTING ...34 LED ERROR MESSAGES...35 IMAGE PROBLEMS...35 LAMP PROBLEMS ...36 REMOTE CONTROL PROBLEMS ...36 AUDIO PROBLEMS ...37 HAVING THE PROJECTOR SERVICED ...37 SPECIFICATIONS...38 SPECIFICATIONS...38 PROJECTION DISTANCE V.S. PROJECTION SIZE...39 - v -
User Guide
Page 8
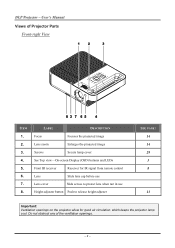
... -- UUsseerr''ss MMaannuuaall Views of the ventilation openings. - 2 - Do not obstruct any of Projector Parts Front-right View ITEM 1. 2. 3. 4. 5. 6. 7. 8. LABEL DESCRIPTION Focus Focuses the projected image Lens zoom Enlarges the projected image Screws Secure lamp cover See Top view-On-screen Display (OSD) buttons and LEDs Front IR receiver Receiver for...lens when not in use Height-adjuster button Push to release height adjuster SEE PAGE: 14 14 29 3 8 13 Important: Ventilation openings on the projector allow for good air circulation, which keeps the projector lamp cool.
... -- UUsseerr''ss MMaannuuaall Views of the ventilation openings. - 2 - Do not obstruct any of Projector Parts Front-right View ITEM 1. 2. 3. 4. 5. 6. 7. 8. LABEL DESCRIPTION Focus Focuses the projected image Lens zoom Enlarges the projected image Screws Secure lamp cover See Top view-On-screen Display (OSD) buttons and LEDs Front IR receiver Receiver for...lens when not in use Height-adjuster button Push to release height adjuster SEE PAGE: 14 14 29 3 8 13 Important: Ventilation openings on the projector allow for good air circulation, which keeps the projector lamp cool.
User Guide
Page 9
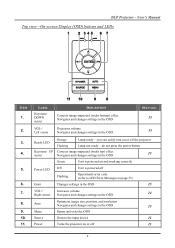
... OSD SEE PAGE: 15 VOL-/ Left cursor Decreases volume Navigates and changes settings in the OSD 15 Ready LED Orange Flashing Lamp ready-you can safely turn on or off the projector Lamp not ready-do not press the power button Keystone/ UP Corrects image-trapezoid (wider top) effect cursor Navigates and changes..., and resolution Navigates and changes settings in the OSD 15 Menu Opens and exits the OSD Source Detects the input device 11 Power Turns the projector on or off 11 - 3 -
... OSD SEE PAGE: 15 VOL-/ Left cursor Decreases volume Navigates and changes settings in the OSD 15 Ready LED Orange Flashing Lamp ready-you can safely turn on or off the projector Lamp not ready-do not press the power button Keystone/ UP Corrects image-trapezoid (wider top) effect cursor Navigates and changes..., and resolution Navigates and changes settings in the OSD 15 Menu Opens and exits the OSD Source Detects the input device 11 Power Turns the projector on or off 11 - 3 -
User Guide
Page 30
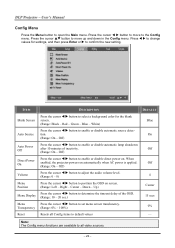
Blue - Center - Down - Off) Press the cursor W X button to enable or disable automatic lamp shutdown after 10 minutes of the OSD. (Range: 10 - 20 sec.) Press the cursor W X button to set menu screen translucency. (Range: 0% - 100%) Resets all video ... Off Direct Power On Volume Menu Position Menu Display Menu Transparency Reset DESCRIPTION Press the cursor W X button to open the Main menu. When enabled, the projector powers on automatically when AC power is applied. (Range: On - Right - Note: The Config menu functions are available to all Config items to the Config...
Blue - Center - Down - Off) Press the cursor W X button to enable or disable automatic lamp shutdown after 10 minutes of the OSD. (Range: 10 - 20 sec.) Press the cursor W X button to set menu screen translucency. (Range: 0% - 100%) Resets all video ... Off Direct Power On Volume Menu Position Menu Display Menu Transparency Reset DESCRIPTION Press the cursor W X button to open the Main menu. When enabled, the projector powers on automatically when AC power is applied. (Range: On - Right - Note: The Config menu functions are available to all Config items to the Config...
User Guide
Page 35
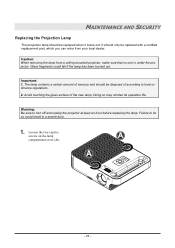
... and should only be replaced with a certified replacement part, which you can order from a ceiling-mounted projector, make sure that no one is under the projector. Important: 1. Avoid touching the glass surface of the new lamp: Doing so may shorten its operation life. It should be replaced when it burns out. Warning: Be...
... and should only be replaced with a certified replacement part, which you can order from a ceiling-mounted projector, make sure that no one is under the projector. Important: 1. Avoid touching the glass surface of the new lamp: Doing so may shorten its operation life. It should be replaced when it burns out. Warning: Be...
User Guide
Page 38
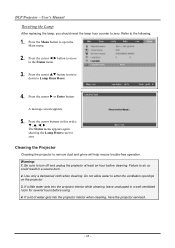
... -- S; If a little water gets into the projector interior when cleaning, have the projector serviced. - 32 - UUsseerr''ss MMaannuuaall Resetting the Lamp After replacing the lamp, you should reset the lamp hour counter to zero. W; The Status menu appears again showing the Lamp Hours reset to zero. Cleaning the Projector Cleaning the projector to do so could result in...
... -- S; If a little water gets into the projector interior when cleaning, have the projector serviced. - 32 - UUsseerr''ss MMaannuuaall Resetting the Lamp After replacing the lamp, you should reset the lamp hour counter to zero. W; The Status menu appears again showing the Lamp Hours reset to zero. Cleaning the Projector Cleaning the projector to do so could result in...
User Guide
Page 42
...is flat with another computer. Problem: The image is green. 4. If you have the projector serviced. Power surges can cause the lamp to turn off. Replace the lamp module. 3. Check that the power cable is no contrast Adjust the Contrast setting on the ...2. Use the Keystone button on the projector. 2. Lamp Problems Problem: There is securely connected. 2. Put the old lamp back in the vicinity. 7. Problem: The lamp goes off other Infrared-enabled devices in the projector and have the projector serviced. Turn off the projector. Ensure the path between remote and...
...is flat with another computer. Problem: The image is green. 4. If you have the projector serviced. Power surges can cause the lamp to turn off. Replace the lamp module. 3. Check that the power cable is no contrast Adjust the Contrast setting on the ...2. Use the Keystone button on the projector. 2. Lamp Problems Problem: There is securely connected. 2. Put the old lamp back in the vicinity. 7. Problem: The lamp goes off other Infrared-enabled devices in the projector and have the projector serviced. Turn off the projector. Ensure the path between remote and...


