
User Manual
Page 1
MP620 / MP720 / MP720p Digital Projector Mainstream Series User's Manual Welcome
MP620 / MP720 / MP720p Digital Projector Mainstream Series User's Manual Welcome

User Manual
Page 3
... panel 9 Remote control 10 Remote control effective range 12 Replacing the remote control battery 12 Positioning your projector 13 Choosing a location 13 Obtaining a preferred projected image size 15 How to determine the position of the projector for a given screen size: .. 16 How to determine the recommended screen size for a given distance: .... 16...
... panel 9 Remote control 10 Remote control effective range 12 Replacing the remote control battery 12 Positioning your projector 13 Choosing a location 13 Obtaining a preferred projected image size 15 How to determine the position of the projector for a given screen size: .. 16 How to determine the recommended screen size for a given distance: .... 16...

User Manual
Page 4
... of lamp hour 43 Warning message 43 Replacing the lamp 44 Temperature information 46 Indicators...47 Safety instructions for ceiling mounting of your BenQ projector 49 Troubleshooting 50 Specifications 51 Projector specifications 51 Timing chart 52 Supported timing for PC input 52 Supported timing for Component-YPbPr input 52 Supported timing for Video...
... of lamp hour 43 Warning message 43 Replacing the lamp 44 Temperature information 46 Indicators...47 Safety instructions for ceiling mounting of your BenQ projector 49 Troubleshooting 50 Specifications 51 Projector specifications 51 Timing chart 52 Supported timing for PC input 52 Supported timing for Component-YPbPr input 52 Supported timing for Video...

User Manual
Page 7
... for safety of ±10 volts occur. Save this user's manual before you operate your projector. This projector is designed to operate safely within a mains voltage between 100 to ensure safe use of this... is recommended that you connect your eyes. In areas where the mains voltage may damage your projector through a power stabilizer, surge protector or uninterruptible power supply (UPS). but could fail if..., to 240 volts AC, • Do not look straight at the projector lens during operation. Caution • To prevent shock, do not open the lens shutter or ...
... for safety of ±10 volts occur. Save this user's manual before you operate your projector. This projector is designed to operate safely within a mains voltage between 100 to ensure safe use of this... is recommended that you connect your eyes. In areas where the mains voltage may damage your projector through a power stabilizer, surge protector or uninterruptible power supply (UPS). but could fail if..., to 240 volts AC, • Do not look straight at the projector lens during operation. Caution • To prevent shock, do not open the lens shutter or ...

User Manual
Page 8
... on an unstable cart, stand, or table. Never replace the lamp assembly or any electronic components unless the projector is required. Allow the projector to cool for replacement. 4. To reduce the risk of the projector or electric shock when the appliance is subsequently used. 3. The lamp becomes extremely hot during operation. Excessive operation...
... on an unstable cart, stand, or table. Never replace the lamp assembly or any electronic components unless the projector is required. Allow the projector to cool for replacement. 4. To reduce the risk of the projector or electric shock when the appliance is subsequently used. 3. The lamp becomes extremely hot during operation. Excessive operation...

User Manual
Page 9
... damage to , the lamp. - Important safety instructions 3 Do not block the ventilation holes. Always place the unit on end vertically. Locations near the projector. - following environments. - Locations where temperatures may result in any of a car with all windows rolled up. - Do not place inflammables near fire ...degrees front to right, nor at least 50 cm clearance from walls and free flow of more than 10000 feet. 9. Do not place this projector in a fire. 8. Do not cover this unit on a blanket, bedding or any other soft surface. - Do not use if tilted ...
... damage to , the lamp. - Important safety instructions 3 Do not block the ventilation holes. Always place the unit on end vertically. Locations near the projector. - following environments. - Locations where temperatures may result in any of a car with all windows rolled up. - Do not place inflammables near fire ...degrees front to right, nor at least 50 cm clearance from walls and free flow of more than 10000 feet. 9. Do not place this projector in a fire. 8. Do not cover this unit on a blanket, bedding or any other soft surface. - Do not use if tilted ...
User Manual
Page 10
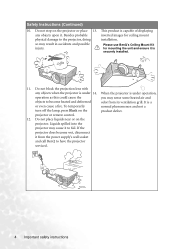
...the product defect. Liquids spilled into the projector may result in accidents and possible injury. projector or remote control. 12. If the projector does become heated and deformed odor from the power supply's wall socket and call BenQ to the projector, doing installation. so may cause it ...to become wet, disconnect it is a or even cause a fire. Please use BenQ's Ceiling Mount Kit for ceiling mount physical damage to have the projector serviced. 4 Important safety instructions ...
...the product defect. Liquids spilled into the projector may result in accidents and possible injury. projector or remote control. 12. If the projector does become heated and deformed odor from the power supply's wall socket and call BenQ to the projector, doing installation. so may cause it ...to become wet, disconnect it is a or even cause a fire. Please use BenQ's Ceiling Mount Kit for ceiling mount physical damage to have the projector serviced. 4 Important safety instructions ...

User Manual
Page 11
... the ambient lighting conditions, selected input source contrast/brightness settings, and is normal and expected behavior. Introduction Projector features The projector integrates high-performance optical engine projection and a user-friendly design to deliver high reliability and ease of the...: • Selectable password protected function • Selectable quick cooling function for reducing projector cooling time • Optional wireless module allowing more computers to share one projector through cable or wireless connection • Compact and portable unit • High quality...
... the ambient lighting conditions, selected input source contrast/brightness settings, and is normal and expected behavior. Introduction Projector features The projector integrates high-performance optical engine projection and a user-friendly design to deliver high reliability and ease of the...: • Selectable password protected function • Selectable quick cooling function for reducing projector cooling time • Optional wireless module allowing more computers to share one projector through cable or wireless connection • Compact and portable unit • High quality...

User Manual
Page 12
... guide with the cables required for your place of the items shown below. Macintosh adapter 2. 230W lamp module 3. Component Video to a PC. Shipping contents The projector is shipped with battery Cleaning cloth Replacement filter Pull the tab before using the remote control. Ceiling mount kit Power cord 4. The supplied accessories will...
... guide with the cables required for your place of the items shown below. Macintosh adapter 2. 230W lamp module 3. Component Video to a PC. Shipping contents The projector is shipped with battery Cleaning cloth Replacement filter Pull the tab before using the remote control. Ceiling mount kit Power cord 4. The supplied accessories will...

User Manual
Page 13
... 11. Rear IR remote sensor 12. RGB signal output socket 21 15. S-Video socket 19. Rear adjuster foot 9. USB socket 13. Audio output socket 21. Projector exterior view Front / upper side 1 2 3 4 5 1. 6 2. 3. 7 4. 5. 6. 7. Speaker Introduction 7
... 11. Rear IR remote sensor 12. RGB signal output socket 21 15. S-Video socket 19. Rear adjuster foot 9. USB socket 13. Audio output socket 21. Projector exterior view Front / upper side 1 2 3 4 5 1. 6 2. 3. 7 4. 5. 6. 7. Speaker Introduction 7
User Manual
Page 15
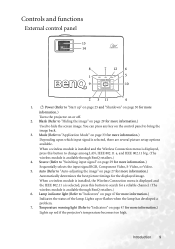
... the image" on page 47 for more information.) Automatically determines the best picture timings for more information.) Depending upon which input signal is available through BenQ retailers.) 4. Introduction 9 Controls and functions External control panel 13 14 8 7 12 6 1 5 9 10 2 3 11 4 1. Mode (Refer to...Source (Refer to hide the screen image. Lights up " on page 25 and "Shutdown" on page 30 for more information.) Turns the projector on page 29 for more information.) Sequentially selects the input signal RGB, Component Video, S-Video, or Video. 5. II Power (Refer to...
... the image" on page 47 for more information.) Automatically determines the best picture timings for more information.) Depending upon which input signal is available through BenQ retailers.) 4. Introduction 9 Controls and functions External control panel 13 14 8 7 12 6 1 5 9 10 2 3 11 4 1. Mode (Refer to...Source (Refer to hide the screen image. Lights up " on page 25 and "Shutdown" on page 30 for more information.) Turns the projector on page 29 for more information.) Sequentially selects the input signal RGB, Component Video, S-Video, or Video. 5. II Power (Refer to...

User Manual
Page 16
... page 25 and "Shutdown" on or off. 2. To release the function, press Freeze again. 10 Introduction 8. Right 4(Refer to "Start up or flashes when the projector is pressed. An icon " " will display in the lower right corner of the projected image. 14. Power indicator light (Refer to make adjustments. 13. When... not activated, #9 and #10 function as directional arrows to select the desired menu items and to "Indicators" on page 47 for more information.) Turns the projector on page 30 for more information.) Adjusts the size of the image.
... page 25 and "Shutdown" on or off. 2. To release the function, press Freeze again. 10 Introduction 8. Right 4(Refer to "Start up or flashes when the projector is pressed. An icon " " will display in the lower right corner of the projected image. 14. Power indicator light (Refer to make adjustments. 13. When... not activated, #9 and #10 function as directional arrows to select the desired menu items and to "Indicators" on page 47 for more information.) Turns the projector on page 30 for more information.) Adjusts the size of the image.

User Manual
Page 18
... if the battery is incorrectly replaced. • Replace only with the same or equivalent type recommended by the battery manufacturer. • Dispose of the projector's IR remote control sensors to the manufacturer's instructions. • Never throw a battery into place. • Avoid excessive heat and humidity. The distance... damage to the remote control from the rear Approx. 15° Approx. 15° Make sure that there are located on the projector that might obstruct the infra-red beam. Insert the new battery in the holder. The remote control must be held at an angle ...
... if the battery is incorrectly replaced. • Replace only with the same or equivalent type recommended by the battery manufacturer. • Dispose of the projector's IR remote control sensors to the manufacturer's instructions. • Never throw a battery into place. • Avoid excessive heat and humidity. The distance... damage to the remote control from the rear Approx. 15° Approx. 15° Make sure that there are located on the projector that might obstruct the infra-red beam. Insert the new battery in the holder. The remote control must be held at an angle ...

User Manual
Page 19
...; 3. For more information, refer to "Wireless connection (optional)" on different notebooks instantly without fiddling with cables To use the projector with wireless function, there's no need to install a BenQ wireless module to the projector and enable your notebook/desktop PC with wireless connection. Your room layout or personal preference will dictate which installation...
...; 3. For more information, refer to "Wireless connection (optional)" on different notebooks instantly without fiddling with cables To use the projector with wireless function, there's no need to install a BenQ wireless module to the projector and enable your notebook/desktop PC with wireless connection. Your room layout or personal preference will dictate which installation...

User Manual
Page 20
...most common way to mount your dealer to position the projector for this location with the projector placed near the floor in front of the screen. Note that a special rear projection screen and the BenQ Projector Ceiling Mounting Kit are required for quick setup and portability.... Select this location with the projector placed near the floor behind the screen. Set in the Advance > Mirror menu after you turn the projector on . 14 Positioning your projector Set in front of the screen. This is required. Purchase the BenQ Projector Ceiling Mounting Kit from the ceiling...
...most common way to mount your dealer to position the projector for this location with the projector placed near the floor in front of the screen. Note that a special rear projection screen and the BenQ Projector Ceiling Mounting Kit are required for quick setup and portability.... Select this location with the projector placed near the floor behind the screen. Set in the Advance > Mirror menu after you turn the projector on . 14 Positioning your projector Set in front of the screen. This is required. Purchase the BenQ Projector Ceiling Mounting Kit from the ceiling...

User Manual
Page 21
... need to -reel film projectors did). The maximum (native) resolution of the projector is above the horizontal plane of the projector. This will ever need to account for your projector. The projector should consider its intended use and input signal aspect ratios. BenQ has provided a table of... directly perpendicular (90° right-angle square) to assist you will result in a proportionally smaller height equivalent to 75% of the projector's native aspect height. 4:3 aspect image in a 4:3 aspect display area 16:9 aspect image scaled to 3 aspect ratio (expressed as darkened...
... need to -reel film projectors did). The maximum (native) resolution of the projector is above the horizontal plane of the projector. This will ever need to account for your projector. The projector should consider its intended use and input signal aspect ratios. BenQ has provided a table of... directly perpendicular (90° right-angle square) to assist you will result in a proportionally smaller height equivalent to 75% of the projector's native aspect height. 4:3 aspect image in a 4:3 aspect display area 16:9 aspect image scaled to 3 aspect ratio (expressed as darkened...

User Manual
Page 22
...screen diameter listed in relation to the horizontal plane of the 3m screen are using the zoom control) to display on either side of the projector. Looking across that row to the left columns labelled 'Screen Diameter' Using this value, look across to the right column and make note... screen, at that the 4.5m measured projection distance will occur. This will fit in relation to the right column and make note of the projector in your screen size. 2. If you want to correct the distortion. Checking the min and max projection distance values for situations where you will...
...screen diameter listed in relation to the horizontal plane of the 3m screen are using the zoom control) to display on either side of the projector. Looking across that row to the left columns labelled 'Screen Diameter' Using this value, look across to the right column and make note... screen, at that the 4.5m measured projection distance will occur. This will fit in relation to the right column and make note of the projector in your screen size. 2. If you want to correct the distortion. Checking the min and max projection distance values for situations where you will...

User Manual
Page 23
Positioning your projector 17 zoom) zoom) 1745 1876 2007 2148 2199 2250 2182 2345 2509 2618 2815 3011 2863 3078 3293 3055 3284 3513 3491 3753 4015 3579 ...
Positioning your projector 17 zoom) zoom) 1745 1876 2007 2148 2199 2250 2182 2345 2509 2618 2815 3011 2863 3078 3293 3055 3284 3513 3491 3753 4015 3579 ...

User Manual
Page 24
... included with the wireless module for simultaneous wireless connectivity to the projector, you can purchase a BenQ wireless module from BenQ retailers. Wi-Fi connectivity is attached to multiple computers which are commercially available from having to a notebook or desktop computer. Even though the projector may not be using its power cable. Refer to a power...
... included with the wireless module for simultaneous wireless connectivity to the projector, you can purchase a BenQ wireless module from BenQ retailers. Wi-Fi connectivity is attached to multiple computers which are commercially available from having to a notebook or desktop computer. Even though the projector may not be using its power cable. Refer to a power...

User Manual
Page 25
...: • With a VGA-DVI cable: 1. Usually a key combo like that shown in your notebook's documentation to the AUDIO IN socket of the projector (mixed mono) speaker in the following diagram: notebook or desktop computer USB cable Speakers Audio cable VGA cable or VGA-DVI cable Audio cable •...; A Mac adapter (an optional accessory) is a mixed mono signal and controlled by the projector Volume and Mute settings. Locate a function key labeled CRT/LCD or a function key with a monitor symbol on the notebook. Press FN and ...
...: • With a VGA-DVI cable: 1. Usually a key combo like that shown in your notebook's documentation to the AUDIO IN socket of the projector (mixed mono) speaker in the following diagram: notebook or desktop computer USB cable Speakers Audio cable VGA cable or VGA-DVI cable Audio cable •...; A Mac adapter (an optional accessory) is a mixed mono signal and controlled by the projector Volume and Mute settings. Locate a function key labeled CRT/LCD or a function key with a monitor symbol on the notebook. Press FN and ...


