
User Manual
Page 3
... view ...8 Lower side ...8 Controls and functions 9 External control panel 9 Remote control 10 Remote control effective range 12 Replacing the remote control battery 12 Positioning your projector 13 Choosing a location 13 Obtaining a preferred projected image size 15 How to determine the position of the projector for a given screen size: .. 16 How to determine the recommended screen size for a given distance: .... 16 Connection 18 Wireless connection (optional 18 Cable connection 18 Connecting a computer or monitor 18 Connecting Video source devices 21 Operation 25 Start up...
... view ...8 Lower side ...8 Controls and functions 9 External control panel 9 Remote control 10 Remote control effective range 12 Replacing the remote control battery 12 Positioning your projector 13 Choosing a location 13 Obtaining a preferred projected image size 15 How to determine the position of the projector for a given screen size: .. 16 How to determine the recommended screen size for a given distance: .... 16 Connection 18 Wireless connection (optional 18 Cable connection 18 Connecting a computer or monitor 18 Connecting Video source devices 21 Operation 25 Start up...

User Manual
Page 4
... Menu operation 31 Menu system 31 Using the menus 32 1. Information menu 39 Maintenance 40 Care of the projector 40 Cleaning the lens 40 Cleaning the projector case 40 Storing the projector 40 Transporting the projector 40 Cleaning and replacing the dust filter 40 Lamp information 43 Calculation of lamp hour 43 Warning message 43 Replacing the lamp 44 Temperature information 46 Indicators...47 Safety instructions for ceiling mounting of your BenQ projector 49 Troubleshooting 50 Specifications 51 Projector specifications 51 Timing chart 52 Supported timing...
... Menu operation 31 Menu system 31 Using the menus 32 1. Information menu 39 Maintenance 40 Care of the projector 40 Cleaning the lens 40 Cleaning the projector case 40 Storing the projector 40 Transporting the projector 40 Cleaning and replacing the dust filter 40 Lamp information 43 Calculation of lamp hour 43 Warning message 43 Replacing the lamp 44 Temperature information 46 Indicators...47 Safety instructions for ceiling mounting of your BenQ projector 49 Troubleshooting 50 Specifications 51 Projector specifications 51 Timing chart 52 Supported timing...

User Manual
Page 7
.... This projector is designed to operate safely within a mains voltage between 100 to qualified service cabinet. Caution • To prevent shock, do not open the lens shutter or remove the lens cap when the projector lamp is recommended that you follow the instructions mentioned in this manual and marked on . • Please read this user's manual before you connect your eyes. The intense light beam...
.... This projector is designed to operate safely within a mains voltage between 100 to qualified service cabinet. Caution • To prevent shock, do not open the lens shutter or remove the lens cap when the projector lamp is recommended that you follow the instructions mentioned in this manual and marked on . • Please read this user's manual before you connect your eyes. The intense light beam...
User Manual
Page 10
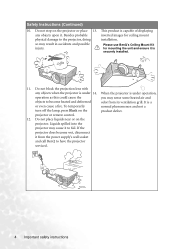
... a turn off the lamp, press Blank on the projector or place 13. projector or remote control. 12. Do not block the projection lens with any objects upon it from its ventilation grill. If the projector does become heated and deformed odor from the power supply's wall socket and call BenQ to fail. Do not place liquids near or on the projector. Safety Instructions (Continued...
... a turn off the lamp, press Blank on the projector or place 13. projector or remote control. 12. Do not block the projection lens with any objects upon it from its ventilation grill. If the projector does become heated and deformed odor from the power supply's wall socket and call BenQ to fail. Do not place liquids near or on the projector. Safety Instructions (Continued...

User Manual
Page 11
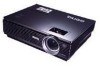
... projector cooling time • Optional wireless module allowing more computers to share one projector through cable or wireless connection • Compact and portable unit • High quality manual zoom lens • One-key auto-adjustment to display the best picture quality • Digital keystone correction to correct distorted images • Adjustable color balance control for data/video display • Ultra-high brightness projection lamp • Ability to display 16.7 million colors • Multi-language on the ambient lighting conditions, selected input source...
... projector cooling time • Optional wireless module allowing more computers to share one projector through cable or wireless connection • Compact and portable unit • High quality manual zoom lens • One-key auto-adjustment to display the best picture quality • Digital keystone correction to correct distorted images • Adjustable color balance control for data/video display • Ultra-high brightness projection lamp • Ability to display 16.7 million colors • Multi-language on the ambient lighting conditions, selected input source...
User Manual
Page 15
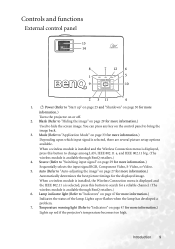
... red if the projector's temperature becomes too high. Source (Refer to search for more information.) Turns the projector on page 29 for a reliable channel. (The wireless module is selected, press this button to hide the screen image. When a wireless module is installed, the Wireless Connection menu is displayed and the IEEE 802.11 a is available through BenQ retailers.) 4. Temperature warning light (Refer to "Indicators" on page 29 for more information.) Used to change among LAN...
... red if the projector's temperature becomes too high. Source (Refer to search for more information.) Turns the projector on page 29 for a reliable channel. (The wireless module is selected, press this button to hide the screen image. When a wireless module is installed, the Wireless Connection menu is displayed and the IEEE 802.11 a is available through BenQ retailers.) 4. Temperature warning light (Refer to "Indicators" on page 29 for more information.) Used to change among LAN...
User Manual
Page 17
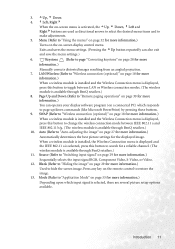
... the image" on the remote control to hide the screen image. Source (Refer to "Switching input signal" on -screen menu is displayed, press this button to make adjustments. 5. Exits and saves the menu settings. (Pressing the 5Up button repeatedly can operate your display software program (on page 33 for more information.) Depending upon which responds to "Auto-adjusting the image" on page 28 for more information.) Manually corrects distorted images resulting from an angled projection. 7. 3. 5Up...
... the image" on the remote control to hide the screen image. Source (Refer to "Switching input signal" on -screen menu is displayed, press this button to make adjustments. 5. Exits and saves the menu settings. (Pressing the 5Up button repeatedly can operate your display software program (on page 33 for more information.) Depending upon which responds to "Auto-adjusting the image" on page 28 for more information.) Manually corrects distorted images resulting from an angled projection. 7. 3. 5Up...

User Manual
Page 20
... you turn the projector on . This is required. II. Purchase the BenQ Projector Ceiling Mounting Kit from your dealer to position the projector for this location with the projector suspended upside-down from the ceiling behind the screen. Set in front of the screen. Floor rear Select this installation location. IV. Ceiling rear Select this location with the projector placed near the floor behind the screen. Note that a special rear projection screen...
... you turn the projector on . This is required. II. Purchase the BenQ Projector Ceiling Mounting Kit from your dealer to position the projector for this location with the projector suspended upside-down from the ceiling behind the screen. Set in front of the screen. Floor rear Select this installation location. IV. Ceiling rear Select this location with the projector placed near the floor behind the screen. Note that a special rear projection screen...

User Manual
Page 21
... and scale a widescreen image to the projector's native aspect width. Obtaining a preferred projected image size The distance from the projector lens to the screen, the zoom setting, and the video format each factors in a 4:3 aspect ratio (and will require an additional 33% display height than that of the scaled 16:9 aspect image projection area). All inputs (other than composite Video being fed a 16:9 aspect signal) will ever need...
... and scale a widescreen image to the projector's native aspect width. Obtaining a preferred projected image size The distance from the projector lens to the screen, the zoom setting, and the video format each factors in a 4:3 aspect ratio (and will require an additional 33% display height than that of the scaled 16:9 aspect image projection area). All inputs (other than composite Video being fed a 16:9 aspect signal) will ever need...

User Manual
Page 25
...: notebook or desktop computer USB cable Speakers Audio cable VGA cable or VGA-DVI cable Audio cable • A Mac adapter (an optional accessory) is a mixed mono signal and controlled by the projector Volume and Mute settings. To connect the projector to find your notebook's key combination. Usually a key combo like that shown in your presentations, take the supplied USB cable and connect the larger end to the USB port of the VGA- Refer to your...
...: notebook or desktop computer USB cable Speakers Audio cable VGA cable or VGA-DVI cable Audio cable • A Mac adapter (an optional accessory) is a mixed mono signal and controlled by the projector Volume and Mute settings. To connect the projector to find your notebook's key combination. Usually a key combo like that shown in your presentations, take the supplied USB cable and connect the larger end to the USB port of the VGA- Refer to your...

User Manual
Page 30
... Video source device to the VIDEO socket on and operating correctly. See "Connecting Video source devices" on page 21 for details. • If the selected video image is not displayed after the projector is turned on and the correct video source has been selected, check that the signal cables have already made a Component Video connection between the projector and this S-Video source device using a composite Video connection if Component Video and S-Video inputs are unavailable for details. Connecting a composite Video source...
... Video source device to the VIDEO socket on and operating correctly. See "Connecting Video source devices" on page 21 for details. • If the selected video image is not displayed after the projector is turned on and the correct video source has been selected, check that the signal cables have already made a Component Video connection between the projector and this S-Video source device using a composite Video connection if Component Video and S-Video inputs are unavailable for details. Connecting a composite Video source...
User Manual
Page 31
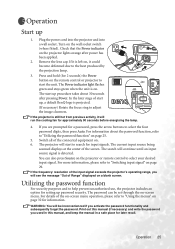
... help prevent unauthorized use, the projector includes an option for a password, press the arrow buttons to "Utilizing the password function" on page 29. The password can also press Source on the projector or remote control to "Switching input signal" on page 25. 5. Turn on the projector lights orange after pressing Power. Operation 25 Remove the lens cap. The start the unit. The projector will run the cooling fan for later recall. Plug the power cord into the projector...
... help prevent unauthorized use, the projector includes an option for a password, press the arrow buttons to "Utilizing the password function" on page 29. The password can also press Source on the projector or remote control to "Switching input signal" on page 25. 5. Turn on the projector lights orange after pressing Power. Operation 25 Remove the lens cap. The start the unit. The projector will run the cooling fan for later recall. Plug the power cord into the projector...

User Manual
Page 32
... time, Password Setup a prompt will display on the screen. Open the on-screen menu and go on -screen when being input. • IMPORTANT: Write your password? Select On by pressing Up 5, pressing Power to turn on the projector. When the function is ready, press Auto to move 3. Use the Left 3 or Press Auto to Confirm Right4 button to confirm. Press 3 or 4to move between the digits of the projector. A confirmation message displays...
... time, Password Setup a prompt will display on the screen. Open the on-screen menu and go on -screen when being input. • IMPORTANT: Write your password? Select On by pressing Up 5, pressing Power to turn on the projector. When the function is ready, press Auto to move 3. Use the Left 3 or Press Auto to Confirm Right4 button to confirm. Press 3 or 4to move between the digits of the projector. A confirmation message displays...
User Manual
Page 33
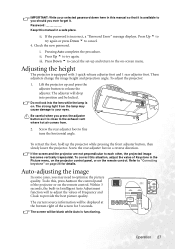
i. ii. These adjusters change the image height and projection angle. The strong light from . 2. Screw the rear adjuster foot to each other, the projected image becomes vertically trapezoidal. To do this manual in the Picture menu, on the projector control panel, or on the remote control. ii. Adjusting the height The projector is incorrect, a "Password Error" message displays. To adjust the projector: 1. Do not look into position and be locked. To retract the foot, hold up and...
i. ii. These adjusters change the image height and projection angle. The strong light from . 2. Screw the rear adjuster foot to each other, the projected image becomes vertically trapezoidal. To do this manual in the Picture menu, on the projector control panel, or on the remote control. ii. Adjusting the height The projector is incorrect, a "Password Error" message displays. To adjust the projector: 1. Do not look into position and be locked. To retract the foot, hold up and...

User Manual
Page 36
... pictures are running on the video or other device. Connect the projector to your display software program (on a connected PC) which responds to any commands during the 90-second cooling down process. • If the projector is frozen. Press Power and a prompt message appears. The Power indicator light flashes orange and the lamp shuts down the projector. • To protect the lamp, the projector will still hear the audio even though the image...
... pictures are running on the video or other device. Connect the projector to your display software program (on a connected PC) which responds to any commands during the 90-second cooling down process. • If the projector is frozen. Press Power and a prompt message appears. The Power indicator light flashes orange and the lamp shuts down the projector. • To protect the lamp, the projector will still hear the audio even though the image...

User Manual
Page 44
... use this projector can operate under "High Altitude Mode" may display auto shut-down symptoms, which is turned off ) as a reminder during the start-up. Setting the projector in darker projected images. If this function. Selecting Off disables this mode is hotter than 3000 feet above , it will be reduced and result in Economic mode extends the lamp timer automatic shutdown feature. A mode for protecting projector from over-heating. Current Status High...
... use this projector can operate under "High Altitude Mode" may display auto shut-down symptoms, which is turned off ) as a reminder during the start-up. Setting the projector in darker projected images. If this function. Selecting Off disables this mode is hotter than 3000 feet above , it will be reduced and result in Economic mode extends the lamp timer automatic shutdown feature. A mode for protecting projector from over-heating. Current Status High...

User Manual
Page 47
... remove or the filter is difficult to replace the filter sponge:" below. Maintenance 41 If the dirt is broken, replace it with a new one pictured to the right will be displayed for computers and other office equipment to clean the filter sponge. Turn the projector off and wait until the fans stop running. 2. filter case 4. Use a small vacuum cleaner designed for 10 seconds every 500 hours...
... remove or the filter is difficult to replace the filter sponge:" below. Maintenance 41 If the dirt is broken, replace it with a new one pictured to the right will be displayed for computers and other office equipment to clean the filter sponge. Turn the projector off and wait until the fans stop running. 2. filter case 4. Use a small vacuum cleaner designed for 10 seconds every 500 hours...

User Manual
Page 49
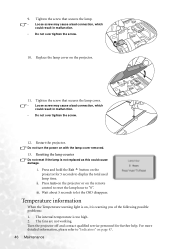
... replace the lamp at this age. With the usage time increase, the lamp brightness diminished gradually. The following Lamp warning displays will light up after 3000 hours usage. Message Status The lamp has been in the center of the screen for 2800 hours. The lamp has been in operation for 2950 hours. The Lamp indicator light and Temperature warning light will remind you may explode. It is normally run with the Lamp indicator lighting up red or a message...
... replace the lamp at this age. With the usage time increase, the lamp brightness diminished gradually. The following Lamp warning displays will light up after 3000 hours usage. Message Status The lamp has been in the center of the screen for 2800 hours. The lamp has been in operation for 2950 hours. The Lamp indicator light and Temperature warning light will remind you may explode. It is normally run with the Lamp indicator lighting up red or a message...
User Manual
Page 52
... screw. 12. i. The fans are not working. Temperature information When the Temperature warning light is too high. 2. Wait about 5 seconds to "0". Press Auto on the projector or on page 47. 46 Maintenance Turn the projector off and contact qualified service personnel for 5 seconds to "Indicators" on the remote control to reset the lamp hour to let the OSD disappear. 9. Replace the lamp cover on the projector for further help. Tighten the screw that secures the lamp...
... screw. 12. i. The fans are not working. Temperature information When the Temperature warning light is too high. 2. Wait about 5 seconds to "0". Press Auto on the projector or on page 47. 46 Maintenance Turn the projector off and contact qualified service personnel for 5 seconds to "Indicators" on the remote control to reset the lamp hour to let the OSD disappear. 9. Replace the lamp cover on the projector for further help. Tighten the screw that secures the lamp...

User Manual
Page 56
... connected to the lens. Remove the lens cap. NO PICTURE Cause Remedy The video source is still attached to turn the projector on the projector or remote control. The lens cap is not turned on . Adjust the projection angle and direction as well as the height of power. Troubleshooting THE PROJECTOR DOES NOT TURN ON. Cause There is switched on or connected correctly. Remedy Plug the power cord into the power outlet. Turn the video source on the projector...
... connected to the lens. Remove the lens cap. NO PICTURE Cause Remedy The video source is still attached to turn the projector on the projector or remote control. The lens cap is not turned on . Adjust the projection angle and direction as well as the height of power. Troubleshooting THE PROJECTOR DOES NOT TURN ON. Cause There is switched on or connected correctly. Remedy Plug the power cord into the power outlet. Turn the video source on the projector...


