User Manual
Page 4
... Cleaning the lens 36 Cleaning the projector case 36 Storing the projector 36 Transporting the projector 36 Lamp information 37 Calculation of lamp hour 37 Warning message 37 Replacing the lamp 38 Temperature information 40 Indicators...41 Safety instructions for ceiling mounting of your BenQ projector 43 Troubleshooting 44 Specifications 45 Projector specifications 45 Timing chart 46 Supported timing...
... Cleaning the lens 36 Cleaning the projector case 36 Storing the projector 36 Transporting the projector 36 Lamp information 37 Calculation of lamp hour 37 Warning message 37 Replacing the lamp 38 Temperature information 40 Indicators...41 Safety instructions for ceiling mounting of your BenQ projector 43 Troubleshooting 44 Specifications 45 Projector specifications 45 Timing chart 46 Supported timing...

User Manual
Page 7
Important safety instructions Your BenQ projector is designed and tested to meet the latest standards for future reference. • In some countries, the line voltage is NOT stable. There are no user serviceable personnel. This projector is important that you connect your projector. The intense light beam may fluctuate ...volts occur. Caution • To prevent shock, do not open the lens shutter or remove the lens cap when the projector lamp is recommended that you operate your projector through a power stabilizer, surge protector or uninterruptible power supply (UPS).
Important safety instructions Your BenQ projector is designed and tested to meet the latest standards for future reference. • In some countries, the line voltage is NOT stable. There are no user serviceable personnel. This projector is important that you connect your projector. The intense light beam may fluctuate ...volts occur. Caution • To prevent shock, do not open the lens shutter or remove the lens cap when the projector lamp is recommended that you operate your projector through a power stabilizer, surge protector or uninterruptible power supply (UPS).
User Manual
Page 8
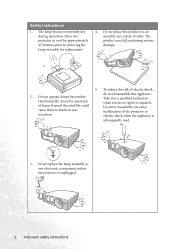
... 2 Important safety instructions Allow the projector to cool for approximately 45 minutes prior to a qualified technician when service or repair is required. do not disassemble this product on rare occasions. Do not operate lamps beyond the rated life could cause them... The lamp becomes extremely hot during operation. The product may fall, sustaining serious damage. 5. Never replace the lamp assembly or any electronic components unless the projector is subsequently used. 3. To reduce the risk of lamps beyond the rated lamp life. Take it to removing the lamp assembly for...
... 2 Important safety instructions Allow the projector to cool for approximately 45 minutes prior to a qualified technician when service or repair is required. do not disassemble this product on rare occasions. Do not operate lamps beyond the rated life could cause them... The lamp becomes extremely hot during operation. The product may fall, sustaining serious damage. 5. Never replace the lamp assembly or any electronic components unless the projector is subsequently used. 3. To reduce the risk of lamps beyond the rated lamp life. Take it to removing the lamp assembly for...
User Manual
Page 9
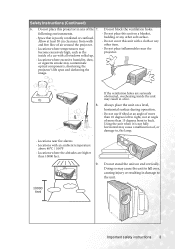
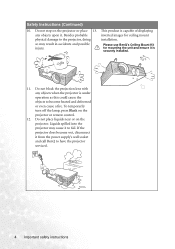
...malfunction of, or damage to, the lamp. - Locations where the altitudes are seriously obstructed, overheating inside of more than 10000 feet. 9. Doing so may contaminate optical components, shortening the projector's life span and darkening the image. Do not place this projector in damage to back. Do not ... not block the ventilation holes. Do not cover this unit on a blanket, bedding or any of air around the projector. - Do not place inflammables near fire alarms - Using the unit when it is poorly ventilated or confined. Safety Instructions (Continued) 6.
...malfunction of, or damage to, the lamp. - Locations where the altitudes are seriously obstructed, overheating inside of more than 10000 feet. 9. Doing so may contaminate optical components, shortening the projector's life span and darkening the image. Do not place this projector in damage to back. Do not ... not block the ventilation holes. Do not cover this unit on a blanket, bedding or any of air around the projector. - Do not place inflammables near fire alarms - Using the unit when it is poorly ventilated or confined. Safety Instructions (Continued) 6.
User Manual
Page 10
...images for mounting the unit and ensure it to have the projector serviced. 4 Important safety instructions If the projector does become heated and deformed or even cause a fire. To temporarily turn off the lamp, press Blank on the projector or place 13. This product is under operation as this could... cause the objects to the projector, doing installation. Do not block the projection lens with any objects when the projector is capable of displaying any objects upon it from the power supply's wall socket and call BenQ to fail. Do not place liquids near or...
...images for mounting the unit and ensure it to have the projector serviced. 4 Important safety instructions If the projector does become heated and deformed or even cause a fire. To temporarily turn off the lamp, press Blank on the projector or place 13. This product is under operation as this could... cause the objects to the projector, doing installation. Do not block the projection lens with any objects when the projector is capable of displaying any objects upon it from the power supply's wall socket and call BenQ to fail. Do not place liquids near or...
User Manual
Page 11
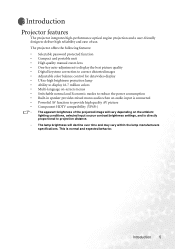
...provide high quality AV picture • Component HDTV compatibility (YPbPr) • The apparent brightness of use. Introduction Projector features The projector integrates high-performance optical engine projection and a user-friendly design to deliver high reliability and ease of the projected ...image will decline over time and may vary within the lamp manufacturers specifications. The projector offers the following features: • Selectable password protected function • Compact and portable unit • High ...
...provide high quality AV picture • Component HDTV compatibility (YPbPr) • The apparent brightness of use. Introduction Projector features The projector integrates high-performance optical engine projection and a user-friendly design to deliver high reliability and ease of the projected ...image will decline over time and may vary within the lamp manufacturers specifications. The projector offers the following features: • Selectable password protected function • Compact and portable unit • High ...

User Manual
Page 12
... the tab before using the remote control. Macintosh adapter 2. 200W lamp module 3. RS232 connector 6 Introduction Carefully unpack and verify that you have all of these items are missing, please contact your region, and may differ from those illustrated. Shipping contents The projector is shipped with battery VGA cable USB cable Optional accessories...
... the tab before using the remote control. Macintosh adapter 2. 200W lamp module 3. RS232 connector 6 Introduction Carefully unpack and verify that you have all of these items are missing, please contact your region, and may differ from those illustrated. Shipping contents The projector is shipped with battery VGA cable USB cable Optional accessories...
User Manual
Page 13
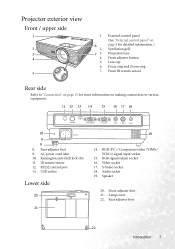
...21 19 14. Audio socket 19. Rear adjuster foot 22 Introduction 7 RS232 control port 13. RGB signal output socket 16. Video socket 17. Lamp cover 22. Front adjuster foot 21. Kensington anti-theft lock slot 11. External control panel (See "External control panel" on page 8 for ... for more information on making connections to various equipment. 11 12 13 14 15 16 17 18 10 9 8 8. AC power cord inlet 10. Speaker 20. Projector exterior view Front / upper side 1 2 3 4 5 1. 6 2. 7 3. 4. 5. 6. 7. Rear adjuster foot 9. RGB (PC) / Component video (YPbPr/ YCbCr) signal input socket...
...21 19 14. Audio socket 19. Rear adjuster foot 22 Introduction 7 RS232 control port 13. RGB signal output socket 16. Video socket 17. Lamp cover 22. Front adjuster foot 21. Kensington anti-theft lock slot 11. External control panel (See "External control panel" on page 8 for ... for more information on making connections to various equipment. 11 12 13 14 15 16 17 18 10 9 8 8. AC power cord inlet 10. Speaker 20. Projector exterior view Front / upper side 1 2 3 4 5 1. 6 2. 7 3. 4. 5. 6. 7. Rear adjuster foot 9. RGB (PC) / Component video (YPbPr/ YCbCr) signal input socket...
User Manual
Page 14
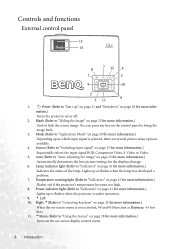
... 7 12 6 1 5 9 10 2 3 11 4 1. II Power (Refer to "Indicators" on page 41 for more information.) Flashes red if the projector's temperature becomes too high. 8. Temperature warning light (Refer to "Start up" on page 21 and "Shutdown" on page 29 for more information.) Depending upon which... light (Refer to "Switching input signal" on page 41 for more information.) Lights up or flashes when the lamp has developed a problem. 7. mation.) Turns the projector on page 23 for the displayed image. 6. Source (Refer to "Indicators" on page 25 for more information.) Used to...
... 7 12 6 1 5 9 10 2 3 11 4 1. II Power (Refer to "Indicators" on page 41 for more information.) Flashes red if the projector's temperature becomes too high. 8. Temperature warning light (Refer to "Start up" on page 21 and "Shutdown" on page 29 for more information.) Depending upon which... light (Refer to "Switching input signal" on page 41 for more information.) Lights up or flashes when the lamp has developed a problem. 7. mation.) Turns the projector on page 23 for the displayed image. 6. Source (Refer to "Indicators" on page 25 for more information.) Used to...
User Manual
Page 29
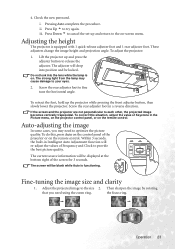
Pressing Auto completes the procedure. To adjust the projector: 1. The strong light from the lamp may need using the zoom ring. Screw the rear adjuster foot in the Picture menu, on the projector control panel, or on the remote control. To correct this , press Auto on . Fine-tuning the image size ...The adjuster will be displayed at the bottom right of the projector or on -screen menu. Auto-adjusting the image In some cases, you need to optimize the picture quality. The screen will drop into the lens while the lamp is on the control panel of the screen for 3 seconds....
Pressing Auto completes the procedure. To adjust the projector: 1. The strong light from the lamp may need using the zoom ring. Screw the rear adjuster foot in the Picture menu, on the projector control panel, or on the remote control. To correct this , press Auto on . Fine-tuning the image size ...The adjuster will be displayed at the bottom right of the projector or on -screen menu. Auto-adjusting the image In some cases, you need to optimize the picture quality. The screen will drop into the lens while the lamp is on the control panel of the screen for 3 seconds....
User Manual
Page 32
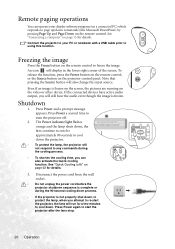
.... Even if an image is not properly shut down, to protect the lamp, when you will not respond to any commands during the 90-second cooling down . Shutdown 1. See "Quick Cooling (off . 2. Connect the projector to your display software program (on page 32 for approximately 90 seconds to... )" on a connected PC) which responds to re-start the projector after the fans stop. 26 Operation If the connected devices have active audio output, you attempt to page up/down the projector. • To protect the lamp, the projector will still hear the audio even though the image is frozen. ...
.... Even if an image is not properly shut down, to protect the lamp, when you will not respond to any commands during the 90-second cooling down . Shutdown 1. See "Quick Cooling (off . 2. Connect the projector to your display software program (on page 32 for approximately 90 seconds to... )" on a connected PC) which responds to re-start the projector after the fans stop. 26 Operation If the connected devices have active audio output, you attempt to page up/down the projector. • To protect the lamp, the projector will still hear the audio even though the image is frozen. ...
User Manual
Page 33
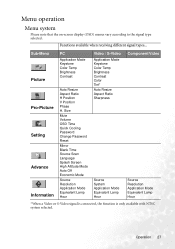
... Time Source Scan Language Splash Screen High Altitude Mode Auto Off Economic Mode Source Resolution Application Mode Equivalent Lamp Hour Video / S-Video Application Mode Keystone Color Temp Brightness Contrast Color Tint* Auto Resize Aspect Ratio Sharpness Source System ...Application Mode Equivalent Lamp Hour Component Video Source Resolution Application Mode Equivalent Lamp Hour *When a Video or S-Video signal is connected, the function is only available with NTSC system ...
... Time Source Scan Language Splash Screen High Altitude Mode Auto Off Economic Mode Source Resolution Application Mode Equivalent Lamp Hour Video / S-Video Application Mode Keystone Color Temp Brightness Contrast Color Tint* Auto Resize Aspect Ratio Sharpness Source System ...Application Mode Equivalent Lamp Hour Component Video Source Resolution Application Mode Equivalent Lamp Hour *When a Video or S-Video signal is connected, the function is only available with NTSC system ...
User Manual
Page 40
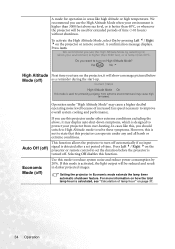
...consumption by 20%. Economic Mode (off . If this mode is activated, the light output will be used for protecting projector from over-heating. For more information on how the total lamp hour is turned off ) Use this function. In cases like high altitude or high temperature. Do you want to...under any and all harsh or extreme conditions. Yes Auto No 5 High Altitude Next time you turn on the projector, it may cause a higher decibel operating noise level because of lamp hour" on High Altitude Mode? Current Status High Altitude Mode On This mode is detected after a set the ...
...consumption by 20%. Economic Mode (off . If this mode is activated, the light output will be used for protecting projector from over-heating. For more information on how the total lamp hour is turned off ) Use this function. In cases like high altitude or high temperature. Do you want to...under any and all harsh or extreme conditions. Yes Auto No 5 High Altitude Next time you turn on the projector, it may cause a higher decibel operating noise level because of lamp hour" on High Altitude Mode? Current Status High Altitude Mode On This mode is detected after a set the ...
User Manual
Page 41
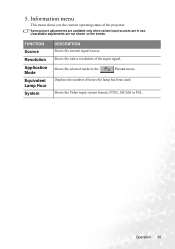
FUNCTION Source Resolution Application Mode Equivalent Lamp Hour System DESCRIPTION Shows the current signal source. Shows the selected mode in use. Unavailable adjustments are in the Picture menu. Shows the Video input system format, NTSC, SECAM or PAL. Displays the number of the projector. Operation 35 Some picture adjustments are available only when certain input sources are not shown on the screen. 5. Information menu This menu shows you the current operating status of hours the lamp has been used. Shows the native resolution of the input signal.
FUNCTION Source Resolution Application Mode Equivalent Lamp Hour System DESCRIPTION Shows the current signal source. Shows the selected mode in use. Unavailable adjustments are in the Picture menu. Shows the Video input system format, NTSC, SECAM or PAL. Displays the number of the projector. Operation 35 Some picture adjustments are available only when certain input sources are not shown on the screen. 5. Information menu This menu shows you the current operating status of hours the lamp has been used. Shows the native resolution of the input signal.

User Manual
Page 42
...dirt or dust on a regular basis is recommended that you need to do on the surface. • Use a canister of the projector Your projector needs little maintenance. Never use the original box or provided soft carry case. 36 Maintenance Cleaning the lens Clean the lens whenever you ... please follow the instructions below: • Make sure the temperature and humidity of the projector except the lamp. Then wipe the case. The only thing you clean the case, turn the projector off using the proper shutdown procedure as described in its original packing or equivalent. These can...
...dirt or dust on a regular basis is recommended that you need to do on the surface. • Use a canister of the projector Your projector needs little maintenance. Never use the original box or provided soft carry case. 36 Maintenance Cleaning the lens Clean the lens whenever you ... please follow the instructions below: • Make sure the temperature and humidity of the projector except the lamp. Then wipe the case. The only thing you clean the case, turn the projector off using the proper shutdown procedure as described in its original packing or equivalent. These can...
User Manual
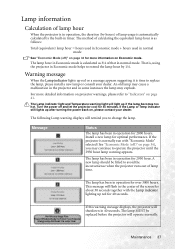
Page 43
... with "Economic Mode" selected (See "Economic Mode (off)" on Economic mode. If the Lamp or Temp indicator still lights up if the lamp becomes too hot. If the projector is time to replace the lamp, please install a new lamp or consult your dealer. The lamp has been in operation for 40 seconds. Warning message When the...
... with "Economic Mode" selected (See "Economic Mode (off)" on Economic mode. If the Lamp or Temp indicator still lights up if the lamp becomes too hot. If the projector is time to replace the lamp, please install a new lamp or consult your dealer. The lamp has been in operation for 40 seconds. Warning message When the...

User Manual
Page 44
...; To reduce the risk of severe burns, allow the projector to cool for approximately 45 minutes until the lamp has cooled. 2. Remove the lamp cover from the projector. Do not turn the projector off and disconnect the projector from the projector. 38 Maintenance If the lamp is hot, avoid burns by touching the lens, do not touch the...
...; To reduce the risk of severe burns, allow the projector to cool for approximately 45 minutes until the lamp has cooled. 2. Remove the lamp cover from the projector. Do not turn the projector off and disconnect the projector from the projector. 38 Maintenance If the lamp is hot, avoid burns by touching the lens, do not touch the...

User Manual
Page 45
... could cause color unevenness and distortion of the projected images. 7. Connect the lamp connector to break and scatter broken glass in the projector. • Do not place the lamp in malfunction. • Do not over tighten the screw. Pull the lamp from the projector. • Pulling it could result in locations where water might splash...
... could cause color unevenness and distortion of the projected images. 7. Connect the lamp connector to break and scatter broken glass in the projector. • Do not place the lamp in malfunction. • Do not over tighten the screw. Pull the lamp from the projector. • Pulling it could result in locations where water might splash...

User Manual
Page 46
... not turn the power on the projector. 11. Wait about 5 seconds to "Indicators" on the projector for further help. The fans are not working. Resetting the lamp counter Do not reset if the lamp is on the remote control to reset the lamp hour to display the total used lamp time. Press and hold the Exit...
... not turn the power on the projector. 11. Wait about 5 seconds to "Indicators" on the projector for further help. The fans are not working. Resetting the lamp counter Do not reset if the lamp is on the remote control to reset the lamp hour to display the total used lamp time. Press and hold the Exit...
User Manual
Page 47
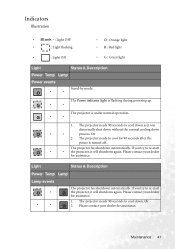
... 90 seconds to cool down - Stand-by mode. - Maintenance 41 Light Status & Description Power Temp Lamp Lamp events O - - - Please contact your dealer for 90 seconds after the power is turned off. The projector has shutdown automatically. Please contact your dealer for assistance. Indicators Illustration • Blank - : Light OFF • : Light flashing • : Light...
... 90 seconds to cool down - Stand-by mode. - Maintenance 41 Light Status & Description Power Temp Lamp Lamp events O - - - Please contact your dealer for 90 seconds after the power is turned off. The projector has shutdown automatically. Please contact your dealer for assistance. Indicators Illustration • Blank - : Light OFF • : Light flashing • : Light...


