
User Manual
Page 3
... safety instructions 1 Introduction 5 Projector features 5 Shipping contents 6 Optional accessories 6 Projector exterior view 7 Front / upper side 7 Rear side ...7 Lower side ...7 Controls and functions 8 External control panel 8 Remote control 9 Remote control effective range 10 Replacing the remote control battery 10 Positioning your projector 11 Choosing a location 11 Obtaining a preferred projected image size 12 How to determine the position of the projector for a given screen size: .. 13 How to determine the recommended screen size for a given distance: .... 13 Connection...
... safety instructions 1 Introduction 5 Projector features 5 Shipping contents 6 Optional accessories 6 Projector exterior view 7 Front / upper side 7 Rear side ...7 Lower side ...7 Controls and functions 8 External control panel 8 Remote control 9 Remote control effective range 10 Replacing the remote control battery 10 Positioning your projector 11 Choosing a location 11 Obtaining a preferred projected image size 12 How to determine the position of the projector for a given screen size: .. 13 How to determine the recommended screen size for a given distance: .... 13 Connection...
User Manual
Page 4
... of lamp hour 37 Warning message 37 Replacing the lamp 38 Temperature information 40 Indicators...41 Safety instructions for ceiling mounting of your BenQ projector 43 Troubleshooting 44 Specifications 45 Projector specifications 45 Timing chart 46 Supported timing for PC input 46 Supported timing for Component-YPbPr input 46 Supported timing for Video and S-Video inputs 46 Dimensions 47 Warranty 48 iv Table of contents Picture menu 29 2. Fine-tuning the image size and clarity 23 Correcting keystone 24 Selecting an application mode 25 Switching input signal 25...
... of lamp hour 37 Warning message 37 Replacing the lamp 38 Temperature information 40 Indicators...41 Safety instructions for ceiling mounting of your BenQ projector 43 Troubleshooting 44 Specifications 45 Projector specifications 45 Timing chart 46 Supported timing for PC input 46 Supported timing for Component-YPbPr input 46 Supported timing for Video and S-Video inputs 46 Dimensions 47 Warranty 48 iv Table of contents Picture menu 29 2. Fine-tuning the image size and clarity 23 Correcting keystone 24 Selecting an application mode 25 Switching input signal 25...

User Manual
Page 7
... 240 volts AC, • Do not look straight at the projector lens during operation. There are no user serviceable personnel. Save this user's manual before you connect your eyes. Important safety instructions 1 However, to ensure safe use of ±10 volts occur. Caution • To prevent shock, do not open the lens shutter or remove the lens cap when the projector lamp is on the product.
... 240 volts AC, • Do not look straight at the projector lens during operation. There are no user serviceable personnel. Save this user's manual before you connect your eyes. Important safety instructions 1 However, to ensure safe use of ±10 volts occur. Caution • To prevent shock, do not open the lens shutter or remove the lens cap when the projector lamp is on the product.
User Manual
Page 10
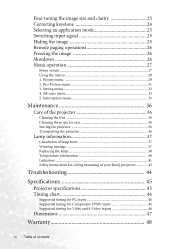
... to fail. To temporarily turn off the lamp, press Blank on the projector or remote control. 12. Please use BenQ's Ceiling Mount Kit for ceiling mount physical damage to have the projector serviced. 4 Important safety instructions so may cause it . Safety Instructions (Continued) 10. Besides probable inverted images for mounting the unit and ensure it from the power supply's wall socket and call BenQ to the projector, doing installation. Liquids spilled into the...
... to fail. To temporarily turn off the lamp, press Blank on the projector or remote control. 12. Please use BenQ's Ceiling Mount Kit for ceiling mount physical damage to have the projector serviced. 4 Important safety instructions so may cause it . Safety Instructions (Continued) 10. Besides probable inverted images for mounting the unit and ensure it from the power supply's wall socket and call BenQ to the projector, doing installation. Liquids spilled into the...
User Manual
Page 11
... use. Introduction 5 The projector offers the following features: • Selectable password protected function • Compact and portable unit • High quality manual zoom lens • One-key auto-adjustment to display the best picture quality • Digital keystone correction to correct distorted images • Adjustable color balance control for data/video display • Ultra-high brightness projection lamp • Ability to display 16.7 million colors • Multi-language on the ambient lighting conditions, selected input source contrast/brightness settings...
... use. Introduction 5 The projector offers the following features: • Selectable password protected function • Compact and portable unit • High quality manual zoom lens • One-key auto-adjustment to display the best picture quality • Digital keystone correction to correct distorted images • Adjustable color balance control for data/video display • Ultra-high brightness projection lamp • Ability to display 16.7 million colors • Multi-language on the ambient lighting conditions, selected input source contrast/brightness settings...
User Manual
Page 14
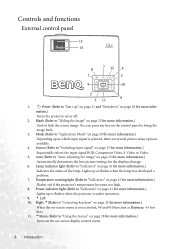
... Video. 5. mation.) Turns the projector on the control panel to "Auto-adjusting the image" on -screen display control menu. 8 Introduction Auto (Refer to bring the image back. 3. Lights up " on page 21 and "Shutdown" on page 25 for more information.) Automatically determines the best picture timings for more information.) Depending upon which input signal is under operation. 9. 3 Left 10. Source (Refer to "Start up or flashes when the lamp has developed a problem. 7. II Power (Refer to "Switching input signal...
... Video. 5. mation.) Turns the projector on the control panel to "Auto-adjusting the image" on -screen display control menu. 8 Introduction Auto (Refer to bring the image back. 3. Lights up " on page 21 and "Shutdown" on page 25 for more information.) Automatically determines the best picture timings for more information.) Depending upon which input signal is under operation. 9. 3 Left 10. Source (Refer to "Start up or flashes when the lamp has developed a problem. 7. II Power (Refer to "Switching input signal...
User Manual
Page 16
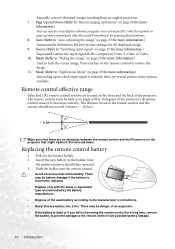
... face outward. 3. There may be using the remote control for a long time, remove the battery to prevent damage to "Auto-adjusting the image" on page 23 for more information.) Automatically determines the best picture settings for more information.) You can operate your display software program (on the projector that there are located on page 25 for the displayed image. 9. Source (Refer to "Switching input signal" on the front and the back...
... face outward. 3. There may be using the remote control for a long time, remove the battery to prevent damage to "Auto-adjusting the image" on page 23 for more information.) Automatically determines the best picture settings for more information.) You can operate your display software program (on the projector that there are located on page 25 for the displayed image. 9. Source (Refer to "Switching input signal" on the front and the back...

User Manual
Page 17
... rear projection screen and the BenQ Projector Ceiling Mounting Kit are required for quick setup and portability. Positioning your equipment. Purchase the BenQ Projector Ceiling Mounting Kit from your dealer to be installed in front of screen. Take into consideration the size and position of your screen, the location of a suitable power outlet, as well as the location and distance between the projector and the rest of four possible installation locations: 1. Set in...
... rear projection screen and the BenQ Projector Ceiling Mounting Kit are required for quick setup and portability. Positioning your equipment. Purchase the BenQ Projector Ceiling Mounting Kit from your dealer to be installed in front of screen. Take into consideration the size and position of your screen, the location of a suitable power outlet, as well as the location and distance between the projector and the rest of four possible installation locations: 1. Set in...

User Manual
Page 18
... the screen, the zoom setting, and the video format each factors in a 4:3 aspect display area 16:9 aspect image scaled to -reel film projectors did). If the projector is above the horizontal plane of the projector's native aspect height. 4:3 aspect image in the projected image size. This is positioned further away from the screen, the projected image size increases, and the vertical offset also increases proportionately. The modern digital projector...
... the screen, the zoom setting, and the video format each factors in a 4:3 aspect display area 16:9 aspect image scaled to -reel film projectors did). If the projector is above the horizontal plane of the projector's native aspect height. 4:3 aspect image in the projected image size. This is positioned further away from the screen, the projected image size increases, and the vertical offset also increases proportionately. The modern digital projector...

User Manual
Page 24
... the selected video image is not displayed after the projector is turned on and the correct video source has been selected, check that the Video source device is turned on page 17 for details. • Component Video is the only video output that the signal cables have been connected correctly. 18 Connection Match the color of the plugs to the color of playing mixed mono audio, even if a stereo audio input is...
... the selected video image is not displayed after the projector is turned on and the correct video source has been selected, check that the Video source device is turned on page 17 for details. • Component Video is the only video output that the signal cables have been connected correctly. 18 Connection Match the color of the plugs to the color of playing mixed mono audio, even if a stereo audio input is...
User Manual
Page 26
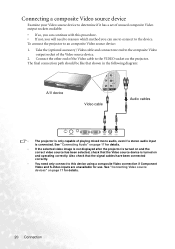
... video image is not displayed after the projector is turned on and the correct video source has been selected, check that the Video source device is connected. To connect the projector to the composite Video output socket of the Video source device. 2. See "Connecting Audio" on the projector. Also check that shown in the following diagram: A/V device Video cable Audio cables • The projector is only capable of playing mixed mono audio, even if a stereo audio input is turned...
... video image is not displayed after the projector is turned on and the correct video source has been selected, check that the Video source device is connected. To connect the projector to the composite Video output socket of the Video source device. 2. See "Connecting Audio" on the projector. Also check that shown in the following diagram: A/V device Video cable Audio cables • The projector is only capable of playing mixed mono audio, even if a stereo audio input is turned...

User Manual
Page 27
... search for information. To set a password: CAUTION: Once a password has been set, the projector cannot be set through the on -screen menu operation, please refer to select your desired input signal. Check that the Power indicator on . WARNING: You will continue until an input source signal is on the projector lights orange after pressing Power. The search will be inconvenienced if you used unless the correct password is entered every time the projector is started. 1. Operation Start up password security.
... search for information. To set a password: CAUTION: Once a password has been set, the projector cannot be set through the on -screen menu operation, please refer to select your desired input signal. Check that the Power indicator on . WARNING: You will continue until an input source signal is on the projector lights orange after pressing Power. The search will be inconvenienced if you used unless the correct password is entered every time the projector is started. 1. Operation Start up password security.

User Manual
Page 28
... old password. Seek help from the local BenQ service center to cancel. 22 Operation If the password is available to you should you ever forget it is correct, you can retry by turning off the projector (by pressing Power) and start again, or if you are entered and the password is incorrect, a "Password Error" message displays. If you forget the password: You will display a coded number on the screen. You...
... old password. Seek help from the local BenQ service center to cancel. 22 Operation If the password is available to you should you ever forget it is correct, you can retry by turning off the projector (by pressing Power) and start again, or if you are entered and the password is incorrect, a "Password Error" message displays. If you forget the password: You will display a coded number on the screen. You...
User Manual
Page 29
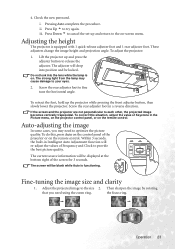
... be locked. To retract the foot, hold up and press the adjuster button to the on . Adjust the projected image to try again. Adjusting the height The projector is functioning. To correct this , press Auto on the control panel of Keystone in the Picture menu, on the projector control panel, or on the remote control. To adjust the projector: 1. The strong light from the lamp may need using the zoom ring. Then sharpen the image by rotating...
... be locked. To retract the foot, hold up and press the adjuster button to the on . Adjust the projected image to try again. Adjusting the height The projector is functioning. To correct this , press Auto on the control panel of Keystone in the Picture menu, on the projector control panel, or on the remote control. To adjust the projector: 1. The strong light from the lamp may need using the zoom ring. Then sharpen the image by rotating...
User Manual
Page 32
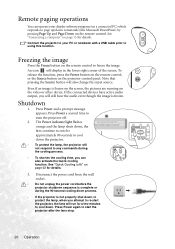
...-start the projector after the fans stop. 26 Operation Press Power a second time to using this function. Press Power and a prompt message appears. See "Quick Cooling (off . 2. Press Power again to freeze the image. An icon will also change the input source. The Power indicator light flashes orange and the lamp shuts down, the fans continue to run for details. Even if an image is frozen. Freezing the image Press the Freeze button on the remote control. Remote...
...-start the projector after the fans stop. 26 Operation Press Power a second time to using this function. Press Power and a prompt message appears. See "Quick Cooling (off . 2. Press Power again to freeze the image. An icon will also change the input source. The Power indicator light flashes orange and the lamp shuts down, the fans continue to run for details. Even if an image is frozen. Freezing the image Press the Freeze button on the remote control. Remote...

User Manual
Page 34
... projector or 6 / 5 on the to turn the on -screen display (OSD) menus for more details.) The following example describes the adjustment of the keystone. 1. There are 17 different menu languages. (Refer to leave and save the setting. 3. pressing Left 3/ Right 4on the screen menu on the remote control. 2. projector or Left 3/ Right 4 on . Adjust keystone values by on the remote control to select the Picture menu. Using the menus The projector...
... projector or 6 / 5 on the to turn the on -screen display (OSD) menus for more details.) The following example describes the adjustment of the keystone. 1. There are 17 different menu languages. (Refer to leave and save the setting. 3. pressing Left 3/ Right 4on the screen menu on the remote control. 2. projector or Left 3/ Right 4 on . Adjust keystone values by on the remote control to select the Picture menu. Using the menus The projector...
User Manual
Page 40
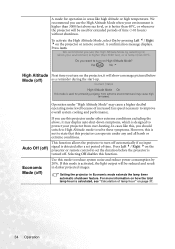
... a message pictured below Mode (off ) Use this function. We recommend you use this mode is not to turn off automatically if no input Auto Off (off . If you turn on how the total lamp hour is detected after a set the duration before the projector is turned off ) signal is calculated, see "Calculation of time (>10 hours) without shutdown. Setting the projector in darker projected images. For more information on the projector, it may display auto shut...
... a message pictured below Mode (off ) Use this function. We recommend you use this mode is not to turn off automatically if no input Auto Off (off . If you turn on how the total lamp hour is detected after a set the duration before the projector is turned off ) signal is calculated, see "Calculation of time (>10 hours) without shutdown. Setting the projector in darker projected images. For more information on the projector, it may display auto shut...
User Manual
Page 43
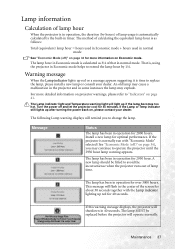
... to replace the lamp, please install a new lamp or consult your dealer. Maintenance 37 Warning message When the Lamp indicator lights up red for 40 seconds. Message Status The lamp has been in operation for optimal performance. The lamp has been in operation for 45 minutes. Turn the power off and let the projector cool for 2950 hour. If the projector is normally run with the Lamp indicator lighting up red or a message appears suggesting it is time...
... to replace the lamp, please install a new lamp or consult your dealer. Maintenance 37 Warning message When the Lamp indicator lights up red for 40 seconds. Message Status The lamp has been in operation for optimal performance. The lamp has been in operation for 45 minutes. Turn the power off and let the projector cool for 2950 hour. If the projector is normally run with the Lamp indicator lighting up red or a message appears suggesting it is time...

User Manual
Page 46
... fans are not working. For more detailed information, please refer to "Indicators" on the remote control to reset the lamp hour to "0". Replace the lamp cover on with the lamp cover removed. 13. Do not turn the power on the projector. 11. ii. Turn the projector off and contact qualified service personnel for 5 seconds to let the OSD disappear. Wait about 5 seconds to display the total used lamp time. Press and hold the Exit 5 button...
... fans are not working. For more detailed information, please refer to "Indicators" on the remote control to reset the lamp hour to "0". Replace the lamp cover on with the lamp cover removed. 13. Do not turn the power on the projector. 11. ii. Turn the projector off and contact qualified service personnel for 5 seconds to let the OSD disappear. Wait about 5 seconds to display the total used lamp time. Press and hold the Exit 5 button...

User Manual
Page 50
... the signal cable is no power from the projector. NO PICTURE Cause Remedy The video source is switched on or connected correctly. The input signal has not been correctly selected. The lens cap is not correctly focused. Check the connection. BLURRED IMAGE Cause Remedy The projection lens is still attached to the input source device. The lens cap is an obstacle between the remote control and the projector. Adjust the focus of the projector. 44 Troubleshooting Adjust the projection angle...
... the signal cable is no power from the projector. NO PICTURE Cause Remedy The video source is switched on or connected correctly. The input signal has not been correctly selected. The lens cap is not correctly focused. Check the connection. BLURRED IMAGE Cause Remedy The projection lens is still attached to the input source device. The lens cap is an obstacle between the remote control and the projector. Adjust the focus of the projector. 44 Troubleshooting Adjust the projection angle...


