
User Guide
Page 2
...for any person of Purchase: Dealer Information Dealer: Telephone Number: Address: The serial number is needed in any form or by BENQ Corporation (formerly Acer Communications & Multimedia Inc.). No part of this publication may be reproduced, transmitted, transcribed, stored in a retrieval...computer language, in the future, record the information described below. Projector Information Product Name: DX/S660 DX/S650 Serial Number: Date of such revision or changes. All rights reserved. Furthermore, BENQ Corporation reserves the right to revise this in the contents hereof...
...for any person of Purchase: Dealer Information Dealer: Telephone Number: Address: The serial number is needed in any form or by BENQ Corporation (formerly Acer Communications & Multimedia Inc.). No part of this publication may be reproduced, transmitted, transcribed, stored in a retrieval...computer language, in the future, record the information described below. Projector Information Product Name: DX/S660 DX/S650 Serial Number: Date of such revision or changes. All rights reserved. Furthermore, BENQ Corporation reserves the right to revise this in the contents hereof...
User Guide
Page 4
...Safety Instructions 1 Warranty 2 Limited Warranty 2 Shipping Contents 3 Optional Accessories 3 Projector Description 4 Projector 4 External Control Panel 5 Adjuster 6 Projector Features 6 Remote Control Description 7 Installing or Replacing Batteries 8 Installation 9 ...Screen Size 9 Connecting to Various Equipment 9 Operation 11 Start Up 11 Digital Keystone Correction 12 Auto Adjustment 12 Source Selection 13 Menu System 13 1. Source Menu 16 4. Image Menu 15 3. BenQ...
...Safety Instructions 1 Warranty 2 Limited Warranty 2 Shipping Contents 3 Optional Accessories 3 Projector Description 4 Projector 4 External Control Panel 5 Adjuster 6 Projector Features 6 Remote Control Description 7 Installing or Replacing Batteries 8 Installation 9 ...Screen Size 9 Connecting to Various Equipment 9 Operation 11 Start Up 11 Digital Keystone Correction 12 Auto Adjustment 12 Source Selection 13 Menu System 13 1. Source Menu 16 4. Image Menu 15 3. BenQ...

User Guide
Page 5
BenQ DX/S660 DX/S650 User's Guide Specifications 26 Projector Specifications 26 Timing Chart 27 Dimensions 28 iv Table of Contents
BenQ DX/S660 DX/S650 User's Guide Specifications 26 Projector Specifications 26 Timing Chart 27 Dimensions 28 iv Table of Contents
User Guide
Page 6
... it for ceiling mount installation. The intense light beam may fall, sustaining serious damage. 6. Introduction 1 The product may damage your projector and save it to 240 volts, but could cause them to removing the lamp assembly for approximately 45 minutes prior to explode on an... The information contained in this user's guide before you in conjuction with this projector. The lamp becomes extremely hot during operation. This product is capable of lamps beyond the rated lamp life. INTRODUCTION BenQ DX/S660 DX/S650 User's Guide Caution TO PREVENT SHOCK, DO NOT OPEN...
... it for ceiling mount installation. The intense light beam may fall, sustaining serious damage. 6. Introduction 1 The product may damage your projector and save it to 240 volts, but could cause them to removing the lamp assembly for approximately 45 minutes prior to explode on an... The information contained in this user's guide before you in conjuction with this projector. The lamp becomes extremely hot during operation. This product is capable of lamps beyond the rated lamp life. INTRODUCTION BenQ DX/S660 DX/S650 User's Guide Caution TO PREVENT SHOCK, DO NOT OPEN...
User Guide
Page 8
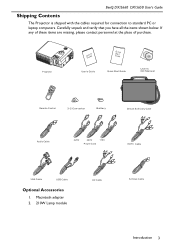
...you have all the items shown below. If any of these items are missing, please contact personnel at the place of purchase. Projector UGsueird'se User's Guide GSQutauidrictek Quick Start Guide User's CD Manual Remote Control 3-2 Converter Battery Deluxe Soft Carry Case Audio Cable 220V... 240V 110V Power Cord HDTV Cable VGA Cable USB Cable Optional Accessories 1. BenQ DX/S660 DX/S650 User's Guide Shipping Contents The Projector is shipped with the cables required for connection to standard PC or laptop computers.
...you have all the items shown below. If any of these items are missing, please contact personnel at the place of purchase. Projector UGsueird'se User's Guide GSQutauidrictek Quick Start Guide User's CD Manual Remote Control 3-2 Converter Battery Deluxe Soft Carry Case Audio Cable 220V... 240V 110V Power Cord HDTV Cable VGA Cable USB Cable Optional Accessories 1. BenQ DX/S660 DX/S650 User's Guide Shipping Contents The Projector is shipped with the cables required for connection to standard PC or laptop computers.
User Guide
Page 9
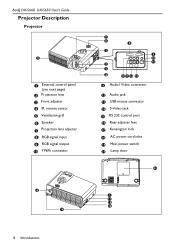
BenQ DX/S660 DX/S650 User's Guide Projector Description Projector 5 1 External control panel (see next page) 2 Projection lens 3 Front adjuster 4 IR remote sensor 5 Ventilation grill 6 Speaker 7 Projection lens adjuster 8 RGB signal input 9 RGB signal output 10 YPBPR connector 4 16 7 6 8 1 9 12 13 2 3 4 10 11 14 15 11 Audio/ Video connector 12 Audio jack 13 USB mouse connector 14 S-Video jack 15 RS 232 control port 16 Rear adjuster feet 17 Kensington lock 18 AC power cord inlet 19 Main power switch 20 Lamp door 20 3 17 18 19 4 Introduction
BenQ DX/S660 DX/S650 User's Guide Projector Description Projector 5 1 External control panel (see next page) 2 Projection lens 3 Front adjuster 4 IR remote sensor 5 Ventilation grill 6 Speaker 7 Projection lens adjuster 8 RGB signal input 9 RGB signal output 10 YPBPR connector 4 16 7 6 8 1 9 12 13 2 3 4 10 11 14 15 11 Audio/ Video connector 12 Audio jack 13 USB mouse connector 14 S-Video jack 15 RS 232 control port 16 Rear adjuster feet 17 Kensington lock 18 AC power cord inlet 19 Main power switch 20 Lamp door 20 3 17 18 19 4 Introduction
User Guide
Page 10
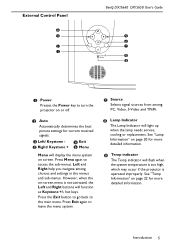
.... See "Temp Information" on -screen menu is operated improperly. External Control Panel 4 3 2 1 BenQ DX/S660 DX/S650 User's Guide 5 6 7 LAMP 8 TEMP 9 1 Power Presses the Power key to turn the projector on or off. 2 Auto Automatically determines the best picture settings for current received signals. 3 Left/ ...- 4 Exit 5 Right/ Keystone + 6 Menu Menu will flash when the system temperature is too high, which may occur if the projector is not activated, the Left and Right buttons will light up when the lamp needs service, cooling or replacement. Left and Right help ...
.... See "Temp Information" on -screen menu is operated improperly. External Control Panel 4 3 2 1 BenQ DX/S660 DX/S650 User's Guide 5 6 7 LAMP 8 TEMP 9 1 Power Presses the Power key to turn the projector on or off. 2 Auto Automatically determines the best picture settings for current received signals. 3 Left/ ...- 4 Exit 5 Right/ Keystone + 6 Menu Menu will flash when the system temperature is too high, which may occur if the projector is not activated, the Left and Right buttons will light up when the lamp needs service, cooling or replacement. Left and Right help ...
User Guide
Page 11
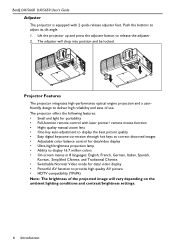
BenQ DX/S660 DX/S650 User's Guide Adjuster The projector is equipped with laser pointer/ remote mouse function • Hight quality manual zoom lens • One-key auto-adjustment to display the best picture quality &#... for data/ video display • Powerful AV function to provide high quality AV picture • HDTV compatibility (YPBPR) Note: The brightness of use. Lift the projector up and press the adjuster button to deliver high reliability and ease of the projected image will drop into position and be locked. Push the...
BenQ DX/S660 DX/S650 User's Guide Adjuster The projector is equipped with laser pointer/ remote mouse function • Hight quality manual zoom lens • One-key auto-adjustment to display the best picture quality &#... for data/ video display • Powerful AV function to provide high quality AV picture • HDTV compatibility (YPBPR) Note: The brightness of use. Lift the projector up and press the adjuster button to deliver high reliability and ease of the projected image will drop into position and be locked. Push the...
User Guide
Page 12
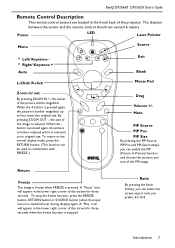
... L-Click/ R-click Mouse Pad Zoom in/ out By pressing ZOOM IN +, the center of the picture will appear in the front/ back of the projector. To return to the normal display mode, press the RETURN button. (This function can enable the PIP (Picture In Picture) function and choose the position...By pressing ZOOM OUT -, the size of the screen for three seconds. The distance between the sensor and the remote control should not exceed 6 meters. BenQ DX/S660 DX/S650 User's Guide Remote Control Description The remote control sensors are located in the lower right corner of the screen for three...
... L-Click/ R-click Mouse Pad Zoom in/ out By pressing ZOOM IN +, the center of the picture will appear in the front/ back of the projector. To return to the normal display mode, press the RETURN button. (This function can enable the PIP (Picture In Picture) function and choose the position...By pressing ZOOM OUT -, the size of the screen for three seconds. The distance between the sensor and the remote control should not exceed 6 meters. BenQ DX/S660 DX/S650 User's Guide Remote Control Description The remote control sensors are located in the lower right corner of the screen for three...
User Guide
Page 14
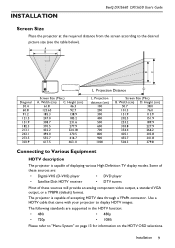
...231.6 370.5 277.9 432.2 324.18 494.0 370.5 555.7 416.7 617.5 463.11 L Projection Distance L. Use a HDTV cable that came with your projector to the desired picture size (see the table below). Diagonal 30.4 60.8 91.2 121.5 151.9 182.3 213.1 243.1 273.5 303.9 Screen Size (Max.)... A. Installation 9 Width (cm) D. INSTALLATION BenQ DX/S660 DX/S650 User's Guide Screen Size Place the projector at the required distance from the screen according to display HDTV images. Some of these sources are supported in the...
...231.6 370.5 277.9 432.2 324.18 494.0 370.5 555.7 416.7 617.5 463.11 L Projection Distance L. Use a HDTV cable that came with your projector to the desired picture size (see the table below). Diagonal 30.4 60.8 91.2 121.5 151.9 182.3 213.1 243.1 273.5 303.9 Screen Size (Max.)... A. Installation 9 Width (cm) D. INSTALLATION BenQ DX/S660 DX/S650 User's Guide Screen Size Place the projector at the required distance from the screen according to display HDTV images. Some of these sources are supported in the...

User Guide
Page 15
Monitor PC/Notebook RGB PC Audio USB To RGB Input To RGB output DVD Player Y Pb Pr Video / Audio AUDIO S-VIDEO VIDEO L R S-Video RGB IN RGB OUT Pr Pb Y AUDIO IN VIDEO L R S-VIDEO CONTROL USB Control PC Audio USB 10 Installation BenQ DX/S660 DX/S650 User's Guide Connecting to Various Equipment It only takes a few seconds to connect your projector to your desktop or notebook computer, VCR, or other systems. However, a Mac adapter (an optional accessory) is needed for connection to Macintosh computers.
Monitor PC/Notebook RGB PC Audio USB To RGB Input To RGB output DVD Player Y Pb Pr Video / Audio AUDIO S-VIDEO VIDEO L R S-Video RGB IN RGB OUT Pr Pb Y AUDIO IN VIDEO L R S-VIDEO CONTROL USB Control PC Audio USB 10 Installation BenQ DX/S660 DX/S650 User's Guide Connecting to Various Equipment It only takes a few seconds to connect your projector to your desktop or notebook computer, VCR, or other systems. However, a Mac adapter (an optional accessory) is needed for connection to Macintosh computers.
User Guide
Page 16
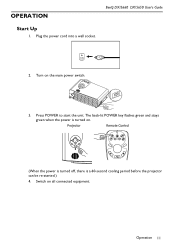
The back-lit POWER key flashes green and stays green when the power is a 60-second cooling period before the projector can be re-started.) 4. Operation 11 Turn on . Press POWER to start the unit. Switch on all connected equipment. Projector Remote Control (When the power is turned off, there is turned on the main power switch. 3. Plug the power cord into a wall socket. BenQ DX/S660 DX/S650 User's Guide 2. OPERATION Start Up 1.
The back-lit POWER key flashes green and stays green when the power is a 60-second cooling period before the projector can be re-started.) 4. Operation 11 Turn on . Press POWER to start the unit. Switch on all connected equipment. Projector Remote Control (When the power is turned off, there is turned on the main power switch. 3. Plug the power cord into a wall socket. BenQ DX/S660 DX/S650 User's Guide 2. OPERATION Start Up 1.

User Guide
Page 17
...Adjustment function will re-adjust settings to optimize the picture quality. Press + to correct keystoning at the top of the projector or on the control panel of the image. Projector Remote control Auto Adjustment In some cases, you may need to provide the best picture quality. To do this , ..., as needed. To correct this , press the AUTO key on the remote control. to correct keystoning at either the top or bottom. BenQ DX/S660 DX/S650 User's Guide Digital Keystone Correction Keystoning refers to the situation where the projected image is noticeably wider at the bottom of...
...Adjustment function will re-adjust settings to optimize the picture quality. Press + to correct keystoning at the top of the projector or on the control panel of the image. Projector Remote control Auto Adjustment In some cases, you may need to provide the best picture quality. To do this , ..., as needed. To correct this , press the AUTO key on the remote control. to correct keystoning at either the top or bottom. BenQ DX/S660 DX/S650 User's Guide Digital Keystone Correction Keystoning refers to the situation where the projected image is noticeably wider at the bottom of...
User Guide
Page 18
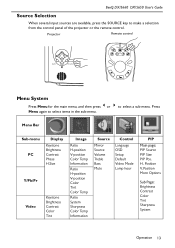
... Options Sub Page: Brightness Contrast Color Tint Sharpness System Operation 13 H. BenQ DX/S660 DX/S650 User's Guide Source Selection When several input sources are available, press the SOURCE key to select a sub-menu. Projector Remote control Source Auto Source Menu System Press Menu for the main menu..., and then press 3or 4 to make a selection from the control panel of the projector or the remote control. Press Menu again to select items...
... Options Sub Page: Brightness Contrast Color Tint Sharpness System Operation 13 H. BenQ DX/S660 DX/S650 User's Guide Source Selection When several input sources are available, press the SOURCE key to select a sub-menu. Projector Remote control Source Auto Source Menu System Press Menu for the main menu..., and then press 3or 4 to make a selection from the control panel of the projector or the remote control. Press Menu again to select items...
User Guide
Page 22
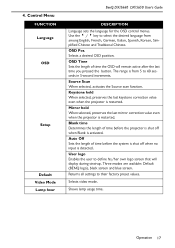
...sets the language for the OSD control menus. Three modes are available: Default (BENQ logo), black screen and blue screen. Selects video mode. Blank time Determines the length of time before the projector is shut off when no input is activated. Auto Off Sets the length of... time before the system is shut off when Blank is detected. Keystone hold When selected, preserves the last mirror correction value even when the projector is from among English, French, German, Italian, Spanish, Korean, Simplified Chinese and Traditional Chinese. Use the 3 / 4 key to their factory ...
...sets the language for the OSD control menus. Three modes are available: Default (BENQ logo), black screen and blue screen. Selects video mode. Blank time Determines the length of time before the projector is shut off when no input is activated. Auto Off Sets the length of... time before the system is shut off when Blank is detected. Keystone hold When selected, preserves the last mirror correction value even when the projector is from among English, French, German, Italian, Spanish, Korean, Simplified Chinese and Traditional Chinese. Use the 3 / 4 key to their factory ...
User Guide
Page 24
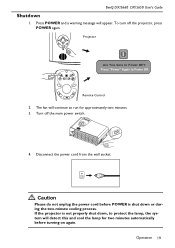
... POWER again. Press POWER and a warning message will detect this and cool the lamp for approximately two minutes. 3. If the projector is not properly shut down, to run for two minutes automatically before POWER is shut down or during the two-minute cooling process. Operation 19 ...Disconnect the power cord from the wall socket. The fan will continue to protect the lamp, the system will appear. BenQ DX/S660 DX/S650 User's Guide Shutdown 1. Caution Please do not unplug the power cord before turning on again...
... POWER again. Press POWER and a warning message will detect this and cool the lamp for approximately two minutes. 3. If the projector is not properly shut down, to run for two minutes automatically before POWER is shut down or during the two-minute cooling process. Operation 19 ...Disconnect the power cord from the wall socket. The fan will continue to protect the lamp, the system will appear. BenQ DX/S660 DX/S650 User's Guide Shutdown 1. Caution Please do not unplug the power cord before turning on again...
User Guide
Page 25
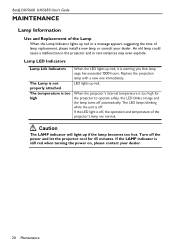
... is still red when turning the power on, please contact your dealer. If the LED light is too high for 45 minutes. When the projector's internal temperature is off automatically. Caution The LAMP indicator will light up red or a message appears suggesting the time of lamp replacement, please ...install a new lamp or consult your dealer. 20 Maintenance BenQ DX/S660 DX/S650 User's Guide MAINTENANCE Lamp Information Use and Replacement of the Lamp When the Lamp Indicator lights up if the lamp becomes...
... is still red when turning the power on, please contact your dealer. If the LED light is too high for 45 minutes. When the projector's internal temperature is off automatically. Caution The LAMP indicator will light up red or a message appears suggesting the time of lamp replacement, please ...install a new lamp or consult your dealer. 20 Maintenance BenQ DX/S660 DX/S650 User's Guide MAINTENANCE Lamp Information Use and Replacement of the Lamp When the Lamp Indicator lights up if the lamp becomes...
User Guide
Page 26
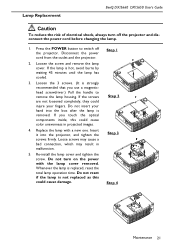
... that you touch the optical components inside, this could injure your hand into the projector, and tighten the screws firmly. Disconnect the power cord from the outlet and the projector. 2. If the screws are not loosened completely, they could cause damage. Do ...projector. Step 1 Step 2 Step 3 Step 4 Maintenance 21 If the lamp is replaced, reset the total lamp operation time. Do not insert your fingers. Re-install the lamp cover and tighten the screw. Press the POWER button to remove the lamp housing. Loosen the screw and remove the lamp cover. Lamp Replacement BenQ...
... that you touch the optical components inside, this could injure your hand into the projector, and tighten the screws firmly. Disconnect the power cord from the outlet and the projector. 2. If the screws are not loosened completely, they could cause damage. Do ...projector. Step 1 Step 2 Step 3 Step 4 Maintenance 21 If the lamp is replaced, reset the total lamp operation time. Do not insert your fingers. Re-install the lamp cover and tighten the screw. Press the POWER button to remove the lamp housing. Loosen the screw and remove the lamp cover. Lamp Replacement BenQ...
User Guide
Page 27
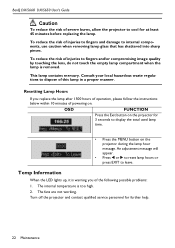
To reduce the risk of injuries to cool for at least 45 minutes before replacing the lamp. BenQ DX/S660 DX/S650 User's Guide Caution To reduce the risk of severe burns, allow the projector to fingers and/or compromising image quality by touching the lens, do not touch the empty lamp ...compartment when the lamp is removed. OSD FUNCTION Press the Exit button on the projector for further help. 22 Maintenance An adjustment message will appear. • Press W or X to reset lamp hours or press EXIT to display the total ...
To reduce the risk of injuries to cool for at least 45 minutes before replacing the lamp. BenQ DX/S660 DX/S650 User's Guide Caution To reduce the risk of severe burns, allow the projector to fingers and/or compromising image quality by touching the lens, do not touch the empty lamp ...compartment when the lamp is removed. OSD FUNCTION Press the Exit button on the projector for further help. 22 Maintenance An adjustment message will appear. • Press W or X to reset lamp hours or press EXIT to display the total ...
User Guide
Page 29
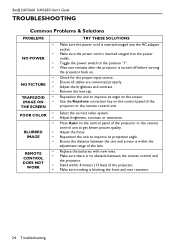
POOR COLOR • • Select the correct video system. BenQ DX/S660 DX/S650 User's Guide TROUBLESHOOTING Common Problems & Solutions PROBLEMS TRY THESE SOLUTIONS NO POWER • Make sure the power cord is inserted snuged ... batteries with new ones. • Make sure there is no obstacle between the unit and screen is within 4 meters (13 feet) of the THE SCREEN projector or the remote control unit. Adjust the brightness and contrast. • Remove the lens cap. TRAPEZOID • Reposition the unit to improve its projection angle...
POOR COLOR • • Select the correct video system. BenQ DX/S660 DX/S650 User's Guide TROUBLESHOOTING Common Problems & Solutions PROBLEMS TRY THESE SOLUTIONS NO POWER • Make sure the power cord is inserted snuged ... batteries with new ones. • Make sure there is no obstacle between the unit and screen is within 4 meters (13 feet) of the THE SCREEN projector or the remote control unit. Adjust the brightness and contrast. • Remove the lens cap. TRAPEZOID • Reposition the unit to improve its projection angle...


