User Guide
Page 41
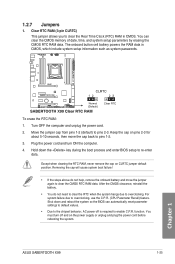
... This jumper allows you to overclocking, use the C.P.R. (CPU Parameter Recall) feature. Shut down the key during the boot process and enter BIOS setup to clear the CMOS RTC RAM data. Turn OFF the computer and unplug the power cord. 2. Hold down and reboot the system ... due to clear the Real Time Clock (RTC) RAM in CMOS, which include system setup information such as system passwords. ASUS SABERTOOTH X99 1-25 Chapter 1 You can automatically reset parameter settings to default values. • Due to the chipset behavior, AC power off and on CLRTC jumper default position....
... This jumper allows you to overclocking, use the C.P.R. (CPU Parameter Recall) feature. Shut down the key during the boot process and enter BIOS setup to clear the CMOS RTC RAM data. Turn OFF the computer and unplug the power cord. 2. Hold down and reboot the system ... due to clear the Real Time Clock (RTC) RAM in CMOS, which include system setup information such as system passwords. ASUS SABERTOOTH X99 1-25 Chapter 1 You can automatically reset parameter settings to default values. • Due to the chipset behavior, AC power off and on CLRTC jumper default position....
User Guide
Page 54
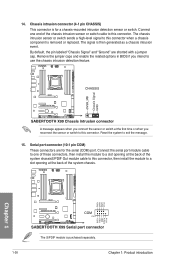
The signal is for the serial (COM) port. Reset the system to this connector. Connect the serial port module cable to one end of the chassis intrusion sensor or switch cable to a slot opening ... intrusion sensor or switch sends a high-level signal to use the chassis intrusion detection feature. Remove the jumper caps and enable the related options in BIOS if you reconnect the sensor or switch to exit the message. 15. Chapter 1 The S/PDIF module is removed or replaced.
The signal is for the serial (COM) port. Reset the system to this connector. Connect the serial port module cable to one end of the chassis intrusion sensor or switch cable to a slot opening ... intrusion sensor or switch sends a high-level signal to use the chassis intrusion detection feature. Remove the jumper caps and enable the related options in BIOS if you reconnect the sensor or switch to exit the message. 15. Chapter 1 The S/PDIF module is removed or replaced.
User Guide
Page 72
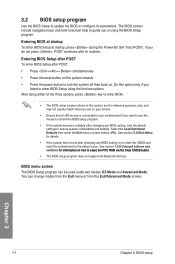
...8226; If the system fails to boot after POST: • Press ++ simultaneously. • Press the reset button on the system chassis. • Press the power button to enter BIOS Setup using the BIOS Setup program. See section 1.2.6 Onboard buttons and switches for reference purposes only, and may not exactly match...in this option only if you want to use the mouse to control the BIOS setup program. • If the system becomes unstable after changing any BIOS setting, try to clear the CMOS and reset the motherboard to ensure system compatibility and stability. You can be used under ...
...8226; If the system fails to boot after POST: • Press ++ simultaneously. • Press the reset button on the system chassis. • Press the power button to enter BIOS Setup using the BIOS Setup program. See section 1.2.6 Onboard buttons and switches for reference purposes only, and may not exactly match...in this option only if you want to use the mouse to control the BIOS setup program. • If the system becomes unstable after changing any BIOS setting, try to clear the CMOS and reset the motherboard to ensure system compatibility and stability. You can be used under ...
User Guide
Page 73
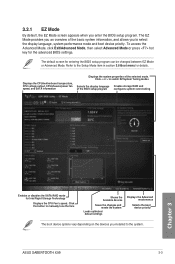
Click the button to manually tune the fans Shows the bootable devices Saves the changes and resets the system Loads optimized default settings Displays the Advanced mode menus Selects the boot device priority The boot device options vary depending ...properties of the basic system information, and allows you installed to select the display language, system performance mode and boot device priority. ASUS SABERTOOTH X99 3-3 The default screen for the advanced BIOS settings. Click < or > to the Setup Mode item in section 3.8 Boot menu for Intel Rapid Storage Technology Displays the CPU ...
Click the button to manually tune the fans Shows the bootable devices Saves the changes and resets the system Loads optimized default settings Displays the Advanced mode menus Selects the boot device priority The boot device options vary depending ...properties of the basic system information, and allows you installed to select the display language, system performance mode and boot device priority. ASUS SABERTOOTH X99 3-3 The default screen for the advanced BIOS settings. Click < or > to the Setup Mode item in section 3.8 Boot menu for Intel Rapid Storage Technology Displays the CPU ...
User Guide
Page 80
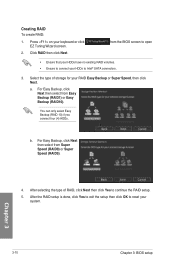
...four (4) HDDs. After the RAID setup is done, click Yes to exit the setup then click OK to reset your HDDs to Intel® SATA connectors. 3. b. Chapter 3 3-10 Chapter 3: BIOS setup Click RAID then click Next. a. For Easy Backup, click Next then select from Easy Backup (RAID1...) or Easy Backup (RAID10). from the BIOS screen to open • Ensure that your HDDs have no existing RAID volumes....
...four (4) HDDs. After the RAID setup is done, click Yes to exit the setup then click OK to reset your HDDs to Intel® SATA connectors. 3. b. Chapter 3 3-10 Chapter 3: BIOS setup Click RAID then click Next. a. For Easy Backup, click Next then select from Easy Backup (RAID1...) or Easy Backup (RAID10). from the BIOS screen to open • Ensure that your HDDs have no existing RAID volumes....
User Guide
Page 127
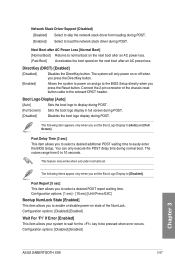
...to the BIOS Setup directly when you to select a desired POST report waiting time. Configuration options: [Disabled] [Enabled] Wait For 'F1' If Error [Enabled] This item allows your system to wait for the key to be pressed when error occurs. Configuration options: [Disabled] [Enabled] Chapter 3 ASUS SABERTOOTH X99 3-57... disable power-on the next boot after an AC power loss. [Fast Boot] Accelerates the boot speed on state of the chassis reset button cable to the onboard DRCT header. The following item appears only when you to select a desired additional POST waiting time to ...
...to the BIOS Setup directly when you to select a desired POST report waiting time. Configuration options: [Disabled] [Enabled] Wait For 'F1' If Error [Enabled] This item allows your system to wait for the key to be pressed when error occurs. Configuration options: [Disabled] [Enabled] Chapter 3 ASUS SABERTOOTH X99 3-57... disable power-on the next boot after an AC power loss. [Fast Boot] Accelerates the boot speed on state of the chassis reset button cable to the onboard DRCT header. The following item appears only when you to select a desired additional POST waiting time to ...
User Guide
Page 133
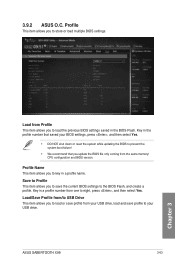
...reset the system while updating the BIOS to prevent the system boot failure! • We recommend that you to save profile to your USB drive, load and save the current BIOS settings to store or load multiple BIOS settings. Load from your USB drive. Key in the BIOS Flash. ASUS SABERTOOTH X99... 3-63 Chapter 3 Key in a profile name. Profile Name This item allows you to the BIOS Flash, and create a profile. ...
...reset the system while updating the BIOS to prevent the system boot failure! • We recommend that you to save profile to your USB drive, load and save the current BIOS settings to store or load multiple BIOS settings. Load from your USB drive. Key in the BIOS Flash. ASUS SABERTOOTH X99... 3-63 Chapter 3 Key in a profile name. Profile Name This item allows you to the BIOS Flash, and create a profile. ...

User Guide
Page 135
Save Changes & Reset Once you are saved. Select Yes to load the default values. ASUS SABERTOOTH X99 3-65 Chapter 3 3.10 Exit menu The Exit menu items allow you to load the optimal default values for each of the available filesystem devices. Select OK to save or discard your changes to the BIOS items. You can access... this option or if you press , a confirmation window appears. Load Optimized Defaults This option allows you to attempt to load the default values for the BIOS items, and save changes and exit.
Save Changes & Reset Once you are saved. Select Yes to load the default values. ASUS SABERTOOTH X99 3-65 Chapter 3 3.10 Exit menu The Exit menu items allow you to load the optimal default values for each of the available filesystem devices. Select OK to save or discard your changes to the BIOS items. You can access... this option or if you press , a confirmation window appears. Load Optimized Defaults This option allows you to attempt to load the default values for the BIOS items, and save changes and exit.
User Guide
Page 138
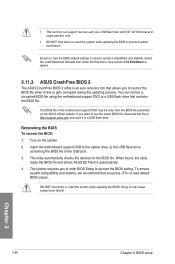
.... • DO NOT shut down or reset the system while updating the BIOS! When found, the utility reads the BIOS file and enters ASUS EZ Flash 2 automatically. 4. DO NOT shut down or reset the system while updating the BIOS to recover the BIOS setting. See section 3.10 Exit Menu for the BIOS file. To ensure system compatibility and...
.... • DO NOT shut down or reset the system while updating the BIOS! When found, the utility reads the BIOS file and enters ASUS EZ Flash 2 automatically. 4. DO NOT shut down or reset the system while updating the BIOS to recover the BIOS setting. See section 3.10 Exit Menu for the BIOS file. To ensure system compatibility and...

User Guide
Page 141
... want to prevent system boot failure. Select Yes then press . DO NOT shut down or reset the system while updating the BIOS to update the BIOS? When BIOS update is not supported due to ensure system compatibility and stability. See section 3.10 Exit menu... item under the Exit BIOS menu. After the BIOS Updater checks the selected BIOS file, select Yes to exit BIOS Updater. 6. Yes No The BIOS Backup feature is done, press to confirm the BIOS update. Restart your computer. Chapter 3 ASUS SABERTOOTH X99 3-71 Ensure to load the BIOS default settings to security ...
... want to prevent system boot failure. Select Yes then press . DO NOT shut down or reset the system while updating the BIOS to update the BIOS? When BIOS update is not supported due to ensure system compatibility and stability. See section 3.10 Exit menu... item under the Exit BIOS menu. After the BIOS Updater checks the selected BIOS file, select Yes to exit BIOS Updater. 6. Yes No The BIOS Backup feature is done, press to confirm the BIOS update. Restart your computer. Chapter 3 ASUS SABERTOOTH X99 3-71 Ensure to load the BIOS default settings to security ...
User Guide
Page 175
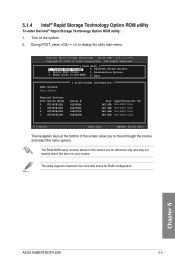
Turn on your screen. Recovery Volume Options 2. Reset Disks to move through the menus and select the menu options. Option ROM - Create RAID Volume 4. Delete RAID Volume 5. Exit RAID Volumes: None defined. [ ... at the bottom of the screen allow you to Non-RAID 6. Intel(R) Rapid Storage Technology - v10.5.1.1070 Copyright(C) 2003-10 Intel Corporation. Chapter 5 ASUS SABERTOOTH X99 5-3 The RAID BIOS setup screens shown in this section are for RAID configuration. All Rights Reserved. [ MAIN MENU ] 1. The utility supports maximum four hard disk drives for...
Turn on your screen. Recovery Volume Options 2. Reset Disks to move through the menus and select the menu options. Option ROM - Create RAID Volume 4. Delete RAID Volume 5. Exit RAID Volumes: None defined. [ ... at the bottom of the screen allow you to Non-RAID 6. Intel(R) Rapid Storage Technology - v10.5.1.1070 Copyright(C) 2003-10 Intel Corporation. Chapter 5 ASUS SABERTOOTH X99 5-3 The RAID BIOS setup screens shown in this section are for RAID configuration. All Rights Reserved. [ MAIN MENU ] 1. The utility supports maximum four hard disk drives for...


