
User Guide
Page 2
...OF THE POSSIBILITY OF SUCH DAMAGES ARISING FROM ANY DEFECT OR ERROR IN THIS MANUAL OR PRODUCT. ASUS ASSUMES NO RESPONSIBILITY OR LIABILITY FOR ANY ERRORS OR INACCURACIES THAT MAY APPEAR IN THIS MANUAL, INCLUDING THE PRODUCTS AND SOFTWARE DESCRIBED IN IT. Where the applicable license ...Public License ("GPL"), under various Free Open Source Software licenses. E10106 First Edition February 2015 Copyright© 2015 ASUSTeK COMPUTER INC. ASUS PROVIDES THIS MANUAL "AS IS" WITHOUT WARRANTY OF ANY KIND, EITHER EXPRESS OR IMPLIED, INCLUDING BUT NOT LIMITED TO THE IMPLIED WARRANTIES OR CONDITIONS...
...OF THE POSSIBILITY OF SUCH DAMAGES ARISING FROM ANY DEFECT OR ERROR IN THIS MANUAL OR PRODUCT. ASUS ASSUMES NO RESPONSIBILITY OR LIABILITY FOR ANY ERRORS OR INACCURACIES THAT MAY APPEAR IN THIS MANUAL, INCLUDING THE PRODUCTS AND SOFTWARE DESCRIBED IN IT. Where the applicable license ...Public License ("GPL"), under various Free Open Source Software licenses. E10106 First Edition February 2015 Copyright© 2015 ASUSTeK COMPUTER INC. ASUS PROVIDES THIS MANUAL "AS IS" WITHOUT WARRANTY OF ANY KIND, EITHER EXPRESS OR IMPLIED, INCLUDING BUT NOT LIMITED TO THE IMPLIED WARRANTIES OR CONDITIONS...
User Guide
Page 5
...Exit menu 3-65 3.11 Updating BIOS 3-66 3.11.1 EZ Update 3-66 3.11.2 ASUS EZ Flash 2 3-67 3.11.3 ASUS CrashFree BIOS 3 3-68 Chapter 4: Software support 4.1 Installing an operating system 4-1 4.2 Support DVD information 4-1 4.2.1 Running the support DVD 4-1 4.2.2 Obtaining the software manuals 4-3 4.3 Software information 4-4 4.4 AI Suite 3...4-4 4.4.1 Ai Charger 4-10 4.4.2 EZ ...5.1.4 Intel® Rapid Storage Technology Option ROM utility 5-3 5.2 Installing the RAID driver during Windows® OS installation 5-7 Appendices Notices ...A-1 ASUS contact information A-5 v
...Exit menu 3-65 3.11 Updating BIOS 3-66 3.11.1 EZ Update 3-66 3.11.2 ASUS EZ Flash 2 3-67 3.11.3 ASUS CrashFree BIOS 3 3-68 Chapter 4: Software support 4.1 Installing an operating system 4-1 4.2 Support DVD information 4-1 4.2.1 Running the support DVD 4-1 4.2.2 Obtaining the software manuals 4-3 4.3 Software information 4-4 4.4 AI Suite 3...4-4 4.4.1 Ai Charger 4-10 4.4.2 EZ ...5.1.4 Intel® Rapid Storage Technology Option ROM utility 5-3 5.2 Installing the RAID driver during Windows® OS installation 5-7 Appendices Notices ...A-1 ASUS contact information A-5 v

User Guide
Page 6
... the product in your area. vi If possible, disconnect all power cables from the existing system before you are using the product, ensure all the manuals that the power cables for the devices are unplugged before the signal cables are not damaged. If you encounter technical problems with the package. •...
... the product in your area. vi If possible, disconnect all power cables from the existing system before you are using the product, ensure all the manuals that the power cables for the devices are unplugged before the signal cables are not damaged. If you encounter technical problems with the package. •...
User Guide
Page 8
... you must press two or more keys simultaneously, the key names are linked with a plus sign (+). Italics Used to complete a task. Keys enclosed in this manual. DANGER/WARNING: Information to prevent injury to yourself when trying to emphasize a word or a phrase. NOTE: Tips and additional information to help you MUST follow...
... you must press two or more keys simultaneously, the key names are linked with a plus sign (+). Italics Used to complete a task. Keys enclosed in this manual. DANGER/WARNING: Information to prevent injury to yourself when trying to emphasize a word or a phrase. NOTE: Tips and additional information to help you MUST follow...
User Guide
Page 14
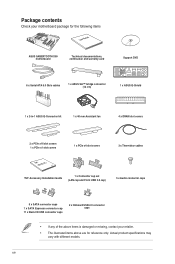
... vary with different models. Package contents Check your motherboard package for the following items User Manual ASUS SABERTOOTH X99 motherboard Technical documentations, certification and warranty card Support DVD 6 x Serial ATA 6.0 Gb/s cables 1 x ASUS SLI™ bridge connector (12 cm) 1 x ASUS Q-Shield 1 x 2-in-1 ASUS Q-Connector kit 1 x 40 mm Assistant fan 4 x DRAM slot covers 2 x PCIe x16 slot covers 1 x PCIe...
... vary with different models. Package contents Check your motherboard package for the following items User Manual ASUS SABERTOOTH X99 motherboard Technical documentations, certification and warranty card Support DVD 6 x Serial ATA 6.0 Gb/s cables 1 x ASUS SLI™ bridge connector (12 cm) 1 x ASUS Q-Shield 1 x 2-in-1 ASUS Q-Connector kit 1 x 40 mm Assistant fan 4 x DRAM slot covers 2 x PCIe x16 slot covers 1 x PCIe...
User Guide
Page 28
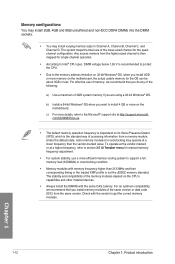
... Presence Detect (SPD), which is then mapped for the quadchannel configuration. Check with the same CAS Latency. Under the default state, some memory modules for manual memory frequency adjustment. • For system stability, use of memory, we recommend that you install memory modules of the same version or data code (D/C) from...
... Presence Detect (SPD), which is then mapped for the quadchannel configuration. Check with the same CAS Latency. Under the default state, some memory modules for manual memory frequency adjustment. • For system stability, use of memory, we recommend that you install memory modules of the same version or data code (D/C) from...
User Guide
Page 40
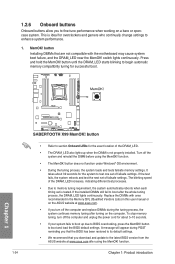
... settings. • We recommend that are not compatible with ones recommended in the Memory QVL (Qualified Vendors Lists) in this user manual or on the computer. The blinking speed of failsafe settings. switch lights continuously. Replace the DIMMs with the motherboard may cause system ...the DRAM_LED near the MemOK! A message will appear during the tuning process, the system continues memory tuning after turning on the ASUS website at www.asus.com after the whole tuning process, the DRAM_LED lights continuously. This is ideal for the exact location of failsafe settings. 1.2.6...
... settings. • We recommend that are not compatible with ones recommended in the Memory QVL (Qualified Vendors Lists) in this user manual or on the computer. The blinking speed of failsafe settings. switch lights continuously. Replace the DIMMs with the motherboard may cause system ...the DRAM_LED near the MemOK! A message will appear during the tuning process, the system continues memory tuning after turning on the ASUS website at www.asus.com after the whole tuning process, the DRAM_LED lights continuously. This is ideal for the exact location of failsafe settings. 1.2.6...
User Guide
Page 44
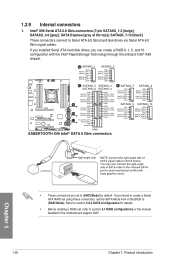
... 1, 5, and 10 configuration with the Intel® Rapid Storage Technology through the onboard Intel® X99 chipset. SATA Express [gray at the top]); Chapter 1 • These connectors are set to section 5.1 RAID configurations or the manual bundled in the BIOS to Serial ATA 6.0 Gb/s hard disk drives via Serial ATA 6.0 Gb/s ...for details. • Before creating a RAID set the SATA Mode item in the motherboard support DVD. 1-28 Chapter 1: Product introduction SATA6G_3-6 [gray]; Intel® X99 Serial ATA 6.0 Gb/s connectors (7-pin SATA6G_1-2 [beige]; 1.2.9 Internal connectors 1.
... 1, 5, and 10 configuration with the Intel® Rapid Storage Technology through the onboard Intel® X99 chipset. SATA Express [gray at the top]); Chapter 1 • These connectors are set to section 5.1 RAID configurations or the manual bundled in the BIOS to Serial ATA 6.0 Gb/s hard disk drives via Serial ATA 6.0 Gb/s ...for details. • Before creating a RAID set the SATA Mode item in the motherboard support DVD. 1-28 Chapter 1: Product introduction SATA6G_3-6 [gray]; Intel® X99 Serial ATA 6.0 Gb/s connectors (7-pin SATA6G_1-2 [beige]; 1.2.9 Internal connectors 1.
User Guide
Page 57
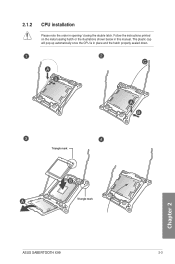
2.1.2 CPU installation Please note the order in place and the hatch properly sealed down. The plastic cap will pop up automatically once the CPU is in opening/ closing the double latch. C A B A B Triangle mark B A Triangle mark Chapter 2 ASUS SABERTOOTH X99 2-3 Follow the instructions printed on the metal sealing hatch or the illustrations shown below in this manual.
2.1.2 CPU installation Please note the order in place and the hatch properly sealed down. The plastic cap will pop up automatically once the CPU is in opening/ closing the double latch. C A B A B Triangle mark B A Triangle mark Chapter 2 ASUS SABERTOOTH X99 2-3 Follow the instructions printed on the metal sealing hatch or the illustrations shown below in this manual.
User Guide
Page 71
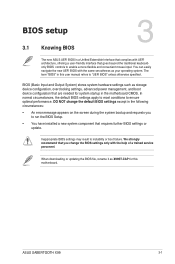
Chapter 3 ASUS SABERTOOTH X99 3-1 In normal circumstances, the default BIOS settings apply to most conditions to "UEFI BIOS" unless otherwise specified. DO NOT change the default BIOS settings except .... You can easily navigate the new UEFI BIOS with the same smoothness as your operating system. Chapter 3: BIOS setup BIOS setup 3.1 Knowing BIOS 3 The new ASUS UEFI BIOS is a Unified Extensible Interface that complies with UEFI architecture, offering a user-friendly interface that are needed for this user...
Chapter 3 ASUS SABERTOOTH X99 3-1 In normal circumstances, the default BIOS settings apply to most conditions to "UEFI BIOS" unless otherwise specified. DO NOT change the default BIOS settings except .... You can easily navigate the new UEFI BIOS with the same smoothness as your operating system. Chapter 3: BIOS setup BIOS setup 3.1 Knowing BIOS 3 The new ASUS UEFI BIOS is a Unified Extensible Interface that complies with UEFI architecture, offering a user-friendly interface that are needed for this user...
User Guide
Page 73
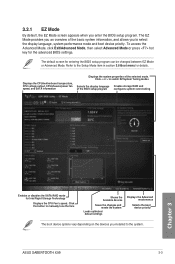
... Chapter 3 Enables or disables the SATA RAID mode for the advanced BIOS settings. Refer to the system. Click the button to manually tune the fans Shows the bootable devices Saves the changes and resets the system Loads optimized default settings Displays the Advanced mode menus ... depending on the devices you to switch EZ System Tuning modes Selects the display language Creates storage RAID and of the selected mode. ASUS SABERTOOTH X99 3-3 To access the Advanced Mode, click Exit/Advanced Mode, then select Advanced Mode or press hot key for Intel Rapid Storage Technology...
... Chapter 3 Enables or disables the SATA RAID mode for the advanced BIOS settings. Refer to the system. Click the button to manually tune the fans Shows the bootable devices Saves the changes and resets the system Loads optimized default settings Displays the Advanced mode menus ... depending on the devices you to switch EZ System Tuning modes Selects the display language Creates storage RAID and of the selected mode. ASUS SABERTOOTH X99 3-3 To access the Advanced Mode, click Exit/Advanced Mode, then select Advanced Mode or press hot key for Intel Rapid Storage Technology...

User Guide
Page 75
... allows you want to section 3.2.4 EZ Tuning Wizard for more information. Use this button to section 3.3 My Favorites for more information. Click this button to manually tweak the fans to RAID mode. It also allows you can select for that menu. Select frequentlyused BIOS settings and save it to view and... the specific items for your fans. Refer to select the language that you to change the motherboard's SATA mode from AHCI to your system. Chapter 3 ASUS SABERTOOTH X99 3-5
... allows you want to section 3.2.4 EZ Tuning Wizard for more information. Use this button to section 3.3 My Favorites for more information. Click this button to manually tweak the fans to RAID mode. It also allows you can select for that menu. Select frequentlyused BIOS settings and save it to view and... the specific items for your fans. Refer to select the language that you to change the motherboard's SATA mode from AHCI to your system. Chapter 3 ASUS SABERTOOTH X99 3-5
User Guide
Page 77
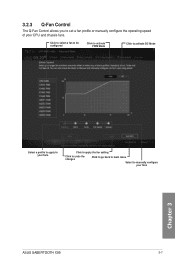
3.2.3 Q-Fan Control The Q-Fan Control allows you to manually configure your CPU and chassis fans. Click to select a fan to be configured Click to activate PWM Mode Click to activate DC Mode Chapter 3 Select a profile to apply to your fans Click to apply the fan setting Click to undo the changes Click to go back to main menu Select to set a fan profile or manually configure the operating speed of your fans ASUS SABERTOOTH X99 3-7
3.2.3 Q-Fan Control The Q-Fan Control allows you to manually configure your CPU and chassis fans. Click to select a fan to be configured Click to activate PWM Mode Click to activate DC Mode Chapter 3 Select a profile to apply to your fans Click to apply the fan setting Click to undo the changes Click to go back to main menu Select to set a fan profile or manually configure the operating speed of your fans ASUS SABERTOOTH X99 3-7
User Guide
Page 78
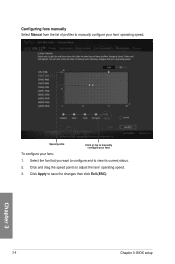
Click and drag the speed points to save the changes then click Exit (ESC). 3-8 Chapter 3: BIOS setup Chapter 3 Click Apply to adjust the fans' operating speed. 3. Configuring fans manually Select Manual from the list of profiles to manually configure your fans: 1. Select the fan that you want to configure and to manually configure your fans To configure your fans' operating speed. Speed points Click or tap to view its current status. 2.
Click and drag the speed points to save the changes then click Exit (ESC). 3-8 Chapter 3: BIOS setup Chapter 3 Click Apply to adjust the fans' operating speed. 3. Configuring fans manually Select Manual from the list of profiles to manually configure your fans: 1. Select the fan that you want to configure and to manually configure your fans To configure your fans' operating speed. Speed points Click or tap to view its current status. 2.
User Guide
Page 86
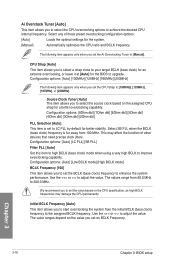
... to upgrade. Select SB PLL when the BCLK (base clock) frequency is set the value based on the value you to select a strap close to [Manual]. Configuration options: [Auto] [LC PLL] [SB PLL] Filter PLL [Auto] Set this item to high BCLK (base clock) mode when using a very high ... [Auto] [Low BCLK mode] [High BCLK mode] BCLK Frequency [100] This item allows you to set on the assigned CPU strap for the system. [Manual] Automatically optimizes the CPU ratio and BCLK frequency. Use the or to achieve the desired CPU internal frequency. Ai Overclock Tuner [Auto] This item allows...
... to upgrade. Select SB PLL when the BCLK (base clock) frequency is set the value based on the value you to select a strap close to [Manual]. Configuration options: [Auto] [LC PLL] [SB PLL] Filter PLL [Auto] Set this item to high BCLK (base clock) mode when using a very high ... [Auto] [Low BCLK mode] [High BCLK mode] BCLK Frequency [100] This item allows you to set on the assigned CPU strap for the system. [Manual] Automatically optimizes the CPU ratio and BCLK frequency. Use the or to achieve the desired CPU internal frequency. Ai Overclock Tuner [Auto] This item allows...
User Guide
Page 87
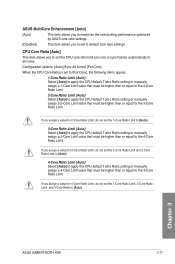
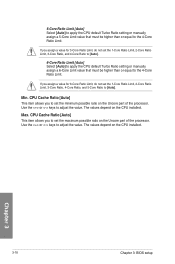
...Core Ratio Limit [Auto] Select [Auto] to apply the CPU default Turbo Ratio setting or manually assign a 2-Core Limit value that must be higher than or equal to the 4-Core Ratio Limit. Chapter 3 ASUS SABERTOOTH X99 3-17 If you assign a value for 4-Core Ratio Limit, do not set the 1-...Core Ratio Limit, 2-Core Ratio Limit, and 3-Core Ratio to [Auto]. ASUS MultiCore Enhancement [Auto] [Auto] This item allows you to maximize...
...Core Ratio Limit [Auto] Select [Auto] to apply the CPU default Turbo Ratio setting or manually assign a 2-Core Limit value that must be higher than or equal to the 4-Core Ratio Limit. Chapter 3 ASUS SABERTOOTH X99 3-17 If you assign a value for 4-Core Ratio Limit, do not set the 1-...Core Ratio Limit, 2-Core Ratio Limit, and 3-Core Ratio to [Auto]. ASUS MultiCore Enhancement [Auto] [Auto] This item allows you to maximize...
User Guide
Page 88
..., 4-Core Ratio, and 5-Core Ratio to the 4-Core Ratio Limit. 5-Core Ratio Limit [Auto] Select [Auto] to apply the CPU default Turbo Ratio setting or manually assign a 5-Core Limit value that must be higher than or equal to [Auto]. If you assign a value for 5-Core Ratio Limit, do not set the..., 2-Core Ratio Limit, 3-Core Ratio, and 4-Core Ratio to [Auto]. 6-Core Ratio Limit [Auto] Select [Auto] to apply the CPU default Turbo Ratio setting or manually assign a 6-Core Limit value that must be higher than or equal to the 4-Core Ratio Limit.
..., 4-Core Ratio, and 5-Core Ratio to the 4-Core Ratio Limit. 5-Core Ratio Limit [Auto] Select [Auto] to apply the CPU default Turbo Ratio setting or manually assign a 5-Core Limit value that must be higher than or equal to [Auto]. If you assign a value for 5-Core Ratio Limit, do not set the..., 2-Core Ratio Limit, 3-Core Ratio, and 4-Core Ratio to [Auto]. 6-Core Ratio Limit [Auto] Select [Auto] to apply the CPU default Turbo Ratio setting or manually assign a 6-Core Limit value that must be higher than or equal to the 4-Core Ratio Limit.
User Guide
Page 96
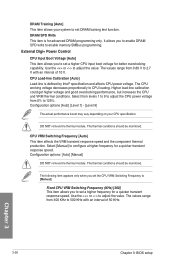
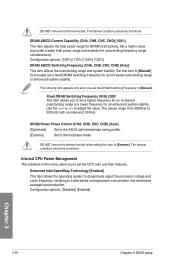
... calibration could get higher voltage and good overclocking performance, but increases the CPU and VRM thermal conditions. Configuration options: [Auto] [Manual] DO NOT remove the thermal module. Fixed CPU VRM Switching Frequency (KHz) [300] This item allows you to enable DRAM SPD...thermal conditions should be monitored. DRAM SPD Write This item is defined by Intel® specification and affects CPU power voltage. Select [Manual] to set DRAM training test function. The following item appears only when you to configure a higher frequency for advanced DRAM programming only...
... calibration could get higher voltage and good overclocking performance, but increases the CPU and VRM thermal conditions. Configuration options: [Auto] [Manual] DO NOT remove the thermal module. Fixed CPU VRM Switching Frequency (KHz) [300] This item allows you to enable DRAM SPD...thermal conditions should be monitored. DRAM SPD Write This item is defined by Intel® specification and affects CPU power voltage. Select [Manual] to set DRAM training test function. The following item appears only when you to configure a higher frequency for advanced DRAM programming only...
User Guide
Page 98
...the overclocking range and system stability. The thermal conditions should be monitored. Fixed DRAM Switching Frequency (KHz) [300] This item allows you to manually set a higher frequency for an increased overclocking range or a lower frequency for an enhanced system stability. Use the or to set the DRAM ...Switching Frequency to the full phase mode. Internal CPU Power Management The subitems in this item to [Manual] to set a fixed DRAM switching frequency for DRAM overclocking. DRAM Power Phase Control (CHA, CHB, CHC, CHD) [Auto] [Optimized] Set ...
...the overclocking range and system stability. The thermal conditions should be monitored. Fixed DRAM Switching Frequency (KHz) [300] This item allows you to manually set a higher frequency for an increased overclocking range or a lower frequency for an enhanced system stability. Use the or to set the DRAM ...Switching Frequency to the full phase mode. Internal CPU Power Management The subitems in this item to [Manual] to set a fixed DRAM switching frequency for DRAM overclocking. DRAM Power Phase Control (CHA, CHB, CHC, CHD) [Auto] [Optimized] Set ...
User Guide
Page 100
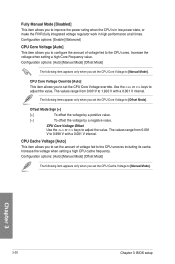
...the CPU uncores including its cache. Configuration options: [Enable] [Balanced] CPU Core Voltage [Auto] This item allows you set the CPU Core Voltage to [Manual Mode]. Chapter 3 3-30 Chapter 3: BIOS setup Use the or keys to adjust the value, The values range from 0.001 V to 0.999 V ... offset the voltage by a positive value. [-] To offset the voltage by a negative value. CPU Core Voltage Offset Use the or keys to [Manual Mode]. Fully Manual Mode [Disabled] This item allows you set the CPU Core Voltage to [Offset Mode]. The values range from 0.001V to 1.920 V with a...
...the CPU uncores including its cache. Configuration options: [Enable] [Balanced] CPU Core Voltage [Auto] This item allows you set the CPU Core Voltage to [Manual Mode]. Chapter 3 3-30 Chapter 3: BIOS setup Use the or keys to adjust the value, The values range from 0.001 V to 0.999 V ... offset the voltage by a positive value. [-] To offset the voltage by a negative value. CPU Core Voltage Offset Use the or keys to [Manual Mode]. Fully Manual Mode [Disabled] This item allows you set the CPU Core Voltage to [Offset Mode]. The values range from 0.001V to 1.920 V with a...


