User Manual
Page 2
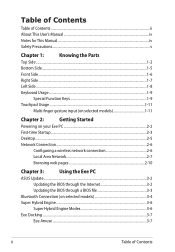
... the Parts Top Side...1-2 Bottom Side...1-5 Front Side...1-6 Right Side...1-7 Left Side...1-8 Keyboard Usage...1-9 Special Function Keys 1-9 Touchpad Usage...1-11 Multi-finger gesture input (on selected models 1-11 Chapter 2: Getting Started Powering on your Eee PC...2-2 First-time Startup...2-3 Desktop...2-5 Network Connection...2-6 Configuring a wireless network connection 2-6 Local Area Network 2-7 Browsing web pages 2-10 Chapter 3: Using the Eee PC ASUS Update...3-2 Updating the BIOS through the Internet 3-2 Updating the BIOS through a BIOS file 3-3 Bluetooth...
... the Parts Top Side...1-2 Bottom Side...1-5 Front Side...1-6 Right Side...1-7 Left Side...1-8 Keyboard Usage...1-9 Special Function Keys 1-9 Touchpad Usage...1-11 Multi-finger gesture input (on selected models 1-11 Chapter 2: Getting Started Powering on your Eee PC...2-2 First-time Startup...2-3 Desktop...2-5 Network Connection...2-6 Configuring a wireless network connection 2-6 Local Area Network 2-7 Browsing web pages 2-10 Chapter 3: Using the Eee PC ASUS Update...3-2 Updating the BIOS through the Internet 3-2 Updating the BIOS through a BIOS file 3-3 Bluetooth...
User Manual
Page 3
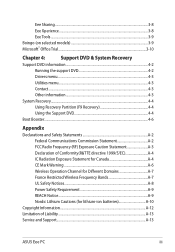
... 4: Support DVD & System Recovery Support DVD information 4-2 Running the support DVD 4-2 Drivers menu...4-3 Utilities menu...4-3 Contact...4-3 Other information 4-3 System Recovery...4-4 Using Recovery Partition (F9 Recovery 4-4 Using the Support DVD 4-4 Boot Booster...4-6 Appendix Declarations and Safety Statements A-2 Federal Communications Commission Statement A-2 FCC Radio Frequency (RF) Exposure Caution Statement A-3 Declaration of Conformity(R&TTE directive 1999/5/EC A-4 IC Radiation Exposure Statement for Canada A-4 CE Mark Warning...A-6 Wireless Operation Channel...
... 4: Support DVD & System Recovery Support DVD information 4-2 Running the support DVD 4-2 Drivers menu...4-3 Utilities menu...4-3 Contact...4-3 Other information 4-3 System Recovery...4-4 Using Recovery Partition (F9 Recovery 4-4 Using the Support DVD 4-4 Boot Booster...4-6 Appendix Declarations and Safety Statements A-2 Federal Communications Commission Statement A-2 FCC Radio Frequency (RF) Exposure Caution Statement A-3 Declaration of Conformity(R&TTE directive 1999/5/EC A-4 IC Radiation Exposure Statement for Canada A-4 CE Mark Warning...A-6 Wireless Operation Channel...
User Manual
Page 4
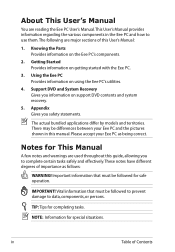
... this guide, allowing you information on support DVD contents and system recovery. 5. IMPORTANT! NOTE: Information for completing tasks. Knowing the Parts Provides information on using the Eee PC's utilities. 4. Notes for safe operation. Vital information that must be followed for This Manual A few notes and warnings are major sections of Contents iv Table of this User's Manual: 1. Using the Eee PC Provides information on the Eee PC...
... this guide, allowing you information on support DVD contents and system recovery. 5. IMPORTANT! NOTE: Information for completing tasks. Knowing the Parts Provides information on using the Eee PC's utilities. 4. Notes for safe operation. Vital information that must be followed for This Manual A few notes and warnings are major sections of Contents iv Table of this User's Manual: 1. Using the Eee PC Provides information on the Eee PC...
User Manual
Page 5
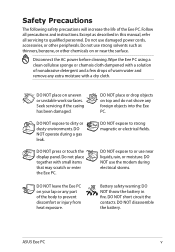
..., or moisture. DO NOT press or touch the display panel. DO NOT leave the Eee PC on uneven or unstable work surfaces. DO NOT place on your lap or any foreign objects into the Eee PC. DO NOT use strong solvents such as described in fire. DO NOT disassemble the battery. Follow all servicing to prevent discomfort or injury from heat...
..., or moisture. DO NOT press or touch the display panel. DO NOT leave the Eee PC on uneven or unstable work surfaces. DO NOT place on your lap or any foreign objects into the Eee PC. DO NOT use strong solvents such as described in fire. DO NOT disassemble the battery. Follow all servicing to prevent discomfort or injury from heat...
User Manual
Page 6
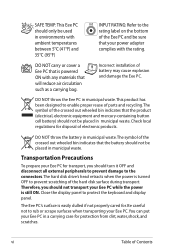
... of the crossed out wheeled bin indicates that the battery should not be placed in municipal waste. The hard disk drive's head retracts when the power is still ON. Therefore, you should turn it OFF and disconnect all external peripherals to prevent damage to enable proper reuse of parts and recycling.The symbol of the Eee PC and be sure that is...
... of the crossed out wheeled bin indicates that the battery should not be placed in municipal waste. The hard disk drive's head retracts when the power is still ON. Therefore, you should turn it OFF and disconnect all external peripherals to prevent damage to enable proper reuse of parts and recycling.The symbol of the Eee PC and be sure that is...

User Manual
Page 11
... models. 7 Touchpad and Buttons The touchpad and its buttons comprises a pointing device that provides the same functions as a desktop mouse. 8 Status Indicators Power Indicator The power indicator lights when the Eee PC is turned ON and blinks slowly when the Eee PC is in the Save-to -RAM (Suspend) mode. ASUS Eee PC 1-3 The power switch only works when the display panel is turned OFF. The keyboard differs depending on /off the function by pressing + . 5 Power Switch The power switch allows powering ON and OFF the Eee PC and recovering...
... models. 7 Touchpad and Buttons The touchpad and its buttons comprises a pointing device that provides the same functions as a desktop mouse. 8 Status Indicators Power Indicator The power indicator lights when the Eee PC is turned ON and blinks slowly when the Eee PC is in the Save-to -RAM (Suspend) mode. ASUS Eee PC 1-3 The power switch only works when the display panel is turned OFF. The keyboard differs depending on /off the function by pressing + . 5 Power Switch The power switch allows powering ON and OFF the Eee PC and recovering...
User Manual
Page 13
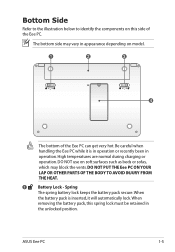
... operation. When the battery pack is inserted, it is in operation or recently been in the unlocked position. ASUS Eee PC 1-5 When removing the battery pack, this side of the Eee PC can get very hot. Bottom Side Refer to the illustration below to identify the components on model. 1 2 3 4 The bottom of the Eee PC. Be careful when handling the Eee PC while it will automatically lock...
... operation. When the battery pack is inserted, it is in operation or recently been in the unlocked position. ASUS Eee PC 1-5 When removing the battery pack, this side of the Eee PC can get very hot. Bottom Side Refer to the illustration below to identify the components on model. 1 2 3 4 The bottom of the Eee PC. Be careful when handling the Eee PC while it will automatically lock...

User Manual
Page 15
... function. 5 LAN Port The eight-pin RJ-45 LAN port (10/100M bit) supports a standard Ethernet cable for Skype, voice narrations, or simple audio recordings. 4 USB Port (2.0/1.1) The USB (Universal Serial Bus) port is compatible with USB 2.0 or USB 1.1 devices such as keyboards, pointing devices, cameras, and storage devices, connected in connector allows convenient use without additional adapters. ASUS Eee PC 1-7 The built-in a series up to 12Mbits/sec (USB 1.1) and 480Mbits/sec (USB 2.0). Using this side of the Eee PC. 1 23 4 5 1 Memory Card Slot...
... function. 5 LAN Port The eight-pin RJ-45 LAN port (10/100M bit) supports a standard Ethernet cable for Skype, voice narrations, or simple audio recordings. 4 USB Port (2.0/1.1) The USB (Universal Serial Bus) port is compatible with USB 2.0 or USB 1.1 devices such as keyboards, pointing devices, cameras, and storage devices, connected in connector allows convenient use without additional adapters. ASUS Eee PC 1-7 The built-in a series up to 12Mbits/sec (USB 1.1) and 480Mbits/sec (USB 2.0). Using this side of the Eee PC. 1 23 4 5 1 Memory Card Slot...
User Manual
Page 17
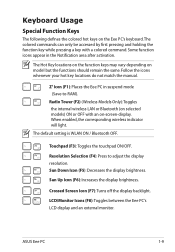
... the display backlight. When enabled, the corresponding wireless indicator will light. The colored commands can only be accessed by first pressing and holding the function key while pressing a key with an on the Eee PC's keyboard. Sun Up Icon (F6): Increases the display brightness. LCD/Monitor Icons (F8): Toggles between the Eee PC's LCD display and an external monitor. Keyboard Usage Special Function Keys The following defines the colored hot keys on -screen-display. The Hot Key locations on the function keys...
... the display backlight. When enabled, the corresponding wireless indicator will light. The colored commands can only be accessed by first pressing and holding the function key while pressing a key with an on the Eee PC's keyboard. Sun Up Icon (F6): Increases the display brightness. LCD/Monitor Icons (F8): Toggles between the Eee PC's LCD display and an external monitor. Keyboard Usage Special Function Keys The following defines the colored hot keys on -screen-display. The Hot Key locations on the function keys...

User Manual
Page 18
Super Hybrid Engine (Fn+Space Bar): Toggles among various power saving modes. Allows you to use of a larger portion of the keyboard for number entering. Volume Down Icon (F11): Decreases speaker volume. Pg Dn (↓): Press to scroll up in documents or the web browser. Windows icon: Displays the start menu. Allows use a larger portion of the keyboard for cell navigation. End (→): Press to move...
Super Hybrid Engine (Fn+Space Bar): Toggles among various power saving modes. Allows you to use of a larger portion of the keyboard for number entering. Volume Down Icon (F11): Decreases speaker volume. Pg Dn (↓): Press to scroll up in documents or the web browser. Windows icon: Displays the start menu. Allows use a larger portion of the keyboard for cell navigation. End (→): Press to move...
User Manual
Page 22
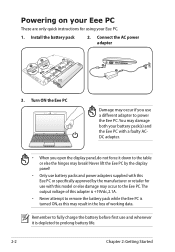
... Eee PC Damage may occur if you open the display panel, do not force it is turned ON, as this may result in the loss of this adapter is +19Vdc, 2.1A. • Never attempt to remove the battery pack while the Eee PC is depleted to prolong battery life. 2-2 Chapter 2: Getting Started Install the battery pack 2. Powering on your Eee PC These are only quick instructions for use with this model...
... Eee PC Damage may occur if you open the display panel, do not force it is turned ON, as this may result in the loss of this adapter is +19Vdc, 2.1A. • Never attempt to remove the battery pack while the Eee PC is depleted to prolong battery life. 2-2 Chapter 2: Getting Started Install the battery pack 2. Powering on your Eee PC These are only quick instructions for use with this model...
User Manual
Page 23
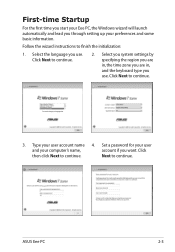
... information. ASUS Eee PC 2-3 First-time Startup For the first time you start your Eee PC, the Windows wizard will launch automatically and lead you want. Follow the wizard instructions to continue. 2. Select you system settings by specifying the region you are in, the time zone you are in, and the keyboard type you use . Click Next to continue. Type your user account name...
... information. ASUS Eee PC 2-3 First-time Startup For the first time you start your Eee PC, the Windows wizard will launch automatically and lead you want. Follow the wizard instructions to continue. 2. Select you system settings by specifying the region you are in, the time zone you are in, and the keyboard type you use . Click Next to continue. Type your user account name...
User Manual
Page 27
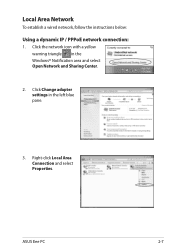
Click Change adapter settings in the Windows® Notification area and select Open Network and Sharing Center. 2. Right-click Local Area Connection and select Properties. ASUS Eee PC 2-7 Click the network icon with a yellow warning triangle in the left blue pane. 3. Local Area Network To establish a wired network, follow the instructions below: Using a dynamic IP / PPPoE network connection: 1.
Click Change adapter settings in the Windows® Notification area and select Open Network and Sharing Center. 2. Right-click Local Area Connection and select Properties. ASUS Eee PC 2-7 Click the network icon with a yellow warning triangle in the left blue pane. 3. Local Area Network To establish a wired network, follow the instructions below: Using a dynamic IP / PPPoE network connection: 1.
User Manual
Page 30
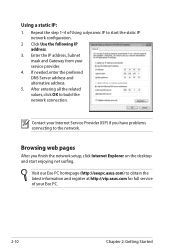
... from your Internet Service Provider (ISP) if you finish the network setup, click Internet Explorer on the desktop and start the static IP network configuration. 2 Click Use the following IP address. 3. After entering all the related values, click OK to start enjoying net surfing. Browsing web pages After you have problems connecting to the network. Repeat the step 1-4 of your Eee PC. 2-10 Chapter 2: Getting Started If needed, enter the...
... from your Internet Service Provider (ISP) if you finish the network setup, click Internet Explorer on the desktop and start the static IP network configuration. 2 Click Use the following IP address. 3. After entering all the related values, click OK to start enjoying net surfing. Browsing web pages After you have problems connecting to the network. Repeat the step 1-4 of your Eee PC. 2-10 Chapter 2: Getting Started If needed, enter the...
User Manual
Page 32
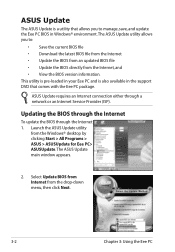
... the BIOS version information. ASUS Update requires an Internet connection either through the Internet 1. Updating the BIOS through the Internet To update the BIOS through a network or an Internet Service Provider (ISP). The ASUS Update utility allows you to : • Save the current BIOS file • Download the latest BIOS file from the Internet • Update the BIOS from an updated BIOS file • Update the BIOS directly from the Windows® desktop by clicking Start > All Programs > ASUS > ASUSUpdate for Eee PC> ASUSUpdate. Select Update BIOS from Internet...
... the BIOS version information. ASUS Update requires an Internet connection either through the Internet 1. Updating the BIOS through the Internet To update the BIOS through a network or an Internet Service Provider (ISP). The ASUS Update utility allows you to : • Save the current BIOS file • Download the latest BIOS file from the Internet • Update the BIOS from an updated BIOS file • Update the BIOS directly from the Windows® desktop by clicking Start > All Programs > ASUS > ASUSUpdate for Eee PC> ASUSUpdate. Select Update BIOS from Internet...
User Manual
Page 33
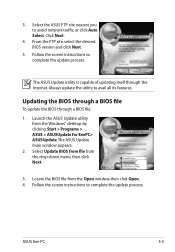
... window appears. 2. ASUS Eee PC 3-3 3. Always update the utility to complete the update process. Launch the ASUS Update utility from the drop‑down menu, then click Next. 3. From the FTP site, select the desired BIOS version and click Next. 5. Select Update BIOS from file from the Windows® desktop by clicking Start > Programs > ASUS > ASUSUpdate for EeePC> ASUSUpdate. Updating the BIOS through a BIOS file To update the BIOS through the Internet. Follow the screen instructions to avoid network...
... window appears. 2. ASUS Eee PC 3-3 3. Always update the utility to complete the update process. Launch the ASUS Update utility from the drop‑down menu, then click Next. 3. From the FTP site, select the desired BIOS version and click Next. 5. Select Update BIOS from file from the Windows® desktop by clicking Start > Programs > ASUS > ASUSUpdate for EeePC> ASUSUpdate. Updating the BIOS through a BIOS file To update the BIOS through the Internet. Follow the screen instructions to avoid network...
User Manual
Page 43
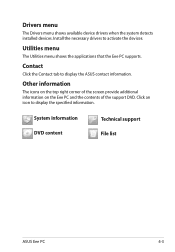
... of the screen provide additional information on the Eee PC and the contents of the support DVD. System information DVD content Technical support File list ASUS Eee PC 4-3 Install the necessary drivers to display the ASUS contact information. Contact Click the Contact tab to activate the devices. Drivers menu The Drivers menu shows available device drivers when the system detects installed devices. Utilities menu The Utilities menu shows the applications that the Eee PC supports. Click an icon to display the specified...
... of the screen provide additional information on the Eee PC and the contents of the support DVD. System information DVD content Technical support File list ASUS Eee PC 4-3 Install the necessary drivers to display the ASUS contact information. Contact Click the Contact tab to activate the devices. Drivers menu The Drivers menu shows available device drivers when the system detects installed devices. Utilities menu The Utilities menu shows the applications that the Eee PC supports. Click an icon to display the specified...
User Manual
Page 44
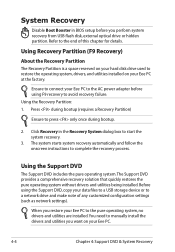
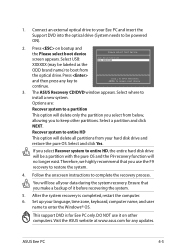
.... You need to manually install the drivers and utilities you restore your Eee PC. 4-4 Chapter 4: Support DVD & System Recovery Using the Support DVD The Support DVD includes the pure operating system.The Support DVD provides a comprehensive recovery solution that quickly restores the pure operating system without drivers and utilities being installed. System Recovery Disable Boot Booster in the Recovery System dialog box to start the system recovery. 3. Using the Recovery Partition: 1. Click Recovery in BIOS setup before using the Support DVD, copy your hard disk drive used to...
.... You need to manually install the drivers and utilities you restore your Eee PC. 4-4 Chapter 4: Support DVD & System Recovery Using the Support DVD The Support DVD includes the pure operating system.The Support DVD provides a comprehensive recovery solution that quickly restores the pure operating system without drivers and utilities being installed. System Recovery Disable Boot Booster in the Recovery System dialog box to start the system recovery. 3. Using the Recovery Partition: 1. Click Recovery in BIOS setup before using the Support DVD, copy your hard disk drive used to...
User Manual
Page 45
... hard disk drive will be a partition with the pure OS and the F9 recovery function will delete all your language, time zone, keyboard, computer name, and user name to entire HD This option will no longer exist. If you select Recover system to install a new system. Follow the onscreen instructions to select boot device continue. 3. ASUS Eee PC 4-5 Press on other partitions. Press and then press any updates. Recover...
... hard disk drive will be a partition with the pure OS and the F9 recovery function will delete all your language, time zone, keyboard, computer name, and user name to entire HD This option will no longer exist. If you select Recover system to install a new system. Follow the onscreen instructions to select boot device continue. 3. ASUS Eee PC 4-5 Press on other partitions. Press and then press any updates. Recover...
User Manual
Page 46
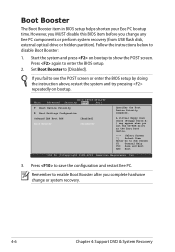
Main BIOS SETUP UTILITY Advanced Security Boot Exit Boot Device Priority Boot Settings Configuration OnBoard LAN Boot ROM [Enabled] Boot Booster [Disabled] Specifies the Boot Device Priority sequence. Boot Booster The Boot Booster item in BIOS setup helps shorten your Eee PC bootup time. However, you MUST disable this BIOS item before you complete hardware change any Eee PC components or perform system recovery (from USB flash disk, external optical drive or hidden partition). Remember to see the POST screen or enter the BIOS setup by doing the instruction above, ...
Main BIOS SETUP UTILITY Advanced Security Boot Exit Boot Device Priority Boot Settings Configuration OnBoard LAN Boot ROM [Enabled] Boot Booster [Disabled] Specifies the Boot Device Priority sequence. Boot Booster The Boot Booster item in BIOS setup helps shorten your Eee PC bootup time. However, you MUST disable this BIOS item before you complete hardware change any Eee PC components or perform system recovery (from USB flash disk, external optical drive or hidden partition). Remember to see the POST screen or enter the BIOS setup by doing the instruction above, ...


