User Manual
Page 1
E5064 Eee PC User Manual Windows® 7 Edition Eee PC 1005 Series 15G06Q178001
E5064 Eee PC User Manual Windows® 7 Edition Eee PC 1005 Series 15G06Q178001

User Manual
Page 18
... the keyboard for number entering. Allows you to use of a larger portion of the keyboard for cell navigation. Crossed Speaker Icon (F10): Mutes the speaker. Windows icon: Displays the start menu. Menu with pointer icon : Activates the properties menu and is shown on an object. 1-10 Chapter 1: Knowing the Parts Scr...
... the keyboard for number entering. Allows you to use of a larger portion of the keyboard for cell navigation. Crossed Speaker Icon (F10): Mutes the speaker. Windows icon: Displays the start menu. Menu with pointer icon : Activates the properties menu and is shown on an object. 1-10 Chapter 1: Knowing the Parts Scr...
User Manual
Page 19
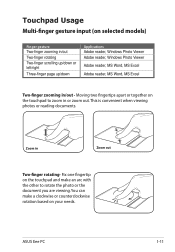
Touchpad Usage Multi-finger gesture input (on your needs. ASUS Eee PC 1-11 Zoom in /out - Moving two fingertips apart or together on the touchpad to rotate the photo or the document you are viewing. You can ...-finger zooming in/out Two-finger rotating Two-finger scrolling up/down or left/right Three-finger page up/down Applications Adobe reader, Windows Photo Viewer Adobe reader, Windows Photo Viewer Adobe reader, MS Word, MS Excel Adobe reader, MS Word, MS Excel Two-finger zooming in Zoom out Two-finger rotating...
Touchpad Usage Multi-finger gesture input (on your needs. ASUS Eee PC 1-11 Zoom in /out - Moving two fingertips apart or together on the touchpad to rotate the photo or the document you are viewing. You can ...-finger zooming in/out Two-finger rotating Two-finger scrolling up/down or left/right Three-finger page up/down Applications Adobe reader, Windows Photo Viewer Adobe reader, Windows Photo Viewer Adobe reader, MS Word, MS Excel Adobe reader, MS Word, MS Excel Two-finger zooming in Zoom out Two-finger rotating...
User Manual
Page 20
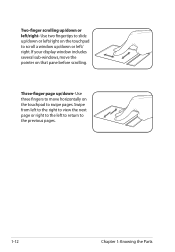
Use two fingertips to slide up/down or left / right. If your display window includes several sub-windows, move horizontally on the touchpad to swipe pages. Three-finger page up/down or left /right on that pane before scrolling. Swipe from left to the right to view the next page or right to the left /right- Two-finger scrolling up/down or left to return to the previous pages. 1-12 Chapter 1: Knowing the Parts Use three fingers to move the pointer on the touchpad to scroll a window up/down -
Use two fingertips to slide up/down or left / right. If your display window includes several sub-windows, move horizontally on the touchpad to swipe pages. Three-finger page up/down or left /right on that pane before scrolling. Swipe from left to the right to view the next page or right to the left /right- Two-finger scrolling up/down or left to return to the previous pages. 1-12 Chapter 1: Knowing the Parts Use three fingers to move the pointer on the touchpad to scroll a window up/down -
User Manual
Page 23
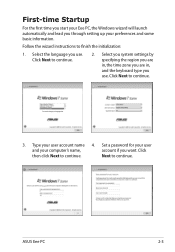
Click Next to continue. ASUS Eee PC 2-3 Select you system settings by specifying the region you are in, the time zone you are in, and the keyboard type you want. Click then ... user account name 4. Click Next to continue. Follow the wizard instructions to finish the initialization: 1. First-time Startup For the first time you start your Eee PC, the Windows wizard will launch automatically and lead you use . Select the language you through setting up your preferences and some basic information.
Click Next to continue. ASUS Eee PC 2-3 Select you system settings by specifying the region you are in, the time zone you are in, and the keyboard type you want. Click then ... user account name 4. Click Next to continue. Follow the wizard instructions to finish the initialization: 1. First-time Startup For the first time you start your Eee PC, the Windows wizard will launch automatically and lead you use . Select the language you through setting up your preferences and some basic information.
User Manual
Page 26
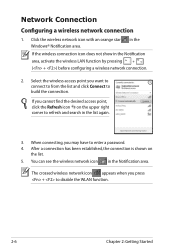
... icon appears when you may have to build the connection. Network Connection Configuring a wireless network connection 1. Click the wireless network icon with an orange star Windows® Notification area. After a connection has been established, the connection is shown on the upper right corner to disable the WLAN function. 2-6 Chapter 2: Getting Started...
... icon appears when you may have to build the connection. Network Connection Configuring a wireless network connection 1. Click the wireless network icon with an orange star Windows® Notification area. After a connection has been established, the connection is shown on the upper right corner to disable the WLAN function. 2-6 Chapter 2: Getting Started...
User Manual
Page 27
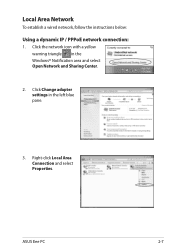
Click the network icon with a yellow warning triangle in the left blue pane. 3. Click Change adapter settings in the Windows® Notification area and select Open Network and Sharing Center. 2. ASUS Eee PC 2-7 Right-click Local Area Connection and select Properties. Local Area Network To establish a wired network, follow the instructions below: Using a dynamic IP / PPPoE network connection: 1.
Click the network icon with a yellow warning triangle in the left blue pane. 3. Click Change adapter settings in the Windows® Notification area and select Open Network and Sharing Center. 2. ASUS Eee PC 2-7 Right-click Local Area Connection and select Properties. Local Area Network To establish a wired network, follow the instructions below: Using a dynamic IP / PPPoE network connection: 1.
User Manual
Page 32
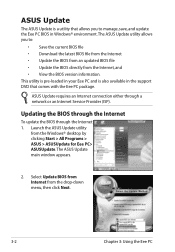
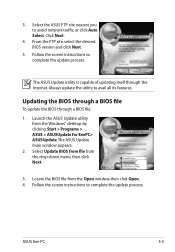
...‑down menu, then click Next. 3-2 Chapter 3: Using the Eee PC Select Update BIOS from Internet from the Windows® desktop by clicking Start > All Programs > ASUS > ASUSUpdate for Eee PC> ASUSUpdate. ASUS Update The ASUS Update is also available in Windows® environment. The ASUS Update main window appears. 2. The ASUS Update utility allows you to : • Save the current BIOS...
...‑down menu, then click Next. 3-2 Chapter 3: Using the Eee PC Select Update BIOS from Internet from the Windows® desktop by clicking Start > All Programs > ASUS > ASUSUpdate for Eee PC> ASUSUpdate. ASUS Update The ASUS Update is also available in Windows® environment. The ASUS Update main window appears. 2. The ASUS Update utility allows you to : • Save the current BIOS...
User Manual
Page 33
... update process. Select Update BIOS from file from the Open window, then click Open. 4. Follow the screen instructions to complete the update process. ASUS Eee PC 3-3 Always update the utility to avoid network traffic, or click Auto Select. The ASUS Update main window appears. 2. 3. Select the ASUS FTP site nearest you to avail all its features. From...
... update process. Select Update BIOS from file from the Open window, then click Open. 4. Follow the screen instructions to complete the update process. ASUS Eee PC 3-3 Always update the utility to avoid network traffic, or click Auto Select. The ASUS Update main window appears. 2. 3. Select the ASUS FTP site nearest you to avail all its features. From...
User Manual
Page 38
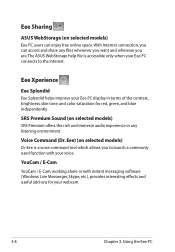
... messaging software (Windows Live Messenger, Skype, etc.), provides interesting effects and useful add-ons for red, green, and blue independently. Voice Command (Dr. Eee) (on selected models) Dr. Eee is accessible only when your voice. With Internet connection, you to launch a commonly used function wtih your Eee PC connects to the Internet. Eee Sharing ASUS WebStorage (on...
... messaging software (Windows Live Messenger, Skype, etc.), provides interesting effects and useful add-ons for red, green, and blue independently. Voice Command (Dr. Eee) (on selected models) Dr. Eee is accessible only when your voice. With Internet connection, you to launch a commonly used function wtih your Eee PC connects to the Internet. Eee Sharing ASUS WebStorage (on...
User Manual
Page 45
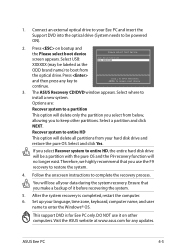
..., keyboard, computer name, and user name to select boot device continue. 3. Select and click Yes. This support DVD is completed, restart the computer. 6. ASUS Eee PC 4-5 If you to be a partition with the pure OS and the F9 recovery function will be powered ON). 2. DO NOT use the F9 recovery to... entire HD, the entire hard disk drive will no longer exist. The ASUS Recovery CD/DVD window appears. Therefore, we highly recommend that you use it before recovering the system. 5. Select USB: XXXXXX (may be labeled as the ...
..., keyboard, computer name, and user name to select boot device continue. 3. Select and click Yes. This support DVD is completed, restart the computer. 6. ASUS Eee PC 4-5 If you to be a partition with the pure OS and the F9 recovery function will be powered ON). 2. DO NOT use the F9 recovery to... entire HD, the entire hard disk drive will no longer exist. The ASUS Recovery CD/DVD window appears. Therefore, we highly recommend that you use it before recovering the system. 5. Select USB: XXXXXX (may be labeled as the ...

User Manual
Page 50
... provide maximum shielding. A-4 Appendix End users must accept any interference, including interference that is installed outdoors is intended to be operated indoors and away from windows to the licensed service (i.e. co-channel Mobile Satellite systems) this device is subject to the transmitting antenna during transmitting. Equipment (or its transmit antenna) that...
... provide maximum shielding. A-4 Appendix End users must accept any interference, including interference that is installed outdoors is intended to be operated indoors and away from windows to the licensed service (i.e. co-channel Mobile Satellite systems) this device is subject to the transmitting antenna during transmitting. Equipment (or its transmit antenna) that...


