Owners Manual
Page 3
... Setting 20 Flash Memory (optional) Playing MP3/WMA Files from Flash Memory (optional 20 About MP3/WMA File of Flash Memory ...........20 iPod/iPhone (optional) (CDE-152/CDE-151 only) Connecting an iPod/iPhone 21 Setting the iPod Control 21 Playback 21 Searching for a desired Song 22 Direct Search Function 22 3-EN
... Setting 20 Flash Memory (optional) Playing MP3/WMA Files from Flash Memory (optional 20 About MP3/WMA File of Flash Memory ...........20 iPod/iPhone (optional) (CDE-152/CDE-151 only) Connecting an iPod/iPhone 21 Setting the iPod Control 21 Playback 21 Searching for a desired Song 22 Direct Search Function 22 3-EN
Owners Manual
Page 4
Contents Select Playlist/Artist/Album/Genre/ Composer 23 Random Play Shuffle (M.I.X 23 Repeat Play 23 Information In Case of Difficulty 24 Basic 24 Radio 24 CD 24 MP3/WMA 24 Audio 24 iPod (CDE-152/CDE-151 only 24 Indication for CD Player 24 Indication for Flash Memory 25 Indication for iPod Mode (CDE-152/CDE-151 only 25 Specifications 27 Installation and Connections WARNING 28 CAUTION 28 PRECAUTIONS 28 Installation 29 Removal 29 Connections 30 LIMITED WARRANTY ENGLISH 4-EN
Contents Select Playlist/Artist/Album/Genre/ Composer 23 Random Play Shuffle (M.I.X 23 Repeat Play 23 Information In Case of Difficulty 24 Basic 24 Radio 24 CD 24 MP3/WMA 24 Audio 24 iPod (CDE-152/CDE-151 only 24 Indication for CD Player 24 Indication for Flash Memory 25 Indication for iPod Mode (CDE-152/CDE-151 only 25 Specifications 27 Installation and Connections WARNING 28 CAUTION 28 PRECAUTIONS 28 Installation 29 Removal 29 Connections 30 LIMITED WARRANTY ENGLISH 4-EN
Owners Manual
Page 8
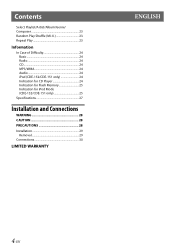
... MODE to "Setting the AUX SETUP mode" on the back of the front panel to ON. Attaching Demonstration Function This unit has a demonstration feature for CDE-152/CDE-151 and when the iPod/iPhone is connected. *2 Only when AUX SETUP is not a malfunction. • When detaching the front panel, do not apply excessive force...
... MODE to "Setting the AUX SETUP mode" on the back of the front panel to ON. Attaching Demonstration Function This unit has a demonstration feature for CDE-152/CDE-151 and when the iPod/iPhone is connected. *2 Only when AUX SETUP is not a malfunction. • When detaching the front panel, do not apply excessive force...

Owners Manual
Page 14
... affecting the other sources. Setting item: SOURCE VOL Further setting items: TUNER / DISC / USB / iPod* / AUX Setting contents: −14 dB ~ +14 dB * CDE-152/CDE-151 only. Equalizer Presets 10 typical equalizer settings are created in this mode. Setting item: 3BAND EQ Further setting items: BASS / MID / TREBLE Setting...
... affecting the other sources. Setting item: SOURCE VOL Further setting items: TUNER / DISC / USB / iPod* / AUX Setting contents: −14 dB ~ +14 dB * CDE-152/CDE-151 only. Equalizer Presets 10 typical equalizer settings are created in this mode. Setting item: 3BAND EQ Further setting items: BASS / MID / TREBLE Setting...
Owners Manual
Page 17
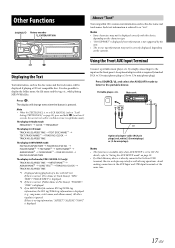
...; FILE NAME*2 ARTIST NAME*3 ALBUM NAME*3 SONG NAME*3 FILE NO./CLOCK FILE NO./ELAPSED TIME The display in iPod mode (CDE-152/CDE-151 only): TRACK NO./ELAPSED TIME ARTIST NAME*3 ALBUM NAME*3 SONG TITLE*3 TRACK NO./CLOCK TRACK NO./ELAPSED TIME *1 Displayed during...
...; FILE NAME*2 ARTIST NAME*3 ALBUM NAME*3 SONG NAME*3 FILE NO./CLOCK FILE NO./ELAPSED TIME The display in iPod mode (CDE-152/CDE-151 only): TRACK NO./ELAPSED TIME ARTIST NAME*3 ALBUM NAME*3 SONG TITLE*3 TRACK NO./CLOCK TRACK NO./ELAPSED TIME *1 Displayed during...
Owners Manual
Page 18
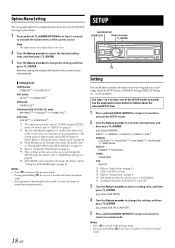
... PLAY MODE DEMO MODE DISPLAY: DIMMER TEXTSCROLL TUNER: TUNER FREQ iPod: iPod LIST *1 Refer to "Audio Setup" on page 13. *2 CDE-152/CDE-151 only. *3 Refer to "Setting Time" on page 20. *6 AUX NAME can be modified. For details, refer to "SETUP" on page 19. SETUP AUDIO/...61541; Setting item: TUNER mode: TUNER SET*1 SOURCE VOL*2 DISC mode: CD SET*3 SOURCE VOL*2 USB mode: SOURCE VOL*2 iPod mode (CDE-152/CDE-151 only): APP DIRECT*4 iPod SET*5 SOURCE VOL*2 AUX mode: AUX SET*6 SOURCE VOL*2 *1 The setting items are linked. For details...
... PLAY MODE DEMO MODE DISPLAY: DIMMER TEXTSCROLL TUNER: TUNER FREQ iPod: iPod LIST *1 Refer to "Audio Setup" on page 13. *2 CDE-152/CDE-151 only. *3 Refer to "Setting Time" on page 20. *6 AUX NAME can be modified. For details, refer to "SETUP" on page 19. SETUP AUDIO/...61541; Setting item: TUNER mode: TUNER SET*1 SOURCE VOL*2 DISC mode: CD SET*3 SOURCE VOL*2 USB mode: SOURCE VOL*2 iPod mode (CDE-152/CDE-151 only): APP DIRECT*4 iPod SET*5 SOURCE VOL*2 AUX mode: AUX SET*6 SOURCE VOL*2 *1 The setting items are linked. For details...
Owners Manual
Page 21
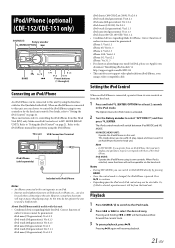
... (HEAD UNIT): Operate the iPod/iPhone via the head unit. iPod MODE: Operate the iPod/iPhone using the Interface cable for iPhone. iPod/iPhone (optional) (CDE-152/CDE-151 only) SOURCE/ Rotary encoder /ENTER/OPTION BAND / II 1 5 2 4 Preset buttons (1 through 6) Connecting an iPod/iPhone An iPod/iPhone can...
... (HEAD UNIT): Operate the iPod/iPhone via the head unit. iPod MODE: Operate the iPod/iPhone using the Interface cable for iPhone. iPod/iPhone (optional) (CDE-152/CDE-151 only) SOURCE/ Rotary encoder /ENTER/OPTION BAND / II 1 5 2 4 Preset buttons (1 through 6) Connecting an iPod/iPhone An iPod/iPhone can...
Owners Manual
Page 24
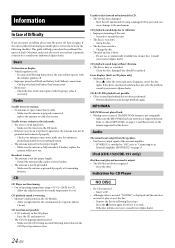
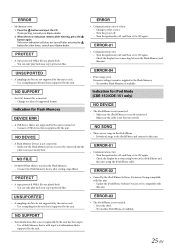
...The antenna is not compatible. - The MP3/WMA format is not the proper length. - If the disc still does not eject, consult your nearest Alpine dealer. Extend the antenna fully; Allow enough time for CD. - Eject the CD and remove it. • The CD is being inserted following ... CD is not played back. • Writing error occurred. Make sure the CD is displayed and the unit does not start to cool. iPod (CDE-152/CDE-151 only) iPod does not play or eject the disc. - Clean the disc; After the error indication disappears, insert the disc again. Radio Unable to...
...The antenna is not compatible. - The MP3/WMA format is not the proper length. - If the disc still does not eject, consult your nearest Alpine dealer. Extend the antenna fully; Allow enough time for CD. - Eject the CD and remove it. • The CD is being inserted following ... CD is not played back. • Writing error occurred. Make sure the CD is displayed and the unit does not start to cool. iPod (CDE-152/CDE-151 only) iPod does not play or eject the disc. - Clean the disc; After the error indication disappears, insert the disc again. Radio Unable to...
Owners Manual
Page 25
...Connect a USB device that is supported by the unit. Turn the ignition key off after pressing the button for a few times, consult your Alpine dealer. 2 When the error indication remains after storing songs (files). • Power surge error Excessive voltage/current is used . - Use a sampling... unit has been input. - Use a sampling rate/bit rate that is supported by the unit is connected. - Indication for iPod Mode (CDE-152/CDE-151 only) • The iPod/iPhone is correctly connected. Make sure the cable is not connected. - Check the display by the iPod/iPhone ...
...Connect a USB device that is supported by the unit. Turn the ignition key off after pressing the button for a few times, consult your Alpine dealer. 2 When the error indication remains after storing songs (files). • Power surge error Excessive voltage/current is used . - Use a sampling... unit has been input. - Use a sampling rate/bit rate that is supported by the unit is connected. - Indication for iPod Mode (CDE-152/CDE-151 only) • The iPod/iPhone is correctly connected. Make sure the cable is not connected. - Check the display by the iPod/iPhone ...
Owners Manual
Page 28
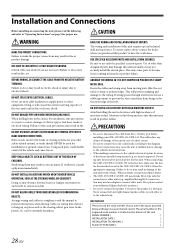
... USE SPECIFIED ACCESSORY PARTS AND INSTALL THEM SECURELY. Be sure to disconnect the cable from the (−) battery post before installing your CDE-152/CDE-151/CDE-150. Use of the unit. DO NOT INSTALL IN LOCATIONS WITH HIGH MOISTURE OR DUST. Moisture or dust that obstruct or hang ...ARRANGE THE WIRING SO IT IS NOT CRIMPED OR PINCHED BY A SHARP METAL EDGE. When connecting the CDE-152/CDE-151/CDE-150 to become loose resulting in compliance with your Alpine dealer. • The CDE-152/CDE-151/CDE-150 uses female RCA-type jacks for the intended circuit of a short-circuit. • Be sure ...
... USE SPECIFIED ACCESSORY PARTS AND INSTALL THEM SECURELY. Be sure to disconnect the cable from the (−) battery post before installing your CDE-152/CDE-151/CDE-150. Use of the unit. DO NOT INSTALL IN LOCATIONS WITH HIGH MOISTURE OR DUST. Moisture or dust that obstruct or hang ...ARRANGE THE WIRING SO IT IS NOT CRIMPED OR PINCHED BY A SHARP METAL EDGE. When connecting the CDE-152/CDE-151/CDE-150 to become loose resulting in compliance with your Alpine dealer. • The CDE-152/CDE-151/CDE-150 uses female RCA-type jacks for the intended circuit of a short-circuit. • Be sure ...
Owners Manual
Page 29
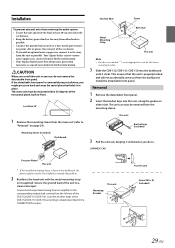
...installed mounting sleeve is removed during installation, you do not remove the detachable front panel. Your Alpine dealer carries various noise suppressors, contact them for further information. • Your Alpine dealer knows best about noise prevention measures so consult your car, do so. The unit ...keys into the dashboard until it as far away from the dashboard. The main unit must be removed from the left rear of the CDE-152/CDE-151/CDE-150. This unit Mounting Bracket Front Frame Screw (M5 × 8) (Included) 29-EN Installation To prevent external noise from entering ...
...installed mounting sleeve is removed during installation, you do not remove the detachable front panel. Your Alpine dealer carries various noise suppressors, contact them for further information. • Your Alpine dealer knows best about noise prevention measures so consult your car, do so. The unit ...keys into the dashboard until it as far away from the dashboard. The main unit must be removed from the left rear of the CDE-152/CDE-151/CDE-150. This unit Mounting Bracket Front Frame Screw (M5 × 8) (Included) 29-EN Installation To prevent external noise from entering ...
Owners Manual
Page 30
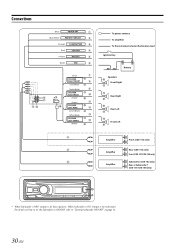
... instrument cluster illumination lead Ignition Key Battery Speakers Front Right Rear Right Rear Left Front Left Amplifier Amplifier Amplifier Front (CDE-152 only) Rear (CDE-152 only) Front (CDE-151/CDE-150 only) Subwoofers (CDE-152 only) Rear or Subwoofers* (CDE-151/CDE-150 only) * When Subwoofer is OFF: Output is for Rear speakers. When Subwoofer is ON: Output is for Subwoofer...
... instrument cluster illumination lead Ignition Key Battery Speakers Front Right Rear Right Rear Left Front Left Amplifier Amplifier Amplifier Front (CDE-152 only) Rear (CDE-152 only) Front (CDE-151/CDE-150 only) Subwoofers (CDE-152 only) Rear or Subwoofers* (CDE-151/CDE-150 only) * When Subwoofer is OFF: Output is for Rear speakers. When Subwoofer is ON: Output is for Subwoofer...
Owners Manual
Page 31
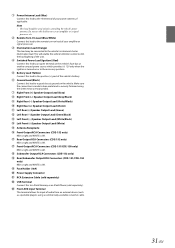
... Antenna Receptacle Front Output RCA Connectors (CDE-152 only) RED is right and WHITE is left. Rear Output RCA Connectors (CDE-152 only) RED is right and WHITE is left. Front Output RCA Connectors (CDE-151/CDE-150 only) RED is right and WHITE is left. ...; Subwoofer Output RCA Connectors (CDE-152 only) Rear/Subwoofer Output RCA Connectors (CDE-151/CDE-150 only) RED is right...
... Antenna Receptacle Front Output RCA Connectors (CDE-152 only) RED is right and WHITE is left. Rear Output RCA Connectors (CDE-152 only) RED is right and WHITE is left. Front Output RCA Connectors (CDE-151/CDE-150 only) RED is right and WHITE is left. ...; Subwoofer Output RCA Connectors (CDE-152 only) Rear/Subwoofer Output RCA Connectors (CDE-151/CDE-150 only) RED is right...

Owners Manual
Page 48
Rappel du mode iPod Selectionner le mode iPod. Recuperaci6n del modo iPod Seleccione el modo iPod. iPodliPhone (Optional) (CDE-1521CDE-151 only) I iPodliPhone (en option) (mod91es CDE-1521 CDE-151 uniquement) 1 iPodliPhone (opcional) • 0 .(Solo serie CDE-1521CDE-151) English An iPod/iPhone can be connected to this unit by using the Interface cable for iPod/ iPhone (included...
Rappel du mode iPod Selectionner le mode iPod. Recuperaci6n del modo iPod Seleccione el modo iPod. iPodliPhone (Optional) (CDE-1521CDE-151 only) I iPodliPhone (en option) (mod91es CDE-1521 CDE-151 uniquement) 1 iPodliPhone (opcional) • 0 .(Solo serie CDE-1521CDE-151) English An iPod/iPhone can be connected to this unit by using the Interface cable for iPod/ iPhone (included...


