Owners Manual
Page 3
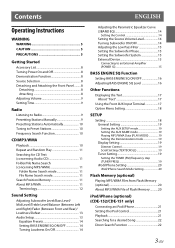
... Adjusting BASS ENGINE SQ Level 16 Other Functions Displaying the Text 17 About "Text 17 Using the Front AUX Input Terminal 17 Option Menu Setting 18 SETUP Setting 18 General Setting 19 Setting the AUX SETUP mode 19 Setting the AUX NAME mode 19 Playing MP3/WMA Data (PLAY MODE 19 Setting the Demonstration mode 19 Display Setting 19 Dimmer Control 19 Scroll Setting (TEXTSCROLL 19 Tuner Setting 19 Setting the TUNER (FM) frequency step (TUNER FREQ 19 iPod/iPhone Setting 20 iPod/iPhone Search Mode Setting 20 Flash Memory (optional) Playing MP3/WMA Files from Flash Memory...
... Adjusting BASS ENGINE SQ Level 16 Other Functions Displaying the Text 17 About "Text 17 Using the Front AUX Input Terminal 17 Option Menu Setting 18 SETUP Setting 18 General Setting 19 Setting the AUX SETUP mode 19 Setting the AUX NAME mode 19 Playing MP3/WMA Data (PLAY MODE 19 Setting the Demonstration mode 19 Display Setting 19 Dimmer Control 19 Scroll Setting (TEXTSCROLL 19 Tuner Setting 19 Setting the TUNER (FM) frequency step (TUNER FREQ 19 iPod/iPhone Setting 20 iPod/iPhone Search Mode Setting 20 Flash Memory (optional) Playing MP3/WMA Files from Flash Memory...

Owners Manual
Page 6
... specifications and may not be displayed on the market for this unit and never use round discs only for protecting the disc surface and improving sound quality. To remove ...use your player if you insert the disc. "ERROR" will not be played Use only compact discs with irregular surfaces are inserted or if discs are various accessories available on your finger to the mechanism. When a new disc is facing up when you insert a disc incorrectly. Use of the disc. Do not leave the disc in a location subjected to the audio CD industry standard. 6-EN Installation Location Make...
... specifications and may not be displayed on the market for this unit and never use round discs only for protecting the disc surface and improving sound quality. To remove ...use your player if you insert the disc. "ERROR" will not be played Use only compact discs with irregular surfaces are inserted or if discs are various accessories available on your finger to the mechanism. When a new disc is facing up when you insert a disc incorrectly. Use of the disc. Do not leave the disc in a location subjected to the audio CD industry standard. 6-EN Installation Location Make...

Owners Manual
Page 7
... USB Port • Only Flash Memory devices and iPod/iPhone can damage speakers and/or amplifiers. • It is inserted in a disc will not produce sound when played back. Do not subject Flash Memory to the USB terminal of a Flash memory device, it in a safe way. • Depending on a personal computer. • Do not remove the USB device while playback is lost while using other than audio in a location where driver operation will not be connected...
... USB Port • Only Flash Memory devices and iPod/iPhone can damage speakers and/or amplifiers. • It is inserted in a disc will not produce sound when played back. Do not subject Flash Memory to the USB terminal of a Flash memory device, it in a safe way. • Depending on a personal computer. • Do not remove the USB device while playback is lost while using other than audio in a location where driver operation will not be connected...
Owners Manual
Page 8
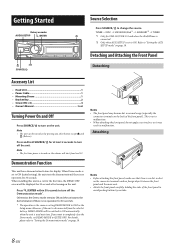
... panel to "Setting the AUX SETUP mode" on page 19. TUNER DISC USB AUDIO/iPod*1 AUXILIARY*2 TUNER *1 Only for CDE-152/CDE-151 and when the iPod/iPhone is connected. *2 Only when AUX SETUP is not a malfunction. • When detaching the front panel, do not apply excessive force as setting DEMO MODE to OFF in a car for display. When installing this unit in the Setup menu. When Demo mode is set to change the source. However, if the unit is disconnected from level...
... panel to "Setting the AUX SETUP mode" on page 19. TUNER DISC USB AUDIO/iPod*1 AUXILIARY*2 TUNER *1 Only for CDE-152/CDE-151 and when the iPod/iPhone is connected. *2 Only when AUX SETUP is not a malfunction. • When detaching the front panel, do not apply excessive force as setting DEMO MODE to OFF in a car for display. When installing this unit in the Setup menu. When Demo mode is set to change the source. However, if the unit is disconnected from level...

Owners Manual
Page 9
... Seek Tuning). Local mode: Only strong stations will reset to select TUNER mode. 2 Press BAND repeatedly until the desired sound is stored. The selected station is obtained. Adjusting Volume Turn the Rotary encoder until the desired radio band is manually tuned in steps (Manual tuning). 4 Press or to normal mode automatically. Remote control sensor Radio SOURCE/ Rotary encoder /ENTER BAND TUNE/A.ME Preset buttons (1 through 6) into which you store a station in a preset memory...
... Seek Tuning). Local mode: Only strong stations will reset to select TUNER mode. 2 Press BAND repeatedly until the desired sound is stored. The selected station is obtained. Adjusting Volume Turn the Rotary encoder until the desired radio band is manually tuned in steps (Manual tuning). 4 Press or to normal mode automatically. Remote control sensor Radio SOURCE/ Rotary encoder /ENTER BAND TUNE/A.ME Preset buttons (1 through 6) into which you store a station in a preset memory...

Owners Manual
Page 13
.... *3 Not displayed when BASS ENGINE SQ mode is on. (Page 14) Subwoofer Bass level Mid level Treble level Balance Fader Loudness Defeat Volume +0 ~ +15 −7 ~ +7 −7 ~ +7 −7 ~ +7 L15 ~ R15 R15 ~ F15 ON/OFF ON/OFF 0 ~ 35 Note • If no operation is performed for 5 seconds, the unit automatically returns to change the setting, and then press ENTER. (e.g. Sound Setting Rotary encoder AUDIO/SETUP /ENTER BASS Adjusting Subwoofer Level/Bass Level/Mid Level/Treble Level/Balance (Between...
.... *3 Not displayed when BASS ENGINE SQ mode is on. (Page 14) Subwoofer Bass level Mid level Treble level Balance Fader Loudness Defeat Volume +0 ~ +15 −7 ~ +7 −7 ~ +7 −7 ~ +7 L15 ~ R15 R15 ~ F15 ON/OFF ON/OFF 0 ~ 35 Note • If no operation is performed for 5 seconds, the unit automatically returns to change the setting, and then press ENTER. (e.g. Sound Setting Rotary encoder AUDIO/SETUP /ENTER BASS Adjusting Subwoofer Level/Bass Level/Mid Level/Treble Level/Balance (Between...

Owners Manual
Page 14
... output from the Subwoofer RCA Connectors (refer to select the desired setting item, and then press ENTER. USER settings are preset at low listening levels. Refer to your personal taste. A narrower setting will boost a wide range of musical source material. This compensates for a variety of frequencies above and below the center frequency. ON (BASS ENGINE SQ mode): Adjust the Bass related audio effect settings globally by pressing AUDIO. The setting...
... output from the Subwoofer RCA Connectors (refer to select the desired setting item, and then press ENTER. USER settings are preset at low listening levels. Refer to your personal taste. A narrower setting will boost a wide range of musical source material. This compensates for a variety of frequencies above and below the center frequency. ON (BASS ENGINE SQ mode): Adjust the Bass related audio effect settings globally by pressing AUDIO. The setting...

Owners Manual
Page 15
... Right SPEAKER RIGHT REAR SPEAKER LEFT REAR Rear Right Rear Left SPEAKER LEFT FRONT Front Left Note • No sound is produced by the built-in amplifier. Setting item: POWER IC Setting contents: OFF / ON (Initial setting) OFF: Use this mode when the line output of this setting, the head unit's internal amplifier is used to OFF. 15-EN Setting the Subwoofer Phase The subwoofer output phase is set to drive an external amplifier. In this unit is turned...
... Right SPEAKER RIGHT REAR SPEAKER LEFT REAR Rear Right Rear Left SPEAKER LEFT FRONT Front Left Note • No sound is produced by the built-in amplifier. Setting item: POWER IC Setting contents: OFF / ON (Initial setting) OFF: Use this mode when the line output of this setting, the head unit's internal amplifier is used to OFF. 15-EN Setting the Subwoofer Phase The subwoofer output phase is set to drive an external amplifier. In this unit is turned...

Owners Manual
Page 16
... unit, several parameters affecting Bass performance are set uniformly in Audio Setup mode. (Page 14) • " " indicator lights up , you frequently listen to switch the sound mode. These items are adjusted simultaneously. Notes • Adjustable only when DEFEAT is performed for optimum Bass effect. 1 Press BASS to display the BASS ENGINE SQ Level adjustment screen. 2 Turn the Rotary encoder to Level 6, the effect of the power amplifier. BASS ENGINE SQ Off (MANUAL SET): Adjust each audio effect setting separately. Adjusting BASS...
... unit, several parameters affecting Bass performance are set uniformly in Audio Setup mode. (Page 14) • " " indicator lights up , you frequently listen to switch the sound mode. These items are adjusted simultaneously. Notes • Adjustable only when DEFEAT is performed for optimum Bass effect. 1 Press BASS to display the BASS ENGINE SQ Level adjustment screen. 2 Turn the Rotary encoder to Level 6, the effect of the power amplifier. BASS ENGINE SQ Off (MANUAL SET): Adjust each audio effect setting separately. Adjusting BASS...
Owners Manual
Page 17
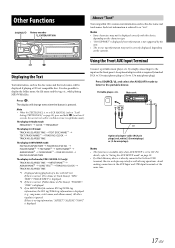
... type. • "NO SUPPORT" is displayed if text information is referred to the portable device. Such text information is not supported by simply connecting it to the input on page 19. • If a Flash Memory device is set to the AUX Input and USB Input terminals at least 2 seconds, the current text will be displayed if playing a CD text compatible disc. Main unit or Optional adapter cable (RCA pin plugs [red, white] 3.5ø...
... type. • "NO SUPPORT" is displayed if text information is referred to the portable device. Such text information is not supported by simply connecting it to the input on page 19. • If a Flash Memory device is set to the AUX Input and USB Input terminals at least 2 seconds, the current text will be displayed if playing a CD text compatible disc. Main unit or Optional adapter cable (RCA pin plugs [red, white] 3.5ø...
Owners Manual
Page 18
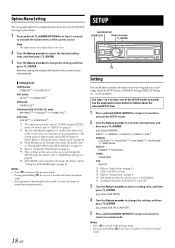
... to the current source automatically. Setting item: TUNER mode: TUNER SET*1 SOURCE VOL*2 DISC mode: CD SET*3 SOURCE VOL*2 USB mode: SOURCE VOL*2 iPod mode (CDE-152/CDE-151 only): APP DIRECT*4 iPod SET*5 SOURCE VOL*2 AUX mode: AUX SET*6 SOURCE VOL*2 *1 The setting items are linked. Refer to "Setting the Source Volume Level" on page 20. *6 AUX NAME can flexibly customize the unit to suit your own tonal preference. From the SETUP menu, GENERAL Setting, DISPLAY Setting, etc., can be selected in SETUP mode. See the...
... to the current source automatically. Setting item: TUNER mode: TUNER SET*1 SOURCE VOL*2 DISC mode: CD SET*3 SOURCE VOL*2 USB mode: SOURCE VOL*2 iPod mode (CDE-152/CDE-151 only): APP DIRECT*4 iPod SET*5 SOURCE VOL*2 AUX mode: AUX SET*6 SOURCE VOL*2 *1 The setting items are linked. Refer to "Setting the Source Volume Level" on page 20. *6 AUX NAME can flexibly customize the unit to suit your own tonal preference. From the SETUP menu, GENERAL Setting, DISPLAY Setting, etc., can be selected in SETUP mode. See the...
Owners Manual
Page 19
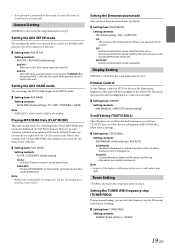
... data, playback starts from the vehicle's battery, the next time you can select the frequency step for 30 seconds. Setting the TUNER (FM) frequency step (TUNER FREQ) During manual tuning, you can choose to OFF, AUX source cannot be played back. If a disc has already been inserted, remove it first. OFF: Quit the demonstration mode. Dimmer Control Set the Dimmer control to AUTO to the unit. SCR AUTO: CD text information, folder and file...
... data, playback starts from the vehicle's battery, the next time you can select the frequency step for 30 seconds. Setting the TUNER (FM) frequency step (TUNER FREQ) During manual tuning, you can choose to OFF, AUX source cannot be played back. If a disc has already been inserted, remove it first. OFF: Quit the demonstration mode. Dimmer Control Set the Dimmer control to AUTO to the unit. SCR AUTO: CD text information, folder and file...
Owners Manual
Page 21
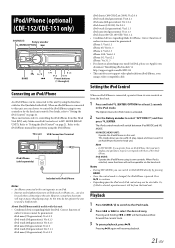
...; Confirmed devices regarding Made for operations using a video-compatible cable. When iPod is selected, some functions will not be connected to iPod MODE directly by using these functions will resume playback. 21-EN Pressing again will stop or pause the playing songs. iPod/iPhone (optional) (CDE-152/CDE-151 only) SOURCE/ Rotary encoder /ENTER/OPTION BAND / II 1 5 2 4 Preset buttons (1 through 6) Connecting an iPod/iPhone An iPod/iPhone can be operable via this Head Unit (HU...
...; Confirmed devices regarding Made for operations using a video-compatible cable. When iPod is selected, some functions will not be connected to iPod MODE directly by using these functions will resume playback. 21-EN Pressing again will stop or pause the playing songs. iPod/iPhone (optional) (CDE-152/CDE-151 only) SOURCE/ Rotary encoder /ENTER/OPTION BAND / II 1 5 2 4 Preset buttons (1 through 6) Connecting an iPod/iPhone An iPod/iPhone can be operable via this Head Unit (HU...
Owners Manual
Page 24
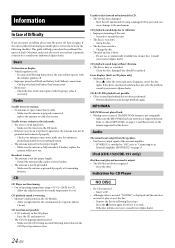
... Alpine dealer. Make sure the antenna is output. • The iPod has not been recognised. - if broken, replace the antenna with the proper value if necessary. Extend the antenna fully; iPod (CDE-152/CDE-151 only) iPod does not play or eject the disc. - Information In Case of Difficulty If you encounter a problem, please turn the power off . • Improper power lead (Red) and battery lead (Yellow) connections. - Unable to receive stations. • No antenna...
... Alpine dealer. Make sure the antenna is output. • The iPod has not been recognised. - if broken, replace the antenna with the proper value if necessary. Extend the antenna fully; iPod (CDE-152/CDE-151 only) iPod does not play or eject the disc. - Information In Case of Difficulty If you encounter a problem, please turn the power off . • Improper power lead (Red) and battery lead (Yellow) connections. - Unable to receive stations. • No antenna...
Owners Manual
Page 25
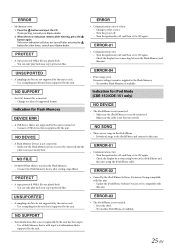
...; button for iPod Mode (CDE-152/CDE-151 only) • The iPod/iPhone is supported by the unit. You can only play back non-copy-protected files. • Communication error or others - Change to a disc of a supported format. Check the display by the unit. Change to other source. - Indication for Flash Memory • A USB device that is not connected. - Turn the ignition key off , and then set to ON again. - Try another Flash Memory, if available. • Mechanism error. 1 Press...
...; button for iPod Mode (CDE-152/CDE-151 only) • The iPod/iPhone is supported by the unit. You can only play back non-copy-protected files. • Communication error or others - Change to a disc of a supported format. Check the display by the unit. Change to other source. - Indication for Flash Memory • A USB device that is not connected. - Turn the ignition key off , and then set to ON again. - Try another Flash Memory, if available. • Mechanism error. 1 Press...
Owners Manual
Page 28
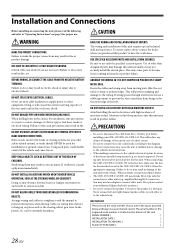
... system. • When making connections to provide power for installation, take such precautions may result in fire, etc. You may result in fire. Never connect left and right channel speaker cables to disconnect the cable from the (−) battery post before installing your CDE-152/CDE-151/CDE-150. Doing so will prevent crimping and damage to "Operating Instructions" on -board computer). DO NOT USE BOLTS OR NUTS...
... system. • When making connections to provide power for installation, take such precautions may result in fire, etc. You may result in fire. Never connect left and right channel speaker cables to disconnect the cable from the (−) battery post before installing your CDE-152/CDE-151/CDE-150. Doing so will prevent crimping and damage to "Operating Instructions" on -board computer). DO NOT USE BOLTS OR NUTS...
Owners Manual
Page 29
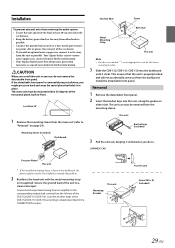
... removed from the dashboard. Connect each input lead coming from an amplifier to the corresponding output lead coming from the unit as possible. Installation To prevent external noise from entering the audio system. • Locate the unit and route the leads at least 10 cm away from the car harness. • Keep the battery power leads as far away from other leads of the CDE-152/CDE...
... removed from the dashboard. Connect each input lead coming from an amplifier to the corresponding output lead coming from the unit as possible. Installation To prevent external noise from entering the audio system. • Locate the unit and route the leads at least 10 cm away from the car harness. • Keep the battery power leads as far away from other leads of the CDE-152/CDE...
Owners Manual
Page 30
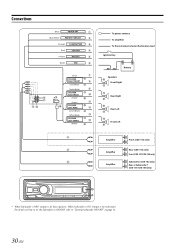
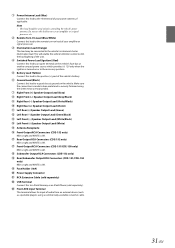
...: Output is for Subwoofer. Connections (Blue) POWER ANT (Blue/White) REMOTE TURN-ON (Orange) ILLUMINATION (Red) IGNITION (Yellow) BATTERY (Black) GND (Gray) SPEAKER RIGHT FRONT (Gray/Black) (Violet/Black) SPEAKER RIGHT REAR (Violet) (Green) SPEAKER LEFT REAR (Green/Black) (White/Black) SPEAKER LEFT FRONT (White) To power antenna To amplifier To the instrument cluster illumination lead Ignition Key Battery Speakers Front Right Rear Right Rear Left Front Left Amplifier Amplifier Amplifier Front (CDE-152 only) Rear (CDE-152 only) Front (CDE...
...: Output is for Subwoofer. Connections (Blue) POWER ANT (Blue/White) REMOTE TURN-ON (Orange) ILLUMINATION (Red) IGNITION (Yellow) BATTERY (Black) GND (Gray) SPEAKER RIGHT FRONT (Gray/Black) (Violet/Black) SPEAKER RIGHT REAR (Violet) (Green) SPEAKER LEFT REAR (Green/Black) (White/Black) SPEAKER LEFT FRONT (White) To power antenna To amplifier To the instrument cluster illumination lead Ignition Key Battery Speakers Front Right Rear Right Rear Left Front Left Amplifier Amplifier Amplifier Front (CDE-152 only) Rear (CDE-152 only) Front (CDE...
Owners Manual
Page 31
... Cable (sold separately) USB Terminal Connect this lead to bare metal and is made to a good chassis ground on lead of the vehicle's battery. Ground Lead (Black) Connect this to a Flash Memory or an iPod/iPhone (sold separately). Front AUX Input Terminal This terminal allows for controlling the vehicle's power antenna. Do not use this lead to turn -on the vehicle. Make sure the connection...
... Cable (sold separately) USB Terminal Connect this lead to bare metal and is made to a good chassis ground on lead of the vehicle's battery. Ground Lead (Black) Connect this to a Flash Memory or an iPod/iPhone (sold separately). Front AUX Input Terminal This terminal allows for controlling the vehicle's power antenna. Do not use this lead to turn -on the vehicle. Make sure the connection...
Owners Manual
Page 32
... installation by over-driving the speaker (amplifier level is turned up and driven into distortion or clipping). http://www.alpine-usa.com ALPINE ELECTRONICS OF AMERICA, INC., 19145 Gramercy Place, Torrance, California 90501, U.S.A. Products purchased in the Canada are covered only in the Owner's manual. Damage caused by the warranty, and if the product was shipped to an Authorized Alpine Service...
... installation by over-driving the speaker (amplifier level is turned up and driven into distortion or clipping). http://www.alpine-usa.com ALPINE ELECTRONICS OF AMERICA, INC., 19145 Gramercy Place, Torrance, California 90501, U.S.A. Products purchased in the Canada are covered only in the Owner's manual. Damage caused by the warranty, and if the product was shipped to an Authorized Alpine Service...

