
Service Guide
Page 7
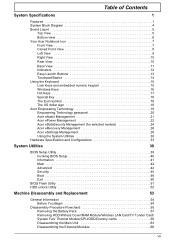
...18 The Euro symbol 18 The US dollar sign 18 Acer Empowering Technology 19 Empowering Technology password 20 Acer eAudio Management 21 Acer ePower Management 22 Acer eDataSecurity Management (for selected models 24 Acer eRecovery Management 26 Acer eSettings Management 28 Using the System Utilities 30 Hardware ... 53 General Information 54 Before You Begin 54 Disassembly Procedure Flowchard 55 Removing the Battery Pack 57 Removing HDD/Wirless Cover/RAM Module/Wireless LAN Card/TV Tunder Card/ System Fan/ Thermal Module/CPU/ODD/Dummy cards 58 Disassembling the Main Unit...
...18 The Euro symbol 18 The US dollar sign 18 Acer Empowering Technology 19 Empowering Technology password 20 Acer eAudio Management 21 Acer ePower Management 22 Acer eDataSecurity Management (for selected models 24 Acer eRecovery Management 26 Acer eSettings Management 28 Using the System Utilities 30 Hardware ... 53 General Information 54 Before You Begin 54 Disassembly Procedure Flowchard 55 Removing the Battery Pack 57 Removing HDD/Wirless Cover/RAM Module/Wireless LAN Card/TV Tunder Card/ System Fan/ Thermal Module/CPU/ODD/Dummy cards 58 Disassembling the Main Unit...
Service Guide
Page 44
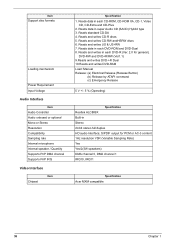
... for PCM or AC-3 content 1Hz resolution VSR (Variable Sampling Rate) Yes Yes/2(3W speakers) DMA channel 0, DMA channel 1 IRQ10, IRQ11 Specification Acer MXM compatible 36 Chapter 1 Reads data in each DVD-ROM and DVD-Dual 8. Reads and writes US & US+RW 7. Reads and writes in... full duplex HD audio Interface; S/PDIF output for general), DVD-RW and DVD+R/RW (Ver1.1) 9.Reads and writes DVD+-R Dual 10.Reads and writes DVD-RAM Load: Manual Release: (a) Electrical Release (Release Button) (b) Release by ATAPI command (c) Emergency Release 5 V +/- 5 % (Operating) Specification Realtek ALC889X Built...
... for PCM or AC-3 content 1Hz resolution VSR (Variable Sampling Rate) Yes Yes/2(3W speakers) DMA channel 0, DMA channel 1 IRQ10, IRQ11 Specification Acer MXM compatible 36 Chapter 1 Reads data in each DVD-ROM and DVD-Dual 8. Reads and writes US & US+RW 7. Reads and writes in... full duplex HD audio Interface; S/PDIF output for general), DVD-RW and DVD+R/RW (Ver1.1) 9.Reads and writes DVD+-R Dual 10.Reads and writes DVD-RAM Load: Manual Release: (a) Electrical Release (Release Button) (b) Release by ATAPI command (c) Emergency Release 5 V +/- 5 % (Operating) Specification Realtek ALC889X Built...
Service Guide
Page 47
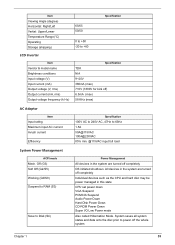
All devices in the system are turned off the whole system Chapter 1 39 Off (G3) Soft Off (G2/S5) Working (G0/S0) Suspend to RAM (S3) Save to power off completely OS initiated shutdown. System saves all system states and data onto the disc prior to Disk (S4) Power Management ...
All devices in the system are turned off the whole system Chapter 1 39 Off (G3) Soft Off (G2/S5) Working (G0/S0) Suspend to RAM (S3) Save to power off completely OS initiated shutdown. System saves all system states and data onto the disc prior to Disk (S4) Power Management ...
Service Guide
Page 67
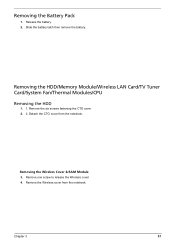
Removing the HDD/Memory Module/Wireless LAN Card/TV Tuner Card/System Fan/Thermal Modules/CPU Removing the HDD 1. 1. Removing the Wireless Cover & RAM Module 3. Remove the six screws fastening the CTO cover 2. 2. Chapter 3 57 Removing the Battery Pack 1. Slide the battery latch then remove the battery. Remove the Wireless cover from the notebook.. Remove one screw to release the Wireless cover 4. Release the battery. 2. Detach the CTO cover from the notebook.
Removing the HDD/Memory Module/Wireless LAN Card/TV Tuner Card/System Fan/Thermal Modules/CPU Removing the HDD 1. 1. Removing the Wireless Cover & RAM Module 3. Remove the six screws fastening the CTO cover 2. 2. Chapter 3 57 Removing the Battery Pack 1. Slide the battery latch then remove the battery. Remove the Wireless cover from the notebook.. Remove one screw to release the Wireless cover 4. Release the battery. 2. Detach the CTO cover from the notebook.
Service Guide
Page 82
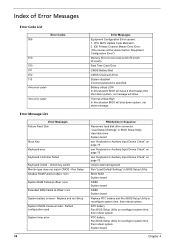
... down system, not show . RTC battery Run BIOS Setup Utility to reconfigure system time, then reboot system. Run Setup Shadow RAM Failed at offset: nnnn System RAM Failed at offset: nnnn Extended RAM Failed at xxxx:xxxx:xxxxh (R:xxxxh, W:xxxxh). Replace and run Setup System CMOS checksum bad - "Load Default Settings" in BIOS...
... down system, not show . RTC battery Run BIOS Setup Utility to reconfigure system time, then reboot system. Run Setup Shadow RAM Failed at offset: nnnn System RAM Failed at offset: nnnn Extended RAM Failed at xxxx:xxxx:xxxxh (R:xxxxh, W:xxxxh). Replace and run Setup System CMOS checksum bad - "Load Default Settings" in BIOS...
Service Guide
Page 85
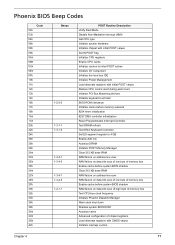
... refresh Test 8742 Keyboard Controller Set ES segment register to 4 GB Enable A20 line Autosize DRAM Initialize POST Memory Manager Clear 215 KB base RAM RAM failure on address line xxxx RAM failure on data bits xxxx of low byte of memory bus Enable cache before system BIOS shadow Clear 215 KB base... RAM RAM failure on address line xxxx RAM failure on data bits xxxx of low byte of memory bus Enable cache before system BIOS shadow RAM failure on data bits xxxx of high byte of memory bus Test CPU bus...
... refresh Test 8742 Keyboard Controller Set ES segment register to 4 GB Enable A20 line Autosize DRAM Initialize POST Memory Manager Clear 215 KB base RAM RAM failure on address line xxxx RAM failure on data bits xxxx of low byte of memory bus Enable cache before system BIOS shadow Clear 215 KB base... RAM RAM failure on address line xxxx RAM failure on data bits xxxx of low byte of memory bus Enable cache before system BIOS shadow RAM failure on data bits xxxx of high byte of memory bus Test CPU bus...
Service Guide
Page 86
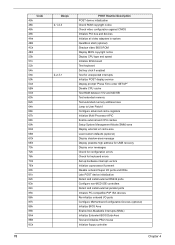
... keyboard Set key click if enabled Test for unexpected interrupts Initialize POST display service Display prompt "Press F2 to enter SETUP" Disable CPU cache Test RAM between 512 and 640 KB Test extended memory Test extended memory address lines Jump to User Patch1 Configure advanced cache registers Initialize Multi Processor APIC...
... keyboard Set key click if enabled Test for unexpected interrupts Initialize POST display service Display prompt "Press F2 to enter SETUP" Disable CPU cache Test RAM between 512 and 640 KB Test extended memory Test extended memory address lines Jump to User Patch1 Configure advanced cache registers Initialize Multi Processor APIC...


