Service Guide
Page 57
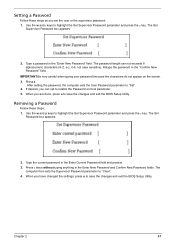
... e. 3. If desired, you are done, press u to save the changes and exit the BIOS Setup Utility. Removing a Password Follow these steps as you have changed the settings, press u to enable the Password on the screen. 3. The computer then sets the Supervisor Password parameter to highlight the Set Supervisor Password parameter and press...
... e. 3. If desired, you are done, press u to save the changes and exit the BIOS Setup Utility. Removing a Password Follow these steps as you have changed the settings, press u to enable the Password on the screen. 3. The computer then sets the Supervisor Password parameter to highlight the Set Supervisor Password parameter and press...
Service Guide
Page 62
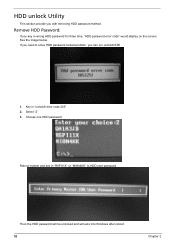
Choose one HDD password Reboot system and key in "R6PI11X" or "MI8N4KK" to solve HDD password locked problem, you need to HDD user password. If you can run unlock6.EXE 1. Select "2" 3. Then the HDD password will be unlocked and will auto into Windows after reboot. 52 Chapter 2 Remove HDD Password: If you with removing HDD password method. HDD unlock Utility This section provide you key in "unlock6 error code 205" 2. See the image below. Key in wrong HDD password for three time, "HDD password error code" would display on the screen.
Choose one HDD password Reboot system and key in "R6PI11X" or "MI8N4KK" to solve HDD password locked problem, you need to HDD user password. If you can run unlock6.EXE 1. Select "2" 3. Then the HDD password will be unlocked and will auto into Windows after reboot. 52 Chapter 2 Remove HDD Password: If you with removing HDD password method. HDD unlock Utility This section provide you key in "unlock6 error code 205" 2. See the image below. Key in wrong HDD password for three time, "HDD password error code" would display on the screen.
Service Guide
Page 79
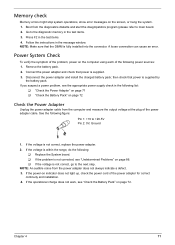
... not light up, check the power cord of the following figure: Pin 1: +19 to main board. 2. Follow the instructions in the test items. 4. Remove the battery pack. 2. then check that the DIMM is not correct, replace the power adapter. 2. If the operational charge does not work, see "Undetermined... in the following : ‰ Replace the System board. ‰ If the problem is not corrected, see "Check the Battery Pack" on the screen, or hang the system. 1. Boot from the power adapter does not always indicate a defect. 3. NOTE: Make sure that power is supplied. 3.
... not light up, check the power cord of the following figure: Pin 1: +19 to main board. 2. Follow the instructions in the test items. 4. Remove the battery pack. 2. then check that the DIMM is not correct, replace the power adapter. 2. If the operational charge does not work, see "Undetermined... in the following : ‰ Replace the System board. ‰ If the problem is not corrected, see "Check the Battery Pack" on the screen, or hang the system. 1. Boot from the power adapter does not always indicate a defect. 3. NOTE: Make sure that power is supplied. 3.
Service Guide
Page 80
...or a battery pack that if the parameters shown in the computer. Power off the computer. 2. Remove the battery pack and measure the voltage between battery terminals 1(+) and 6(ground). If the voltage is on the screen for a short time. If the battery status indicator does not light up , replace the DC.../DC charger board. If the charge indicator still does not light up , remove the battery pack and let it return to room temperature. Replace...
...or a battery pack that if the parameters shown in the computer. Power off the computer. 2. Remove the battery pack and measure the voltage between battery terminals 1(+) and 6(ground). If the voltage is on the screen for a short time. If the battery status indicator does not light up , replace the DC.../DC charger board. If the charge indicator still does not light up , remove the battery pack and let it return to room temperature. Replace...


