
Aspire 5680/5650/5630/5610/5610Z/3690 User's Guide
Page 12
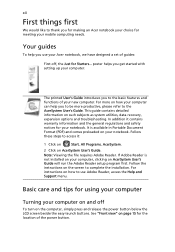
... and release the power button below the LCD screen beside the easy-launch buttons. Basic care and tips for using your computer Turning your notebook. See "Front view" on such subjects as system utilities, data recovery, expansion options and troubleshooting. For more productive, please refer to the AcerSystem User's Guide. Note: Viewing the file requires Adobe Reader. poster helps you get started with setting up your computer...
... and release the power button below the LCD screen beside the easy-launch buttons. Basic care and tips for using your computer Turning your notebook. See "Front view" on such subjects as system utilities, data recovery, expansion options and troubleshooting. For more productive, please refer to the AcerSystem User's Guide. Note: Viewing the file requires Adobe Reader. poster helps you get started with setting up your computer...
Aspire 5680/5650/5630/5610/5610Z/3690 User's Guide
Page 17
... to bring with you 73 Special considerations 73 Securing your computer 74 Using a computer security lock 74 Using passwords 74 Entering passwords 75 Setting passwords 75 Expanding through options 76 Connectivity options 76 Fax/data modem 76 Built-in network feature 77 Fast Infrared (FIR) 77 Universal Serial Bus (USB) 78 IEEE 1394 port 78 PC Card slot 79 ExpressCard 80 Installing memory 81 Connecting your TV and AV-in...
... to bring with you 73 Special considerations 73 Securing your computer 74 Using a computer security lock 74 Using passwords 74 Entering passwords 75 Setting passwords 75 Expanding through options 76 Connectivity options 76 Fax/data modem 76 Built-in network feature 77 Fast Infrared (FIR) 77 Universal Serial Bus (USB) 78 IEEE 1394 port 78 PC Card slot 79 ExpressCard 80 Installing memory 81 Connecting your TV and AV-in...
Aspire 5680/5650/5630/5610/5610Z/3690 User's Guide
Page 22
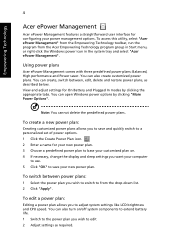
... necessary, change the display and sleep settings you to save and quickly switch to save your power management options. To create a new power plan: Creating customized power plans allows you want your computer to use. 5 Click "OK" to a personalized set of power options. 1 Click the Create Power Plan icon. 2 Enter a name for configuring your new power plan. To edit a power plan: Editing a power plan allows you wish to switch to adjust system settings like LCD brightness and CPU speed. You can open Windows power options by...
... necessary, change the display and sleep settings you to save and quickly switch to save your power management options. To create a new power plan: Creating customized power plans allows you want your computer to use. 5 Click "OK" to a personalized set of power options. 1 Click the Create Power Plan icon. 2 Enter a name for configuring your new power plan. To edit a power plan: Editing a power plan allows you wish to switch to adjust system settings like LCD brightness and CPU speed. You can open Windows power options by...
Aspire 5680/5650/5630/5610/5610Z/3690 User's Guide
Page 38
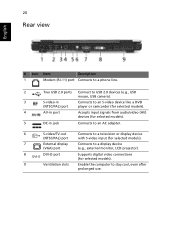
..., USB camera). 3 S-video-in Connects to an S-video device like a DVD (NTSC/PAL) port player or camcorder (for selected models). 4 AV-in port Accepts input signals from audio/video (AV) devices (for selected models). 5 DC-in jack Connects to an AC adapter. 6 S-video/TV-out Connects to a television or display device (NTSC/PAL) port with S-video input (for selected models). 7 External display Connects to a display device (VGA) port (e.g., external monitor, LCD projector). 8 DVI-D port Supports digital video connections (for selected models). 9 Ventilation slots Enable...
..., USB camera). 3 S-video-in Connects to an S-video device like a DVD (NTSC/PAL) port player or camcorder (for selected models). 4 AV-in port Accepts input signals from audio/video (AV) devices (for selected models). 5 DC-in jack Connects to an AC adapter. 6 S-video/TV-out Connects to a television or display device (NTSC/PAL) port with S-video input (for selected models). 7 External display Connects to a display device (VGA) port (e.g., external monitor, LCD projector). 8 DVI-D port Supports digital video connections (for selected models). 9 Ventilation slots Enable...
Aspire 5680/5650/5630/5610/5610Z/3690 User's Guide
Page 41
... W AC adapter • 88-/89-key keyboard, with inverted "T" cursor layout; 2.5 mm (minimum) key travel • Touchpad with 4-way scroll button • 12 function keys, four cursor keys, two Windows® keys, hotkey controls, embedded numeric keypad, international language support • Four easy-launch buttons: Empowering Key, email, Internet, user-programmable button • Six/seven media keys: TV, volume up, volume down, play/pause, stop, next, previous (for selected models) • Three communication LED-buttons: WLAN, 3G, Bluetooth®...
... W AC adapter • 88-/89-key keyboard, with inverted "T" cursor layout; 2.5 mm (minimum) key travel • Touchpad with 4-way scroll button • 12 function keys, four cursor keys, two Windows® keys, hotkey controls, embedded numeric keypad, international language support • Four easy-launch buttons: Empowering Key, email, Internet, user-programmable button • Six/seven media keys: TV, volume up, volume down, play/pause, stop, next, previous (for selected models) • Three communication LED-buttons: WLAN, 3G, Bluetooth®...

Aspire 5680/5650/5630/5610/5610Z/3690 User's Guide
Page 61
... are using on the battery, it is not lit, no power is not full-screen. Remove or replace it is set the resolution lower than the specified resolution are provided for each one. I turned on . Press any key to adjust the brightness level. • The display device might be too low. Press + (increase) to turn the display back on the screen. Then click on an external monitor. Look...
... are using on the battery, it is not lit, no power is not full-screen. Remove or replace it is set the resolution lower than the specified resolution are provided for each one. I turned on . Press any key to adjust the brightness level. • The display device might be too low. Press + (increase) to turn the display back on the screen. Then click on an external monitor. Look...
Aspire 5680/5650/5630/5610/5610Z/3690 User's Guide
Page 107
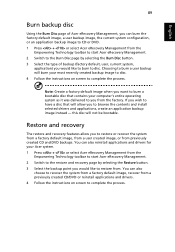
... Burn backup disc Using the Burn Disc page of Acer eRecovery Management, you can burn the factory default image, a user backup image, the current system configuration, or an application backup image to CD or DVD. 1 Press + or select Acer eRecovery Management from the Empowering Technology toolbar to start Acer eRecovery Management. 2 Switch to the restore and recovery page by selecting the Burn Disc button. 3 Select the type of backup (factory default, user, current system, application) you to restore or recover...
... Burn backup disc Using the Burn Disc page of Acer eRecovery Management, you can burn the factory default image, a user backup image, the current system configuration, or an application backup image to CD or DVD. 1 Press + or select Acer eRecovery Management from the Empowering Technology toolbar to start Acer eRecovery Management. 2 Switch to the restore and recovery page by selecting the Burn Disc button. 3 Select the type of backup (factory default, user, current system, application) you to restore or recover...
Aspire 5610 Service Guide
Page 7
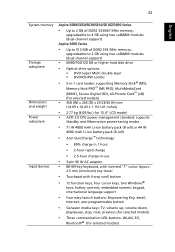
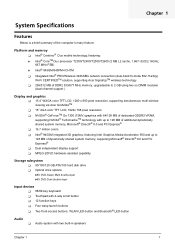
... shared system memory, supporing Microsoft® DirectX® 9.0 and PCI Expresst® T Dual independent display support T MPEG-2/DVD hardware-assisted capability Storage subsystem T 80/100/120 GB ATA/100 hard disk drive T Optical drive options: t8X DVD-Super Multi double-layer t8X DVD-Dual double-layer Input devices T 88/89-key keyboard T Touchpad with 4-way scroll button T 12 function keys T Four easy-launch buttons T Two front-access buttons: WLAN LED-button and Bluetooth® LED-button Audio T Audio system with...
... shared system memory, supporing Microsoft® DirectX® 9.0 and PCI Expresst® T Dual independent display support T MPEG-2/DVD hardware-assisted capability Storage subsystem T 80/100/120 GB ATA/100 hard disk drive T Optical drive options: t8X DVD-Super Multi double-layer t8X DVD-Dual double-layer Input devices T 88/89-key keyboard T Touchpad with 4-way scroll button T 12 function keys T Four easy-launch buttons T Two front-access buttons: WLAN LED-button and Bluetooth® LED-button Audio T Audio system with...
Aspire 5610 Service Guide
Page 26
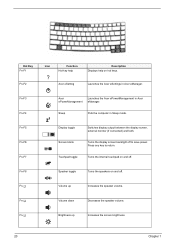
...-y Volume down Decreases the speaker volume. Turns the internal touchpad on hot keys. Fn-w Volume up Increases the screen brightness. 20 Chapter 1 Acer eSetting Launches the Acer eSettings in Sleep mode. Turns the display screen backlight off to return. Fn-F5 Fn-F6 Fn-F7 Display toggle Screen blank Touchpad toggle Switches display output between the display screen, external monitor (if connected) and both. Fn-x Brightness up Increases the speaker volume. Hot Key Fn-F1 Fn-F2 Icon Function Hot key help Description Displays help...
...-y Volume down Decreases the speaker volume. Turns the internal touchpad on hot keys. Fn-w Volume up Increases the screen brightness. 20 Chapter 1 Acer eSetting Launches the Acer eSettings in Sleep mode. Turns the display screen backlight off to return. Fn-F5 Fn-F6 Fn-F7 Display toggle Screen blank Touchpad toggle Switches display output between the display screen, external monitor (if connected) and both. Fn-x Brightness up Increases the speaker volume. Hot Key Fn-F1 Fn-F2 Icon Function Hot key help Description Displays help...
Aspire 5610 Service Guide
Page 35
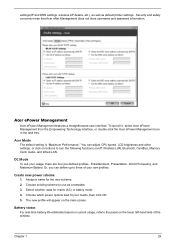
... of the window. Or, you can adjust CPU speed, LCD brightness and other settings, or click on buttons to turn the following functions on the main screen. Acer Mode The default setting is "Maximum Performance." Create new power scheme 1. settings(IP and DNS settings, wireless AP details, etc.), as well as a template. 3. Select whether used for the new scheme. 2. Battery status For real-time battery life estimates based on current usage, referto the panel on...
... of the window. Or, you can adjust CPU speed, LCD brightness and other settings, or click on buttons to turn the following functions on the main screen. Acer Mode The default setting is "Maximum Performance." Create new power scheme 1. settings(IP and DNS settings, wireless AP details, etc.), as well as a template. 3. Select whether used for the new scheme. 2. Battery status For real-time battery life estimates based on current usage, referto the panel on...
Aspire 5610 Service Guide
Page 38
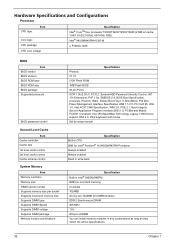
... control Cache scheme control System Memory Item Memory controller Memory size DIMM socket number Supports memory size per socket Supports maximum memory size Supports DIMM type Supports DIMM Speed Supports DIMM voltage Supports DIMM package Memory module combinations Specification Phneoix V1.10 512K Flash ROM 1MB Flash BIOS 32-pin PLCC ACPI 1.0b/2.0/3.0, PCI2.2, System/HDD Password Security Control, INT 13h Extensions, PnP 1.0a, SMBIOS 2.4, BIOS Boot Specification (Compaq, Phoenix, INtel), Simple Boot Flag 1.0, Boot Block, PCI Bus Power Management Interface Specification,USB 1.1/2.0, PC Card...
... control Cache scheme control System Memory Item Memory controller Memory size DIMM socket number Supports memory size per socket Supports maximum memory size Supports DIMM type Supports DIMM Speed Supports DIMM voltage Supports DIMM package Memory module combinations Specification Phneoix V1.10 512K Flash ROM 1MB Flash BIOS 32-pin PLCC ACPI 1.0b/2.0/3.0, PCI2.2, System/HDD Password Security Control, INT 13h Extensions, PnP 1.0a, SMBIOS 2.4, BIOS Boot Specification (Compaq, Phoenix, INtel), Simple Boot Flag 1.0, Boot Block, PCI Bus Power Management Interface Specification,USB 1.1/2.0, PC Card...
Aspire 5610 Service Guide
Page 54
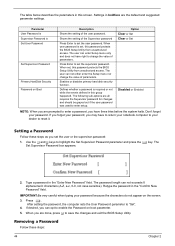
... of the Supervisor password Press Enter to enter setup. Use the w andy keys to "Set". 4. Retype the password in the "Enter New Password" field. Type a password in the "Confirm New Password" field. Enables or disables primary hard disk security function. The following sub-options are prompted to enter a password, you are all requires the Supervisor password for changes and should be grayed out if the user password was used to set , this password protects the BIOS Setup Utility from unauthorized access. The table below...
... of the Supervisor password Press Enter to enter setup. Use the w andy keys to "Set". 4. Retype the password in the "Enter New Password" field. Type a password in the "Confirm New Password" field. Enables or disables primary hard disk security function. The following sub-options are prompted to enter a password, you are all requires the Supervisor password for changes and should be grayed out if the user password was used to set , this password protects the BIOS Setup Utility from unauthorized access. The table below...
Aspire 5610 Service Guide
Page 55
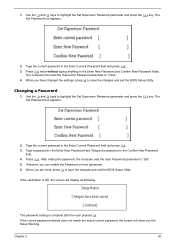
... save the changes and exit the BIOS Setup Utility. Retype the password in the Enter Current Password field and press e. 3. Type a password in the Enter New Password field. The password setting is OK, the screen will show you can enable the Password on boot parameter. 6. The Set Password box appears: 2. After setting the password, the computer sets the User Password parameter to highlight the Set Supervisor Password parameter and press the e key. If the current password entered does not match...
... save the changes and exit the BIOS Setup Utility. Retype the password in the Enter Current Password field and press e. 3. Type a password in the Enter New Password field. The password setting is OK, the screen will show you can enable the Password on boot parameter. 6. The Set Password box appears: 2. After setting the password, the computer sets the User Password parameter to highlight the Set Supervisor Password parameter and press the e key. If the current password entered does not match...
Aspire 5610 Service Guide
Page 58
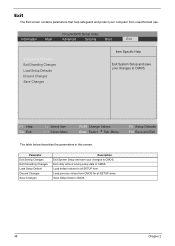
...; Select Menu F5/F6 Change Values Enter Select 4 Sub-Menu F9 Setup Defaults F10 Save and Exit The table below describes the parameters in this screen. Load default values for all SETUP item. Parameter Exit Saving Changes Exit Discarding Changes Load Setup Default Discard Changes Save Changes Description Exit System Setup and save your changes to CMOS. Load previous values from unauthorized use. PhoenixBIOS Setup Utility Information Main Advanced Security Boot Exit...
...; Select Menu F5/F6 Change Values Enter Select 4 Sub-Menu F9 Setup Defaults F10 Save and Exit The table below describes the parameters in this screen. Load default values for all SETUP item. Parameter Exit Saving Changes Exit Discarding Changes Load Setup Default Discard Changes Save Changes Description Exit System Setup and save your changes to CMOS. Load previous values from unauthorized use. PhoenixBIOS Setup Utility Information Main Advanced Security Boot Exit...
Aspire 5610 Service Guide
Page 83
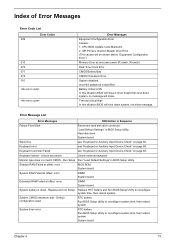
... Configuration Error Causes: 1. "Load Default Settings" in Sequence Failure Fixed Disk Reconnect hard disk drive connector. System CMOS checksum bad - System timer error RTC battery Run BIOS Setup Utility to reconfigure system time, then reboot system. Battery critical LOW In this situation BIOS will shut down system, no message will show message. Keyboard locked - Error Message List Error Messages FRU/Action in BIOS Setup Utility. Unlock key switch Unlock external keyboard Monitor type does not match CMOS - System board Chapter 4 73 Hard disk drive System board...
... Configuration Error Causes: 1. "Load Default Settings" in Sequence Failure Fixed Disk Reconnect hard disk drive connector. System CMOS checksum bad - System timer error RTC battery Run BIOS Setup Utility to reconfigure system time, then reboot system. Battery critical LOW In this situation BIOS will shut down system, no message will show message. Keyboard locked - Error Message List Error Messages FRU/Action in BIOS Setup Utility. Unlock key switch Unlock external keyboard Monitor type does not match CMOS - System board Chapter 4 73 Hard disk drive System board...
Aspire 5610 Service Guide
Page 87
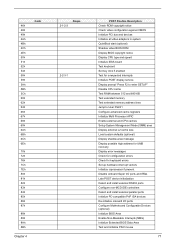
... devices Initialize all video adapters in system QuietBoot start (optional) Shadow video BIOS ROM Display BIOS copyright notice Display CPU type and speed Initialize EISA board Test keyboard Set key click if enabled Test for unexpected interrupts Initialize POST display service Display prompt "Press F2 to enter SETUP" Disable CPU cache Test RAM between 512 and 640 KB Test extended memory Test extended memory address lines Jump to User Patch1 Configure advanced cache registers Initialize Multi Processor APIC Enable external and CPU caches Setup...
... devices Initialize all video adapters in system QuietBoot start (optional) Shadow video BIOS ROM Display BIOS copyright notice Display CPU type and speed Initialize EISA board Test keyboard Set key click if enabled Test for unexpected interrupts Initialize POST display service Display prompt "Press F2 to enter SETUP" Disable CPU cache Test RAM between 512 and 640 KB Test extended memory Test extended memory address lines Jump to User Patch1 Configure advanced cache registers Initialize Multi Processor APIC Enable external and CPU caches Setup...
Aspire 5610 Service Guide
Page 89
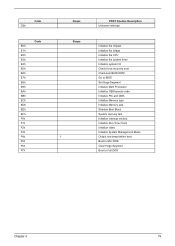
... the CPU Initialize the system timer Initialize system I/O Check force recovery boot Checksum BIOS ROM Go to BIOS Set Huge Segment Initialize Multi Processor Initialize OEM special code Initialize PIC and DMA Initialize Memory type Initialize Memory size Shadow Boot Block System memory test Initialize interrupt vectors Initialize Run Time Clock Initialize video Initialize System Management Mode Output one beep before boot Boot to Mini DOS Clear Huge Segment Boot...
... the CPU Initialize the system timer Initialize system I/O Check force recovery boot Checksum BIOS ROM Go to BIOS Set Huge Segment Initialize Multi Processor Initialize OEM special code Initialize PIC and DMA Initialize Memory type Initialize Memory size Shadow Boot Block System memory test Initialize interrupt vectors Initialize Run Time Clock Initialize video Initialize System Management Mode Output one beep before boot Boot to Mini DOS Clear Huge Segment Boot...
Aspire 5610 Service Guide
Page 90
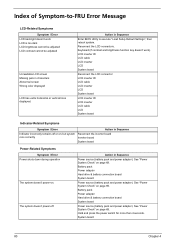
... Sequence Power source (battery pack and power adapter). Keyboard (if contrast and brightness function key doesn't work LCD is too dark LCD brightness cannot be adjusted LCD contrast cannot be adjusted Unreadable LCD screen Missing pels in Sequence Indicator incorrectly remains off . See "Power System Check" on page 69. See "Power System Check" on page 69. Hold and press the power switch for more than 4 seconds. Action in Sequence Enter BIOS Utility to -FRU Error Message LCD...
... Sequence Power source (battery pack and power adapter). Keyboard (if contrast and brightness function key doesn't work LCD is too dark LCD brightness cannot be adjusted LCD contrast cannot be adjusted Unreadable LCD screen Missing pels in Sequence Indicator incorrectly remains off . See "Power System Check" on page 69. See "Power System Check" on page 69. Hold and press the power switch for more than 4 seconds. Action in Sequence Enter BIOS Utility to -FRU Error Message LCD...
Aspire 5610 Service Guide
Page 91
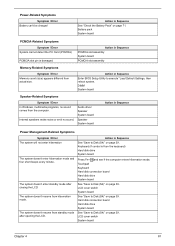
... / Error In Windows, multimedia programs, no sound. Hard disk connection board Hard disk drive System board See "Save to execute "Load Default Settings, then reboot system. The system doesn't enter standby mode after opening the LCD. Action in Sequence PCMCIA slot assembly System board PCMCIA slot assembly Memory-Related Symptoms Symptom / Error Memory count (size) appears different from the keyboard) Hard disk drive System board Press Fn+oand see if the computer enters hibernation mode. Power-Related Symptoms Symptom / Error Battery can't be charged Action...
... / Error In Windows, multimedia programs, no sound. Hard disk connection board Hard disk drive System board See "Save to execute "Load Default Settings, then reboot system. The system doesn't enter standby mode after opening the LCD. Action in Sequence PCMCIA slot assembly System board PCMCIA slot assembly Memory-Related Symptoms Symptom / Error Memory count (size) appears different from the keyboard) Hard disk drive System board Press Fn+oand see if the computer enters hibernation mode. Power-Related Symptoms Symptom / Error Battery can't be charged Action...
Aspire 5610 Service Guide
Page 93
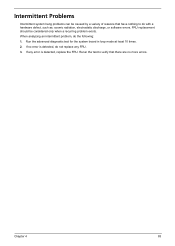
If no more errors. When analyzing an intermittent problem, do with a hardware defect, such as: cosmic radiation, electrostatic discharge, or software errors. Run the advanced diagnostic test for the system board in loop mode at least 10 times. 2. Chapter 4 83 If any error is detected, do not replace any FRU. 3. FRU replacement should be caused by a variety of reasons that have...
If no more errors. When analyzing an intermittent problem, do with a hardware defect, such as: cosmic radiation, electrostatic discharge, or software errors. Run the advanced diagnostic test for the system board in loop mode at least 10 times. 2. Chapter 4 83 If any error is detected, do not replace any FRU. 3. FRU replacement should be caused by a variety of reasons that have...


