
Acer Aspire 5532 Notebook Series Service Guide
Page 23
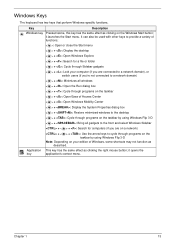
... your computer (if you 're not connected to a network domain) < > + : Minimizes all windows < > + : Open the Run dialog box < > + : Cycle through programs on the taskbar < > + : Open Ease of Access Center < > + : Open Windows Mobility Center < > + : Display the System Properties dialog box < > + : Restore minimized windows to cycle through Sidebar gadgets < > + : Lock your edition of functions: < >: Open or...
... your computer (if you 're not connected to a network domain) < > + : Minimizes all windows < > + : Open the Run dialog box < > + : Cycle through programs on the taskbar < > + : Open Ease of Access Center < > + : Open Windows Mobility Center < > + : Display the System Properties dialog box < > + : Restore minimized windows to cycle through Sidebar gadgets < > + : Lock your edition of functions: < >: Open or...
Acer Aspire 5532 Notebook Series Service Guide
Page 136
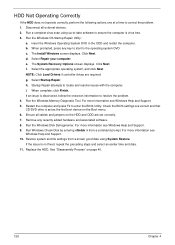
... good date using up-to-date software to the operating system DVD. See "Disassembly Process" on the Boot menu. 6. Run the Windows OS Startup Repair Utility: a. c. Select Repair your computer. The System Recovery Options screen displays. NOTE: Click Load Drivers if controller ...a command prompt. Replace the HDD. f. For more information see Windows Help and Support. 9. Click Next. For more information see Windows Help and Support. 10. Run a complete virus scan using System Restore. insert the Windows Operating System DVD in the ODD and restart the computer. Click...
... good date using up-to-date software to the operating system DVD. See "Disassembly Process" on the Boot menu. 6. Run the Windows OS Startup Repair Utility: a. c. Select Repair your computer. The System Recovery Options screen displays. NOTE: Click Load Drivers if controller ...a command prompt. Replace the HDD. f. For more information see Windows Help and Support. 9. Click Next. For more information see Windows Help and Support. 10. Run a complete virus scan using System Restore. insert the Windows Operating System DVD in the ODD and restart the computer. Click...
Acer Aspire 5532 Notebook Series Service Guide
Page 141
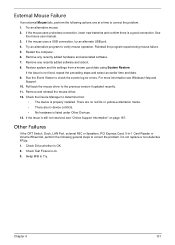
... Wheel fail, perform the following actions one at a time to the previous version if updated recently. 11. Check Drive whether is still not resolved, see Windows Help and Support. 10. Chapter 4 131 Restart the computer. 6. Run the Event Viewer to correct the problem. If the Issue is OK. 2. Try an alternative... Failure If an external Mouse fails, perform the following general steps to check the events log for errors. Remove any recently added software and reboot. 8. Restore system and file settings from a known good date using System...
... Wheel fail, perform the following actions one at a time to the previous version if updated recently. 11. Check Drive whether is still not resolved, see Windows Help and Support. 10. Chapter 4 131 Restart the computer. 6. Run the Event Viewer to correct the problem. If the Issue is OK. 2. Try an alternative... Failure If an external Mouse fails, perform the following general steps to check the events log for errors. Remove any recently added software and reboot. 8. Restore system and file settings from a known good date using System...
Acer Aspire 5532 Notebook Series Service Guide
Page 151
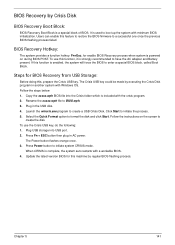
...Press Fn + ESC button then plug in the USB disk. 4. Update the latest version BIOS for enable BIOS Recovery process when system is included with Windows OS. Chapter 5 141 The Crisis USB key could be made by executing the Crisis Disk program in another system with the crisis program. 2. Copy the... Recovery Boot Block is used to create the disk. BIOS Recovery Hotkey: The system provides a function hotkey: Fn+Esc, for this feature to restore the BIOS firmware to have the AC adapter and Battery present. Click Start to format the disk and click Start. Press Power button to enter...
...Press Fn + ESC button then plug in the USB disk. 4. Update the latest version BIOS for enable BIOS Recovery process when system is included with Windows OS. Chapter 5 141 The Crisis USB key could be made by executing the Crisis Disk program in another system with the crisis program. 2. Copy the... Recovery Boot Block is used to create the disk. BIOS Recovery Hotkey: The system provides a function hotkey: Fn+Esc, for this feature to restore the BIOS firmware to have the AC adapter and Battery present. Click Start to format the disk and click Start. Press Power button to enter...
Aspire 5740DG Notebook Series Users Guide
Page 17
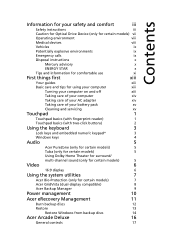
...reader) 1 Touchpad basics (with two-click buttons) 2 Using the keyboard 3 Lock keys and embedded numeric keypad* 3 Windows keys 4 Audio 5 Acer PureZone (only for certain models) 5 Tuba (only for certain models) 5 Using Dolby Home Theater for surround/ multi-... Using the system utilities 7 Acer Bio-Protection (only for certain models) 7 Acer GridVista (dual-display compatible) 8 Acer Backup Manager 9 Power management 10 Acer eRecovery Management 11 Burn backup discs 12 Restore 13 Restore Windows from backup discs 14 Acer Arcade Deluxe 16 General controls 17
...reader) 1 Touchpad basics (with two-click buttons) 2 Using the keyboard 3 Lock keys and embedded numeric keypad* 3 Windows keys 4 Audio 5 Acer PureZone (only for certain models) 5 Tuba (only for certain models) 5 Using Dolby Home Theater for surround/ multi-... Using the system utilities 7 Acer Bio-Protection (only for certain models) 7 Acer GridVista (dual-display compatible) 8 Acer Backup Manager 9 Power management 10 Acer eRecovery Management 11 Burn backup discs 12 Restore 13 Restore Windows from backup discs 14 Acer Arcade Deluxe 16 General controls 17
Aspire 5740DG Notebook Series Users Guide
Page 24
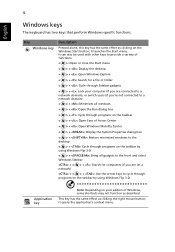
... through programs on the taskbar < > + : Open Ease of Access Center < > + : Open Windows Mobility Center < > + : Display the System Properties dialog box < > + : Restore minimized windows to the desktop < > + : Cycle through programs on the taskbar by using Windows Flip 3-D < > + : Bring all gadgets to the front and select Windows Sidebar + < network) > + : Search for computers (if you are on a + < > + : Use...
... through programs on the taskbar < > + : Open Ease of Access Center < > + : Open Windows Mobility Center < > + : Display the System Properties dialog box < > + : Restore minimized windows to the desktop < > + : Cycle through programs on the taskbar by using Windows Flip 3-D < > + : Bring all gadgets to the front and select Windows Sidebar + < network) > + : Search for computers (if you are on a + < > + : Use...
Aspire 5740DG Notebook Series Users Guide
Page 34
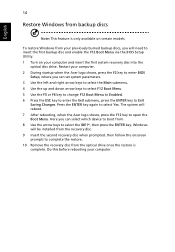
...Utility. 1 Turn on certain models. Windows will reboot. 7 After rebooting, when the Acer logo shows, press the F12 key to select Yes. Here you can select which device to boot from. 8 Use the arrow keys to Exit Saving Changes. English 14 Restore Windows from backup discs Note: This feature... is complete. Restart your computer. 2 During startup when the Acer logo shows, press the F2 key to enter BIOS Setup, where you can set system parameters....
...Utility. 1 Turn on certain models. Windows will reboot. 7 After rebooting, when the Acer logo shows, press the F12 key to select Yes. Here you can select which device to boot from. 8 Use the arrow keys to Exit Saving Changes. English 14 Restore Windows from backup discs Note: This feature... is complete. Restart your computer. 2 During startup when the Acer logo shows, press the F2 key to enter BIOS Setup, where you can set system parameters....
Aspire 5740DG Notebook Series Users Guide
Page 35
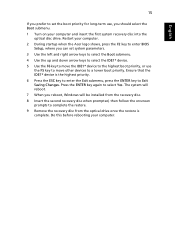
.... The system will reboot. 7 When you reboot, Windows will be installed from the recovery disc. 8 Insert the second recovery disc when prompted, then follow the onscreen prompts to complete the restore. 9 Remove the recovery disc from the optical drive once the restore is the highest priority. 6 Press the ESC key ... before rebooting your computer and insert the first system recovery disc into the optical disc drive. Restart your computer. 2 During startup when the Acer logo shows, press the F2 key to enter BIOS Setup, where you can set the boot priority for long-term use the F5 key to...
.... The system will reboot. 7 When you reboot, Windows will be installed from the recovery disc. 8 Insert the second recovery disc when prompted, then follow the onscreen prompts to complete the restore. 9 Remove the recovery disc from the optical drive once the restore is the highest priority. 6 Press the ESC key ... before rebooting your computer and insert the first system recovery disc into the optical disc drive. Restart your computer. 2 During startup when the Acer logo shows, press the F2 key to enter BIOS Setup, where you can set the boot priority for long-term use the F5 key to...


