Acer Aspire 5532 Notebook Series Service Guide
Page 7
... 8 Indicators 10 TouchPad Basics 11 Using the Keyboard 12 Lock Keys and embedded numeric keypad 12 Windows Keys 13 Hot Keys 14 Special Key 15 Using the System Utilities 16 Acer GridVista (dual-display compatible 16 Hardware Specifications and Configurations 17 System Utilities 23 BIOS Setup Utility 23 Navigating the BIOS Utility 23 Aspire 5532 BIOS 24 Information 24 Main 25 Security 26 Boot 29 Exit 30 BIOS Flash Utilities 31 DOS Flash Utility 32 WinFlash Utility 33 Remove HDD/BIOS Password Utilities 34 Machine Disassembly and Replacement 39 Disassembly Requirements...
... 8 Indicators 10 TouchPad Basics 11 Using the Keyboard 12 Lock Keys and embedded numeric keypad 12 Windows Keys 13 Hot Keys 14 Special Key 15 Using the System Utilities 16 Acer GridVista (dual-display compatible 16 Hardware Specifications and Configurations 17 System Utilities 23 BIOS Setup Utility 23 Navigating the BIOS Utility 23 Aspire 5532 BIOS 24 Information 24 Main 25 Security 26 Boot 29 Exit 30 BIOS Flash Utilities 31 DOS Flash Utility 32 WinFlash Utility 33 Remove HDD/BIOS Password Utilities 34 Machine Disassembly and Replacement 39 Disassembly Requirements...

Acer Aspire 5532 Notebook Series Service Guide
Page 8
... Replacing the LCD Module 106 Replacing the Keyboard 111 Replacing the Switch Cover 112 Replacing the Hard Disk Drive Module 112 Replacing the WLAN Module 114 Replacing the DIMM Modules 114 Replacing the ODD Module 115 Replacing the Lower Covers 115 Replacing the SD Dummy Card 116 Replacing the Battery 117 Troubleshooting 119 Common Problems 119 Power On Issue 120 No Display Issue 121 Random Loss of BIOS Settings 122 LCD Failure 123 Built-In Keyboard Failure 123 TouchPad Failure 124 Internal Speaker Failure 124 HDD...
... Replacing the LCD Module 106 Replacing the Keyboard 111 Replacing the Switch Cover 112 Replacing the Hard Disk Drive Module 112 Replacing the WLAN Module 114 Replacing the DIMM Modules 114 Replacing the ODD Module 115 Replacing the Lower Covers 115 Replacing the SD Dummy Card 116 Replacing the Battery 117 Troubleshooting 119 Common Problems 119 Power On Issue 120 No Display Issue 121 Random Loss of BIOS Settings 122 LCD Failure 123 Built-In Keyboard Failure 123 TouchPad Failure 124 Internal Speaker Failure 124 HDD...
Acer Aspire 5532 Notebook Series Service Guide
Page 15
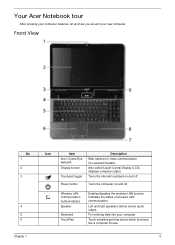
...), displays computer output. Indicates the status of wireless LAN communication. Wireless LAN communication button/indicator Speaker Keyboard TouchPad Enables/disables the wireless LAN function. Power button Turns the computer on and off . Touch-sensitive pointing device which functions like a computer mouse. 5 Left and right speakers deliver stereo audio output. Turns the internal touchpad on and off . Front View No. 1 2 3 4 5 6 Chapter 1 Icon Item Acer Crystal Eye webcam Display screen Touchpad toggle Description Web camera for video communication (for selected models...
...), displays computer output. Indicates the status of wireless LAN communication. Wireless LAN communication button/indicator Speaker Keyboard TouchPad Enables/disables the wireless LAN function. Power button Turns the computer on and off . Touch-sensitive pointing device which functions like a computer mouse. 5 Left and right speakers deliver stereo audio output. Turns the internal touchpad on and off . Front View No. 1 2 3 4 5 6 Chapter 1 Icon Item Acer Crystal Eye webcam Display screen Touchpad toggle Description Web camera for video communication (for selected models...
Acer Aspire 5532 Notebook Series Service Guide
Page 24
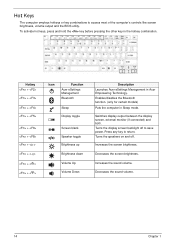
Switches display output between the display screen, external monitor (if connected) and both. To activate hot keys, press and hold the key before pressing the other key in Sleep mode. Decreases the screen brightness. Increases the sound volume. Turns the speakers on and off to save power. Increases the screen brightness. Decreases the sound volume. 14 Chapter 1 Enables/disables the Bluetooth function. (only for certain models) Puts the computer in the hotkey combination. Press any key to access most of the computer's controls like...
Switches display output between the display screen, external monitor (if connected) and both. To activate hot keys, press and hold the key before pressing the other key in Sleep mode. Decreases the screen brightness. Increases the sound volume. Turns the speakers on and off to save power. Increases the screen brightness. Decreases the sound volume. 14 Chapter 1 Enables/disables the Bluetooth function. (only for certain models) Puts the computer in the hotkey combination. Press any key to access most of the computer's controls like...
Acer Aspire 5532 Notebook Series Service Guide
Page 34
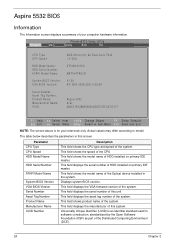
....00 Aspire 5532 Acer 39353164386665643635001EECE1D377 F1 Help Esc Exit Select Item F5/F6 Change Values F9 Setup Defaults Select Menu Enter Select Sub-Menu F10 Save and Exit NOTE: The screen above is an identifier standard used in this unit. Parameter CPU Type CPU Speed HDD Model Name HDD Serial Number ATAPI Model Name System BIOS Version VGA BIOS Version Serial Number Asset Tag Number Product Name Manufacturer Name UUID Number Description This field shows the CPU type...
....00 Aspire 5532 Acer 39353164386665643635001EECE1D377 F1 Help Esc Exit Select Item F5/F6 Change Values F9 Setup Defaults Select Menu Enter Select Sub-Menu F10 Save and Exit NOTE: The screen above is an identifier standard used in this unit. Parameter CPU Type CPU Speed HDD Model Name HDD Serial Number ATAPI Model Name System BIOS Version VGA BIOS Version Serial Number Asset Tag Number Product Name Manufacturer Name UUID Number Description This field shows the CPU type...
Acer Aspire 5532 Notebook Series Service Guide
Page 37
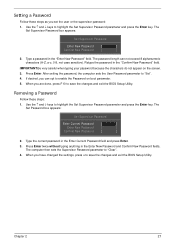
... the changes and exit the BIOS Setup Utility. Retype the password in the "Enter New Password" field. If desired, you set the user or the supervisor password: 1. The Set Password box appears: Set Supervisor Password Enter Current Password [ ] Enter New Password [ ] Confirm New Password [ ] 2. Setting a Password Follow these steps: 1. Press Enter. Use the ↑ and ↓ keys to highlight the Set Supervisor Password parameter and press the Enter key. Chapter 2 27 When you are done, press F10 to enable the Password on the screen. 3. Use...
... the changes and exit the BIOS Setup Utility. Retype the password in the "Enter New Password" field. If desired, you set the user or the supervisor password: 1. The Set Password box appears: Set Supervisor Password Enter Current Password [ ] Enter New Password [ ] Confirm New Password [ ] 2. Setting a Password Follow these steps: 1. Press Enter. Use the ↑ and ↓ keys to highlight the Set Supervisor Password parameter and press the Enter key. Chapter 2 27 When you are done, press F10 to enable the Password on the screen. 3. Use...

Acer Aspire 5532 Notebook Series Service Guide
Page 38
.... 6. Changing a Password 1. Use the ↑ and ↓ keys to "Set". 5. Type the current password in the Confirm New Password field. 4. If desired, you the Setup Warning. Type a password in the Enter New Password field. After setting the password, the computer sets the User Password parameter to highlight the Set Supervisor Password parameter and press the Enter key. When you are done, press F10 to save the changes and exit the BIOS Setup Utility. Setup Warning Passwords do not match, the screen...
.... 6. Changing a Password 1. Use the ↑ and ↓ keys to "Set". 5. Type the current password in the Confirm New Password field. 4. If desired, you the Setup Warning. Type a password in the Enter New Password field. After setting the password, the computer sets the User Password parameter to highlight the Set Supervisor Password parameter and press the Enter key. When you are done, press F10 to save the changes and exit the BIOS Setup Utility. Setup Warning Passwords do not match, the screen...
Acer Aspire 5532 Notebook Series Service Guide
Page 129
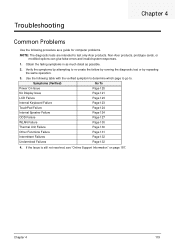
... Other Functions Failure Page 131 Intermittent Failures Page 132 Undermined Failures Page 132 4. Non-Acer products, prototype cards, or modified options can give false errors and invalid system responses. 1. Verify the symptoms by attempting to re-create the failure by running the diagnostic test or by repeating the same operation. 3. Use the following procedure as possible. 2. Troubleshooting Chapter 4 Common Problems Use...
... Other Functions Failure Page 131 Intermittent Failures Page 132 Undermined Failures Page 132 4. Non-Acer products, prototype cards, or modified options can give false errors and invalid system responses. 1. Verify the symptoms by attempting to re-create the failure by running the diagnostic test or by repeating the same operation. 3. Use the following procedure as possible. 2. Troubleshooting Chapter 4 Common Problems Use...

Acer Aspire 5532 Notebook Series Service Guide
Page 131
... 40). 8. Connect an external monitor to correct the problem. Remove the drives (see "LCD Failure" on page 187. Chapter 4 121 Do not replace a non-defective FRUs: No POST or Video If the POST or video doesn't display, perform the following occurs: • Fans start up • Status LEDs light up If there is done by removing the power cable and battery and holding down the power button for specific model procedures. 2. Make sure the...
... 40). 8. Connect an external monitor to correct the problem. Remove the drives (see "LCD Failure" on page 187. Chapter 4 121 Do not replace a non-defective FRUs: No POST or Video If the POST or video doesn't display, perform the following occurs: • Fans start up • Status LEDs light up If there is done by removing the power cable and battery and holding down the power button for specific model procedures. 2. Make sure the...
Acer Aspire 5532 Notebook Series Service Guide
Page 132
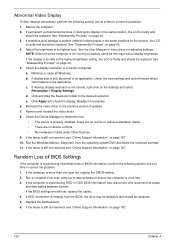
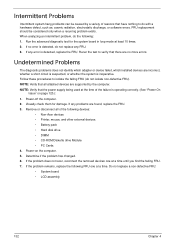
... same locations on battery alone as this may be defective and should be replaced. NOTE: Ensure that : • The device is properly installed. Check the display resolution is experiencing HDD or ODD BIOS information loss, disconnect and reconnect the power and data cables between devices. Minimize or close all Windows. b. Run the Windows Memory Diagnostic from the BIOS, the drive may reduce display brightness. Random Loss of BIOS Settings If...
... same locations on battery alone as this may be defective and should be replaced. NOTE: Ensure that : • The device is properly installed. Check the display resolution is experiencing HDD or ODD BIOS information loss, disconnect and reconnect the power and data cables between devices. Minimize or close all Windows. b. Run the Windows Memory Diagnostic from the BIOS, the drive may reduce display brightness. Random Loss of BIOS Settings If...
Acer Aspire 5532 Notebook Series Service Guide
Page 136
... a time to the operating system DVD. Run the Windows OS Startup Repair Utility: a. e. f. b. NOTE: Click Load Drivers if controller drives are correct and that CD/DVD drive is set correctly. 7. Startup Repair attempts to enter the BIOS Utility. Restart the computer and press F2 to locate and resolve issues with the computer. Run the Windows Disk Defragmenter. Run a complete virus scan using System Restore. d. Remove any key to start to correct the problem. 1. If the issue...
... a time to the operating system DVD. Run the Windows OS Startup Repair Utility: a. e. f. b. NOTE: Click Load Drivers if controller drives are correct and that CD/DVD drive is set correctly. 7. Startup Repair attempts to enter the BIOS Utility. Restart the computer and press F2 to locate and resolve issues with the computer. Run the Windows Disk Defragmenter. Run a complete virus scan using System Restore. d. Remove any key to start to correct the problem. 1. If the issue...
Acer Aspire 5532 Notebook Series Service Guide
Page 139
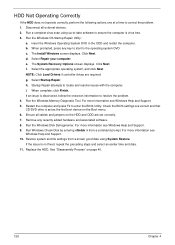
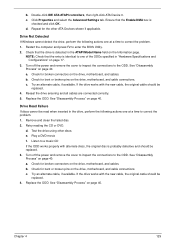
... power and remove the cover to inspect the connections to correct the problem. 1. If the drive works with the new cable, the original cable should be replaced. 3. Replace the ODD. c. Drive Not Detected If Windows cannot detect the drive, perform the following actions one of the ODDs specified in "Hardware Specifications and Configurations" on the drive, motherboard, and cable connections. d. Check for bent or broken pins on page 17. 3. c. Drive Read Failure If discs...
... power and remove the cover to inspect the connections to correct the problem. 1. If the drive works with the new cable, the original cable should be replaced. 3. Replace the ODD. c. Drive Not Detected If Windows cannot detect the drive, perform the following actions one of the ODDs specified in "Hardware Specifications and Configurations" on the drive, motherboard, and cable connections. d. Check for bent or broken pins on page 17. 3. c. Drive Read Failure If discs...
Acer Aspire 5532 Notebook Series Service Guide
Page 141
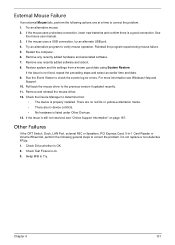
... the mouse user manual. 3. If the issue is listed under Other Devices. 13. Check the Device Manager to correct the problem. If the Issue is OK. 2. Other Failures If the CRT Switch, Dock, LAN Port, external MIC or Speakers, PCI Express Card, 5-in-1 Card Reader or Volume Wheel fail, perform the following actions one at a time to verify mouse operation. If the mouse uses a USB connection, try an alternate USB port. 4. Remove any recently added hardware...
... the mouse user manual. 3. If the issue is listed under Other Devices. 13. Check the Device Manager to correct the problem. If the Issue is OK. 2. Other Failures If the CRT Switch, Dock, LAN Port, external MIC or Speakers, PCI Express Card, 5-in-1 Card Reader or Volume Wheel fail, perform the following actions one at a time to verify mouse operation. If the mouse uses a USB connection, try an alternate USB port. 4. Remove any recently added hardware...
Acer Aspire 5532 Notebook Series Service Guide
Page 142
.... 7. Power-on page 120.): 1. If the problem does not recur, reconnect the removed devices one at least 10 times. 2. If the problem remains, replace the following devices: • Non-Acer devices • Printer, mouse, and other external devices • Battery pack • Hard disk drive • DIMM • CD-ROM/Diskette drive Module • PC Cards 4. Visually check them for the system board in loop mode at a time. Determine if the problem has changed...
.... 7. Power-on page 120.): 1. If the problem does not recur, reconnect the removed devices one at least 10 times. 2. If the problem remains, replace the following devices: • Non-Acer devices • Printer, mouse, and other external devices • Battery pack • Hard disk drive • DIMM • CD-ROM/Diskette drive Module • PC Cards 4. Visually check them for the system board in loop mode at a time. Determine if the problem has changed...
Acer Aspire 5532 Notebook Series Service Guide
Page 144
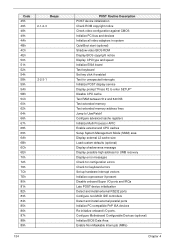
... Description POST device initialization Check ROM copyright notice Check video configuration against CMOS Initialize PCI bus and devices Initialize all video adapters in system QuietBoot start (optional) Shadow video BIOS ROM Display BIOS copyright notice Display CPU type and speed Initialize EISA board Test keyboard Set key click if enabled Test for unexpected interrupts Initialize POST display service Display prompt "Press F2 to enter SETUP" Disable CPU cache Test RAM between 512 and 640 KB Test extended memory Test extended memory address lines...
... Description POST device initialization Check ROM copyright notice Check video configuration against CMOS Initialize PCI bus and devices Initialize all video adapters in system QuietBoot start (optional) Shadow video BIOS ROM Display BIOS copyright notice Display CPU type and speed Initialize EISA board Test keyboard Set key click if enabled Test for unexpected interrupts Initialize POST display service Display prompt "Press F2 to enter SETUP" Disable CPU cache Test RAM between 512 and 640 KB Test extended memory Test extended memory address lines...
Acer Aspire 5532 Notebook Series Service Guide
Page 145
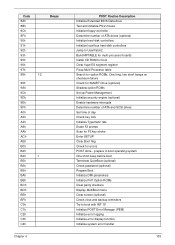
... menu Clear screen (optional) Check virus and backup reminders Try to UserPatch2 Build MPTABLE for multi-processor boards Install CD ROM for boot Clear huge ES segment register Fixup Multi Processor table Search for option ROMs. One long, two short beeps on checksum failure Check for SMART Drive (optional) Shadow option ROMs Set up Power Management Initialize security engine (optional) Enable hardware interrupts Determine number of ATA and SCSI drives Set time of ATA drives (optional) Initialize hard-disk controllers...
... menu Clear screen (optional) Check virus and backup reminders Try to UserPatch2 Build MPTABLE for multi-processor boards Install CD ROM for boot Clear huge ES segment register Fixup Multi Processor table Search for option ROMs. One long, two short beeps on checksum failure Check for SMART Drive (optional) Shadow option ROMs Set up Power Management Initialize security engine (optional) Enable hardware interrupts Determine number of ATA and SCSI drives Set time of ATA drives (optional) Initialize hard-disk controllers...
Acer Aspire 5532 Notebook Series Service Guide
Page 199
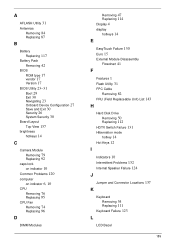
... Onboard Device Configuration 27 Save and Exit 30 Security 26 System Security 30 Board Layout Top View 137 brightness hotkeys 14 C Camera Module Removing 79 Replacing 92 caps lock on indicator 10 Common Problems 120 computer on indicator 6, 10 CPU Removing 76 Replacing 95 CPU Fan Removing 74 Replacing 96 D DIMM Modules Removing 47 Replacing 114 Display 4 display hotkeys 14 E EasyTouch Failure 130 Euro 15 External Module Disassembly Flowchart 41 F Features 1 Flash Utility 31 FPC Cable Removing 82 FRU (Field Replaceable Unit) List 143 H Hard Disk Drive Removing 50 Replacing...
... Onboard Device Configuration 27 Save and Exit 30 Security 26 System Security 30 Board Layout Top View 137 brightness hotkeys 14 C Camera Module Removing 79 Replacing 92 caps lock on indicator 10 Common Problems 120 computer on indicator 6, 10 CPU Removing 76 Replacing 95 CPU Fan Removing 74 Replacing 96 D DIMM Modules Removing 47 Replacing 114 Display 4 display hotkeys 14 E EasyTouch Failure 130 Euro 15 External Module Disassembly Flowchart 41 F Features 1 Flash Utility 31 FPC Cable Removing 82 FRU (Field Replaceable Unit) List 143 H Hard Disk Drive Removing 50 Replacing...
Aspire 5740DG Notebook Series Users Guide
Page 13
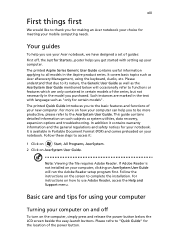
... release the power button below will run the Adobe Reader setup program first. It covers basic topics such as system utilities, data recovery, expansion options and troubleshooting. It is not installed on your notebook. Follow the instructions on the screen to all models in Portable Document Format (PDF) and comes preloaded on such subjects as Acer eRecovery Management, using your computer Turning your mobile computing needs. The printed Aspire Series Generic User Guide contains useful information...
... release the power button below will run the Adobe Reader setup program first. It covers basic topics such as system utilities, data recovery, expansion options and troubleshooting. It is not installed on your notebook. Follow the instructions on the screen to all models in Portable Document Format (PDF) and comes preloaded on such subjects as Acer eRecovery Management, using your computer Turning your mobile computing needs. The printed Aspire Series Generic User Guide contains useful information...

Aspire 5740DG Notebook Series Users Guide
Page 47
... to disconnect your computer from external accessories: 1 Save any open files. 2 Remove any media, floppy disks or compact disks from the drive(s). 3 Shut down the computer: Click on Start then click on Shut Down. To bring the computer out of Sleep mode, open the display; Preparing the computer Before moving within the building. then press and release the power button. Disconnecting from the desktop...
... to disconnect your computer from external accessories: 1 Save any open files. 2 Remove any media, floppy disks or compact disks from the drive(s). 3 Shut down the computer: Click on Start then click on Shut Down. To bring the computer out of Sleep mode, open the display; Preparing the computer Before moving within the building. then press and release the power button. Disconnecting from the desktop...
Aspire 5740DG Notebook Series Users Guide
Page 63
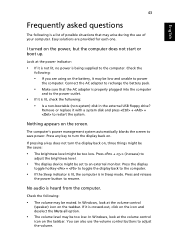
... the external USB floppy drive? I turned on the screen. Press and release the power button to save power. If it is being supplied to adjust the brightness level. • The display device might be set to an external monitor. Easy solutions are using on . Check the following : • The volume may be too low. No audio is crossed-out, click on the taskbar. In Windows, look at the volume control (speaker...
... the external USB floppy drive? I turned on the screen. Press and release the power button to save power. If it is being supplied to adjust the brightness level. • The display device might be set to an external monitor. Easy solutions are using on . Check the following : • The volume may be too low. No audio is crossed-out, click on the taskbar. In Windows, look at the volume control (speaker...


