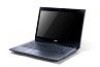
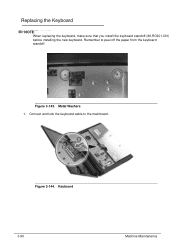
Acer Aspire 4743Z Keyboard Replacement
Related Manual Pages


Similar Questions


How To Video On Replacing Keyboard On Aspire 4743-4861
Need necessary steps on keyboard removal and install.
Need necessary steps on keyboard removal and install.
(Posted by justinpoky 10 years ago)


Keyboard Replacement
I want to try to replace my keyboard on a acer 4810tz 4474 but can't get the old keyboard out. where...
I want to try to replace my keyboard on a acer 4810tz 4474 but can't get the old keyboard out. where...
(Posted by debdiver 12 years ago)
Related Terms
The following terms were also used when searching for Acer Aspire 4743Z Keyboard Replacement:- acer aspire 4743 webcam
- acer aspire 4743g laptop
- acer aspire 4743z
- acer aspire 4743z 4861
- acer aspire 4743z battery
- acer aspire 4743z bios
- acer aspire 4743z bluetooth
- acer aspire 4743z bluetooth driver
- acer aspire 4743z camera driver
- acer aspire 4743z driver
- acer aspire 4743z driver download
- acer aspire 4743z driver for windows 7
- acer aspire 4743z driver for windows 7 32bit
- acer aspire 4743z driver for xp
- acer aspire 4743z driver for xp download
- acer aspire 4743z driver network
- acer aspire 4743z driver windows 7
- acer aspire 4743z drivers
- acer aspire 4743z drivers for windows 7
- acer aspire 4743z drivers for windows xp
- acer aspire 4743z drivers windows 7
- acer aspire 4743z ethernet controller driver
- acer aspire 4743z india
- acer aspire 4743z keyboard
- acer aspire 4743z keyboard replacement
- acer aspire 4743z lan driver
- acer aspire 4743z laptop
- acer aspire 4743z laptop price
- acer aspire 4743z manual
- acer aspire 4743z model
- acer aspire 4743z motherboard
- acer aspire 4743z network controller
- acer aspire 4743z network controller driver
- acer aspire 4743z network driver
- acer aspire 4743z notebook
- acer aspire 4743z p6200
- acer aspire 4743z price
- acer aspire 4743z price in india
- acer aspire 4743z price in malaysia
- acer aspire 4743z recovery key
- acer aspire 4743z review
- acer aspire 4743z reviews
- acer aspire 4743z screen
- acer aspire 4743z specification
- acer aspire 4743z specs
- acer aspire 4743z support
- acer aspire 4743z video driver
- acer aspire 4743z web camera driver
- acer aspire 4743z webcam driver
- acer aspire 4743z wifi driver
- acer aspire 4743z windows xp driver
- acer aspire 4743z wireless driver
- acer aspire 4743z wireless lan driver
- acer aspire 4743z xp drivers
- acer aspire 4743z-4861
- acer aspire 4743z-4861 bluetooth
- acer aspire 4743z-4861 screen
- acer aspire 4743zg
- acer aspire 4743zg driver
- acer aspire 4743zg driver download
- acer aspire 4743zg price
- acer aspire 4743zg specification
- acer aspire4743z
- aspire 4743
- aspire 4743 driver
- aspire 4743 drivers
- aspire 4743 webcam
- aspire 4743 webcame
- aspire 4743 z
- aspire 4743g
- aspire 4743g drivers
- aspire 4743g laptop
- aspire 4743z
- aspire 4743z 4861
- aspire 4743z battery
- aspire 4743z bios
- aspire 4743z bluetooth
- aspire 4743z bluetooth driver
- aspire 4743z camera
- aspire 4743z camera driver
- aspire 4743z camera driver 32 bit
- aspire 4743z driver
- aspire 4743z driver download
- aspire 4743z driver for windows 7
- aspire 4743z driver for windows 7 32bit
- aspire 4743z driver for xp
- aspire 4743z driver for xp download
- aspire 4743z driver network
- aspire 4743z driver windows 7
- aspire 4743z drivers
- aspire 4743z drivers download
- aspire 4743z drivers for windows 7
- aspire 4743z drivers for windows xp
- aspire 4743z drivers windows 7
- aspire 4743z drivers xp
- aspire 4743z ethernet controller driver
- aspire 4743z india
- aspire 4743z keyboard
- aspire 4743z keyboard replacement
- aspire 4743z lan driver
- aspire 4743z laptop
- aspire 4743z manual
- aspire 4743z model
- aspire 4743z motherboard
- aspire 4743z network controller
- aspire 4743z network controller driver
- aspire 4743z network driver
- aspire 4743z notebook
- aspire 4743z p6200
- aspire 4743z price
- aspire 4743z price in india
- aspire 4743z price in malaysia
- aspire 4743z recovery key
- aspire 4743z review
- aspire 4743z reviews
- aspire 4743z screen
- aspire 4743z specification
- aspire 4743z specs
- aspire 4743z support
- aspire 4743z video driver
- aspire 4743z web camera driver
- aspire 4743z webcam driver
- aspire 4743z wifi driver
- aspire 4743z windows xp driver
- aspire 4743z wireless driver
- aspire 4743z wireless lan driver
- aspire 4743z xp drivers
- aspire 4743z-4861
- aspire 4743z-4861 bluetooth
- aspire 4743z-4861 keyboard
- aspire 4743z-4861 screen
- aspire 4743z-4874
- aspire 4743zg
- aspire 4743zg driver
- aspire 4743zg driver download
- aspire 4743zg drivers
- aspire 4743zg price
- aspire 4743zg specification
- download driver acer aspire 4743zg
- download driver aspire 4743zg
- driver acer aspire 4743z