
Aspire 4743 and 4743Z Notebook Series Service Guide
Page 6
...2-8 Boot 2-12 Exit 2-13 BIOS Flash Utilities 2-14 DOS Flash Utility 2-15 WinFlash Utility 2-15 Remove HDD/BIOS Password Utilities 2-16 Removing HDD Password 2-16 Removing BIOS Passwords 2-17 Cleaning BIOS Passwords 2-18 Using DMI Tools 2-19 LAN EEPROM Utility 2-19 CHAPTER 3 Machine Maintenance Machine Disassembly and Replacement 3-5 Recommended Equipment 3-5 Replacement Requirements 3-5 Pre-disassembly Instructions 3-6 Disassembly Process 3-7 External Module Disassembly Process 3-8 External Modules Disassembly Flowchart 3-8 Removing the Battery Pack 3-9 Remove the Dummy Card...
...2-8 Boot 2-12 Exit 2-13 BIOS Flash Utilities 2-14 DOS Flash Utility 2-15 WinFlash Utility 2-15 Remove HDD/BIOS Password Utilities 2-16 Removing HDD Password 2-16 Removing BIOS Passwords 2-17 Cleaning BIOS Passwords 2-18 Using DMI Tools 2-19 LAN EEPROM Utility 2-19 CHAPTER 3 Machine Maintenance Machine Disassembly and Replacement 3-5 Recommended Equipment 3-5 Replacement Requirements 3-5 Pre-disassembly Instructions 3-6 Disassembly Process 3-7 External Module Disassembly Process 3-8 External Modules Disassembly Flowchart 3-8 Removing the Battery Pack 3-9 Remove the Dummy Card...

Aspire 4743 and 4743Z Notebook Series Service Guide
Page 7
... the Touchpad Board 3-33 Removing the USB Board 3-35 Removing the Bluetooth Module 3-37 Removing the RTC Battery 3-38 Removing the Mainboard 3-39 Removing the Thermal Module 3-42 Removing the CPU 3-44 Removing the LCD Module 3-45 LCD Module Disassembly Process 3-48 LCD Module Disassembly Flowchart 3-48 Removing the LCD Bezel 3-49 Removing the LCD Panel 3-51 Removing the LCD Brackets 3-54 Removing the Microphone 3-55 Removing the Camera Board 3-56 Removing the Antennas 3-57 LCD Reassembly Process 3-58 Replacing the Antennas 3-58 Replacing the Camera Board 3-59 Replacing the...
... the Touchpad Board 3-33 Removing the USB Board 3-35 Removing the Bluetooth Module 3-37 Removing the RTC Battery 3-38 Removing the Mainboard 3-39 Removing the Thermal Module 3-42 Removing the CPU 3-44 Removing the LCD Module 3-45 LCD Module Disassembly Process 3-48 LCD Module Disassembly Flowchart 3-48 Removing the LCD Bezel 3-49 Removing the LCD Panel 3-51 Removing the LCD Brackets 3-54 Removing the Microphone 3-55 Removing the Camera Board 3-56 Removing the Antennas 3-57 LCD Reassembly Process 3-58 Replacing the Antennas 3-58 Replacing the Camera Board 3-59 Replacing the...
Aspire 4743 and 4743Z Notebook Series Service Guide
Page 8
... the Battery Pack 3-103 CHAPTER 4 Troubleshooting Introduction 4-3 General Information 4-3 Power On Issues 4-4 No Display Issues 4-5 LCD Failure 4-7 Keyboard Failure 4-8 Touchpad Failure 4-9 Internal Speaker Failure 4-10 Microphone Failure 4-12 USB Failure 4-13 WLAN Failure 4-14 Bluetooth Failure 4-15 Card Reader Failure 4-16 Thermal Unit Failure 4-17 Other Functions Failure 4-18 Intermittent Problems 4-19 Undetermined Problems 4-19 Error Codes 4-20 BIOS Beep Codes 4-21 POST Codes 4-26 CHAPTER 5 Jumper and Connector Locations Clearing Password Check and BIOS Recovery...
... the Battery Pack 3-103 CHAPTER 4 Troubleshooting Introduction 4-3 General Information 4-3 Power On Issues 4-4 No Display Issues 4-5 LCD Failure 4-7 Keyboard Failure 4-8 Touchpad Failure 4-9 Internal Speaker Failure 4-10 Microphone Failure 4-12 USB Failure 4-13 WLAN Failure 4-14 Bluetooth Failure 4-15 Card Reader Failure 4-16 Thermal Unit Failure 4-17 Other Functions Failure 4-18 Intermittent Problems 4-19 Undetermined Problems 4-19 Error Codes 4-20 BIOS Beep Codes 4-21 POST Codes 4-26 CHAPTER 5 Jumper and Connector Locations Clearing Password Check and BIOS Recovery...
Aspire 4743 and 4743Z Notebook Series Service Guide
Page 12
Features 1-5 Operating System 1-5 Platform 1-5 System Memory 1-5 Display 1-5 Graphics 1-5 Storage Subsystem 1-6 Audio Subsystem 1-6 Optical Media Drive 1-6 Communication 1-7 Privacy Control 1-7 Dimensions and Weight 1-7 Power Adapter and Battery 1-7 Special Keys and Controls 1-8 Software 1-9 Warranty 1-10 Environment 1-10 Notebook Tour 1-11 Top View 1-11 Closed Rear View 1-13 Left View 1-13 Right View 1-14 Base View 1-15 Indicators 1-16 Touchpad Basics 1-16 Using the Keyboard 1-17 Lock Keys 1-18 Windows Keys 1-19 Hotkeys 1-20 Special Keys 1-21 Specification Tables...
Features 1-5 Operating System 1-5 Platform 1-5 System Memory 1-5 Display 1-5 Graphics 1-5 Storage Subsystem 1-6 Audio Subsystem 1-6 Optical Media Drive 1-6 Communication 1-7 Privacy Control 1-7 Dimensions and Weight 1-7 Power Adapter and Battery 1-7 Special Keys and Controls 1-8 Software 1-9 Warranty 1-10 Environment 1-10 Notebook Tour 1-11 Top View 1-11 Closed Rear View 1-13 Left View 1-13 Right View 1-14 Base View 1-15 Indicators 1-16 Touchpad Basics 1-16 Using the Keyboard 1-17 Lock Keys 1-18 Windows Keys 1-19 Hotkeys 1-20 Special Keys 1-21 Specification Tables...

Aspire 4743 and 4743Z Notebook Series Service Guide
Page 18
...; Special Keys and Controls 0 Keyboard 0 AC4T Flat keyboard support with number key, Internet scroll key, international language support Touchpad 0 Multi-touch touchpad supporting two-finger scroll, pinch, rotate, flip I/O Ports 0 Multi-in-1 card reader (SD™, MMC, MMCplus™, MS, MS PRO, xD) Three USB 2.0 ports HDMI® port with HDCP support External display (VGA) port Headphone/speaker/line-out jack with S/PDIF support Microphone-in jack...
...; Special Keys and Controls 0 Keyboard 0 AC4T Flat keyboard support with number key, Internet scroll key, international language support Touchpad 0 Multi-touch touchpad supporting two-finger scroll, pinch, rotate, flip I/O Ports 0 Multi-in-1 card reader (SD™, MMC, MMCplus™, MS, MS PRO, xD) Three USB 2.0 ports HDMI® port with HDCP support External display (VGA) port Headphone/speaker/line-out jack with S/PDIF support Microphone-in jack...
Aspire 4743 and 4743Z Notebook Series Service Guide
Page 22
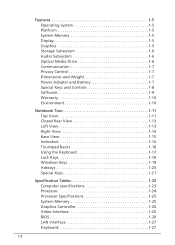
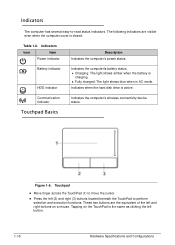
... remove/install the card. Indicates when the hard disk drive is charging. Fully charged: The light shows blue when in -1 card reader 7 Power indicator Battery indicator HDD indicator Communication indicator 8 Click buttons (left and right mouse buttons. Internal microphone for hand when using the computer. Icon Item 6 Multi-in AC mode. The left and right buttons function like the left and right) 9 Palm rest 10 Speakers 11 Microphone Description Accepts Secure Digital (SD), MultiMediaCard (MMC), Memory Stick (MS), Memory Stick PRO...
... remove/install the card. Indicates when the hard disk drive is charging. Fully charged: The light shows blue when in -1 card reader 7 Power indicator Battery indicator HDD indicator Communication indicator 8 Click buttons (left and right mouse buttons. Internal microphone for hand when using the computer. Icon Item 6 Multi-in AC mode. The left and right buttons function like the left and right) 9 Palm rest 10 Speakers 11 Microphone Description Accepts Secure Digital (SD), MultiMediaCard (MMC), Memory Stick (MS), Memory Stick PRO...
Aspire 4743 and 4743Z Notebook Series Service Guide
Page 26
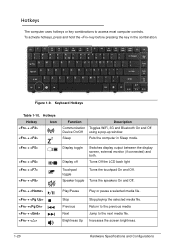
... the left (2) and right (3) buttons located beneath the TouchPad to perform selection and execution functions. These two buttons are visible even when the computer cover is charging. Fully charged: The light shows blue when in AC mode. Battery indicator HDD indicator Indicates the computerís battery status. Charging: The light shows amber when the battery is closed. Communication indicator Touchpad Basics Indicates the computer's wireless connectivity device status. 0 Figure 1-6. Indicators 0 The computer has several...
... the left (2) and right (3) buttons located beneath the TouchPad to perform selection and execution functions. These two buttons are visible even when the computer cover is charging. Fully charged: The light shows blue when in AC mode. Battery indicator HDD indicator Indicates the computerís battery status. Charging: The light shows amber when the battery is closed. Communication indicator Touchpad Basics Indicates the computer's wireless connectivity device status. 0 Figure 1-6. Indicators 0 The computer has several...

Aspire 4743 and 4743Z Notebook Series Service Guide
Page 29
... Application key Functions supported by Windows XP BREAK>: Display the System Properties dialog box < > + : Open Ease of functions. it launches the Start menu. Hardware Specifications and Configurations 1-19 Windows Keys 0 The keyboard has two keys that perform Windows-specific functions. Windows Logo key Application key Table 1-9. Windows Keys Key Description Windows Logo key Pressed alone, this key has the same effect as clicking the right mouse button; it opens the application's context menu. It can also be used with other keys...
... Application key Functions supported by Windows XP BREAK>: Display the System Properties dialog box < > + : Open Ease of functions. it launches the Start menu. Hardware Specifications and Configurations 1-19 Windows Keys 0 The keyboard has two keys that perform Windows-specific functions. Windows Logo key Application key Table 1-9. Windows Keys Key Description Windows Logo key Pressed alone, this key has the same effect as clicking the right mouse button; it opens the application's context menu. It can also be used with other keys...
Aspire 4743 and 4743Z Notebook Series Service Guide
Page 30
... media file. Figure 1-9. Keyboard Hotkeys Table 1-10. Increases the screen brightness. 1-20 Hardware Specifications and Configurations Hotkeys 0 The computer uses hotkeys or key combinations to the next media file. To activate hotkeys, press and hold the key before pressing the key in Sleep mode. + + + + Display toggle Display off Switches display output between the display screen, external monitor (if connected) and both. Turns Off the LCD back light Touchpad toggle Speaker toggle Turns the touchpad On and Off. Return to the previous media Jump to access...
... media file. Figure 1-9. Keyboard Hotkeys Table 1-10. Increases the screen brightness. 1-20 Hardware Specifications and Configurations Hotkeys 0 The computer uses hotkeys or key combinations to the next media file. To activate hotkeys, press and hold the key before pressing the key in Sleep mode. + + + + Display toggle Display off Switches display output between the display screen, external monitor (if connected) and both. Turns Off the LCD back light Touchpad toggle Speaker toggle Turns the touchpad On and Off. Return to the previous media Jump to access...
Aspire 4743 and 4743Z Notebook Series Service Guide
Page 37
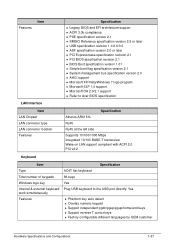
... 1.0 support Microsoft OA 2.0/2.1 support Refer to Acer BIOS specification LAN Interface Item LAN Chipset LAN connector type LAN connector location Features Specification Atheros AR8151L RJ45 RJ45 at the left side Supports 10/100/1000 Mbps Integrated 10/100 BASE-T transceiver Wake on LAN support compliant with ACPI 2.0 PCI v2.2 Keyboard Item Type Total number of keypads Windows logo key Internal & external keyboard work simultaneously Features Specification AC4T flat keyboard 86 keys Yes Plug USB keyboard to the USB port...
... 1.0 support Microsoft OA 2.0/2.1 support Refer to Acer BIOS specification LAN Interface Item LAN Chipset LAN connector type LAN connector location Features Specification Atheros AR8151L RJ45 RJ45 at the left side Supports 10/100/1000 Mbps Integrated 10/100 BASE-T transceiver Wake on LAN support compliant with ACPI 2.0 PCI v2.2 Keyboard Item Type Total number of keypads Windows logo key Internal & external keyboard work simultaneously Features Specification AC4T flat keyboard 86 keys Yes Plug USB keyboard to the USB port...
Aspire 4743 and 4743Z Notebook Series Service Guide
Page 53
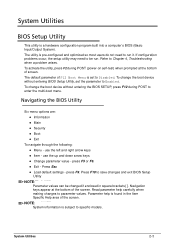
...). If configuration problems occur, the setup utility may need to run . System Utilities 2-3 System Utilities BIOS Setup Utility 0 This utility is subject to specific models. Refer to enter the multi-boot menu. use the up and down arrow keys Change parameter value - Press Esc Load default settings - Parameter help carefully when making changes to parameter values. The default parameter of the screen. To change the boot device without entering the BIOS SETUP, press F12 during POST (power-on...
...). If configuration problems occur, the setup utility may need to run . System Utilities 2-3 System Utilities BIOS Setup Utility 0 This utility is subject to specific models. Refer to enter the multi-boot menu. use the up and down arrow keys Change parameter value - Press Esc Load default settings - Parameter help carefully when making changes to parameter values. The default parameter of the screen. To change the boot device without entering the BIOS SETUP, press F12 during POST (power-on...

Aspire 4743 and 4743Z Notebook Series Service Guide
Page 63
...) Setup Utility Main Security Boot Exit Exit Saving Changes Exit Discarding Changes Load Setup Defaults Discard Changes Save Changes Item Specific Help Exit System Setup and save your changes to system. Exit Discarding Changes Exit BIOS utility without saving setup item changes to CMOS. Exit Parameters Parameter Description Exit Saving Changes Exit BIOS utility and save or discard changes and quit the BIOS Setup Utility. System Utilities 2-13 Table 2-4. Load Setup Default Load default values for all setup items. Discard Changes...
...) Setup Utility Main Security Boot Exit Exit Saving Changes Exit Discarding Changes Load Setup Defaults Discard Changes Save Changes Item Specific Help Exit System Setup and save your changes to system. Exit Discarding Changes Exit BIOS utility without saving setup item changes to CMOS. Exit Parameters Parameter Description Exit Saving Changes Exit BIOS utility and save or discard changes and quit the BIOS Setup Utility. System Utilities 2-13 Table 2-4. Load Setup Default Load default values for all setup items. Discard Changes...
Aspire 4743 and 4743Z Notebook Series Service Guide
Page 72
... the Keyboard 3-23 Removing the Palmrest Module/Upper Cover 3-26 Removing the Speakers 3-28 Removing the Power Button Board 3-31 Removing the Touchpad Board 3-33 Removing the USB Board 3-35 Removing the Bluetooth Module 3-37 Removing the RTC Battery 3-38 Removing the Mainboard 3-39 Removing the Thermal Module 3-42 Removing the CPU 3-44 Removing the LCD Module 3-45 LCD Module Disassembly Process 3-48 LCD Module Disassembly Flowchart 3-48 Removing the LCD Bezel 3-49 Removing the LCD Panel 3-51 Removing the LCD Brackets 3-54 Removing the Microphone 3-55 Removing the Camera Board...
... the Keyboard 3-23 Removing the Palmrest Module/Upper Cover 3-26 Removing the Speakers 3-28 Removing the Power Button Board 3-31 Removing the Touchpad Board 3-33 Removing the USB Board 3-35 Removing the Bluetooth Module 3-37 Removing the RTC Battery 3-38 Removing the Mainboard 3-39 Removing the Thermal Module 3-42 Removing the CPU 3-44 Removing the LCD Module 3-45 LCD Module Disassembly Process 3-48 LCD Module Disassembly Flowchart 3-48 Removing the LCD Bezel 3-49 Removing the LCD Panel 3-51 Removing the LCD Brackets 3-54 Removing the Microphone 3-55 Removing the Camera Board...
Aspire 4743 and 4743Z Notebook Series Service Guide
Page 177
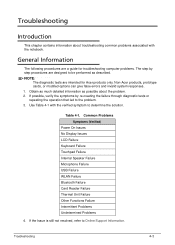
... symptom to determine the solution. Non-Acer products, prototype cards, or modified options can give false errors and invalid system responses. 1. Use Table 4-1 with the notebook. Common Problems Symptoms (Verified) Power On Issues No Display Issues LCD Failure Keyboard Failure Touchpad Failure Internal Speaker Failure Microphone Failure USB Failure WLAN Failure Bluetooth Failure Card Reader Failure Thermal Unit Failure Other Functions Failure Intermittent Problems Undetermined Problems 4. Troubleshooting Introduction 0 This chapter contains information...
... symptom to determine the solution. Non-Acer products, prototype cards, or modified options can give false errors and invalid system responses. 1. Use Table 4-1 with the notebook. Common Problems Symptoms (Verified) Power On Issues No Display Issues LCD Failure Keyboard Failure Touchpad Failure Internal Speaker Failure Microphone Failure USB Failure WLAN Failure Bluetooth Failure Card Reader Failure Thermal Unit Failure Other Functions Failure Intermittent Problems Undetermined Problems 4. Troubleshooting Introduction 0 This chapter contains information...
Aspire 4743 and 4743Z Notebook Series Service Guide
Page 180
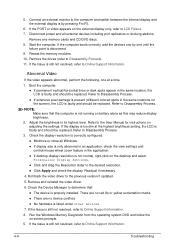
... computer is properly installed. Adjust the brightness to the previous version if updated. 5. If the Issue is by one at the highest brightness setting, the LCD is listed under Other Devices 7. Start the computer. 5. Connect an external monitor to the computer and switch between the internal display and the external display is still not resolved, refer to LCD Failure. 7. If the Issue is faulty and should be replaced. Boot the computer...
... computer is properly installed. Adjust the brightness to the previous version if updated. 5. If the Issue is by one at the highest brightness setting, the LCD is listed under Other Devices 7. Start the computer. 5. Connect an external monitor to the computer and switch between the internal display and the external display is still not resolved, refer to LCD Failure. 7. If the Issue is faulty and should be replaced. Boot the computer...

Aspire 4743 and 4743Z Notebook Series Service Guide
Page 193
... problem remains, replace the following devices: Non-Acer devices Printer, mouse, and other external devices Battery pack Hard disk drive DIMM CD-ROM/Diskette drive Module PC Cards 4. Perform the following : 1. NOTE: NOTE: Verify that have nothing to Power On Issues). 1. Remove or disconnect all attached devices are no error is operating correctly. (Refer to do with a hardware...
... problem remains, replace the following devices: Non-Acer devices Printer, mouse, and other external devices Battery pack Hard disk drive DIMM CD-ROM/Diskette drive Module PC Cards 4. Perform the following : 1. NOTE: NOTE: Verify that have nothing to Power On Issues). 1. Remove or disconnect all attached devices are no error is operating correctly. (Refer to do with a hardware...
Aspire 4743 and 4743Z Notebook Series Service Guide
Page 196
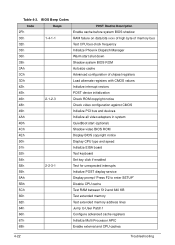
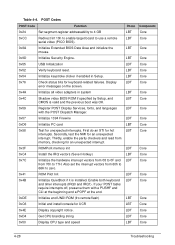
... ROM copyright notice 48h Check video configuration against CMOS 49h Initialize PCI bus and devices 4Ah Initialize all video adapters in system 4Bh QuietBoot start (optional) 4Ch Shadow video BIOS ROM 4Eh Display BIOS copyright notice 50h Display CPU type and speed 51h Initialize EISA board 52h Test keyboard 54h Set key click if enabled 58h 2-2-3-1 Test for unexpected interrupts 59h Initialize POST display service 5Ah Display prompt "Press F2 to enter SETUP" 5Bh Disable CPU cache 5Ch Test RAM...
... ROM copyright notice 48h Check video configuration against CMOS 49h Initialize PCI bus and devices 4Ah Initialize all video adapters in system 4Bh QuietBoot start (optional) 4Ch Shadow video BIOS ROM 4Eh Display BIOS copyright notice 50h Display CPU type and speed 51h Initialize EISA board 52h Test keyboard 54h Set key click if enabled 58h 2-2-3-1 Test for unexpected interrupts 59h Initialize POST display service 5Ah Display prompt "Press F2 to enter SETUP" 5Bh Disable CPU cache 5Ch Test RAM...
Aspire 4743 and 4743Z Notebook Series Service Guide
Page 202
... ROMPolit memory init LBT Core 0xC4 Install the IRQ vectors (Sever Hotkey) LBT Core 0x7C Initialize the hardware interrupt vectors from 08 to 0F and LBT from 70h to use a remote serial video (PICO BIOS). Enable both keyboard LBT and timer interrupts (IRQ0 and IRQ1). LBT Core 0xD4 Get CPU branding string LBT Core 0x50 Display CPU type and speed LBT Core 4-28 Troubleshooting LBT...
... ROMPolit memory init LBT Core 0xC4 Install the IRQ vectors (Sever Hotkey) LBT Core 0x7C Initialize the hardware interrupt vectors from 08 to 0F and LBT from 70h to use a remote serial video (PICO BIOS). Enable both keyboard LBT and timer interrupts (IRQ0 and IRQ1). LBT Core 0xD4 Get CPU branding string LBT Core 0x50 Display CPU type and speed LBT Core 4-28 Troubleshooting LBT...
Aspire 4743 and 4743Z Notebook Series Service Guide
Page 205
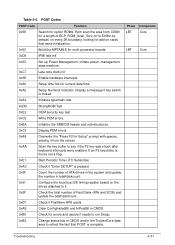
... current date/time 0xA2 Setup Numlock indicator. Initiate power -management state machine. 0xC7 Late note dock init 0x9E Enable hardware interrupts 0xA0 Setup time tick for multi-processor boards LBT Core 0xD9 IPMI late init 0x9C Set up Power Management. Table 4-4. POST Codes POST Code Function 0x98 Search for option ROMs. Rom scan the area from the screen. 0xAA Scan the key buffer to E000h by default) on cards that need initialization.
... current date/time 0xA2 Setup Numlock indicator. Initiate power -management state machine. 0xC7 Late note dock init 0x9E Enable hardware interrupts 0xA0 Setup time tick for multi-processor boards LBT Core 0xD9 IPMI late init 0x9C Set up Power Management. Table 4-4. POST Codes POST Code Function 0x98 Search for option ROMs. Rom scan the area from the screen. 0xAA Scan the key buffer to E000h by default) on cards that need initialization.
Aspire 4743 and 4743Z Notebook Series Service Guide
Page 211
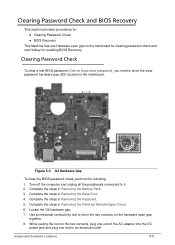
... AC adapter into the DC power jack and plug one end to it. 2. G2 Hardware Gap To clear the BIOS password check, perform the following: 1. Complete the steps in Removing the Keyboard. 5. Use an electrical conductivity tool to short the clear password hardware gap (G2) located on the mainboard for clearing password check and one Hotkey for : Clearing Password Check BIOS Recovery This Machine has one Hardware open gap...
... AC adapter into the DC power jack and plug one end to it. 2. G2 Hardware Gap To clear the BIOS password check, perform the following: 1. Complete the steps in Removing the Keyboard. 5. Use an electrical conductivity tool to short the clear password hardware gap (G2) located on the mainboard for clearing password check and one Hotkey for : Clearing Password Check BIOS Recovery This Machine has one Hardware open gap...


