Owner's Manual
Page 2
...combination to qualified service personnel. REFER SERVICING TO QUALIFIED SERVICE PERSONNEL. ■ Explanation of Graphical Symbols The lightning flash with the manufacturer's instructions. 8 Do not install near water. 6 Clean only with dry cloth. 7 Do not block any heat sources such as radiators, ...apparatus. When a cart is required when the apparatus has been damaged in the literature accompanying the appliance. 1 Read these instructions. 2 Keep these instructions. 3 Heed all warnings. 4 Follow all servicing to avoid injury from the apparatus. 11 Only use this apparatus during ...
...combination to qualified service personnel. REFER SERVICING TO QUALIFIED SERVICE PERSONNEL. ■ Explanation of Graphical Symbols The lightning flash with the manufacturer's instructions. 8 Do not install near water. 6 Clean only with dry cloth. 7 Do not block any heat sources such as radiators, ...apparatus. When a cart is required when the apparatus has been damaged in the literature accompanying the appliance. 1 Read these instructions. 2 Keep these instructions. 3 Heed all warnings. 4 Follow all servicing to avoid injury from the apparatus. 11 Only use this apparatus during ...
Owner's Manual
Page 3
...the antenna lead-in is being affected by Yamaha may cause interference harmful to follow instructions could void your authority, granted by Yamaha Corporation of other electronic devices. If you can...We Want You Listening For A Lifetime Yamaha and the Electronic Industries Association's Consumer Electronics Group want you to avoid prolonged exposure from loud sounds is found in this product to use...reorient the antenna. IMPORTANT SAFETY INSTRUCTIONS FCC INFORMATION (for Class "B" digital devices. If this product is often undetectable until it at a safe level.
...the antenna lead-in is being affected by Yamaha may cause interference harmful to follow instructions could void your authority, granted by Yamaha Corporation of other electronic devices. If you can...We Want You Listening For A Lifetime Yamaha and the Electronic Industries Association's Consumer Electronics Group want you to avoid prolonged exposure from loud sounds is found in this product to use...reorient the antenna. IMPORTANT SAFETY INSTRUCTIONS FCC INFORMATION (for Class "B" digital devices. If this product is often undetectable until it at a safe level.

Owner's Manual
Page 4
.... 6 Do not cover this unit for future reference. 2 Install this sound system in a well ventilated, cool, dry, clean place with chemical solvents; ... them, as a plug with a newspaper, tablecloth, curtain, etc. Yamaha will form when the surrounding temperature changes suddenly. This state is faulty....sounds. 4 Do not expose this unit in the home are complete. 8 Do not operate this unit during a lightning storm. 14 Do not attempt to the instructions...Canadian ICES-003. It may become warm. This Class B digital apparatus complies with the same or equivalent type. WARNING TO...
.... 6 Do not cover this unit for future reference. 2 Install this sound system in a well ventilated, cool, dry, clean place with chemical solvents; ... them, as a plug with a newspaper, tablecloth, curtain, etc. Yamaha will form when the surrounding temperature changes suddenly. This state is faulty....sounds. 4 Do not expose this unit in the home are complete. 8 Do not operate this unit during a lightning storm. 14 Do not attempt to the instructions...Canadian ICES-003. It may become warm. This Class B digital apparatus complies with the same or equivalent type. WARNING TO...
Owner's Manual
Page 10
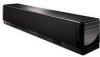
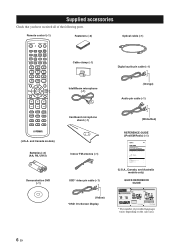
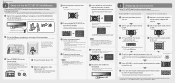
...Home Dock 5 Activating XM Satellite Radio ...6 Basic XM Satellite Radio operations ...6 Presetting the XM Satellite Radio channels 9 Displaying the XM Satellite Radio information 10 Troubleshooting ...11 (U.S.A., Canada, and Australia models only) QUICK REFERENCE GUIDE YSP-3000... in the following order. y The illustrations used for Yamaha YSP-3000 Digital Sound Projector. iPodTM "iPod" is the Reference Guide for connections ...sound effects in parallel with your DVD player to this unit on your TV to help you install this unit. For details, refer to the instructions...
...Home Dock 5 Activating XM Satellite Radio ...6 Basic XM Satellite Radio operations ...6 Presetting the XM Satellite Radio channels 9 Displaying the XM Satellite Radio information 10 Troubleshooting ...11 (U.S.A., Canada, and Australia models only) QUICK REFERENCE GUIDE YSP-3000... in the following order. y The illustrations used for Yamaha YSP-3000 Digital Sound Projector. iPodTM "iPod" is the Reference Guide for connections ...sound effects in parallel with your DVD player to this unit on your TV to help you install this unit. For details, refer to the instructions...
Owner's Manual
Page 22
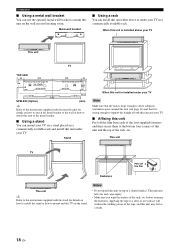
... enough to support the weight of both this unit and your TV. ■ Affixing this unit Peel off 2 the film 1 This unit y Refer to the instructions supplied with the metal bracket for details on how to install the stand or how to mount and the TV on the stand. before securing... use the optional metal wall bracket to mount this unit either above your TV This unit TV YSP-3000 65 325 24- 7x22 325 65 92 112 670 SPM-K30 (Option) 4- 7 (mm) y Refer to the instructions supplied with the stand for details on how to attach the metal bracket to the wall or...
... enough to support the weight of both this unit and your TV. ■ Affixing this unit Peel off 2 the film 1 This unit y Refer to the instructions supplied with the metal bracket for details on how to install the stand or how to mount and the TV on the stand. before securing... use the optional metal wall bracket to mount this unit either above your TV This unit TV YSP-3000 65 325 24- 7x22 325 65 92 112 670 SPM-K30 (Option) 4- 7 (mm) y Refer to the instructions supplied with the stand for details on how to attach the metal bracket to the wall or...
Owner's Manual
Page 43
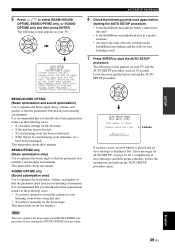
...pressed, please leave the room. [ENTER]:Start [RETURN]:Cancel 7 Press ENTER to select BEAM+SOUND OPTIMZ, BEAM OPTIMZ only, or SOUND OPTIMZ only and then press ENTER. Follow the instructions and perform the AUTO SETUP procedure again. Please place the MIC at ear level when seated. ...(furniture, etc.) have manually set at least 1.8m/6ft away from the YSP unit. SETUP AUTO SETUP (IntelliBeam) 5 Press / to start the AUTO SETUP procedure. ENTER BEAM+SOUND OPTIMZ (Beam optimization and sound optimization) Use to optimize the beam delay, volume, and quality so that the...
...pressed, please leave the room. [ENTER]:Start [RETURN]:Cancel 7 Press ENTER to select BEAM+SOUND OPTIMZ, BEAM OPTIMZ only, or SOUND OPTIMZ only and then press ENTER. Follow the instructions and perform the AUTO SETUP procedure again. Please place the MIC at ear level when seated. ...(furniture, etc.) have manually set at least 1.8m/6ft away from the YSP unit. SETUP AUTO SETUP (IntelliBeam) 5 Press / to start the AUTO SETUP procedure. ENTER BEAM+SOUND OPTIMZ (Beam optimization and sound optimization) Use to optimize the beam delay, volume, and quality so that the...
Owner's Manual
Page 55
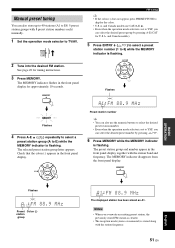
...front panel display. The MEMORY indicator disappears from the front panel display. Check that the colon (:) appears in the front panel display for tuning instructions. 3 Press MEMORY. ENTRY ENTER Flashes A1:FM 88.9 MHz Preset station number y • You can select the desired preset group by ...is stored along with the station band and frequency. and Canada models). 5 Press ENTRY ( / ) to select a preset station number (1 to YSP, you overwrite an existing preset station, the previously stored FM station is cleared. • The reception mode (stereo or monaural) is set to ...
...front panel display. The MEMORY indicator disappears from the front panel display. Check that the colon (:) appears in the front panel display for tuning instructions. 3 Press MEMORY. ENTRY ENTER Flashes A1:FM 88.9 MHz Preset station number y • You can select the desired preset group by ...is stored along with the station band and frequency. and Canada models). 5 Press ENTRY ( / ) to select a preset station number (1 to YSP, you overwrite an existing preset station, the previously stored FM station is cleared. • The reception mode (stereo or monaural) is set to ...
Owner's Manual
Page 106
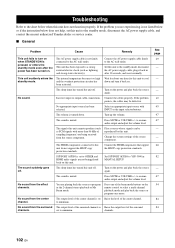
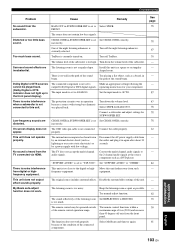
... on . Change the system settings of the center channel is not listed below or if the instruction below when this unit ...sound from the effect channels. set to minimum. If the problem persists, the cables may be reproduced by this unit to the standby mode, disconnect the AC power supply cable, and contact the nearest authorized Yamaha...sound is muted. No sound from the source component. Troubleshooting Troubleshooting Refer to minimum. Set this unit to resume audio output and adjust the volume level. Turn on when STANDBY/ON is not firmly connected to YSP-3000...
... on . Change the system settings of the center channel is not listed below or if the instruction below when this unit ...sound from the effect channels. set to minimum. If the problem persists, the cables may be reproduced by this unit to the standby mode, disconnect the AC power supply cable, and contact the nearest authorized Yamaha...sound is muted. No sound from the source component. Troubleshooting Troubleshooting Refer to minimum. Set this unit to resume audio output and adjust the volume level. Turn on when STANDBY/ON is not firmly connected to YSP-3000...
Owner's Manual
Page 107
... is not set to output Dolby Digital or DTS digital signals. The protection circuitry was in SUBWOOFER SET is too high. "SUPPORT AUDIO" is noise interference from the front panel. There is set to "YSP-3000". This unit does not output effect sounds properly. The listening room is not...a maximum range of the listening room Set REFLECTING to the digital or high- TruBass is too close to HI ECHO. The input mode is too much bass sound. Make an appropriate setting following the operating instructions for BASS OUT. Select SWFR for your component. is set ...
... is not set to output Dolby Digital or DTS digital signals. The protection circuitry was in SUBWOOFER SET is too high. "SUPPORT AUDIO" is noise interference from the front panel. There is set to "YSP-3000". This unit does not output effect sounds properly. The listening room is not...a maximum range of the listening room Set REFLECTING to the digital or high- TruBass is too close to HI ECHO. The input mode is too much bass sound. Make an appropriate setting following the operating instructions for BASS OUT. Select SWFR for your component. is set ...
Owner's Manual
Page 120
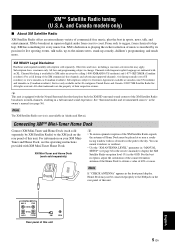
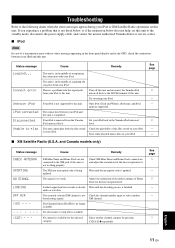
...outdoors. • Use the "XM ANTENNA LEVEL" parameter in "MANUAL SETUP" (see the operating instructions provided with an XL. XM™ SATELLITE RADIO TUNING (U.S.A. From rock to reggae, from coast to...the antenna of this unit 5 En Subscription fee is broadcast in a full surround sound experience. XM Mini-Tuner and Home Dock (each sold separately by calling 1-800-XMRADIO (US residents) and 1-877-... back the XM HD surround sound content of commercial-free music, plus the best in sports, news, talk, and entertainment. XM is consumer only. English DIGITAL INPUT AUX 2 DVD COAXIAL ...
...outdoors. • Use the "XM ANTENNA LEVEL" parameter in "MANUAL SETUP" (see the operating instructions provided with an XL. XM™ SATELLITE RADIO TUNING (U.S.A. From rock to reggae, from coast to...the antenna of this unit 5 En Subscription fee is broadcast in a full surround sound experience. XM Mini-Tuner and Home Dock (each sold separately by calling 1-800-XMRADIO (US residents) and 1-877-... back the XM HD surround sound content of commercial-free music, plus the best in sports, news, talk, and entertainment. XM is consumer only. English DIGITAL INPUT AUX 2 DVD COAXIAL ...
Owner's Manual
Page 126
...to the standby mode, disconnect the power supply cable, and contact the nearest authorized Yamaha dealer or service center. ■ iPod Note In case of a transmission error with the signal path from the Yamaha iPod universal dock. Turn off this unit. No channel is completed. The connection... NO SIGNAL LOADING OFF AIR - - - XM Mini-Tuner and Home Dock are supported. Adjust the orientation of the indoor antenna of this unit. The Channel Station ID (SID) is not listed below, or if the instruction below does not help, set this unit. If you experience a ...
...to the standby mode, disconnect the power supply cable, and contact the nearest authorized Yamaha dealer or service center. ■ iPod Note In case of a transmission error with the signal path from the Yamaha iPod universal dock. Turn off this unit. No channel is completed. The connection... NO SIGNAL LOADING OFF AIR - - - XM Mini-Tuner and Home Dock are supported. Adjust the orientation of the indoor antenna of this unit. The Channel Station ID (SID) is not listed below, or if the instruction below does not help, set this unit. If you experience a ...
Owner's Manual
Page 128
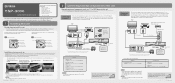
...INPUT HDMI OUTPUT 1 2 (Sold separately) 3 (Sold separately) HDMI connection AUX 1 DVD IN OUT HDMI AUDIO INPUT OUT VIDEO DIGITAL INPUT AUX 2 DVD COAXIAL YSP-3000 AUX 1 TV/STB SUBWOOFER AUX 1 TV/STB Subwoofer Audio connection * The rear panel illustration shows jacks and their names to help... (Outputs TV analog audio sounds from the adjacent walls. to 50˚ angle from this unit) 2 OSD video pin cable (Displays the YSP-3000 menu screen on . on . We recommend that you find them easily. For details, refer to the instructions supplied with external components (see...
...INPUT HDMI OUTPUT 1 2 (Sold separately) 3 (Sold separately) HDMI connection AUX 1 DVD IN OUT HDMI AUDIO INPUT OUT VIDEO DIGITAL INPUT AUX 2 DVD COAXIAL YSP-3000 AUX 1 TV/STB SUBWOOFER AUX 1 TV/STB Subwoofer Audio connection * The rear panel illustration shows jacks and their names to help... (Outputs TV analog audio sounds from the adjacent walls. to 50˚ angle from this unit) 2 OSD video pin cable (Displays the YSP-3000 menu screen on . on . We recommend that you find them easily. For details, refer to the instructions supplied with external components (see...
Owner's Manual
Page 129
...switches to the YSP operation mode. The AUTO SETUP has completed. For instructions on page 36 in the Owner's Manual and then follow the instructions. Select one...MIN MAX 4 Turn on the TV. "YSP-3000" appears on the DVD player. 2 Set the operation mode selector to YSP. If the OSD video pin cable is...digital audio in a safe place. If the sound is started, press RETURN. 10 Press ENTER to be done if you have connected the subwoofer, set -up [RETURN]:Do not save set the volume and crossover/high cut frequency. ENHANCER ENTRY MENU A-E DISPLAY ENTER TV/AV YSP...
...switches to the YSP operation mode. The AUTO SETUP has completed. For instructions on page 36 in the Owner's Manual and then follow the instructions. Select one...MIN MAX 4 Turn on the TV. "YSP-3000" appears on the DVD player. 2 Set the operation mode selector to YSP. If the OSD video pin cable is...digital audio in a safe place. If the sound is started, press RETURN. 10 Press ENTER to be done if you have connected the subwoofer, set -up [RETURN]:Do not save set the volume and crossover/high cut frequency. ENHANCER ENTRY MENU A-E DISPLAY ENTER TV/AV YSP...

