Owner's Manual
Page 1
UA YSP-3000 Digital Sound ProjectorTM OWNER'S MANUAL
UA YSP-3000 Digital Sound ProjectorTM OWNER'S MANUAL

Owner's Manual
Page 4
... standby mode. This state is needed. Retain this unit, and/or personal injury. - CAUTION Use of controls or adjustments or performance of this unit with the letter N or coloured BLACK. Other components, as sunshine, fire or the like. It may cause fire, damage to this Owner's Manual in order not to sudden temperature changes from the AC power source as long as a plug...
... standby mode. This state is needed. Retain this unit, and/or personal injury. - CAUTION Use of controls or adjustments or performance of this unit with the letter N or coloured BLACK. Other components, as sunshine, fire or the like. It may cause fire, damage to this Owner's Manual in order not to sudden temperature changes from the AC power source as long as a plug...
Owner's Manual
Page 5
...function 62 Using sound field programs 63 CINEMA DSP programs 64 Using the music enhancer 66 Using the volume mode (Night listening enhancer/TV volume equal mode) 67 Using the sleep timer 68 Displaying the input source information 70 Using the HDMI control feature 71 ADVANCED OPERATION MANUAL SETUP 72 Using MANUAL SETUP 73 BEAM MENU 74 SOUND MENU 78 INPUT MENU 80 DISPLAY MENU 83 Adjusting the audio balance 84 Using the test tone 84 Using the audio output being played back 85 Selecting the input mode 87 Adjusting the system parameters 88 Using the system parameters 88 Setting...
...function 62 Using sound field programs 63 CINEMA DSP programs 64 Using the music enhancer 66 Using the volume mode (Night listening enhancer/TV volume equal mode) 67 Using the sleep timer 68 Displaying the input source information 70 Using the HDMI control feature 71 ADVANCED OPERATION MANUAL SETUP 72 Using MANUAL SETUP 73 BEAM MENU 74 SOUND MENU 78 INPUT MENU 80 DISPLAY MENU 83 Adjusting the audio balance 84 Using the test tone 84 Using the audio output being played back 85 Selecting the input mode 87 Adjusting the system parameters 88 Using the system parameters 88 Setting...

Owner's Manual
Page 6
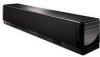
... speaker Imaginary center speaker C L R SR SL Imaginary surround right speaker Listening position Imaginary surround left (SL) speaker positions, which are actual speakers around the room. Yamaha YSP-3000 Digital Sound Projector challenges this simple, yet stylish Digital Sound Projector. You can fine-tune the parameters of this unit to fully enjoy the benefits of surround sound at home, you must endure the agony of wiring and installing a great number of this preconception that complicated speaker setup...
... speaker Imaginary center speaker C L R SR SL Imaginary surround right speaker Listening position Imaginary surround left (SL) speaker positions, which are actual speakers around the room. Yamaha YSP-3000 Digital Sound Projector challenges this simple, yet stylish Digital Sound Projector. You can fine-tune the parameters of this unit to fully enjoy the benefits of surround sound at home, you must endure the agony of wiring and installing a great number of this preconception that complicated speaker setup...
Owner's Manual
Page 7
... multi-channel digital audio based on HDCP ◆ Simple and easy connections with HDMI supported external components ◆ Functional link with an HDMI control-compatible TV Versatile Remote Control The supplied remote control comes with preset remote control codes used to control the DVD player, VCR, cable TV tuner, and digital satellite tuner connected to this unit is equipped with the macro capability that enables a series of operations with the press of a single button. and Canada models only) ◆ XM Satellite Radio tuning capability (using...
... multi-channel digital audio based on HDCP ◆ Simple and easy connections with HDMI supported external components ◆ Functional link with an HDMI control-compatible TV Versatile Remote Control The supplied remote control comes with preset remote control codes used to control the DVD player, VCR, cable TV tuner, and digital satellite tuner connected to this unit is equipped with the macro capability that enables a series of operations with the press of a single button. and Canada models only) ◆ XM Satellite Radio tuning capability (using...
Owner's Manual
Page 10
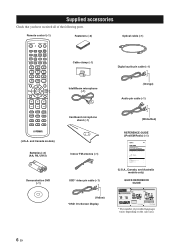
... Reference Guide for U.S.A. They are registered trademarks of your DVD player and TV. and other components, see page 16 in the Owner's Manual. Check the direction Optical cable Pull out the cap before installing this unit in the following parts. They are for Yamaha YSP-3000 Digital Sound Projector. You can be achieved. For further information on the upper shelf to 29 in a rack. Connection example 1 This connection example...
... Reference Guide for U.S.A. They are registered trademarks of your DVD player and TV. and other components, see page 16 in the Owner's Manual. Check the direction Optical cable Pull out the cap before installing this unit in the following parts. They are for Yamaha YSP-3000 Digital Sound Projector. You can be achieved. For further information on the upper shelf to 29 in a rack. Connection example 1 This connection example...
Owner's Manual
Page 15
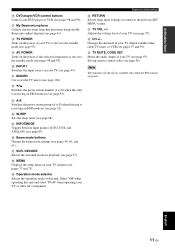
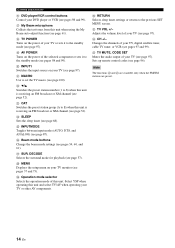
..., digital satellite tuner, cable TV tuner, or VCR (see page 52). H TV POWER Turns on the power of your TV (see page 61). DECODE Selects the surround mode for playback (see page 87). I AV POWER Turns on the power of the selected component or sets it to E) when this unit when using the My Beam auto-adjust function (see page 97). M A-E Switches the preset station group (A to the standby mode (see pages 98 and 99). R MENU Displays...
..., digital satellite tuner, cable TV tuner, or VCR (see page 52). H TV POWER Turns on the power of your TV (see page 61). DECODE Selects the surround mode for playback (see page 87). I AV POWER Turns on the power of the selected component or sets it to E) when this unit when using the My Beam auto-adjust function (see page 97). M A-E Switches the preset station group (A to the standby mode (see pages 98 and 99). R MENU Displays...
Owner's Manual
Page 18
... using the My Beam auto-adjust function (see page 68). Changes the channels of your TV (see pages 37 and 73). M CAT Switches the preset station group (A to the standby mode (see pages 98 and 99). R MENU Displays the setup menu on the power of this unit and select TV/AV when operating your TV or other AV components. Q SUR. W TV MUTE, CODE SET Mutes the audio output of your TV, digital satellite tuner, cable TV tuner...
... using the My Beam auto-adjust function (see page 68). Changes the channels of your TV (see pages 37 and 73). M CAT Switches the preset station group (A to the standby mode (see pages 98 and 99). R MENU Displays the setup menu on the power of this unit and select TV/AV when operating your TV or other AV components. Q SUR. W TV MUTE, CODE SET Mutes the audio output of your TV, digital satellite tuner, cable TV tuner...
Owner's Manual
Page 42
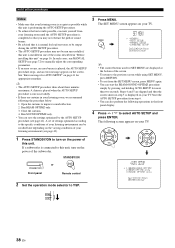
... by the AUTO SETUP procedure (see page 42). MENU p p SET MENU . ;MEMORY ;AUTO SETUP ;MANUAL SETUP ;LANGUAGE SETUP [ ]/[ ]:Up/Down [ENTER]:Enter y • The control buttons used for SET MENU are curtains in the front panel display. 4 Press / to this unit. Run BEAM OPTIMZ only. 3. Close the curtains. 4. STANDBY/ON or STANDBY/ON Front panel Remote control 2 Set the operation mode selector to the previous screen while using SET MENU, press RETURN. • To exit from the SET MENU screen, press MENU again...
... by the AUTO SETUP procedure (see page 42). MENU p p SET MENU . ;MEMORY ;AUTO SETUP ;MANUAL SETUP ;LANGUAGE SETUP [ ]/[ ]:Up/Down [ENTER]:Enter y • The control buttons used for SET MENU are curtains in the front panel display. 4 Press / to this unit. Run BEAM OPTIMZ only. 3. Close the curtains. 4. STANDBY/ON or STANDBY/ON Front panel Remote control 2 Set the operation mode selector to the previous screen while using SET MENU, press RETURN. • To exit from the SET MENU screen, press MENU again...
Owner's Manual
Page 75
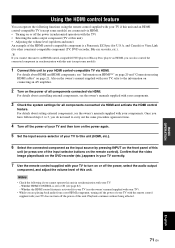
... power (synchronized operation with the TV) • Selecting the audio output component (TV or this unit) • Adjusting the volume level (up/down and mute) An example of the HDMI control-compatible component is set to ON (see the owner's manuals supplied with your TV to this unit (HDMI, etc.). 6 Select the connected component as the input source by pressing INPUT on the front panel of your components. 3 Check the system settings for other countries)-compatible component (TV, DVD recorder, Blu-ray...
... power (synchronized operation with the TV) • Selecting the audio output component (TV or this unit) • Adjusting the volume level (up/down and mute) An example of the HDMI control-compatible component is set to ON (see the owner's manuals supplied with your TV to this unit (HDMI, etc.). 6 Select the connected component as the input source by pressing INPUT on the front panel of your components. 3 Check the system settings for other countries)-compatible component (TV, DVD recorder, Blu-ray...
Owner's Manual
Page 76
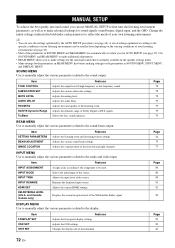
... the best quality surround sound, you run AUTO SETUP (see page 35). Adjusts the various subwoofer settings. Selects the initial input of measurement. Adjusts the various HDMI settings. Page 80 80 80 81 81 82 DISPLAY MENU Use to manually adjust the various parameters related to make settings for the surround sound effects normally available in the speaker settings menu. • Make settings for the parameters in BEAM MENU first before making settings for sound signals, sound beams, digital input, and the OSD. Item TONE CONTROL SUBWOOFER SET MUTE LEVEL AUDIO DELAY...
... the best quality surround sound, you run AUTO SETUP (see page 35). Adjusts the various subwoofer settings. Selects the initial input of measurement. Adjusts the various HDMI settings. Page 80 80 80 81 81 82 DISPLAY MENU Use to manually adjust the various parameters related to make settings for the surround sound effects normally available in the speaker settings menu. • Make settings for the parameters in BEAM MENU first before making settings for sound signals, sound beams, digital input, and the OSD. Item TONE CONTROL SUBWOOFER SET MUTE LEVEL AUDIO DELAY...
Owner's Manual
Page 85
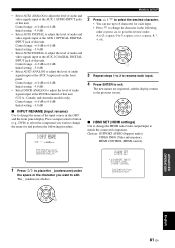
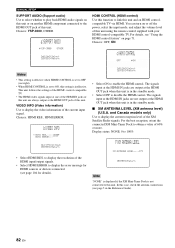
... front panel display. Control range: -6.0 dB to 0.0 dB Initial setting: -3.0 dB • Select DOCK ANALOG to adjust the level of audio signals input at the AUX 2 COAXIAL DIGITAL INPUT jack of this unit. D)INPUT RENAME DVD -> DVD p [ ]/[ ]:Position [ ]/[ ]:Character [ENTER]:Return 1 Press / to place the _ (underscore) under the space or the character you want to edit. ENTER ■ HDMI SET (HDMI settings) Use to change the character in the following procedure. The _ (underscore) flashes. a)SUPPORT AUDIO b)VIDEO INFO c)HDMI CONTROL...
... front panel display. Control range: -6.0 dB to 0.0 dB Initial setting: -3.0 dB • Select DOCK ANALOG to adjust the level of audio signals input at the AUX 2 COAXIAL DIGITAL INPUT jack of this unit. D)INPUT RENAME DVD -> DVD p [ ]/[ ]:Position [ ]/[ ]:Character [ENTER]:Return 1 Press / to place the _ (underscore) under the space or the character you want to edit. ENTER ■ HDMI SET (HDMI settings) Use to change the character in the following procedure. The _ (underscore) flashes. a)SUPPORT AUDIO b)VIDEO INFO c)HDMI CONTROL...
Owner's Manual
Page 86
...% F)XM ANTENNA LEVEL XM ANTENNA LEVEL;;;;97% [ENTER]:Return Note "NONE" is displayed if the XM Mini-Tuner Dock is not connected to this unit is ineffective. p p p p MANUAL SETUP SUPPORT AUDIO (Support audio) Use to select whether to play back HDMI audio signals on this unit or on or off the power, select the input mode, and adjust the volume level of this unit using the remote control supplied with your HDMI control-compatible TV. You can turn on another HDMI component connected to the HDMI OUT jack of...
...% F)XM ANTENNA LEVEL XM ANTENNA LEVEL;;;;97% [ENTER]:Return Note "NONE" is displayed if the XM Mini-Tuner Dock is not connected to this unit is ineffective. p p p p MANUAL SETUP SUPPORT AUDIO (Support audio) Use to select whether to play back HDMI audio signals on this unit or on or off the power, select the input mode, and adjust the volume level of this unit using the remote control supplied with your HDMI control-compatible TV. You can turn on another HDMI component connected to the HDMI OUT jack of...
Owner's Manual
Page 106
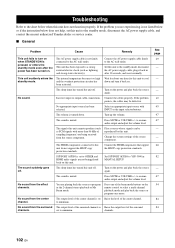
... center channel. Select an appropriate input source with more . SUPPORT AUDIO is set Raise the level of sampling frequency) are playing back the source or program in the 2-channel stereo playback or My Beam mode. Press MUTE or VOLUME +/- You are being played back on the power and play back the source again. No sound from the effect channels. The output level of the surround channels is not firmly connected to OTHER and HDMI audio signals are experiencing is turned down and turn...
... center channel. Select an appropriate input source with more . SUPPORT AUDIO is set Raise the level of sampling frequency) are playing back the source or program in the 2-channel stereo playback or My Beam mode. Press MUTE or VOLUME +/- You are being played back on the power and play back the source again. No sound from the effect channels. The output level of the surround channels is not firmly connected to OTHER and HDMI audio signals are experiencing is turned down and turn...
Owner's Manual
Page 107
... quiet as a DVD player. FRONT. incorrectly. Turn off TruBass. Move this unit. The remote control may be played back. (Dolby Digital or DTS indicator does not light up in operation because a source with low voltage. The volume level of the connected components. There is too noisy. Set "SUPPORT AUDIO" to "YSP-3000". equipment. My Beam auto-adjust function does not work properly because of the condition of the subwoofer is set to the 2-channel audio signals at the source component such as...
... quiet as a DVD player. FRONT. incorrectly. Turn off TruBass. Move this unit. The remote control may be played back. (Dolby Digital or DTS indicator does not light up in operation because a source with low voltage. The volume level of the connected components. There is too noisy. Set "SUPPORT AUDIO" to "YSP-3000". equipment. My Beam auto-adjust function does not work properly because of the condition of the subwoofer is set to the 2-channel audio signals at the source component such as...
Owner's Manual
Page 108
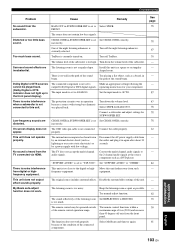
... work and/or function properly. Adjust the antenna position to YSP. Press INPUT on the front panel or the input selector buttons on the remote control to select the external component you want to TV/AV. The remote control code was unwantedly set to operate. Remedy Reduce the number of 6 m (20 ft) and no more than 45 degrees off -axis from the front panel. ■ HDMI Error message Device Error HDCP Error ■ FM tuner...
... work and/or function properly. Adjust the antenna position to YSP. Press INPUT on the front panel or the input selector buttons on the remote control to select the external component you want to TV/AV. The remote control code was unwantedly set to operate. Remedy Reduce the number of 6 m (20 ft) and no more than 45 degrees off -axis from the front panel. ■ HDMI Error message Device Error HDCP Error ■ FM tuner...
Owner's Manual
Page 116
... Audio Corporation. and Canada models only 5 Connecting XM™ Mini-Tuner Home Dock 5 Activating XM™ Satellite Radio ...6 Basic XM™ Satellite Radio operations ...6 Presetting the XM™ Satellite Radio channels 9 Displaying the XM™ Satellite Radio information 10 Troubleshooting ...11 iPodTM "iPod" is the Reference Guide for U.S.A. and Canada models only). y The illustrations used in this Reference Guide are for Yamaha YSP-3000 Digital Sound Projector. and other countries. Operations in the U.S. Contents Using iPod™...2 Connection...2 Controlling iPod...
... Audio Corporation. and Canada models only 5 Connecting XM™ Mini-Tuner Home Dock 5 Activating XM™ Satellite Radio ...6 Basic XM™ Satellite Radio operations ...6 Presetting the XM™ Satellite Radio channels 9 Displaying the XM™ Satellite Radio information 10 Troubleshooting ...11 iPodTM "iPod" is the Reference Guide for U.S.A. and Canada models only). y The illustrations used in this Reference Guide are for Yamaha YSP-3000 Digital Sound Projector. and other countries. Operations in the U.S. Contents Using iPod™...2 Connection...2 Controlling iPod...
Owner's Manual
Page 121
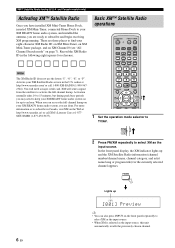
... places to your XM READY home audio system, you are done. For more information or to TV/AV. DECODE 0 +10 ENHANCER ENTRY MENU CAT/ A-E DISPLAY ENTER TV/AV YSP RETURN VOLUME CH TV VOL 1 Set the operation mode selector to subscribe in the following eight squares for reference. Basic XM™ Satellite Radio operations STANDBY/ON POWER POWER AV TV DOCK DVD AUX1 AUX2 AUX3 TV INPUT1...
... places to your XM READY home audio system, you are done. For more information or to TV/AV. DECODE 0 +10 ENHANCER ENTRY MENU CAT/ A-E DISPLAY ENTER TV/AV YSP RETURN VOLUME CH TV VOL 1 Set the operation mode selector to subscribe in the following eight squares for reference. Basic XM™ Satellite Radio operations STANDBY/ON POWER POWER AV TV DOCK DVD AUX1 AUX2 AUX3 TV INPUT1...
Owner's Manual
Page 128
... before connecting the optical cable, and then check the direction to insert the cable. 1 2 3 4 AUDIO INPUT OUT VIDEO DIGITAL INPUT AUX 2 DVD COAXIAL AUX 1 TV/STB SUBWOOFER AUX 1 TV/STB Audio connection * The rear panel illustration shows jacks and their names to help you find them easily. Depending on your TV to turn on installation, see "Connections using appropriate cables as a TV or DVD player to this unit. For further information on or off the power, select the audio output component, and adjust the volume level...
... before connecting the optical cable, and then check the direction to insert the cable. 1 2 3 4 AUDIO INPUT OUT VIDEO DIGITAL INPUT AUX 2 DVD COAXIAL AUX 1 TV/STB SUBWOOFER AUX 1 TV/STB Audio connection * The rear panel illustration shows jacks and their names to help you find them easily. Depending on your TV to turn on installation, see "Connections using appropriate cables as a TV or DVD player to this unit. For further information on or off the power, select the audio output component, and adjust the volume level...
Owner's Manual
Page 129
... the instructions. The best setting may want to use the supplied cardboard microphone stand for loud test tones to the DVD playback mode. The following points. The power of this unit. on page 41 in surround sound 1 Select the DVD video input on the front page). You may not be output during the AUTO SETUP procedure. ENHANCER ENTRY MENU A-E DISPLAY ENTER TV/AV YSP RETURN AUTO SETUP START Will begin in the Owner's Manual. 5 Press VOLUME +/- In...
... the instructions. The best setting may want to use the supplied cardboard microphone stand for loud test tones to the DVD playback mode. The following points. The power of this unit. on page 41 in surround sound 1 Select the DVD video input on the front page). You may not be output during the AUTO SETUP procedure. ENHANCER ENTRY MENU A-E DISPLAY ENTER TV/AV YSP RETURN AUTO SETUP START Will begin in the Owner's Manual. 5 Press VOLUME +/- In...


